SpringBoot从入门到精通教程(八)- 多环境配置文件用法
需求背景
在没有使用配置中心的情况下,其实默认在Springboot2框架中,是支持了多个配置文件,允许在不同环境下切换的了,可以去结合Jenkins/Docker来使用(这部分内容后续会更新)
准备内容
1. 准备两个Mysql实例,db1和db2
2. 两份数据库初始化init.sql脚本内容(或Docker安装MySQL数据库)
db1-init.sql
-- for db1

drop table city;

CREATE TABLE `city` (
  `id` int(11) NOT NULL primary key,
  `name` varchar(32) DEFAULT NULL,
  `state` varchar(32) DEFAULT NULL,
  `country` varchar(32) DEFAULT NULL
) ENGINE=InnoDB DEFAULT CHARSET=utf8;

INSERT INTO `city` (`id`, `name`, `state`, `country`)
VALUES
	(1, '广州11', 'GZ11', 'CH11'),
	(2, '北京12', 'BJ12', 'CH12'),
	(3, '深圳13', 'SZ13', 'CH13');
db2-init.sql
-- for db2

drop table city;

CREATE TABLE `city` (
  `id` int(11) NOT NULL primary key,
  `name` varchar(32) DEFAULT NULL,
  `state` varchar(32) DEFAULT NULL,
  `country` varchar(32) DEFAULT NULL
) ENGINE=InnoDB DEFAULT CHARSET=utf8;

INSERT INTO `city` (`id`, `name`, `state`, `country`)
VALUES
	(4, '广州14', 'GZ14', 'CH14'),
	(5, '北京15', 'BJ15', 'CH15'),
	(6, '深圳16', 'SZ16', 'CH16');
代码演示
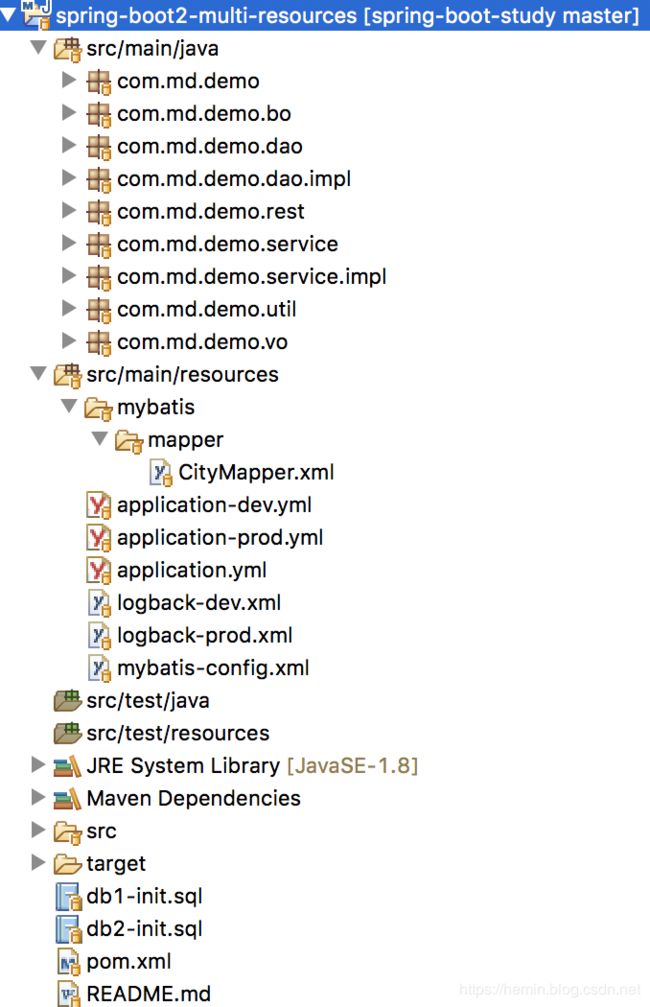
此项目目录结构(本项目是在此教程(Mysql和Mybatis+XML用法详解)基础上改造而来):
主要核心代码如下:
1. 三个application.yml文件
application.yml
# 不同的环境使用不同的配置,通过指定启动参数使用不同的profile和配置文件,比如:
# 开发环境:java -jar xxx.jar --spring.profiles.active=dev
# 生产环境:java -jar xxx.jar --spring.profiles.active=prod
spring:
   profiles:
      active: dev

# tomcat
server:
   port: 9090

# mybatis
mybatis:
   config-location: classpath:mybatis-config.xml

# logging
logging:
   config: classpath:logback-${spring.profiles.active}.xml
开发/测试环境:application-dev.yml(如果要用到多数据源用法,则参考spring-boot2-mysql-multi-datasource项目)
spring:
   datasource:
      driverClassName: com.mysql.jdbc.Driver
      url: jdbc:mysql://192.168.0.1:3306/db1?useUnicode=true&autoReconnect=true&allowMultiQueries=true&useSSL=false
      username: root
      password: 123456
生产环境:application-prod.yml
spring:
   datasource:
      driverClassName: com.mysql.jdbc.Driver
      url: jdbc:mysql://192.168.0.1:3306/db2?useUnicode=true&autoReconnect=true&allowMultiQueries=true&useSSL=false
      username: root
      password: 123456
2. logback.xml日志配置文件
开发/测试环境:logback-dev.xml
			%d [%t] [%c] [%p] (%file:%line\)- %m%n
			UTF-8


		log/run.log

			log/run.log.%d.%i


				64 MB


			7


				%d [%t] [%c] [%p] (%file:%line\)- %m%n

			UTF-8
生产环境:logback-prod.xml
			%d [%t] [%c] [%p] (%file:%line\)- %m%n
			UTF-8


		log/run.log

			log/run.log.%d.%i


				64 MB


			7


				%d [%t] [%c] [%p] (%file:%line\)- %m%n

			UTF-8
3. 项目启动
不同的环境使用不同的配置,通过指定启动参数使用不同的profile和配置文件,比如:
开发环境:java -jar xxx.jar --spring.profiles.active=dev
生产环境:java -jar xxx.jar --spring.profiles.active=prod
在启动日志中时,可以看得到具体是激活哪个配置了
4. 验证功能
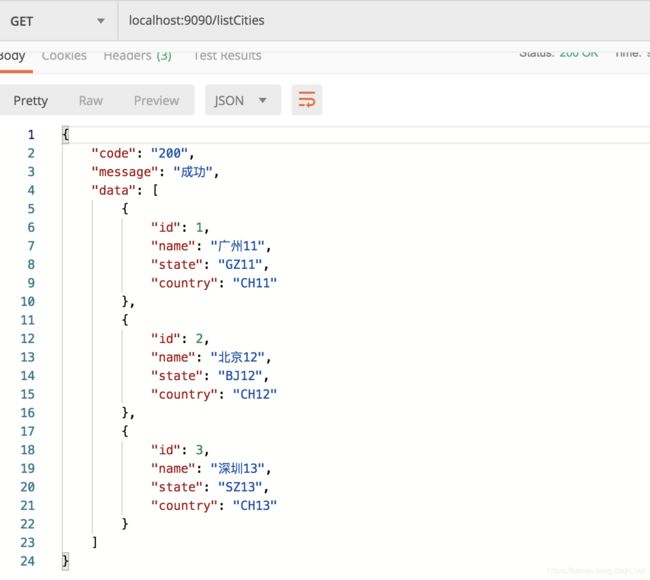
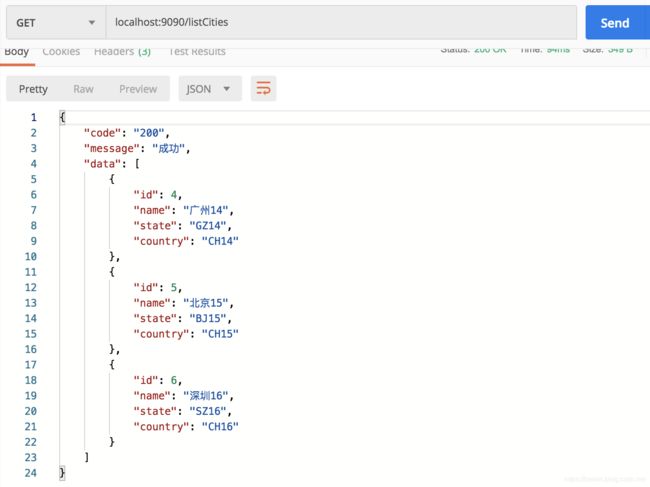
分别启动访问同一个接口时 localhost:9090/listCities,可以看到数据已变化
dev环境时,访问db1库的数据:
日志也输出了debug内容:
而,prod环境时,访问db2库的数据:
日志只输出了info内容
完整源码下载
我的Github源码地址:
https://github.com/hemin1003/spring-boot-study/tree/master/spring-boot2-study/spring-boot2-parent
下一章教程
SpringBoot从入门到精通教程(九)- Docker集成+容器化部署详解/上篇
该系列教程
SpringBoot从入门到精通教程
至此,全部介绍就结束了
------------------------------------------------------
------------------------------------------------------
关于我(个人域名)
我的开源项目集Github
期望和大家一起学习,一起成长,共勉,O(∩_∩)O谢谢
欢迎交流问题,可加个人QQ 469580884,
或者,加我的群号 751925591,一起探讨交流问题
不讲虚的,只做实干家
Talk is cheap,show me the code
![]()
如果觉得内容赞,您可以请我喝杯咖啡:


