SpringBoot缓冲技术,SpringBoot整合Ehcache和springDataRedis
一,springboot整合Ehcache
修改pom文件
	4.0.0

		org.springframework.boot
		spring-boot-starter-parent
		1.5.10.RELEASE

	com.ljw
	spring-boot-Ehcache
	0.0.1-SNAPSHOT

		1.8
		3.0.2.RELEASE
		2.0.4


			org.springframework.boot
			spring-boot-starter-web


			org.springframework.boot
			spring-boot-starter-thymeleaf


			org.springframework.boot
			spring-boot-starter-data-jpa


			org.springframework.boot
			spring-boot-starter-test


			mysql
			mysql-connector-java


			com.alibaba
			druid
			1.0.9


			org.springframework.boot
			spring-boot-starter-cache


			net.sf.ehcache
			ehcache
创建ehcache的配置文件
文件名:ehcache.xml
位置:src/main/resource/ehcache.xml
修改application.properties文件
#配置Ehcache缓存
spring.cache.ehcache.config=ehcache.xml
实体类要实现序列号
public class Users implements Serializable
启动类添加@EnableCaching注解
@SpringBootApplication
@EnableCaching
public class App {

	public static void main(String[] args) {
		SpringApplication.run(App.class, args);
	}

}
两个常见的注解
@Cacheable
把方法的返回值添加到Ehcache中做缓存
value属性:制定一个Ehcache配置文件中的缓存策略,
如果value没有制定,则表示默认使用默认的缓存策略
@Override
	@Cacheable(value = "users")//对当前对象做缓存处理,在谁上面加就对谁起作用,value:写ehcache.xml配置文件里的name
	public Users findUsersById(Integer id) {
		return this.usersRepository.findOne(id);
	}
key属性:给存储的值起个名称,在查询时如果有名称相同的
那么则知已从缓存中将数据返回
如下代码key的默认的时#pageable 等同于key=“#pageable”
@Override
	@Cacheable(value = "users")
	public Page findUsersByPage(Pageable pageable) {
		return this.usersRepository.findAll(pageable);
	}
测试代码
package com.ljw.test;

import org.junit.Test;
import org.junit.runner.RunWith;
import org.springframework.beans.factory.annotation.Autowired;
import org.springframework.boot.test.context.SpringBootTest;
import org.springframework.data.domain.Page;
import org.springframework.data.domain.PageRequest;
import org.springframework.data.domain.Pageable;
import org.springframework.test.context.junit4.SpringJUnit4ClassRunner;

import com.ljw.App;
import com.ljw.pojo.Users;
import com.ljw.service.UsersService;

@RunWith(SpringJUnit4ClassRunner.class)
@SpringBootTest(classes = App.class)
public class UsersServiceTest {

	@Autowired
	private UsersService usersService;

	@Test
	public void findUserById() {
		// 第一次查询
		Users users1 = this.usersService.findUsersById(1);
		System.out.println(users1);

		// 第一次查询
		Users users2 = this.usersService.findUsersById(1);
		System.out.println(users2);

	}

	@Test
	public void testPage() {
		Pageable pageable = new PageRequest(0, 2);
		// 第一次查询
		Page page1 = this.usersService.findUsersByPage(pageable);
		System.out.println(page1.getTotalElements());
		// 第二次查询
		Page page2 = this.usersService.findUsersByPage(pageable);
		System.out.println(page2.getTotalElements());
		// 第三次查询
		Pageable pageable3 = new PageRequest(1, 2);
		Page page3 = this.usersService.findUsersByPage(pageable3);
		System.out.println(page3.getTotalElements());
	}

}
@CacheEvict
清楚缓存,
@Cacheable(value = "users")
	public List findUserAll() {
		return this.usersRepository.findAll();
	}
@CacheEvict(value = "users",allEntries = true)//清除以users缓存策略的缓冲对象
	public void saveUsers(Users users) {
		this.usersRepository.save(users);
	}
测试代码
@Test
	public void testFindAll() {
		// 第一次查询
		System.out.println(this.usersService.findUserAll().size());
		Users users=new Users();
		users.setName("xxx");
		users.setAge(100);
		users.setAddress("SZ");
		this.usersService.saveUsers(users);
		// 第二次查询
		System.out.println(this.usersService.findUserAll().size());
	}
测试结果
二、springboot整合springDataRedis
Redis版本:3.0.0
运行环境:Linux
安装gcc编译器
Yum install gcc-c++
安装Redis
解压redis-3.0.0.tar.gz
命令:tar -zxvf redis-3.0.0.tar.gz
进入解压后的目录进行编译
cd redis-3.0.0
执行make命令编译
将redis安装到指定目录
make PREFIX=/usr/local/redis install
启动redis
./redis-server
创建项目,修改pom文件
	4.0.0

		org.springframework.boot
		spring-boot-starter-parent
		1.5.10.RELEASE

	com.ljw
	spring-boot-redis
	0.0.1-SNAPSHOT

		1.8
		3.0.2.RELEASE
		2.0.4


			org.springframework.boot
			spring-boot-starter-web


			org.springframework.boot
			spring-boot-starter-thymeleaf


			org.springframework.boot
			spring-boot-starter-data-redis


			org.springframework.boot
			spring-boot-starter-test
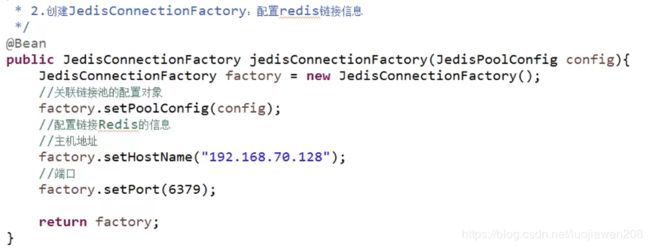
编写springData redis的配置类
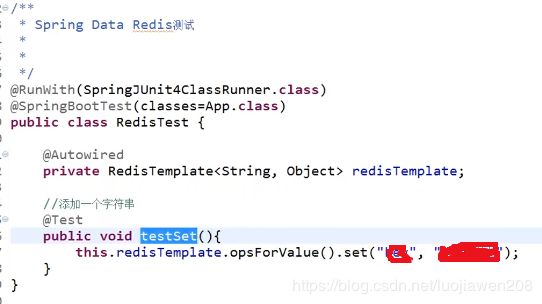
测试代码
提取redis的配置信息,为了开发方便,dev,test,product的环境配置方便
application.properties文件
springData Redis操作java对象
创建实体类
编写测试代码
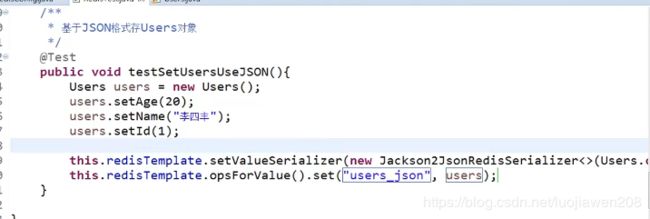
springData Redis操作JSON对象
序列化器,认识序列化器并会使用它
测试代码


