SpringBoot2.x系列教程70-SpringBoot中实现注册用户发送激活邮件功能
SpringBoot2.x系列教程70--SpringBoot中实现注册用户发送激活邮件功能
作者:一一哥
在上一章节中,我带大家学习了SpringBoot中如何发送各种类型的邮件,接下来我再带大家实现一下,在实际开发中的邮件发送功能。
需求分析:
很多网站注册时,都会给我们的注册邮箱发送一封激活邮件,里面是一串连接,点击链接激活之后才可以登录,今天咱们就实现这个功能。
一. 发送激活邮件实现步骤
1. 创建web项目
我们按照之前的经验,创建一个web程序,并将之改造成Spring Boot项目,具体过程略。

2. 添加依赖包
            org.springframework.boot
            spring-boot-starter-data-jpa


            mysql
            mysql-connector-java
            runtime


            com.alibaba
            druid-spring-boot-starter
            1.1.10


            org.springframework.boot
            spring-boot-starter-mail


            org.springframework.boot
            spring-boot-starter-freemarker


            org.springframework.boot
            spring-boot-starter-thymeleaf
3. 创建application.yml配置文件
把配置文件中关于数据库等的配置,全部改写成自己的配置信息。
spring:
  http:
    encoding:
      charset: UTF-8
      force: true
      enabled: true
  datasource:
    url: jdbc:mysql://localhost:3306/db6?characterEncoding=utf-8&useSSL=false&serverTimezone=UTC
    username: root
    password: syc
    driverClassName: com.mysql.jdbc.Driver
    type: com.alibaba.druid.pool.DruidDataSource
  jpa:
    database: mysql
    show-sql: true
    hibernate:
      ddl-auto: update
      naming:
        physical-strategy: org.hibernate.boot.model.naming.PhysicalNamingStrategyStandardImpl
    database-platform: org.hibernate.dialect.MySQL5Dialect
  #页面模板配置
  thymeleaf:
    prefix: classpath:/templates/
    suffix: .html
  mail:
    host: smtp.qq.com
    from: [email protected]
    username: [email protected]
    password: xxx(自己的授权码)
    protocol: smtp
    default-encoding: UTF-8
server:
  tomcat:
    uri-encoding: UTF-8
4. 封装User实体类
package com.yyg.boot.entity;

import lombok.Data;

import javax.persistence.*;
import java.io.Serializable;

/**
 * @Author 一一哥Sun
 * @Date Created in 2020/4/20
 * @Description Description
 */
@Data
@Entity
@Table(name = "user")
public class User implements Serializable {

    @Id
    @GeneratedValue(strategy = GenerationType.IDENTITY)
    private Integer id;

    private String username;

    private String password;

    @Column(name = "usermail")
    private String userMail;

    /**
     * 状态:0代表未激活,1代表激活
     */
    private Integer status;

    /**
     * 用UUID生成一段数字,发送到用户邮箱,当用户点击链接时,再做一个校验,
     * 如果用户传来的code跟我们发送的code一致,则更改状态为“1”来激活用户.
     */
    private String  code;

}
5. 配置数据源
package com.yyg.boot.config;

import com.alibaba.druid.pool.DruidDataSource;
import org.springframework.boot.context.properties.ConfigurationProperties;
import org.springframework.context.annotation.Bean;
import org.springframework.context.annotation.Configuration;

/**
 * @Author 一一哥Sun
 * @Date Created in 2020/4/20
 * @Description Description
 */
@Configuration
public class DataSourceConfig {

    @Bean
    @ConfigurationProperties(prefix = "spring.datasource")
    public DruidDataSource druidConfig(){
        return new DruidDataSource();
    }

}
6. 创建JPA的仓库类
package com.yyg.boot.repository;

import com.yyg.boot.entity.User;
import org.springframework.data.jpa.repository.JpaRepository;
import org.springframework.data.jpa.repository.JpaSpecificationExecutor;
import org.springframework.stereotype.Repository;

/**
 * @Author 一一哥Sun
 * @Date Created in 2020/4/20
 * @Description Description
 */
@Repository
public interface UserRepository  extends JpaRepository,JpaSpecificationExecutor {

    User findUserByCode(String code);

    User findByUsernameAndPassword(String username,String password);

}
7. 创建生成UUID的工具类
package com.yyg.boot.utils;

import java.util.UUID;

/**
 * @Author 一一哥Sun
 * @Date Created in 2020/4/20
 * @Description Description
 */
public class UUIDUtil {

    public static String getUUID(){
        return UUID.randomUUID().toString().replace("-","");
    }

}
8. 定义发送邮件的工具类
定义发送邮件工具类接口
package com.yyg.boot.mail;

/**
 * @Author 一一哥Sun
 * @Date Created in 2020/4/20
 * @Description 封装一个发邮件的接口,方便后边直接调用.
 */
public interface IMailService {

    /**
     * 发送文本邮件
     *
     * @param to      收件人
     * @param subject 主题
     * @param content 内容
     */
    void sendSimpleMail(String to, String subject, String content);

    /**
     * 发送HTML邮件
     *
     * @param to      收件人
     * @param subject 主题
     * @param content 内容
     */
    void sendHtmlMail(String to, String subject, String content);

    /**
     * 发送带附件的邮件
     *
     * @param to       收件人
     * @param subject  主题
     * @param content  内容
     * @param filePath 附件
     */
    void sendAttachmentsMail(String to, String subject, String content, String filePath);

    /**
     * 发送模板邮件
     * @param to 收件人
     * @param subject 主题
     * @param fileName 邮件模板文件名称
     * @param model 邮件数据载体
     */
    void sendModelMail(String to, String subject, String fileName, Object model);

}
实现发送邮件工具类
package com.yyg.boot.mail.impl;

import com.yyg.boot.mail.IMailService;
import freemarker.template.Configuration;
import freemarker.template.Template;
import freemarker.template.TemplateException;
import lombok.extern.slf4j.Slf4j;
import org.springframework.beans.factory.annotation.Autowired;
import org.springframework.beans.factory.annotation.Value;
import org.springframework.core.io.ClassPathResource;
import org.springframework.core.io.FileSystemResource;
import org.springframework.mail.SimpleMailMessage;
import org.springframework.mail.javamail.JavaMailSender;
import org.springframework.mail.javamail.MimeMessageHelper;
import org.springframework.stereotype.Service;
import org.springframework.ui.freemarker.FreeMarkerTemplateUtils;

import javax.mail.MessagingException;
import javax.mail.internet.MimeMessage;
import java.io.IOException;
import java.util.Objects;

/**
 * @Author 一一哥Sun
 * @Date Created in 2020/4/20
 * @Description Description
 */
@Slf4j
@Service
public class IMailServiceImpl implements IMailService {

    /**
     * Spring Boot 提供了一个发送邮件的简单抽象,使用的是下面这个接口,这里直接注入即可使用
     */
    @Autowired
    private JavaMailSender mailSender;

    @Autowired
    private Configuration configuration;

    /**
     * 配置文件中我的qq邮箱
     */
    @Value("${spring.mail.from}")
    private String from;

    /**
     * 简单文本邮件
     *
     * @param to      收件人
     * @param subject 主题
     * @param content 内容
     */
    @Override
    public void sendSimpleMail(String to, String subject, String content) {
        //创建SimpleMailMessage对象
        SimpleMailMessage message = new SimpleMailMessage();
        //邮件发送人
        message.setFrom(from);
        //邮件接收人
        message.setTo(to);
        //邮件主题
        message.setSubject(subject);
        //邮件内容
        message.setText(content);
        //发送邮件
        mailSender.send(message);
    }

    /**
     * html邮件
     *
     * @param to      收件人
     * @param subject 主题
     * @param content 内容
     */
    @Override
    public void sendHtmlMail(String to, String subject, String content) {
        //获取MimeMessage对象
        MimeMessage message = mailSender.createMimeMessage();
        MimeMessageHelper messageHelper;
        try {
            messageHelper = new MimeMessageHelper(message, true);
            //邮件发送人
            messageHelper.setFrom(from);
            //邮件接收人
            messageHelper.setTo(to);
            //邮件主题
            message.setSubject(subject);
            //邮件内容,html格式
            messageHelper.setText(content, true);
            //发送
            mailSender.send(message);
            //日志信息
            log.info("邮件已经发送...");
        } catch (MessagingException e) {
            log.error("发送邮件时发生异常!", e);
        }
    }

    /**
     * 带附件的邮件
     * @param to       收件人
     * @param subject  主题
     * @param content  内容
     * @param filePath 附件
     */
    @Override
    public void sendAttachmentsMail(String to, String subject, String content, String filePath) {
        MimeMessage message = mailSender.createMimeMessage();
        try {
            MimeMessageHelper helper = new MimeMessageHelper(message, true);
            helper.setFrom(from);
            helper.setTo(to);
            helper.setSubject(subject);
            helper.setText(content, true);

            //FileSystemResource file = new FileSystemResource(new File(filePath));
            ClassPathResource resource = new ClassPathResource(filePath);
            FileSystemResource file = new FileSystemResource(resource.getFile());
            helper.addAttachment(Objects.requireNonNull(file.getFilename()), file);
            //可以同时添加多个附件,只需要在这里直接添加第2,第3...附件就行了.
            //helper.addAttachment(fileName2, file2);
            mailSender.send(message);
            //日志信息
            log.info("邮件已经发送...");
        } catch (MessagingException e) {
            log.error("发送邮件时发生异常!", e);
        } catch (IOException e) {
            e.printStackTrace();
            log.error("发送邮件时发生异常!", e);
        }
    }

    @Override
    public void sendModelMail(String to, String subject, String fileName, Object model) {
        MimeMessage mimeMessage = mailSender.createMimeMessage();
        try {
            MimeMessageHelper helper = new MimeMessageHelper(mimeMessage, true);
            helper.setFrom(from);
            helper.setTo(to);
            helper.setSubject(subject);

            Template template = configuration.getTemplate(fileName);
            String html = FreeMarkerTemplateUtils.processTemplateIntoString(template, model);

            helper.setText(html, true);

            mailSender.send(mimeMessage);

            //日志信息
            log.info("邮件已经发送...");
        } catch (MessagingException e) {
            log.error("发送邮件时发生异常!", e);
        } catch (TemplateException e) {
            e.printStackTrace();
            log.error("发送邮件时发生异常!", e);
        } catch (IOException e) {
            e.printStackTrace();
        }
    }

}
9. 定义Service及其实现
定义UserService接口
package com.yyg.boot.service;

import com.yyg.boot.entity.User;

/**
 * @Author 一一哥Sun
 * @Date Created in 2020/4/20
 * @Description Description
 */
public interface UserService {

    /**
     * 用户注册,
     * @param user
     */
    void register(User user);

    /**
     * 根据激活码code查询用户,之后再进行修改状态
     */
    User checkCode(String code);

    /**
     * 激活账户,修改用户状态为“1”
     */
    void updateUserStatus(User user);

    /**
     * 登录
     */
    User login(User user);

}
定义UserServiceImpl实现
package com.yyg.boot.service.impl;

import com.yyg.boot.entity.User;
import com.yyg.boot.mail.IMailService;
import com.yyg.boot.repository.UserRepository;
import com.yyg.boot.service.UserService;
import lombok.extern.slf4j.Slf4j;
import org.springframework.beans.factory.annotation.Autowired;
import org.springframework.stereotype.Service;

/**
 * @Author 一一哥Sun
 * @Date Created in 2020/4/20
 * @Description Description
 */
@Service
@Slf4j
public class UserServiceImpl implements UserService {

    @Autowired
    private UserRepository userDao;

    /**
     * 注入邮件接口
     */
    @Autowired
    private IMailService mailService;

    /**
     * 用户注册,同时发送一封激活邮件
     */
    @Override
    public void register(User user) {
        userDao.save(user);
        //获取激活码
        String code = user.getCode();
        log.warn("code:"+code);
        //主题
        String subject = "来自一一哥网站的激活邮件";
        //user/checkCode?code=code(激活码)是我们点击邮件链接之后根据激活码查询用户,如果存在说明一致,将用户状态修改为“1”激活
        //上面的激活码发送到用户注册邮箱
        //注意:此处的链接地址,是项目内部地址,如果我们没有正式的服务器地址,暂时无法从qq邮箱中跳转到我们自己项目的激活页面
        String context = "激活请点击:"+code+"";
        //发送激活邮件
        mailService.sendHtmlMail (user.getUserMail(),subject,context);
    }

    /**
     * 根据激活码code进行查询用户,之后再进行修改状态
     */
    @Override
    public User checkCode(String code) {
        return userDao.findUserByCode(code);
    }

    /**
     * 激活账户,修改用户状态
     */
    @Override
    public void updateUserStatus(User user) {
        userDao.saveAndFlush(user);
    }

    /**
     * 登录
     */
    @Override
    public User login(User user) {
        User u = userDao.findByUsernameAndPassword(user.getUsername(),user.getPassword());
        if (u !=null){
            return u;
        }
        return null;
    }

}
10. 定义跳转到首页面的接口
package com.yyg.boot.web;

import org.springframework.stereotype.Controller;
import org.springframework.web.bind.annotation.RequestMapping;

/**
 * @Author 一一哥Sun
 * @Date Created in 2020/4/20
 * @Description Description
 */
@Controller
public class IndexController {

    @RequestMapping(value = "/")
    public String index(){

        return "index";
    }

}
11. 定义核心业务接口
package com.yyg.boot.web;

import com.yyg.boot.entity.User;
import com.yyg.boot.service.UserService;
import com.yyg.boot.utils.UUIDUtil;
import org.springframework.beans.factory.annotation.Autowired;
import org.springframework.stereotype.Controller;
import org.springframework.ui.Model;
import org.springframework.web.bind.annotation.*;

/**
 * @Author 一一哥Sun
 * @Date Created in 2020/4/20
 * @Description Description
 */
@Controller
@RequestMapping("/user")
public class UserController {

    @Autowired
    private UserService userService;

    /**
     * 注册
     */
    @PostMapping(value = "/registerUser")
    public String register(User user){
        user.setStatus(0);
        String code = UUIDUtil.getUUID();
        user.setCode(code);
        userService.register(user);
        return "success";
    }

    /**
     * 校验邮箱中的code激活账户
     * 首先根据激活码code查询用户,之后再把状态修改为"1"
     */
    @GetMapping(value = "/checkCode")
    public String checkCode(String code){
        User user = userService.checkCode(code);
        //如果用户不等于null,把用户状态修改status=1
        if (user !=null){
            user.setStatus(1);
            //把code验证码清空,已经不需要了
            user.setCode("");
            userService.updateUserStatus(user);
        }
        return "login";
    }

    /**
     * 跳转到登录页面
     * @return login
     */
    @GetMapping(value = "/loginPage")
    public String login(){
        return "login";
    }

    /**
     * 登录
     */
    @RequestMapping(value = "/loginUser")
    public String login(User user){
        User u = userService.login(user);
        if (u !=null){
            return "welcome";
        }
        return "login";
    }

}
12. 创建html页面
index.html页面
注册
登录
login.html页面
登录
success.html页面
    注册成功


前往邮箱激活账户
welcome.html页面
    欢迎


登录成功
13. 创建入口类
package com.yyg.boot;

import org.springframework.boot.SpringApplication;
import org.springframework.boot.autoconfigure.SpringBootApplication;

/**
 * @Author 一一哥Sun
 * @Date Created in 2020/4/20
 * @Description Description
 */
@SpringBootApplication
public class CheckMailApplication {

    public static void main(String[] args){
        SpringApplication.run(CheckMailApplication.class,args);
    }

}
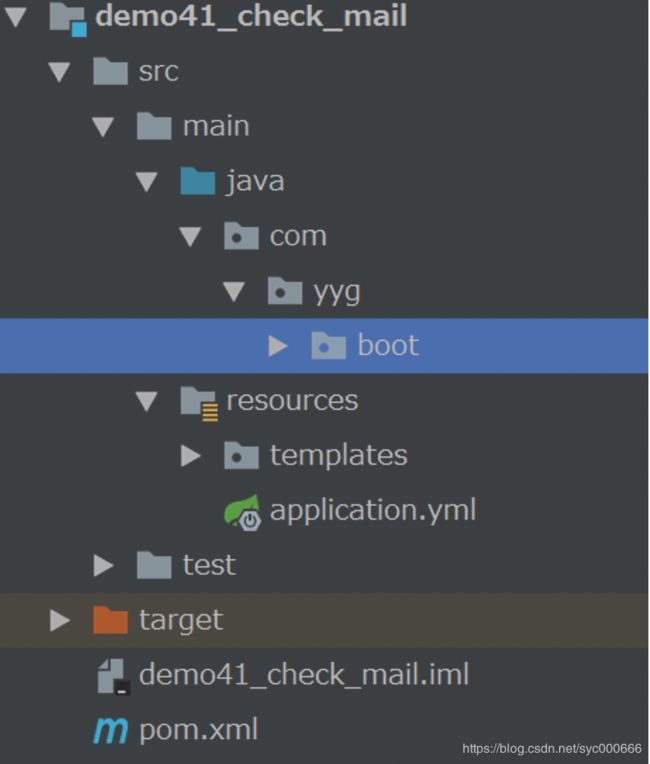
14. 完整项目结构

15. 启动程序,进行测试
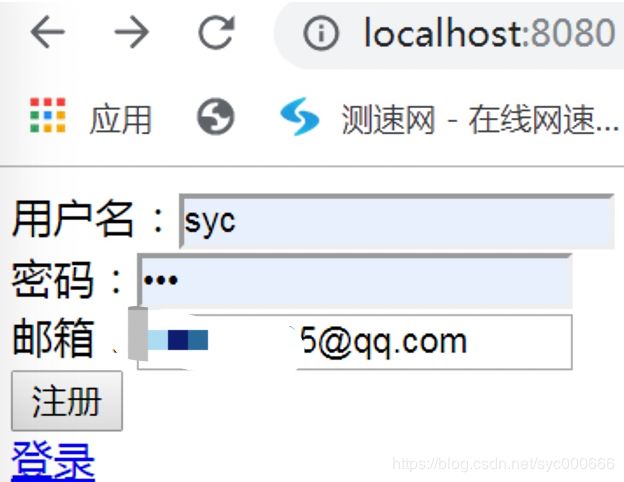
进入首页面
注意:
因为我们的项目并没有上线,激活链接属于项目内部链接,而腾讯邮箱属于外包应用,所以暂时无法实现跳转。等后续项目上线,有了真正的服务器地址,可以把邮件链接改成自己的服务器地址,就可以实现跳转,然后修改自己数据库中用户的状态值了。
咱们的案例中仅做演示,逻辑是没问题的!


