cas 5.3 serve 搭建 (单点登录服务端搭建)
cas 5.3 server 搭建:
-
github下载地址:https://github.com/apereo/cas-overlay-template/tree/5.3
-
下载后在目录下执行cmd :build.cmd run ,等待build结束,进入target 文件夹,将cas.war
,复制到tomcat webapp下,运行tomcat(注意:此处tomcat使用的是 已经搭建了tomcat https服务之下的–在【tomcat搭建https服务】文章基础之上) -
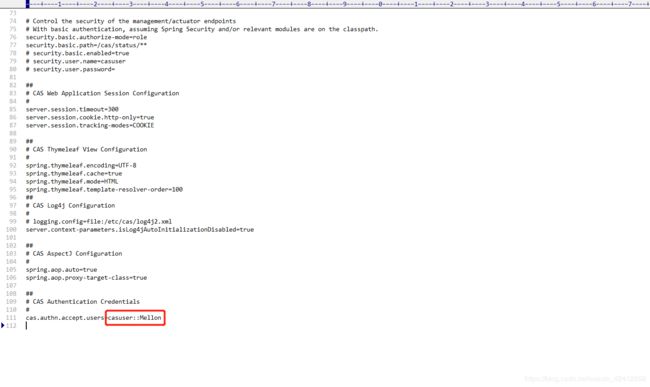
默认用户名:casuser 密码:Mellon,在cas-overlay-template\target\cas\WEB-INF\classes\application.properties,最后一行:
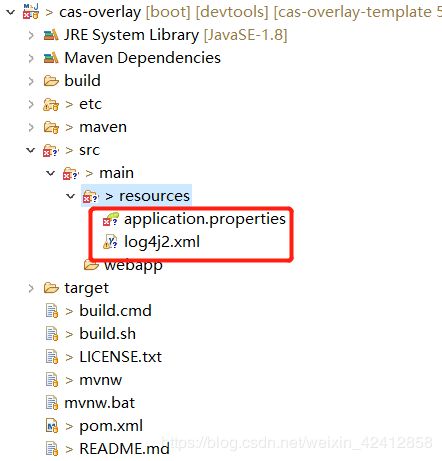
- 将从git clone下来的maven项目导入eclipse中 ,在src下建立resource目录

从部署到tomcat中被解压的文件中提取 application.properties和log4j2.xml 两个文件,
application.properties内容更改如下:(注意:请留意 [变更处] )
## # CAS Server Context Configuration # server.context-path=/cas server.port=8443 #(变更处) #未更改的: #server.ssl.key-store=file:/etc/cas/thekeystore #server.ssl.key-store-password=changeit #server.ssl.key-password=changeit #更改后的: #之前生成的服务端密钥地址(在【tomcat搭建https服务】文章基础下) server.ssl.key-store=file:D:/ProgramFiles/tomcat_https/tomcat.keystore #密码 server.ssl.key-store-password=password server.ssl.key-password=password server.max-http-header-size=2097152 server.use-forward-headers=true server.connection-timeout=20000 server.error.include-stacktrace=ALWAYS server.compression.enabled=true server.compression.mime-types=application/javascript,application/json,application/xml,text/html,text/xml,text/plain server.tomcat.max-http-post-size=2097152 server.tomcat.basedir=build/tomcat server.tomcat.accesslog.enabled=true server.tomcat.accesslog.pattern=%t %a "%r" %s (%D ms) server.tomcat.accesslog.suffix=.log server.tomcat.min-spare-threads=10 server.tomcat.max-threads=200 server.tomcat.port-header=X-Forwarded-Port server.tomcat.protocol-header=X-Forwarded-Proto server.tomcat.protocol-header-https-value=https server.tomcat.remote-ip-header=X-FORWARDED-FOR server.tomcat.uri-encoding=UTF-8 spring.http.encoding.charset=UTF-8 spring.http.encoding.enabled=true spring.http.encoding.force=true ## # CAS Cloud Bus Configuration # spring.cloud.bus.enabled=false # Indicates that systemPropertiesOverride can be used. # Set to false to prevent users from changing the default accidentally. Default true. spring.cloud.config.allow-override=true # External properties should override system properties. spring.cloud.config.override-system-properties=false # When allowOverride is true, external properties should take lowest priority, and not override any # existing property sources (including local config files). spring.cloud.config.override-none=false # spring.cloud.bus.refresh.enabled=true # spring.cloud.bus.env.enabled=true # spring.cloud.bus.destination=CasCloudBus # spring.cloud.bus.ack.enabled=true endpoints.enabled=false endpoints.sensitive=true endpoints.restart.enabled=false endpoints.shutdown.enabled=false # Control the security of the management/actuator endpoints # The 'enabled' flag below here controls the rendering of details for the health endpoint amongst other things. management.security.enabled=true management.security.roles=ACTUATOR,ADMIN management.security.sessions=if_required management.context-path=/status management.add-application-context-header=false # Define a CAS-specific "WARN" status code and its order management.health.status.order=WARN, DOWN, OUT_OF_SERVICE, UNKNOWN, UP # Control the security of the management/actuator endpoints # With basic authentication, assuming Spring Security and/or relevant modules are on the classpath. security.basic.authorize-mode=role security.basic.path=/cas/status/** # security.basic.enabled=true # security.user.name=casuser # security.user.password= ## # CAS Web Application Session Configuration # server.session.timeout=300 server.session.cookie.http-only=true server.session.tracking-modes=COOKIE ## # CAS Thymeleaf View Configuration # spring.thymeleaf.encoding=UTF-8 spring.thymeleaf.cache=true spring.thymeleaf.mode=HTML spring.thymeleaf.template-resolver-order=100 ## # CAS Log4j Configuration # # logging.config=file:/etc/cas/log4j2.xml server.context-parameters.isLog4jAutoInitializationDisabled=true ## # CAS AspectJ Configuration # spring.aop.auto=true spring.aop.proxy-target-class=true ## # CAS Authentication Credentials # #(变更处) #(原)注释下面默认用户及密码 #cas.authn.accept.users=casuser::Mellon #解决 未认证授权的服务 CAS的服务记录是空的,没有定义服务。 希望通过CAS进行认证的应用程序必须在服务记录中明确定义。 cas.tgc.secure=false #使用json配置 cas.service-registry.init-from-json=true #允许退出之后重定向页面 cas.logout.followServiceRedirects=true - 将从git clone下来的maven项目导入eclipse中 ,在src下建立resource目录
jdbc方式进行认证:
-
添加阿里巴巴镜像源,下载速度更快
<repositories> <repository> <id>maven-aliid> <url>http://maven.aliyun.com/nexus/content/groups/public//url> <releases> <enabled>trueenabled> releases> <snapshots> <enabled>trueenabled> <updatePolicy>alwaysupdatePolicy> <checksumPolicy>failchecksumPolicy> snapshots> repository> repositories> -
pom.xml中引入jar包
<dependencies> <dependency> <groupId>org.apereo.casgroupId> <artifactId>cas-server-support-jdbcartifactId> <version>5.3.2version> dependency> <dependency> <groupId>mysqlgroupId> <artifactId>mysql-connector-javaartifactId> <version>5.1.35version> dependency> dependencies> -
添加jdbc配置(单属性返回)
## # JDBC配置 # #查询账号密码SQL,必须包含密码字段 cas.authn.jdbc.query[0].sql=select * from sys_user where username=? #指定上面的SQL查询字段名(必须) cas.authn.jdbc.query[0].fieldPassword=password #指定过期字段,1为过期,若过期不可用 cas.authn.jdbc.query[0].fieldExpired=expired #为不可用字段段,1为不可用,需要修改密码 cas.authn.jdbc.query[0].fieldDisabled=disabled #数据库连接 cas.authn.jdbc.query[0].url=jdbc:mysql://121.36.213.145:3307/jeecg-boot?characterEncoding=UTF-8&useUnicode=true&useSSL=false&tinyInt1isBit=false #数据库dialect配置 cas.authn.jdbc.query[0].dialect=org.hibernate.dialect.MySQLDialect #数据库用户名 cas.authn.jdbc.query[0].user=root #数据库用户密码 cas.authn.jdbc.query[0].password=admin #数据库事务自动提交 cas.authn.jdbc.query[0].autocommit=false #数据库驱动 cas.authn.jdbc.query[0].driverClass=com.mysql.jdbc.Driver #超时配置 cas.authn.jdbc.query[0].idleTimeout=5000 #默认加密策略,通过encodingAlgorithm来指定算法,默认NONE不加密 cas.authn.jdbc.query[0].passwordEncoder.type=DEFAULT #此处可以指定处理加密实现类 #cas.authn.jdbc.query[0].password-encoder.type=com.example.CustomPasswordEncoder cas.authn.jdbc.query[0].passwordEncoder.characterEncoding=UTF-8 #加密类型md5 cas.authn.jdbc.query[0].passwordEncoder.encodingAlgorithm=MD5 -
jdbc连接 (多属性返回)
## # JDBC配置 # #查询账号密码SQL,必须包含密码字段 cas.authn.jdbc.query[0].sql=select * from sys_user where username=? #指定上面的SQL查询字段名(必须) cas.authn.jdbc.query[0].fieldPassword=password #指定过期字段,1为过期,若过期不可用 cas.authn.jdbc.query[0].fieldExpired=expired #为不可用字段段,1为不可用,需要修改密码 cas.authn.jdbc.query[0].fieldDisabled=disabled #数据库连接 cas.authn.jdbc.query[0].url=jdbc:mysql://121.36.213.145:3307/jeecg-boot?characterEncoding=UTF-8&useUnicode=true&useSSL=false&tinyInt1isBit=false #数据库dialect配置 cas.authn.jdbc.query[0].dialect=org.hibernate.dialect.MySQLDialect #数据库用户名 cas.authn.jdbc.query[0].user=root #数据库用户密码 cas.authn.jdbc.query[0].password=admin #数据库事务自动提交 cas.authn.jdbc.query[0].autocommit=false #数据库驱动 cas.authn.jdbc.query[0].driverClass=com.mysql.jdbc.Driver #超时配置 cas.authn.jdbc.query[0].idleTimeout=5000 #默认加密策略,通过encodingAlgorithm来指定算法,默认NONE不加密 cas.authn.jdbc.query[0].passwordEncoder.type=DEFAULT #此处可以指定处理加密实现类 #cas.authn.jdbc.query[0].password-encoder.type=com.cas.encry.PasswordEncryption cas.authn.jdbc.query[0].passwordEncoder.characterEncoding=UTF-8 #加密类型md5 cas.authn.jdbc.query[0].passwordEncoder.encodingAlgorithm=MD5 ## #单行属性 cas.authn.attributeRepository.jdbc[0].attributes.username=username cas.authn.attributeRepository.jdbc[0].attributes.password=password cas.authn.attributeRepository.jdbc[0].attributes.realname=realname cas.authn.attributeRepository.jdbc[0].attributes.salt=salt cas.authn.attributeRepository.jdbc[0].singleRow=true cas.authn.attributeRepository.jdbc[0].order=0 cas.authn.attributeRepository.jdbc[0].requireAllAttributes=true # cas.authn.attributeRepository.jdbc[0].caseCanonicalization=NONE|LOWER|UPPER # cas.authn.attributeRepository.jdbc[0].queryType=OR|AND cas.authn.attributeRepository.jdbc[0].sql=SELECT * FROM sys_user WHERE {0} cas.authn.attributeRepository.jdbc[0].username=username #数据库连接 cas.authn.attributeRepository.jdbc[0].url=jdbc:mysql://121.36.213.145:3307/jeecg-boot?characterEncoding=UTF-8&useUnicode=true&useSSL=false&tinyInt1isBit=false #数据库dialect配置 cas.authn.attributeRepository.jdbc[0].dialect=org.hibernate.dialect.MySQLDialect #数据库用户名 cas.authn.attributeRepository.jdbc[0].user=root #数据库用户密码 cas.authn.attributeRepository.jdbc[0].password=admin #数据库事务自动提交 cas.authn.attributeRepository.jdbc[0].autocommit=false #数据库驱动 cas.authn.attributeRepository.jdbc[0].driverClass=com.mysql.jdbc.Driver #超时配置 cas.authn.attributeRepository.jdbc[0].idleTimeout=5000 cas.authn.attributeRepository.jdbc[0].ddlAuto=none cas.authn.attributeRepository.jdbc[0].leakThreshold=10 cas.authn.attributeRepository.jdbc[0].batchSize=1 cas.authn.attributeRepository.jdbc[0].dataSourceProxy=false -
cas默认不通过http请求,解决方法 :
更改项目下cas/WEB-INF/classes/services/HTTPSandIMAPS-10000001.json文件
为:(注意:此文件在tomcat >webapp>war被解压的目录下)在:serviceId 中添加 http支持
{ "@class" : "org.apereo.cas.services.RegexRegisteredService", "serviceId" : "^(https|imaps|http)://.*", "name" : "HTTPS and IMAPS", "id" : 10000001, "description" : "This service definition authorizes all application urls that support HTTPS and IMAPS protocols.", "evaluationOrder" : 10000 } -
附录:
(证书生成方式请以 【tomcat搭建https服务,浏览器及服务器证书生成方法】为准 )
-
以下供参考:
添加jre证书 运行以下命令 :(注意:此命令是在 【 tomcat搭建https服务】文章基础上)
将生成cacerts文件,将客户端使用的java 的 jre 下的\lib\security\cacerts文件替换掉即可。
生成服务端密钥

//keytool -genkey -alias tomcat -keyalg RSA -keystore D:\ProgramFiles\tomcat_https\tomcat8.0\server.thekeystore
	keytool -genkey -alias caskeystore -keypass 123456 -keyalg RSA -keystore  D:\ProgramFiles\tomcat_https\tomcat8.0\thekeystore

查看密钥
	keytool -list -keystore D:\ProgramFiles\Java\jre1.8.0\lib\security\cacerts

生成客户端密钥
	keytool -genkey -v -alias caskeystore -keyalg RSA -storetype PKCS12 -keystore D:\ProgramFiles\tomcat_https\tomcat8.0\mykey.p12

生成客户端证书
	keytool -export -alias caskeystore -keystore D:\ProgramFiles\tomcat_https\tomcat8.0\mykey.p12 -storetype PKCS12 -storepass 123456 -rfc -file D:\ProgramFiles\tomcat_https\tomcat8.0\mykey.cer
客户端导入到服务器的证书库,添加信任
	keytool -import -v -file D:\ProgramFiles\tomcat_https\tomcat8.0\mykey.cer -keystore D:\ProgramFiles\tomcat_https\tomcat8.0\thekeystore


生成jre密钥
	keytool -export -alias caskeystore -keystore D:\ProgramFiles\tomcat_https\tomcat8.0\thekeystore -rfc -file D:\ProgramFiles\tomcat_https\tomcat8.0\cas.crt
导入jre密钥
	keytool -import -alias caskeystore -keystore D:\ProgramFiles\Java\jre1.8.0\lib\security\cacerts -file D:\ProgramFiles\tomcat_https\tomcat8.0\cas.crt -trustcacerts -storepass changeit
-


