SpringCloud之Hystrix使用高级篇
1.本篇前言
这里我们接着《SpringCloud之Hystrix使用篇》往下介绍,本篇首先是介绍Hystrix的执行流程与与之相关的参数配置,然后介绍Hystrix监控 Hystrix Dashboard仪表盘,主要是配置与仪表盘界面,最后是Hystrix Turbine 聚合监控的使用。
2.Hystrix高级应用
2.1 Hystrix工作流程
首先我们先介绍下Hystrix的工作流程,当我们调用出现问题的时候,Hystrix会开启一个默认10s的时间窗口,然后在这个窗口时间内,会统计调用次数是否达到了最小请求数,如果没有达到就会重制统计信息,
如果达到了,就会计算统计失败占所有请求的百分比,判断是否到达阈值,如果达到,就会跳闸,不再请求对应服务,
如果失败占所有请求的百分比未达到阈值,然后重置统计信息。
如果跳闸,则会开启一个活动窗口,默认是5s,每隔5s 会让一个请求通过,到达那个有问题的服务,看看是否还有问题,如果没问题就重置断路器,如果有问题,继续每5s通过一个请求来验证。
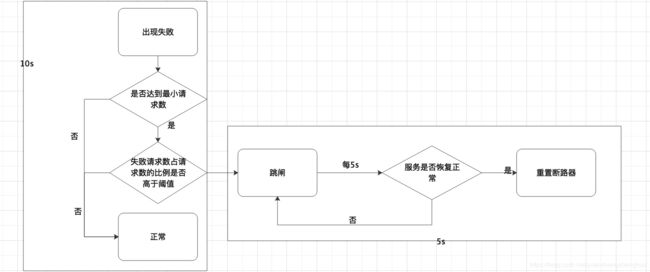
整个流程,有一些参数我们是可以根据业务来改动:
- 当出现错误的时候,会开启一个默认10s的窗口,这个10s我们是可以配置的
- 再就是这个最小请求数
- 再就是错误请求占比阈值
- 发生跳闸,然后每隔默认5s来放一个请求探测对方服务,其中这个5s的活动窗口我们是可以配置的。
2.2 Hystrix配置
2.2.1 配置方式一:注解方式
 @GetMapping("/getTodayStatisticB/{id}")
    @HystrixCommand(
            fallbackMethod = "getTodayStatisticFallbackB",// 服务降级方法
            // 使用commandProperties 可以配置熔断的一些细节信息
            commandProperties = {
                    // 类似kv形式
                    //这里这个参数意思是熔断超时时间2s,表示过了多长时间还没结束就进行熔断
                    @HystrixProperty(name = "execution.isolation.thread.timeoutInMilliseconds",value = "2000"),
                    // 当遇到失败后,开启一个11s的窗口
                    @HystrixProperty(name = "metrics.rollingStats.timeInMilliseconds",value = "11000"),
                    // 最小请求数
                    @HystrixProperty(name = "circuitBreaker.requestVolumeThreshold",value = "3"),
                    // 失败次数占请求的50%
                    @HystrixProperty(name = "circuitBreaker.errorThresholdPercentage",value = "50"),
                    // 跳闸后 活动窗口配置 这里配置了10s
                    @HystrixProperty(name = "circuitBreaker.sleepWindowInMilliseconds",value = "10000")
            }

    )
    public Integer getTodayStatisticB(@PathVariable("id") Integer id){
        String url  ="http://spring-cloud-order-service-provider/order/data/getTodayFinishOrderNum/"+id;
        return restTemplate.getForObject(url, Integer.class);
    }
    // 服务降级方法 ,这里参数与返回值需要原方法保持一直
    public Integer getTodayStatisticFallbackB(Integer id){
        return -1;
    }
2.2.2 配置方式二:配置文件方式
hystrix:
  command:
    default:
      circuitBreaker:
        forceOpen: false # 是否强制打开熔断器,如果设置true,表示打开熔断器,然后拒绝所有请求,默认是false的
        errorThresholdPercentage: 50   #失败比例阈值,默认值50%
        sleepWindowInMilliseconds: 1000  #熔断后休眠时⻓,默认值5秒
        requestVolumeThreshold: 3   #最小请求数,默认值是20
      execution:
        isolation:
          thread:
            timeoutInMilliseconds: 2000  #超时设置,默认为1秒
2.2.3 项目测试
2.2.3.1 修改服务调用者
2.2.3.1.1 添加actuator 依赖
在pom.xml中添加actuator 依赖,主要是用于springboot状态检查,当然我们最好是放到父工程的pom文件中,因为不止这个服务会用到。
<dependency>
       <groupId>org.springframework.bootgroupId>
       <artifactId>spring-boot-starter-actuatorartifactId>
dependency>
2.2.3.1.2 配置文件中配置actuator
management:
  endpoints:
    web:
      exposure:
        include: "*"
  endpoint:
    health:
      show-details: always
2.2.3.1.3 修改controller
我们在UserCenterController 中 ,再添加一个getTodayStatisticB 方法,并且配置咱们Hystrix的详细参数。
@GetMapping("/getTodayStatisticB/{id}")
    @HystrixCommand(
            // 线程池标识
            threadPoolKey = "getTodayStatisticB",
            threadPoolProperties = {
                    @HystrixProperty(name="coreSize",value = "1"),  // 这个就是咱们那个线程池core线程核心数
                    @HystrixProperty(name="maxQueueSize",value="100") //这个是队列大小
            },
            fallbackMethod = "getTodayStatisticFallbackB",// 服务降级方法
            // 使用commandProperties 可以配置熔断的一些细节信息
            commandProperties = {
                    // 类似kv形式
                    //这里这个参数意思是熔断超时时间500ms,表示过了多长时间还没结束就进行熔断
                    @HystrixProperty(name = "execution.isolation.thread.timeoutInMilliseconds",value = "500"),
                    // 当遇到失败后,开启一个15s的窗口
                    @HystrixProperty(name = "metrics.rollingStats.timeInMilliseconds",value = "15000"),
                    // 最小请求数 5
                    @HystrixProperty(name = "circuitBreaker.requestVolumeThreshold",value = "5"),
                    // 失败次数占请求的50%
                    @HystrixProperty(name = "circuitBreaker.errorThresholdPercentage",value = "50"),
                    // 跳闸后 活动窗口配置 这里配置了10s
                    @HystrixProperty(name = "circuitBreaker.sleepWindowInMilliseconds",value = "10000")
            }

    )
    public Integer getTodayStatisticB(@PathVariable("id") Integer id){
        String url  ="http://spring-cloud-order-service-provider/order/data/getTodayFinishOrderNum/"+id;
        return restTemplate.getForObject(url, Integer.class);
    }
    // 服务降级方法 ,这里参数与返回值需要原方法保持一直
    public Integer getTodayStatisticFallbackB(Integer id){
        return -1;
    }
2.2.3.2 测试
启动咱们的Eureka Server 集群,订单服务2个与咱们修改的用户服务

使用postman测试,添加getTodayStatisticB方法request到咱们的collection里面

发起20次调用,然后http://localhost:8080/actuator/health 查看健康状态,我们可以看到咱们的getTodayStatisticB发生了熔断

3.Hystrix Dashboard监控仪表盘
在上个部分,我们只能看到hystrix发生了熔断,并不能看到里面的发生了什么,一些具体的指标并不能看到 ,Hystrix Dashboard监控仪表盘能够帮我们看到更详细的熔断信息,比如有多少请求、多少成功、多少失败、多少降级等,引入 SpringBoot健康监控之后,我们可以通过访问/actuator/hystrix.stream接口可以获取到监控的文字信息,我们可以再使用postman 发起批请求,然后查看这个接口。
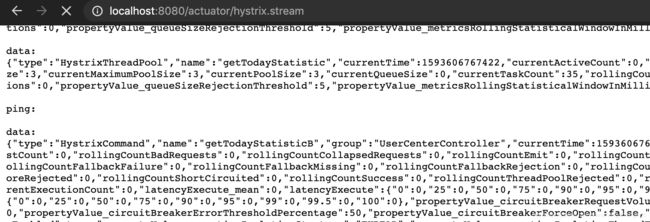
我们可以看文字描述信息 ,Hystrix Dashboard 监控仪表盘 能够帮助我们以图形化的方式展示出来。
3.1 新建Hystrix Dashboard服务
3.1.1 pom文件
    <dependency>
        <groupId>org.springframework.cloudgroupId>
        <artifactId>spring-cloud-starter-netflix-hystrixartifactId>
    dependency>

    <dependency>
        <groupId>org.springframework.cloudgroupId>
        <artifactId>spring-cloud-starter-netflix-hystrix-dashboardartifactId>
    dependency>

    <dependency>
        <groupId>org.springframework.cloudgroupId>
        <artifactId>spring-cloud-starter-netflix-eureka-clientartifactId>
    dependency>
3.1.2 配置文件
application.yml
server:
  port: 6060

spring:
  application:
    name: spring-cloud-hystrix-dashboard-server

#eureka 配置
eureka:
  client:
    service-url:
      defaultZone: http://EurekaServerA:9090/eureka,http://EurekaServerB:9091/eureka
    register-with-eureka: true
    fetch-registry: true
  instance:
    prefer-ip-address: true
    instance-id: ${spring.cloud.client.ip-address}:${spring.application.name}:${server.port}:@project.version@
3.1.3 启动类
启动类我们添加@EnableHystrixDashboard 注解表示开启HystrixDashboard
@SpringBootApplication
@EnableHystrixDashboard  // 表示开启HystrixDashboard
public class HystrixDashBoardApplication {

    public static void main(String[] args) {
        SpringApplication.run(HystrixDashBoardApplication.class,args);
    }
}
3.1.4 注册HystrixMetricsStreamServlet
写个配置类,然后注册HystrixMetricsStreamServlet
@Configuration
public class ServletRegisterConfiguration {
    @Bean
    public ServletRegistrationBean getServlet(){
        HystrixMetricsStreamServlet streamServlet = new HystrixMetricsStreamServlet();
        ServletRegistrationBean registrationBean = new ServletRegistrationBean(streamServlet);
        registrationBean.setLoadOnStartup(1);
        registrationBean.addUrlMappings("/actuator/hystrix.stream");
        registrationBean.setName("HystrixMetricsStreamServlet");
        return registrationBean;
    }
}
3.1.5 启动
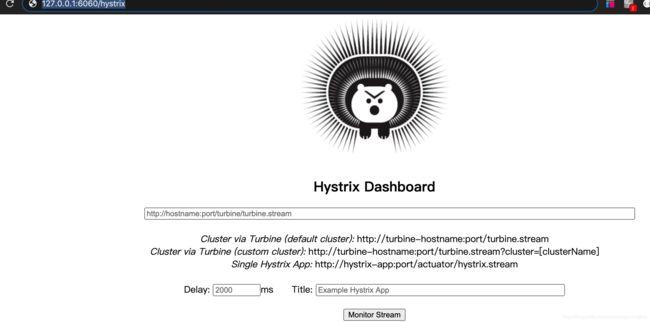
启动项目并访问http://127.0.0.1:6060/hystrix
3.2 使用
我们继续使用postman 发起批请求,然后将 http://127.0.0.1:8080/actuator/hystrix.stream 这个地址输入HystrixDashboard 监控平台中

我们就会进入对这个监控流的可视化界面中

其中图中各个颜色的指标是与右边指标解释颜色是对应的。
4.Hystrix Turbine聚合监控
我们在使用Hystrix Dashboard的时候发现它只能监控一个服务的连接,比如我这个服务调用者有多个实例,只能通过切换监控流来观察,而且不能监控到整个服务组的总体情况,这时候Hystrix Turbine就是专门来解决这个问题的,Hystrix Turbine能够帮我们汇总数据流,然后把流暴露给Hystrix Dashboard 来展示。
Hystrix Turbine大体上是扮演着这样一个角色。

4.1 新建Hystrix Turbine项目
4.1.1 pom文件
<dependency>
    <groupId>org.springframework.cloudgroupId>
    <artifactId>spring-cloud-starter-netflix-turbineartifactId>
dependency>

<dependency>
    <groupId>org.springframework.cloudgroupId>
    <artifactId>spring-cloud-starter-netflix-eureka-clientartifactId>
dependency>
这里添加eureka 客户端依赖主要是为了我们在聚合的时候,通过配置服务名来聚合url,它会根据你配置的服务名到erueka中找到对应的所有实例,然后聚合他们的流
4.1.2 配置文件
这里主要是Eureka 配置与 turbine 配置
server:
  port: 6020

spring:
  application:
    name: spring-cloud-hystrix-turbine-server

#eureka 配置
eureka:
  client:
    service-url:
      defaultZone: http://EurekaServerA:9090/eureka,http://EurekaServerB:9091/eureka
    register-with-eureka: true
    fetch-registry: true
  instance:
    prefer-ip-address: true
    instance-id: ${spring.cloud.client.ip-address}:${spring.application.name}:${server.port}:@project.version@
turbine:
  # 这里是配置 需要聚合的服务名字,然后多个的话 就用逗号隔开,   我们这里是配置的用户服务
  app-config: spring-cloud-user-service-consumer
  # 这里是集群默认名字
  cluster-name-expression: "'default'"
4.1.3 启动类
需要我们在启动类上面添加@EnableTurbine 注解表示开启Hystrix Turbine
@SpringBootApplication
@EnableDiscoveryClient
@EnableTurbine  // 开启Hystrix Turbine
public class HystrixTurbineApplication {

    public static void main(String[] args) {
        SpringApplication.run(HystrixTurbineApplication.class, args);
    }
}
4.1.4 启动
我们启动,然后访问一下 http://127.0.0.1:6020/turbine.stream 这个地址,可以看到

因为我们这还没请求,所以都没有详细数据。
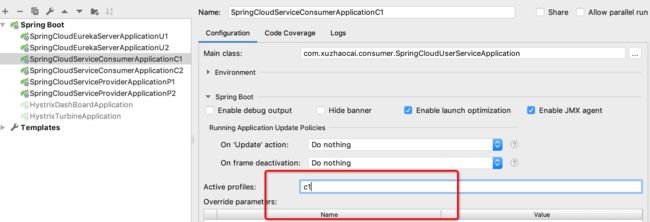
4.2 配置服务调用者
我们这边服务调用者现在只有一个8080 端口的,现在我们通过配置文件配置出来一个8081端口的,这样就能两个服务调用者了。
这里主要是修改application.yml文件
spring:
  application:
    name: spring-cloud-user-service-consumer

# 配置springboot中暴露健康检查等断点接口
management:
  endpoints:
    web:
      exposure:
        include: "*"
    # 暴露健康接口的细节
  endpoint:
    health:
      show-details: always
---
spring:
  profiles: c1
server:
  port: 8080
eureka:
  client:
    service-url:
      defaultZone: http://EurekaServerA:9090/eureka,http://EurekaServerB:9091/eureka
    register-with-eureka: true
    fetch-registry: true
  instance:
    prefer-ip-address: true
    instance-id: ${spring.cloud.client.ip-address}:${spring.application.name}:${server.port}:@project.version@
#spring-cloud-order-service-provider:
  #ribbon:
    #NFLoadBalancerRuleClassName: com.netflix.loadbalancer.RandomRule
---
spring:
  profiles: c2
server:
  port: 8081
eureka:
  client:
    service-url:
      defaultZone: http://EurekaServerA:9090/eureka,http://EurekaServerB:9091/eureka
    register-with-eureka: true
    fetch-registry: true
  instance:
    prefer-ip-address: true
    instance-id: ${spring.cloud.client.ip-address}:${spring.application.name}:${server.port}:@project.version@
    #spring-cloud-order-service-provider:
    #ribbon:
    #NFLoadBalancerRuleClassName: com.netflix.loadbalancer.RandomRule
4.3 验证
我们先将 c1服务暴露的接口添加到 postman中之前的collection 里面。

然后对collection中的request 发起几轮请求,然后再看一下 turbine的访问地址,可以看到,就有数据了

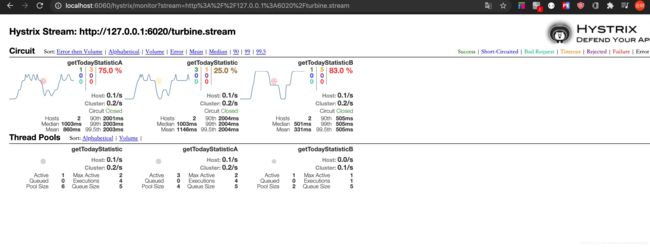
然后将turbine聚合的这个流放到Hystrix Dashboard中,查看效果,我们可以看到host=2也就是host有2个。
