Clickhouse从单节点到集群搭建详解以及分布式分表设计,mysql整表同步,表主键去重以及脚本增删改查,以及可视化工具DBeaver推荐详解
一.背景
参考:ClickHouse高性能分布式分析数据库
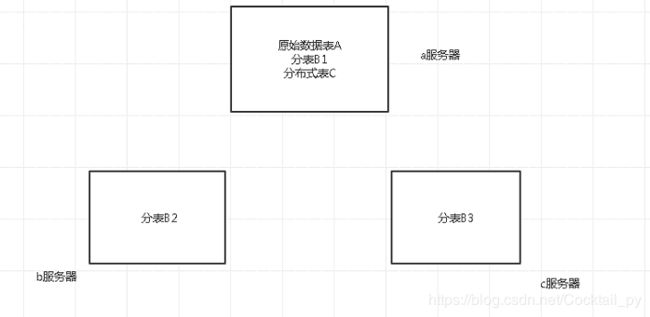
二.分布式设计
原始数据表A:a服务器
分表B1:a服务器 分表B2:b服务器 分表B3:c服务器
三.搭建
1.单节点搭建
#使用脚本安装yum源
curl -s https://packagecloud.io/install/repositories/altinity/clickhouse/script.rpm.sh | sudo bash
#yum 安装 server 以及 client
sudo yum install -y clickhouse-server clickhouse-client

# yum下载的数据一般都在/etc/init.d目录下
#查看是否安装完成
sudo yum list installed 'clickhouse*'


# 对外开放
cd /etc/clickhouse-server
vim config.xml
<listen_host>0.0.0.0</listen_host>


# 开机启动clickhouse-server
# systemctl enable clickhouse-server
# systemctl start clickhouse-server
2.集群搭建(三台机器)
zookeeper搭建参考centos7搭建kafka集群
# 三台服务器依次进行一下操作
vim config.xml
<!-- 外部配置文件 -->
<include_from>/etc/clickhouse-server/metrika.xml</include_from>

cd /etc/clickhouse-server
vim metrika.xml

<yandex>
<!-- 集群配置 -->
<clickhouse_remote_servers>
    <!-- 3分片1备份 -->
    <cluster_3shards_1replicas>
        <!-- 数据分片1  -->
        <shard>
            <replica>
                <host>10.8.*.147</host>
                <port>9000</port>
            </replica>
        </shard>
        <!-- 数据分片2  -->
        <shard>
            <replica>
                <host>10.8.*.62</host>
                <port> 9000</port>
            </replica>
        </shard>
        <!-- 数据分片3  -->
        <shard>
            <replica>
                <host>10.8.*.239</host>
                <port>9000</port>
            </replica>
        </shard>
    </cluster_3shards_1replicas>
</clickhouse_remote_servers>
<!-- zk配置  -->
<zookeeper-servers>
        <node index="1">
            <host>10.8.*.147</host>
            <port>2181</port>
        </node>
        <node index="2">
            <host>10.8.*.62</host>
            <port>2181</port>
        </node>
        <node index="3">
            <host>10.8.*.239</host>
            <port>2181</port>
        </node>
    </zookeeper-servers>
</yandex>
查看集群是否搭建成功
# 进入客户端
clickhouse-client

select * from system.clusters;
四.Clickhouse表设计
4.1mysql整表同步
# 进入客户端
clickhouse-client

CREATE TABLE clickhousedb.clickhousetablename ENGINE = MergeTree ORDER BY xxxxid AS SELECT * FROM mysql('ip:3306', 'mysqldbname', 'mysqltablename', 'mysqluser', 'mysqlpwd');

# 查看迁移后的数据量
select count(1) from clickhousetablename;
4.2分布式表设计
# 分表设计(a,b,c三台服务器)
CREATE TABLE test.ontime_local (
`ip` Nullable(String),
 `id` Int32,
 `media` Int8,
 `type` Int8,
 `page_id` String,
 `home_id` Nullable(String),
 `obj_name` Nullable(String),
 `img_url` Nullable(String),
 `c_url` Nullable(String),
 `company_url` Nullable(String),
 `email` Nullable(String),
 `tel` Nullable(String),
 `vocation` Nullable(String),
 `address` Nullable(String),
 `markers` Nullable(String),
 `country` Nullable(String),
 `country_code` Nullable(String),
 `country_code_iso` Nullable(String),
 `country_code_iso2` Nullable(String),
 `province` Nullable(String),
 `city` Nullable(String),
 `district` Nullable(String),
 `street` Nullable(String),
 `fans` Nullable(String),
 `lik` Nullable(String),
 `brief` Nullable(String),
 `source_kw` Nullable(String),
 `to_company` Nullable(String),
 `img_status` Int32,
 `is_upload` Int32,
 `twitter` Nullable(String),
 `linkedin` Nullable(String),
 `pinterest` Nullable(String),
 `instagram` Nullable(String),
 `issuu` Nullable(String),
 `youtube` Nullable(String),
 `google` Nullable(String),
 `times` Nullable(DateTime),
 `update_time` Nullable(DateTime),
 `status` Nullable(String)
) ENGINE = MergeTree ORDER BY id SETTINGS index_granularity = 8192
# 分布式表设计
CREATE TABLE test(数据库名).ontime_all ENGINE = Distributed(cluster_3shards_1replicas(集群名), test(数据库名), ontime_local(表名), rand())
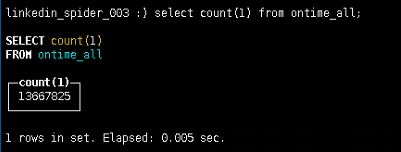
# 迁移数据到分布式表
INSERT INTO test.ontime_all SELECT * FROM jwt_client;
4.3 ReplacingMergeTree根据主键去重
# 根据c_url字段进行去重
CREATE TABLE tablename (
	c_url String,
	facebook_content String,
	facebook_img String,
	facebook_time String,
	facebook_time_sort Int64,
	main_id String,
	update_time Int64,
	post_id String,
	create_date date
) ENGINE = ReplacingMergeTree(create_date, (c_url), 8192);
CREATE TABLE [IF NOT EXISTS] [db.]table_name [ON CLUSTER cluster]
(
    name1 [type1] [DEFAULT|MATERIALIZED|ALIAS expr1],
    name2 [type2] [DEFAULT|MATERIALIZED|ALIAS expr2],
    ...
) ENGINE = ReplacingMergeTree([ver])
[PARTITION BY expr]
[ORDER BY expr]
[PRIMARY KEY expr]
[SAMPLE BY expr]
[SETTINGS name=value, ...]

# 官网参考案例
CREATE TABLE [IF NOT EXISTS] [db.]table_name [ON CLUSTER cluster]
(
    name1 [type1] [DEFAULT|MATERIALIZED|ALIAS expr1],
    name2 [type2] [DEFAULT|MATERIALIZED|ALIAS expr2],
    ...
) ENGINE [=] ReplacingMergeTree(date-column [, sampling_expression], (primary, key), index_granularity, [ver])
4.4 python脚本增删改查操作clickhouse
# -*- coding: utf-8 -*-
# @Time    : 2020/4/26 20:13
# @Author  :

import datetime
from decimal import Decimal

from clickhouse_driver import Client


class ClickHouse(object):
    """clickhouse读写封装"""

    def __init__(self, host='ip', port='9000', user='default'):
        self.client = Client(host=host, port=port, user=user)

    def query(self, sql):
        """查询"""
        ans = self.client.execute(sql, with_column_types=True)

        def time_transform(obj):
            """时间转换处理"""
            if isinstance(obj, datetime.datetime):
                return str(obj)
            elif isinstance(obj, datetime.date):
                return str(obj)
            elif isinstance(obj, Decimal):
                return float(obj)
            else:
                return obj

        return dict(zip((i[0] for i in ans[1]), (time_transform(ob) for ob in ans[0][0])))

    def bulk_insert(self, db_name, table_name, kwargs_list):
        """
        批量插入 建议一次性插入数据量大于1000条
        :param db_name:
        :param table_name:
        :param kwargs_list:
        :return:
        """
        sql = 'INSERT INTO  {db_name}.{table_name}(%s)values'.format(db_name=db_name, table_name=table_name)
        keys = kwargs_list[0].keys()
        sql_2 = sql % ",".join(keys)
        ans = self.client.execute(sql_2, params=kwargs_list)
        return ans


if __name__ == '__main__':
    click = ClickHouse()
    kwargs_list = [
        {"id": 555555, "name": "东莞测试"},
        {"id": 666666, "name": "东莞测试"},
        {"id": 777777, "name": "东莞测试"},
        {"id": 888888, "name": "东莞测试"},
        {"id": 999999, "name": "东莞测试"}]
    # test.mytest
    # 批量插入
    click.bulk_insert("test", "mytest", kwargs_list)
    sql = "select * from test.mytest where id=555555;"
    result = click.query(sql)
    print(result)

# 单条更新操作
ALTER TABLE test.f_kw_url UPDATE ip='ddd112.1112.111.222' where id=11325362;

# 单条删除操作
ALTER TABLE test.f_kw_url DELETE where id=999999;
五.Clickhouse可视化工具DBeaver推荐
参考:https://clickhouse.tech/docs/en/engines/table_engines
参考:https://www.jianshu.com/p/20639fdfdc99
推荐:http://blog.itpub.net/69965230/viewspace-2690052/


