Swift — UIKit 之(5)—— TableViews
文章目录
- 0. 本篇重点
- 1. Table Views
- 2. 新建工程Tabbed App
- 3. 准备主界面
- 3.1 删除 Second View
- 3.2 添加一个 TableViewController,并关联到 TabBar
- 3.3 再加一个 TableViewController,并关联到 TabBar,命名为“自定义Cell”
- 4. 第一个页面“初步”
- 4.1 手动添加一个 Table View 并拉满
- 4.2 显示一个 Cell
- 4.3 更改 Cell 的 Style 为 subtitle
- 4.4 为 Cell 设定辨识 id
- 4.5 为控制类添加 UITableViewDataSource 协议
- 4.6 编写代码
- 4.7 委托别人实现 UITableViewDataSource
- 4.8 运行效果
- 5. 第二个页面“分区”
- 5.1 添加资源文件 sortednames.plist
- 5.2 添加 Controller 并关联
- 5.3 编写代码
- 5.3.1 定义加载数据的变量
- 5.3.2 加载文件
- 5.3.3 设定分区数量
- 5.3.4 设定每一个分区有多少行
- 5.3.5 定义每个分区 Session 的名称
- 5.3.6 定义每个 Cell 如何呈现
- 5.3.7 添加索引栏
- 5.4 效果
- 6. 第三个界面“自定义Cell”
- 6.1 新建自定义Cell的文件和对应的XIB
- 6.2 自定义Cell
- 6.3 为两个 Label 定义输出
- 6.4 为第三个界面“自定义Cell”建立控制类
- 6.5 编写代码
- 6.6 效果
0. 本篇重点
- TableViews 基本使用
- TableViews 的分区
- TableViews 的自定义 Cell
1. Table Views

2. 新建工程Tabbed App
我们这次直接选择新建一个 Tabbed App 工程,它会自动帮我们建立一个 TabBarController

3. 准备主界面
3.1 删除 Second View

3.2 添加一个 TableViewController,并关联到 TabBar

3.3 再加一个 TableViewController,并关联到 TabBar,命名为“自定义Cell”
4. 第一个页面“初步”
4.1 手动添加一个 Table View 并拉满

4.2 显示一个 Cell

4.3 更改 Cell 的 Style 为 subtitle

4.4 为 Cell 设定辨识 id

4.5 为控制类添加 UITableViewDataSource 协议
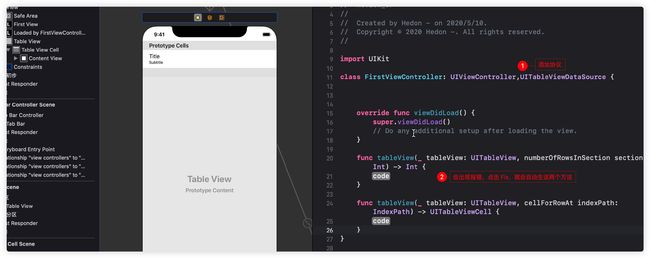
4.6 编写代码
//
//  FirstViewController.swift
//  Review_07
//
//  Created by Hedon - on 2020/5/10.
//  Copyright © 2020 Hedon -. All rights reserved.
//

import UIKit

class FirstViewController: UIViewController,UITableViewDataSource {

    //键值对数组,我们要把这些信息装到表格当中
    let products = [
        ["name":"金32","detail":"金士顿32G"],
        ["name":"金24","detail":"金士顿24G"],
        ["name":"金16","detail":"金士顿16G"],
        ["name":"爱32","detail":"爱国者32G"],
        ["name":"爱24","detail":"爱国者24G"],
        ["name":"爱16","detail":"爱国者16G"],
        ["name":"爱16","detail":"爱国者16G"]
    ]

    override func viewDidLoad() {
        super.viewDidLoad()
        // Do any additional setup after loading the view.
    }

    //一个分区里面有多少行,我们这里不分区,所以就是总共有多少行
    func tableView(_ tableView: UITableView, numberOfRowsInSection section: Int) -> Int {
        return products.count   //行数
    }


    //每一行都是一个Cell,这个函数就定义每一个Cell具体是怎样呈现的
    func tableView(_ tableView: UITableView, cellForRowAt indexPath: IndexPath) -> UITableViewCell {

        /**
         dequeueReusableCell:
            界面空间有限,比如我们有100个单元格,但是只能显示10个,在滚动的时候,这个属性就先保存滚动出界面的单元格,保存到可重用队列当中,在我们再次需要用到以前的单元格的时候,就再次从队列中取出来就可以了,这样就省去了删除和重建单元格带来的开销。
         */
        //cell1 是我们前面给 Cell 设定的辨识 id
        let cell:UITableViewCell = tableView.dequeueReusableCell(withIdentifier: "cell1", for: indexPath)

        /**
            indexPath 有两个非常重要的属性:
                row: 当前的行
                session: 当前所在分区
         */
        cell.textLabel?.text = products[indexPath.row]["name"]
        cell.detailTextLabel?.text = products[indexPath.row]["detail"]
        cell.imageView?.image = UIImage(named: "first")

        return cell
    }
}
到这里我们运行的话还没有效果,因为到这里我们“初步”这个界面里面的表格还没有去实现 UITableViewDataSource 这个协议。
这里我们可以委托“初步”里面的ViewController 对应的控制类 FirstViewController.swift 来实现 UITableViewDataSource 这个协议。
4.7 委托别人实现 UITableViewDataSource


4.8 运行效果

5. 第二个页面“分区”
5.1 添加资源文件 sortednames.plist
这个文件会放在网盘中,有需要可自取。

我们要做的就是把这个资源文件中的数据显示到“分区”这个界面中的 Table View 中。
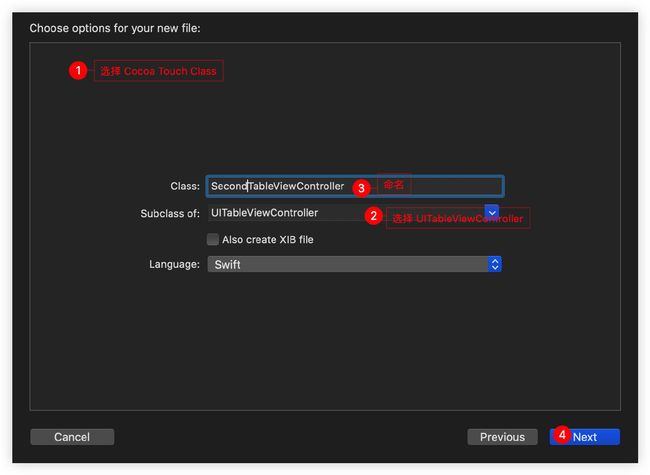
5.2 添加 Controller 并关联

5.3 编写代码
5.3.1 定义加载数据的变量
    //定义加载数据的变量
    var names:[String:[String]]!
    var keys:[String]!
数据类型我们可以通过查看 sortednames.plist 里面数据的类型。

5.3.2 加载文件
    override func viewDidLoad() {
        super.viewDidLoad()

        /**
         Bundle.main.path 表示当前应用的路径下
         forResource:文件名
         ofType:文件类型
         */
        let path = Bundle.main.path(forResource: "sortednames", ofType: "plist")
        let namesDict = NSDictionary(contentsOfFile: path!)

        names = namesDict as? [String:[String]]
        keys = (namesDict!.allKeys as! [String]).sorted()
    }
5.3.3 设定分区数量
    //分区个数
    override func numberOfSections(in tableView: UITableView) -> Int {
        // #warning Incomplete implementation, return the number of sections
        return keys.count
    }
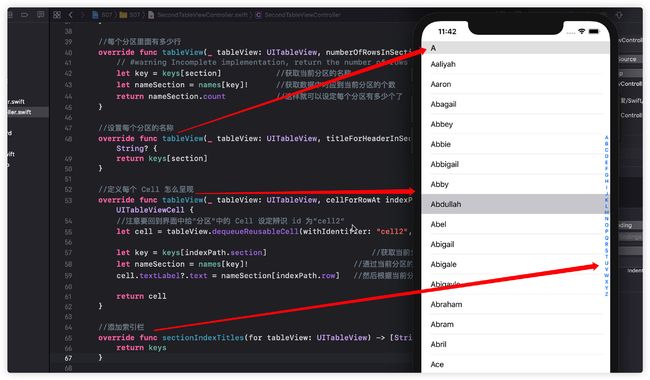
5.3.4 设定每一个分区有多少行
    //每个分区里面有多少行
    override func tableView(_ tableView: UITableView, numberOfRowsInSection section: Int) -> Int {
        // #warning Incomplete implementation, return the number of rows
        let key = keys[section]            //获取当前分区的名称
        let nameSection = names[key]!      //获取数据中对应到当前分区的个数
        return nameSection.count           //这样就可以设定每个分区有多少个了
    }
5.3.5 定义每个分区 Session 的名称
    //设置每个分区的名称
    override func tableView(_ tableView: UITableView, titleForHeaderInSection section: Int) -> String? {
        return keys[section]
    }
5.3.6 定义每个 Cell 如何呈现
    //定义每个 Cell 怎么呈现
    override func tableView(_ tableView: UITableView, cellForRowAt indexPath: IndexPath) -> UITableViewCell {
        //注意要回到界面中给“分区”中的 Cell 设定辨识 id 为“cell2”
        let cell = tableView.dequeueReusableCell(withIdentifier: "cell2", for: indexPath)

        let key = keys[indexPath.section]                       //获取当前分区的名称
        let nameSection = names[key]!                       //通过当前分区的名称获取这个分区里面的所有数据
        cell.textLabel?.text = nameSection[indexPath.row]   //然后根据当前分区的第几行,来取出第几个数据

        return cell
    }
5.3.7 添加索引栏
    //添加索引栏
    override func sectionIndexTitles(for tableView: UITableView) -> [String]? {
        return keys
    }
5.4 效果
6. 第三个界面“自定义Cell”
6.1 新建自定义Cell的文件和对应的XIB

6.2 自定义Cell
这里 Cell 的照片要做得好一点的话应该弄成动态的,然后从数据库中获取,这里为了方便就直接定死了。

6.3 为两个 Label 定义输出

6.4 为第三个界面“自定义Cell”建立控制类

6.5 编写代码
import UIKit

class ThirdTableViewController: UITableViewController {

    let products = [
        ["name":"金32","detail":"金士顿32G"],
        ["name":"金24","detail":"金士顿24G"],
        ["name":"金16","detail":"金士顿16G"],
        ["name":"爱32","detail":"爱国者32G"],
        ["name":"爱24","detail":"爱国者24G"],
        ["name":"爱16","detail":"爱国者16G"],
        ["name":"爱16","detail":"爱国者16G"]
    ]

    override func viewDidLoad() {
        super.viewDidLoad()

        //将我们自定义的Cell注册进本界面的tableView当中
        let xib = UINib(nibName: "CustomTableViewCell", bundle: nil)
        tableView.register(xib, forCellReuseIdentifier: "cell3")

        tableView.rowHeight = 130
    }

    // MARK: - Table view data source
    override func tableView(_ tableView: UITableView, numberOfRowsInSection section: Int) -> Int {
        // #warning Incomplete implementation, return the number of rows
        return products.count
    }


    override func tableView(_ tableView: UITableView, cellForRowAt indexPath: IndexPath) -> UITableViewCell {

        let cell = tableView.dequeueReusableCell(withIdentifier: "cell3", for: indexPath) as! CustomTableViewCell

        cell.nameLabel.text = products[indexPath.row]["name"]
        cell.detailLabel.text = products[indexPath.row]["detail"]
        return cell
    }
}
6.6 效果
