原文链接: https://www.callicoder.com/spring-boot-spring-security-jwt-mysql-react-app-part-2/
欢迎来到全栈开发系列第二章(Spring Boot,Spring Security,JWT,MySQL,React)。
在第一章,我们创建了基础的领域模型和数据仓库并启动了项目。
在本文中,我们将通过结合Spring Security和JWT来配置认证功能,编写用户注册,登录的API。
本项目的完整源码托管在Github,如果你碰到困难,可随时参考。
安全机制概述
- 构建一个新用户注册的API,信息有 name, username, email , password
- 构建一个让用户通过 username或email和password登录的API。在验证完用户凭证后,API应该生成并返回一个JWT身份授权令牌
客户端请求受保护资源时应该在每个request的头部在Authorization中放入JWT Token。 - 配置Spring Security限制受保护资源的访问。比如
- 登录,注册接口以及其他的静态资源(图片,scripts,css)应该被通过
- 创建调查,发起投票等接口应只能被认证通过的用户访问。
- 配置Spring Security,如果用户未携带JWT Token访问受保护资源,则抛出401未认证通过错误
- 配置基于
角色的授权。比如- 只有角色是
ADMIN的用户可以创建一个调查 - 只有角色是
USER的用户可以投票
- 只有角色是
配置 Spring Security 和 JWT
下面的类是实现安全的重中之重,他包含了几乎所有本项目需要的安全相关的配置。
让我们首先在com.example.polls.config包下创建SecurityConfig,然后我们照着代码学习每个配置到底做了什么事。
package com.example.polls.config;

import com.example.polls.security.CustomUserDetailsService;
import com.example.polls.security.JwtAuthenticationEntryPoint;
import com.example.polls.security.JwtAuthenticationFilter;
import org.springframework.beans.factory.annotation.Autowired;
import org.springframework.context.annotation.Bean;
import org.springframework.context.annotation.Configuration;
import org.springframework.http.HttpMethod;
import org.springframework.security.authentication.AuthenticationManager;
import org.springframework.security.config.BeanIds;
import org.springframework.security.config.annotation.authentication.builders.AuthenticationManagerBuilder;
import org.springframework.security.config.annotation.method.configuration.EnableGlobalMethodSecurity;
import org.springframework.security.config.annotation.web.builders.HttpSecurity;
import org.springframework.security.config.annotation.web.configuration.EnableWebSecurity;
import org.springframework.security.config.annotation.web.configuration.WebSecurityConfigurerAdapter;
import org.springframework.security.config.http.SessionCreationPolicy;
import org.springframework.security.crypto.bcrypt.BCryptPasswordEncoder;
import org.springframework.security.crypto.password.PasswordEncoder;
import org.springframework.security.web.authentication.UsernamePasswordAuthenticationFilter;

@Configuration
@EnableWebSecurity
@EnableGlobalMethodSecurity(
        securedEnabled = true,
        jsr250Enabled = true,
        prePostEnabled = true
)
public class SecurityConfig extends WebSecurityConfigurerAdapter {
    @Autowired
    CustomUserDetailsService customUserDetailsService;

    @Autowired
    private JwtAuthenticationEntryPoint unauthorizedHandler;

    @Bean
    public JwtAuthenticationFilter jwtAuthenticationFilter() {
        return new JwtAuthenticationFilter();
    }

    @Override
    public void configure(AuthenticationManagerBuilder authenticationManagerBuilder) throws Exception {
        authenticationManagerBuilder
                .userDetailsService(customUserDetailsService)
                .passwordEncoder(passwordEncoder());
    }

    @Bean(BeanIds.AUTHENTICATION_MANAGER)
    @Override
    public AuthenticationManager authenticationManagerBean() throws Exception {
        return super.authenticationManagerBean();
    }

    @Bean
    public PasswordEncoder passwordEncoder() {
        return new BCryptPasswordEncoder();
    }

    @Override
    protected void configure(HttpSecurity http) throws Exception {
        http
                .cors()
                    .and()
                .csrf()
                    .disable()
                .exceptionHandling()
                    .authenticationEntryPoint(unauthorizedHandler)
                    .and()
                .sessionManagement()
                    .sessionCreationPolicy(SessionCreationPolicy.STATELESS)
                    .and()
                .authorizeRequests()
                    .antMatchers("/",
                        "/favicon.ico",
                        "/**/*.png",
                        "/**/*.gif",
                        "/**/*.svg",
                        "/**/*.jpg",
                        "/**/*.html",
                        "/**/*.css",
                        "/**/*.js")
                        .permitAll()
                    .antMatchers("/api/auth/**")
                        .permitAll()
                    .antMatchers("/api/user/checkUsernameAvailability", "/api/user/checkEmailAvailability")
                        .permitAll()
                    .antMatchers(HttpMethod.GET, "/api/polls/**", "/api/users/**")
                        .permitAll()
                    .anyRequest()
                        .authenticated();

        // Add our custom JWT security filter
        http.addFilterBefore(jwtAuthenticationFilter(), UsernamePasswordAuthenticationFilter.class);

    }
}
以上的 SecurityConfig类在你的IDE中会有几处编译错误,因为我们还没有定义此类中需要用到的一些类。我们将在文章的后文中定义他们。
但在此之前,让我们理解这些注解的意义和代码中相关的配置的含义。
1. @EnableWebSecurity
这是Spring Sercurity主要的注解,用于在项目中开启Web Security。
2. @EnableGlobalMethodSecurity
这个注解用于开启方法级别的安全,你可使用以下3个类型的注解去保护你的方法。
- securityEnable: 它的作用是使
@Secured注解可以保护你的Controller/Service层方法。
@Secured("ROLE_ADMIN")
public User getAllUsers() {}

@Secured({"ROLE_USER", "ROLE_ADMIN"})
public User getUser(Long id) {}

@Secured("IS_AUTHENTICATED_ANONYMOUSLY")
public boolean isUsernameAvailable() {}
- jsr250Enabled:它可以让
@RolesAllowed可以像这样使用
@RolesAllowed("ROLE_ADMIN")
public Poll createPoll() {}
- ** prePostEnabled:**它可以使用@PreAuthorize和@PostAuthorize注解,基于表达式构造更复杂的访问控制语法
@PreAuthorize("isAnonymous()")
public boolean isUsernameAvailable() {}

@PreAuthorize("hasRole('USER')")
public Poll createPoll() {}
3. WebSecurityConfigurerAdapter
此类实现了Spring Security的 WebSecurityConfigurer接口。它提供了默认的安全配置项,如需自定义一些自己的需求可以通过继承他覆盖他的方法来更改。
我们的Security类继承了WebSecurityConfigurerAdapter并复写了他的几个方法来提供自己的安全配置。
4. CustomUserDetailsService
为验证用户和实现各种基于角色的检查,Spring Security需要我们提供用户的一些信息。
因此,他存在一个名为UserDetailService的接口,内容为通过username检索返回User相关信息。
UserDetails loadUserByUsername(String username) throws UsernameNotFoundException;
我们定义了CustomUserDetailsService实现了UserDetailsService接口并且提供了一个loadUserByUsername的具体实现。
注意,loadUserByUsername方法返回一个UserDetails对象,而Spring Security正需要他用于进行各种认证与基于角色的验证。
在我们的实现中,我们还定义了一个定制的UserPrincipal类实现了UserDetails接口,在loadUserByUsername()方法中我们返回了UserPrincipal对象。(loadUserByUsername()方法返回的是UserDetails对象,作者是因为UserPrincipal实现了UserDetails接口,所以这么说也没问题)
5. JwtAuthenticationEntryPoint
当客户端想访问受保护资源,缺没有提供合适的认证令牌时,这个类返回401未认证通过错误给客户端。这个类实现了Spring Security的AuthenticationEntryPoint接口。
6. JwtAuthenticationFilter
我们用JwtAuthenticationFilter实现了过滤器的功能
- 从requests中Header里的
Authorization中读取JWT授权信息 - 验证token
- 用户信息与token关联
- 把用户信息放到Spring Security的上下文(
SecurityContext)中,Spring Security使用用户信息去做一些校验。我们也可以从SecurityContext中取出用户信息用在自己的业务逻辑中。
7.AuthenticationManagerBuilder 和 AuthenticationManager
AuthenticationManagerBuilder用于创建AuthenticationManager实例,这个接口就是Spring Security用于认证用户的主要接口。
你可以使用AuthenticationManagerBuilder构建 基于内存的认证,LDAP认证,JDBC 认证,或自定义认证。
在我们的例子中,我们提供了自己的customUserDetailsService和passwordEncoder去构建AuthenticationManager。
我们后面将会使用配置好的AuthenticationManager在登录接口中验证用户。
8.HttpSecurity configurations
HttpSecurity configurations用于配置安全功能,像 csrf, sessionManagement,也可以通过多种条件配置规则来保护资源。
在我们的例子中,我们给予静态资源和一些任意用户可访问的API公开权限,同时也限制了一些API只能被登录的用户所访问。
我们当然也可以把JWTAuthenticationEntryPoint和自定义的JWTAuthenticationFilter配置到HttpSecurity中。
创建自定义Spring Security类,Filter,Annotations
在上一节,我们将许多自定义的类和Filters与Spring Security结合,在这一节,我们将逐一定义这些类。
以下所创建的所有类都在包com.example.poll.security中。
1.自定义Spring Security AuthenticationEntryPoint
我们第一个定义的与Spring Security相关的类是 JwtAuthenticationEntryPoint。他实现了AuthenticationEntryPoint接口并实现了接口中的commence()方法。当一个未经认证过的用户尝试访问一个需要认证才可以访问的资源时,这个方法将被调用。
在本例中,我们简化response仅包含401错误码和一些异常信息。
package com.example.polls.security;

import org.slf4j.Logger;
import org.slf4j.LoggerFactory;
import org.springframework.security.core.AuthenticationException;
import org.springframework.security.web.AuthenticationEntryPoint;
import org.springframework.stereotype.Component;

import javax.servlet.ServletException;
import javax.servlet.http.HttpServletRequest;
import javax.servlet.http.HttpServletResponse;
import java.io.IOException;

@Component
public class JwtAuthenticationEntryPoint implements AuthenticationEntryPoint {

    private static final Logger logger = LoggerFactory.getLogger(JwtAuthenticationEntryPoint.class);
    @Override
    public void commence(HttpServletRequest httpServletRequest,
                         HttpServletResponse httpServletResponse,
                         AuthenticationException e) throws IOException, ServletException {
        logger.error("Responding with unauthorized error. Message - {}", e.getMessage());
        httpServletResponse.sendError(HttpServletResponse.SC_UNAUTHORIZED, e.getMessage());
    }
}
2. 自定义Spring Security UserDetails
下一步,让我们自定义UserPrincipal类实现UserDetails类。此类是UserDetails类的实现,在我们自定义的UserDetailService作为结果返回。Spring Security会使用存储在UserPrincipal对象的数据来进行认证和授权。
以下就是完整的UserPrincipal类代码 -
package com.example.polls.security;

import com.example.polls.model.User;
import com.fasterxml.jackson.annotation.JsonIgnore;
import org.springframework.security.core.GrantedAuthority;
import org.springframework.security.core.authority.SimpleGrantedAuthority;
import org.springframework.security.core.userdetails.UserDetails;

import java.util.Collection;
import java.util.List;
import java.util.Objects;
import java.util.stream.Collectors;

public class UserPrincipal implements UserDetails {
    private Long id;

    private String name;

    private String username;

    @JsonIgnore
    private String email;

    @JsonIgnore
    private String password;

    private Collection authorities;

    public UserPrincipal(Long id, String name, String username, String email, String password, Collection authorities) {
        this.id = id;
        this.name = name;
        this.username = username;
        this.email = email;
        this.password = password;
        this.authorities = authorities;
    }

    public static UserPrincipal create(User user) {
        List authorities = user.getRoles().stream().map(role ->
                new SimpleGrantedAuthority(role.getName().name())
        ).collect(Collectors.toList());

        return new UserPrincipal(
                user.getId(),
                user.getName(),
                user.getUsername(),
                user.getEmail(),
                user.getPassword(),
                authorities
        );
    }

    public Long getId() {
        return id;
    }

    public String getName() {
        return name;
    }

    public String getEmail() {
        return email;
    }

    @Override
    public String getUsername() {
        return username;
    }

    @Override
    public String getPassword() {
        return password;
    }

    @Override
    public Collection getAuthorities() {
        return authorities;
    }

    @Override
    public boolean isAccountNonExpired() {
        return true;
    }

    @Override
    public boolean isAccountNonLocked() {
        return true;
    }

    @Override
    public boolean isCredentialsNonExpired() {
        return true;
    }

    @Override
    public boolean isEnabled() {
        return true;
    }

    @Override
    public boolean equals(Object o) {
        if (this == o) return true;
        if (o == null || getClass() != o.getClass()) return false;
        UserPrincipal that = (UserPrincipal) o;
        return Objects.equals(id, that.id);
    }

    @Override
    public int hashCode() {

        return Objects.hash(id);
    }
}
3. 自定义Spring Security UserDetailService
现在我们来完成自定义的UserDetailService,可以通过username查找到User信息。
package com.example.polls.security;

import com.example.polls.model.User;
import com.example.polls.repository.UserRepository;
import org.springframework.beans.factory.annotation.Autowired;
import org.springframework.security.core.userdetails.UserDetails;
import org.springframework.security.core.userdetails.UserDetailsService;
import org.springframework.security.core.userdetails.UsernameNotFoundException;
import org.springframework.stereotype.Service;
import org.springframework.transaction.annotation.Transactional;

@Service
public class CustomUserDetailsService implements UserDetailsService {

    @Autowired
    UserRepository userRepository;

    @Override
    @Transactional
    public UserDetails loadUserByUsername(String usernameOrEmail)
            throws UsernameNotFoundException {
        // Let people login with either username or email
        User user = userRepository.findByUsernameOrEmail(usernameOrEmail, usernameOrEmail)
                .orElseThrow(() ->
                        new UsernameNotFoundException("User not found with username or email : " + usernameOrEmail)
        );

        return UserPrincipal.create(user);
    }

    // This method is used by JWTAuthenticationFilter
    @Transactional
    public UserDetails loadUserById(Long id) {
        User user = userRepository.findById(id).orElseThrow(
            () -> new UsernameNotFoundException("User not found with id : " + id)
        );

        return UserPrincipal.create(user);
    }
}
第一个方法loadUserByUsername()是为Spring Security提供的,注意findByUsernameOrEmail方法,他是可以用username或email登录的。
第二个方法loadUserById()是为JWTAuthenticationFilter提供的,我们稍后定义它。
4. 生成和验证Token的实用类
下面这个类的作用在用户登录成功后生成JWT,验证请求中头部的JWT授权信息。
package com.example.polls.security;

import io.jsonwebtoken.*;
import org.slf4j.Logger;
import org.slf4j.LoggerFactory;
import org.springframework.beans.factory.annotation.Value;
import org.springframework.security.core.Authentication;
import org.springframework.stereotype.Component;
import java.util.Date;

@Component
public class JwtTokenProvider {

    private static final Logger logger = LoggerFactory.getLogger(JwtTokenProvider.class);

    @Value("${app.jwtSecret}")
    private String jwtSecret;

    @Value("${app.jwtExpirationInMs}")
    private int jwtExpirationInMs;

    public String generateToken(Authentication authentication) {

        UserPrincipal userPrincipal = (UserPrincipal) authentication.getPrincipal();

        Date now = new Date();
        Date expiryDate = new Date(now.getTime() + jwtExpirationInMs);

        return Jwts.builder()
                .setSubject(Long.toString(userPrincipal.getId()))
                .setIssuedAt(new Date())
                .setExpiration(expiryDate)
                .signWith(SignatureAlgorithm.HS512, jwtSecret)
                .compact();
    }

    public Long getUserIdFromJWT(String token) {
        Claims claims = Jwts.parser()
                .setSigningKey(jwtSecret)
                .parseClaimsJws(token)
                .getBody();

        return Long.parseLong(claims.getSubject());
    }

    public boolean validateToken(String authToken) {
        try {
            Jwts.parser().setSigningKey(jwtSecret).parseClaimsJws(authToken);
            return true;
        } catch (SignatureException ex) {
            logger.error("Invalid JWT signature");
        } catch (MalformedJwtException ex) {
            logger.error("Invalid JWT token");
        } catch (ExpiredJwtException ex) {
            logger.error("Expired JWT token");
        } catch (UnsupportedJwtException ex) {
            logger.error("Unsupported JWT token");
        } catch (IllegalArgumentException ex) {
            logger.error("JWT claims string is empty.");
        }
        return false;
    }
}
上面这个类用到了@Value去properties中读取JWT secret和expiration time。
让我们在配置文件中加上这2个属性的配置吧 -
JWT Properties
## App Properties
app.jwtSecret= JWTSuperSecretKey
app.jwtExpirationInMs = 604800000
5. 定义Spring Security AuthenticationFilter
最后,我们创建JWTAuthenticationFilter来从request中拿到JWT token并验证它,建立token与用户之间的联系,并在Spring Security中放行。
package com.example.polls.security;

import org.slf4j.Logger;
import org.slf4j.LoggerFactory;
import org.springframework.beans.factory.annotation.Autowired;
import org.springframework.security.authentication.UsernamePasswordAuthenticationToken;
import org.springframework.security.core.context.SecurityContextHolder;
import org.springframework.security.core.userdetails.UserDetails;
import org.springframework.security.web.authentication.WebAuthenticationDetailsSource;
import org.springframework.util.StringUtils;
import org.springframework.web.filter.OncePerRequestFilter;
import javax.servlet.FilterChain;
import javax.servlet.ServletException;
import javax.servlet.http.HttpServletRequest;
import javax.servlet.http.HttpServletResponse;
import java.io.IOException;

public class JwtAuthenticationFilter extends OncePerRequestFilter {

    @Autowired
    private JwtTokenProvider tokenProvider;

    @Autowired
    private CustomUserDetailsService customUserDetailsService;

    private static final Logger logger = LoggerFactory.getLogger(JwtAuthenticationFilter.class);

    @Override
    protected void doFilterInternal(HttpServletRequest request, HttpServletResponse response, FilterChain filterChain) throws ServletException, IOException {
        try {
            String jwt = getJwtFromRequest(request);

            if (StringUtils.hasText(jwt) && tokenProvider.validateToken(jwt)) {
                Long userId = tokenProvider.getUserIdFromJWT(jwt);

                UserDetails userDetails = customUserDetailsService.loadUserById(userId);
                UsernamePasswordAuthenticationToken authentication = new UsernamePasswordAuthenticationToken(userDetails, null, userDetails.getAuthorities());
                authentication.setDetails(new WebAuthenticationDetailsSource().buildDetails(request));

                SecurityContextHolder.getContext().setAuthentication(authentication);
            }
        } catch (Exception ex) {
            logger.error("Could not set user authentication in security context", ex);
        }

        filterChain.doFilter(request, response);
    }

    private String getJwtFromRequest(HttpServletRequest request) {
        String bearerToken = request.getHeader("Authorization");
        if (StringUtils.hasText(bearerToken) && bearerToken.startsWith("Bearer ")) {
            return bearerToken.substring(7, bearerToken.length());
        }
        return null;
    }
}
在上面这个过滤器里,我们首先从请求头的Authorization中拿到JWT解析,拿到了用户ID。其后,我们从数据库中拿到了用户具体信息并将验证信息放到了Spring Security的上下文中。
注意,在filter中通过查询数据库拿到用户信息是可选的。你也可以将用户的账号,密码及角色信息编码后放到JWT claims中,然后通过解析JWT的claims去创建一个UserDetails。如此便不会产生数据库IO。
然而,从数据库中读取用户信息还是非常有用的。比如,当用户角色更改后或用户在创建JWT后更改了密码,则不应让他还用之前的JWT登录。
6. 获取当前登录用户的自定义注解
Spring Security提供了一个叫@AuthenticationPrincipal的注解去在Controller中获取当前登录的且被认证通过的用户。
以下 的 @CurrentUser注解头部添加了@AuthenticationPrincipal注解。
package com.example.polls.security;

import org.springframework.security.core.annotation.AuthenticationPrincipal;
import java.lang.annotation.*;

@Target({ElementType.PARAMETER, ElementType.TYPE})
@Retention(RetentionPolicy.RUNTIME)
@Documented
@AuthenticationPrincipal
public @interface CurrentUser {

}
我们创建了一个元注解(注解的注解)的目的是为了在我们项目中不用到处与Spring Security的相关注解打交道。减少了对Spring Security的依赖。如果我们决定不再使用Spring Security了,我们也可以轻松的更改@CurrentUser来做到。
编写登录和注册API
伙计们,我们已经把我们需要的安全配置都搞定了,是时候来编写登录和注册的API了。
但在定义这些API之前,我们需要先定义API需要使用到的 请求体和返回体。
所有的这些请求体和返回体我们定义在包com.example.polls.payload中。
Request Payloads
1. LoginRquest
package com.example.polls.payload;

import javax.validation.constraints.NotBlank;

public class LoginRequest {
    @NotBlank
    private String usernameOrEmail;

    @NotBlank
    private String password;

    public String getUsernameOrEmail() {
        return usernameOrEmail;
    }

    public void setUsernameOrEmail(String usernameOrEmail) {
        this.usernameOrEmail = usernameOrEmail;
    }

    public String getPassword() {
        return password;
    }

    public void setPassword(String password) {
        this.password = password;
    }
}
2. SignUpRequest
package com.example.polls.payload;

import javax.validation.constraints.*;

public class SignUpRequest {
    @NotBlank
    @Size(min = 4, max = 40)
    private String name;

    @NotBlank
    @Size(min = 3, max = 15)
    private String username;

    @NotBlank
    @Size(max = 40)
    @Email
    private String email;

    @NotBlank
    @Size(min = 6, max = 20)
    private String password;

    public String getName() {
        return name;
    }

    public void setName(String name) {
        this.name = name;
    }

    public String getUsername() {
        return username;
    }

    public void setUsername(String username) {
        this.username = username;
    }

    public String getEmail() {
        return email;
    }

    public void setEmail(String email) {
        this.email = email;
    }

    public String getPassword() {
        return password;
    }

    public void setPassword(String password) {
        this.password = password;
    }
}
Response Payloads
1. JwtAuthenticationResponse
package com.example.polls.payload;

public class JwtAuthenticationResponse {
    private String accessToken;
    private String tokenType = "Bearer";

    public JwtAuthenticationResponse(String accessToken) {
        this.accessToken = accessToken;
    }

    public String getAccessToken() {
        return accessToken;
    }

    public void setAccessToken(String accessToken) {
        this.accessToken = accessToken;
    }

    public String getTokenType() {
        return tokenType;
    }

    public void setTokenType(String tokenType) {
        this.tokenType = tokenType;
    }
}
2. ApiResponse
package com.example.polls.payload;

public class ApiResponse {
    private Boolean success;
    private String message;

    public ApiResponse(Boolean success, String message) {
        this.success = success;
        this.message = message;
    }

    public Boolean getSuccess() {
        return success;
    }

    public void setSuccess(Boolean success) {
        this.success = success;
    }

    public String getMessage() {
        return message;
    }

    public void setMessage(String message) {
        this.message = message;
    }
}
自定义业务异常
请求非法或一些超预期情况的发生时,API会抛出异常。
我们需要在返回体中展现出不同类型的异常应有对应的 HTTP code。
让我们用@ResponseStatus注解开始定义异常吧(所有异常相关代码都定义在com.example.polls.exception)
1. AppException
package com.example.polls.exception;

import org.springframework.http.HttpStatus;
import org.springframework.web.bind.annotation.ResponseStatus;

@ResponseStatus(HttpStatus.INTERNAL_SERVER_ERROR)
public class AppException extends RuntimeException {
    public AppException(String message) {
        super(message);
    }

    public AppException(String message, Throwable cause) {
        super(message, cause);
    }
}
2. BadRequestException
package com.example.polls.exception;
import org.springframework.http.HttpStatus;
import org.springframework.web.bind.annotation.ResponseStatus;
@ResponseStatus(HttpStatus.BAD_REQUEST)
public class BadRequestException extends RuntimeException {
public BadRequestException(String message) {
    super(message);
}

public BadRequestException(String message, Throwable cause) {
    super(message, cause);
}
}
3. ResourceNotFoundException
package com.example.polls.exception;

import org.springframework.http.HttpStatus;
import org.springframework.web.bind.annotation.ResponseStatus;

@ResponseStatus(HttpStatus.NOT_FOUND)
public class ResourceNotFoundException extends RuntimeException {
    private String resourceName;
    private String fieldName;
    private Object fieldValue;

    public ResourceNotFoundException( String resourceName, String fieldName, Object fieldValue) {
        super(String.format("%s not found with %s : '%s'", resourceName, fieldName, fieldValue));
        this.resourceName = resourceName;
        this.fieldName = fieldName;
        this.fieldValue = fieldValue;
    }

    public String getResourceName() {
        return resourceName;
    }

    public String getFieldName() {
        return fieldName;
    }

    public Object getFieldValue() {
        return fieldValue;
    }
}
Authentication Controller
最后,AuthController包含了登录和注册的接口。(所有Controller应放在包com.example.polls.controller下)-
package com.example.polls.controller;

import com.example.polls.exception.AppException;
import com.example.polls.model.Role;
import com.example.polls.model.RoleName;
import com.example.polls.model.User;
import com.example.polls.payload.ApiResponse;
import com.example.polls.payload.JwtAuthenticationResponse;
import com.example.polls.payload.LoginRequest;
import com.example.polls.payload.SignUpRequest;
import com.example.polls.repository.RoleRepository;
import com.example.polls.repository.UserRepository;
import com.example.polls.security.JwtTokenProvider;
import org.springframework.beans.factory.annotation.Autowired;
import org.springframework.http.HttpStatus;
import org.springframework.http.ResponseEntity;
import org.springframework.security.authentication.AuthenticationManager;
import org.springframework.security.authentication.UsernamePasswordAuthenticationToken;
import org.springframework.security.core.Authentication;
import org.springframework.security.core.context.SecurityContextHolder;
import org.springframework.security.crypto.password.PasswordEncoder;
import org.springframework.web.bind.annotation.PostMapping;
import org.springframework.web.bind.annotation.RequestBody;
import org.springframework.web.bind.annotation.RequestMapping;
import org.springframework.web.bind.annotation.RestController;
import org.springframework.web.servlet.support.ServletUriComponentsBuilder;

import javax.validation.Valid;
import java.net.URI;
import java.util.Collections;

@RestController
@RequestMapping("/api/auth")
public class AuthController {

    @Autowired
    AuthenticationManager authenticationManager;

    @Autowired
    UserRepository userRepository;

    @Autowired
    RoleRepository roleRepository;

    @Autowired
    PasswordEncoder passwordEncoder;

    @Autowired
    JwtTokenProvider tokenProvider;

    @PostMapping("/signin")
    public ResponseEntity authenticateUser(@Valid @RequestBody LoginRequest loginRequest) {

        Authentication authentication = authenticationManager.authenticate(
                new UsernamePasswordAuthenticationToken(
                        loginRequest.getUsernameOrEmail(),
                        loginRequest.getPassword()
                )
        );

        SecurityContextHolder.getContext().setAuthentication(authentication);

        String jwt = tokenProvider.generateToken(authentication);
        return ResponseEntity.ok(new JwtAuthenticationResponse(jwt));
    }

    @PostMapping("/signup")
    public ResponseEntity registerUser(@Valid @RequestBody SignUpRequest signUpRequest) {
        if(userRepository.existsByUsername(signUpRequest.getUsername())) {
            return new ResponseEntity(new ApiResponse(false, "Username is already taken!"),
                    HttpStatus.BAD_REQUEST);
        }

        if(userRepository.existsByEmail(signUpRequest.getEmail())) {
            return new ResponseEntity(new ApiResponse(false, "Email Address already in use!"),
                    HttpStatus.BAD_REQUEST);
        }

        // Creating user's account
        User user = new User(signUpRequest.getName(), signUpRequest.getUsername(),
                signUpRequest.getEmail(), signUpRequest.getPassword());

        user.setPassword(passwordEncoder.encode(user.getPassword()));

        Role userRole = roleRepository.findByName(RoleName.ROLE_USER)
                .orElseThrow(() -> new AppException("User Role not set."));

        user.setRoles(Collections.singleton(userRole));

        User result = userRepository.save(user);

        URI location = ServletUriComponentsBuilder
                .fromCurrentContextPath().path("/api/users/{username}")
                .buildAndExpand(result.getUsername()).toUri();

        return ResponseEntity.created(location).body(new ApiResponse(true, "User registered successfully"));
    }
}
开启跨域
react需要从自己的端访问到服务端的这些API。为了允许跨域访问这些接口,我们需要创建WebMvcConfig类在包com.example.polls.config下。
package com.example.polls.config;

import org.springframework.context.annotation.Configuration;
import org.springframework.web.servlet.config.annotation.CorsRegistry;
import org.springframework.web.servlet.config.annotation.WebMvcConfigurer;

@Configuration
public class WebMvcConfig implements WebMvcConfigurer {

    private final long MAX_AGE_SECS = 3600;

    @Override
    public void addCorsMappings(CorsRegistry registry) {
        registry.addMapping("/**")
                .allowedOrigins("*")
                .allowedMethods("HEAD", "OPTIONS", "GET", "POST", "PUT", "PATCH", "DELETE")
                .maxAge(MAX_AGE_SECS);
    }
}
检测当前配置并启动程序
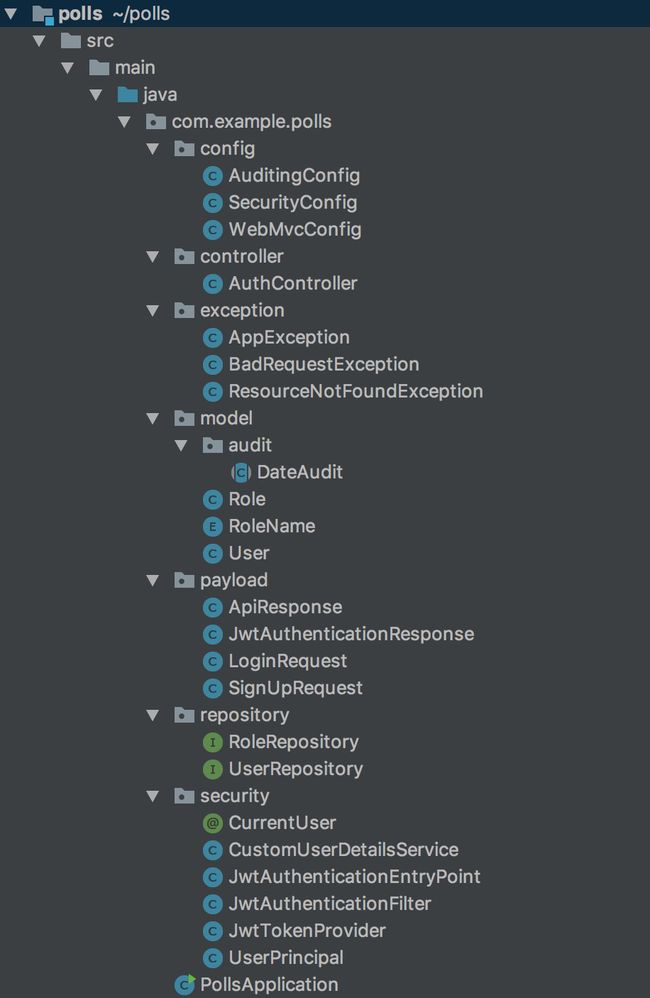
如果你根据以上一步步完成了下来,你的项目结构应该如下-
你可以在当前项目根目录下,用终端输入一下命令来启动项目:
mvn spring-boot:run
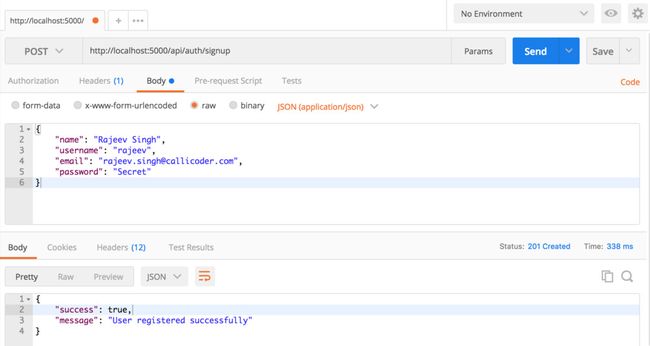
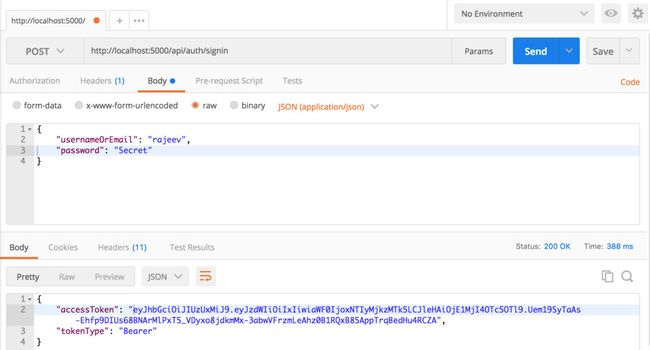
测试登录和注册API
注册
登录
调用受保护API
一旦你从登录接口获得了返回的token,你就可以通过把token放到请求头的Authorization中去调用受保护的API,就像下面这样-
Authorization: Bearer
JwtAuthenticationFilter将会从请求头读取token,验证它而判断是否有权限去访问这些API。
下一步是什么?
哦吼!我们在本文章讨论了很多。并使用Spring Security和JWT构建了可靠的身份认证和授权逻辑。感谢一直阅读到最后。
在下一章中,我们会编写创建调查和投票,获取用户等API。


