- <电子幽灵>开发笔记:BAT基础笔记(一)
BAT脚本基础笔记(一)介绍费曼学习法最重要的部分,即把知识教给一个完全不懂的孩子——或者小白。为了更好的自我学习,也为了让第一次接触某个知识范畴的同学快速入门,我会把我的学习笔记整理成电子幽灵系列。提示:作为低代码工具的笔记,这里会用特殊字体表示要用到的函数等等。请若要学习,请结合相关工具边用边学。BAT基础笔记(一)BAT脚本基础笔记(一)介绍简介在哪里编写BAT代码?BAT基本语法1.基本命
- <电子幽灵>前端第一件:HTML基础笔记下
靈镌sama
电子幽灵随手记前端html笔记
HTML基础笔记(下)介绍费曼学习法最重要的部分,即把知识教给一个完全不懂的孩子——或者小白。为了更好的自我学习,也为了让第一次接触某个知识范畴的同学快速入门,我会把我的学习笔记整理成电子幽灵系列。提示:文章的是以解释-代码块-解释的结构呈现的。当你看到代码块并准备复制复现的时候,最好先保证自己看过了代码块前后的解释。<电子幽灵>前端第一件:HTML基础笔记上中,最基础的一部分HTML标签和已经以
- 深度学习之分类手写数字的网络
newyork major
卷积神经网络CNN深度学习人工智能
面临的问题定义神经⽹络后,我们回到⼿写识别上来。我们可以把识别⼿写数字问题分成两个⼦问题:把包含许多数字的图像分成⼀系列单独的图像,每个包含单个数字;也就是把图像,分成6个单独的图像分类单独的数字我们将专注于编程解决第⼆个问题,分类单独的数字。这样是因为,⼀旦你有分类单独数字的有效⽅法,分割问题是不难解决的。⼀种⽅法是尝试不同的分割⽅式,⽤数字分类器对每⼀个切分⽚段打分;如果数字分类器对每⼀个⽚段
- VR协作香港:虚拟现实技术重塑商业协作新模式
cpsvps_net
vr
随着虚拟现实技术的快速发展,VR协作正在全球范围内掀起新一轮的数字化转型浪潮。作为国际金融中心的香港,凭借其独特的地理位置和先进的科技基础设施,正在成为VR协作应用的重要试验场。本文将深入探讨VR协作在香港的发展现状、应用场景、技术优势以及未来趋势,为关注这一领域的读者提供全面洞察。VR协作香港:虚拟现实技术重塑商业协作新模式香港VR协作市场的发展现状香港作为亚洲重要的商业枢纽,VR协作技术的应用
- 基于 Three.js 与 WebGL 的商场全景 VR 导航系统源码级解析
维小帮定位导航
javascriptvr前端开发场景优化WebGL物联网智慧商场
本文面向Web前端开发者、WebGL/Three.js爱好者、对VR/AR应用开发感兴趣的技术人员、智慧商场解决方案开发者。详细介绍如何利用WebGL(Three.js框架)构建高性能的商场全景VR环境,并实现精准的室内定位与3D路径规划导航功能。如需获取商场全景VR导航系统解决方案请前往文章最下方获取,如有项目合作及技术交流欢迎私信作者。一、商场全景VR导航的核心技术概述商场全景VR导航融合了全
- 树莓派上 基于Opencv 实现人脸检测与人脸识别
土拨鼠不是老鼠
C++opencv人工智能计算机视觉
一,需求基于树莓派4b,usb1080p摄像头,实现人脸检测与人脸识别。尝试了海陵科的模组和百度的sdk。海陵科的模组无法录入人脸,浪费了100多块钱。百度的sdk在树莓派上也无法录入人脸,官方解决不了。最后只能用opencv自己实现,因为只要实现最简单检测和识别就行,不在乎准确率。经测试opencv能满足基本要求,这里整理下思路。二,(1),加载模型并实例化Ptr和Ptr对象。树莓派4bopen
- 欧标TH-307EV3.41对讲机写频软件详解
侯昂
本文还有配套的精品资源,点击获取简介:对讲机在多个领域中有着广泛应用,欧标TH-307EV3.41是一款针对特定型号对讲机进行频率配置和功能设置的软件工具。它允许用户自定义工作频率、频道管理、功能配置,并执行数据备份与恢复、固件更新等功能。本软件是无线电爱好者和专业用户的实用工具,需在遵守无线电法规的前提下使用。1.欧标TH-307EV3.41对讲机概述1.1对讲机的技术演进对讲机自问世以来,经历
- Windows 7上IIS7.0的全面应用
侯昂
本文还有配套的精品资源,点击获取简介:IIS7.0是微软为Windows7操作系统推出的Web服务器软件,具备模块化设计、高效管理和丰富的开发环境。它支持多种网络协议,包括HTTP、HTTPS和FTP,并通过集成安全机制和优化的性能特性,如应用程序池、FTP服务、URL重写等,为用户提供了强大的Web服务管理能力。IIS7.0的设计旨在提高资源利用率、管理便捷性,并确保服务器的安全稳定运行。1.I
- 8、 探讨排序算法及其实际应用
侯昂
排序算法插入排序快速排序
探讨排序算法及其实际应用1.排序算法的重要性排序算法在计算机科学中扮演着至关重要的角色。无论是日常生活中常见的任务,还是复杂的数据处理工作,排序算法都能帮助我们更有效地管理和检索信息。以下是几个实际应用场景:字典中的单词:字典中的单词按顺序排列,忽略大小写差异。这使得查找特定单词变得非常容易。目录中的文件:目录中的文件通常按排序顺序列出,方便用户快速找到所需文件。书籍索引:一本书的索引是排序过的,
- 基于 Vue + RuoYi 架构设计的商城Web/小程序实训课程
速易达网络
springbootuni-appvue.js
以下是基于Vue+RuoYi架构设计的商城Web/小程序实训课程方案,结合企业级开发需求与教学实践,涵盖全栈技术栈与实战模块:一、课程概述目标:通过Vue前端+RuoYi后端(SpringBoot)开发企业级电商系统,实现多终端(Web/H5/小程序)适配,覆盖从架构设计到部署上线的全流程。周期:8周(建议每日3小时)适合人群:具备基础Java/Vue知识的开发者,熟悉HTML/CSS/JavaS
- git和解决冲突
代码杂货铺子
gitgitlab
安装包:Git-Downloadsgit小乌龟:TortoiseGit–WindowsShellInterfacetoGit简单介绍git一般指git还有gitlab,实际工程使用时依据项目建立的位置或者需要使用到的特性不同,可以自行选择,基础功能都差不多。git安装后会提供类似shell一样的命令行管理工具,直接在git工程所在的目录右键鼠标单击打开就可以。TortoiseGit是提供了一个类似
- 微信小程序实现websocket及单人聊天功能
蝶妹妹
微信小程序websocket小程序
一、什么是websocket:WebSocket是HTML5下一种新的协议(websocket协议本质上是一个基于tcp的协议)它实现了浏览器与服务器全双工通信,能更好的节省服务器资源和带宽并达到实时通讯的目的Websocket是一个持久化的协议二、websocket的原理:websocket约定了一个通信的规范,通过一个握手的机制,客户端和服务器之间能建立一个类似tcp的连接,从而方便它们之间的
- springboot+websocket+微信小程序(实现后端主动推送消息 小程序的实时报警功能)
Listitem本项目主要实现的需求为:主要功能汽车在行驶的过程中如果前方遇到限高杆,车前的摄像头在安全距离前测出限高杆的高度后,小程序能够实时报警(当前车辆内否安全通过)。次要功能1.车主利用微信用户名登录后能够绑定车牌,实现车牌的增删改查2.车主可以为自己的车牌号添加家庭成员(绑定微信用户名的方式)3.简单权限管理(车主拥有其名下车牌的增删改查权限,家庭成员则没有)实现方式1.后端使用spri
- Java web开发常见中间件多版本下载备用
却诚Salong
安装问题和解决方法java中间件开发语言
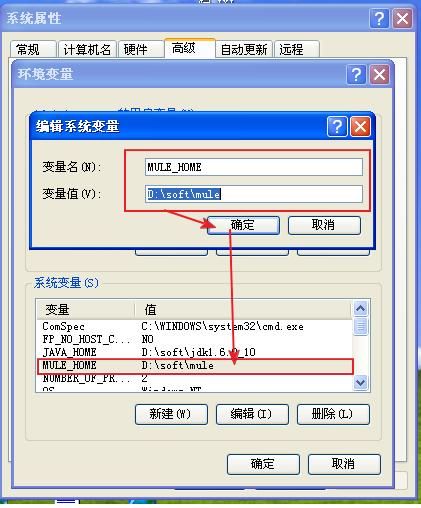
备注:每次换电脑都要重新构建一下环境,下载找资源很麻烦,官网英文网页找个历史版本看不懂,还要慢慢去搜,所以直接整理一波,需要的自行收藏。1.nodejs自选版本下载:地址:https://nodejs.org/download/release/网速快,自选任何版本下载。2.maven自选版本下载:地址:https://archive.apache.org/dist/maven/maven-3/网速
- X86和ARM架构的优缺点?
心对元&鑫鑫
arm开发架构
x86和ARM是当前主流的两种处理器架构,分别主导不同领域(如PC/服务器和移动/嵌入式设备)。它们的优缺点对比如下:1.x86架构(Intel/AMD)优点:高性能:复杂指令集(CISC)设计,单条指令功能强大,适合高吞吐量计算。强大的单线程性能,尤其在浮点运算和多媒体处理(如视频编辑、游戏)。软件生态成熟:主导PC和服务器市场,兼容Windows、Linux等主流操作系统。支持大量专业软件(如
- uptime命令详解
半桶水专家
运维linux网络
uptime是Linux/Unix系统中的一个非常常用的命令,用于显示系统的运行时间、当前时间、登录用户数以及系统负载(loadaverage)。下面是对uptime命令的详细解释。一、基本语法uptime[参数]常用参数:参数说明无显示当前时间、系统运行时间、用户数、平均负载-p只显示系统已运行的时间(pretty格式)-s显示系统最近的启动时间(since)-h显示帮助信息二、命令输出详解示例
- MySQL对CPU的占用率很高怎么处理
半桶水专家
mysqlmysql数据库
一、确认与定位确认整体CPU使用情况top-b-n1|head-n15观察MySQL(mysqld)进程所占的%CPU。如果是多核系统,关注总和以及单核是否满载。查看系统负载uptimeLoadAverage长期高于CPU核数,说明系统压力大。查看其它进程情况psaux--sort=-%cpu|head-n10确认是否仅MySQL占用高,或与其它进程有关。二、操作系统层面排查磁盘I/O瓶颈iost
- 从x86到ARM64:CPU架构的进化与未来
小俊学长
架构
从x86到ARM64:CPU架构的进化与未来在计算机发展的历史长河中,CPU架构的演变是推动计算技术不断前进的重要动力。从早期的x86架构,到现代的x64和ARM64架构,每一次变革都带来了计算性能、能效比以及应用领域的显著提升。本文将深入探讨x86、x64和ARM64这三大主流CPU架构的历史背景、技术特点、市场应用以及未来发展趋势,以期为读者提供一个全面的视角,理解CPU架构的进化路径及其对未
- 配置MySQL主从复制(一主一从)
cici15874
mysql
MySQL主从复制简介MySQL主从复制的目的是实现数据库冗余备份,将master数据库的数据定时同步到slave库中,一旦master数据库宕机,可以将Web应用数据库配置快速切换到slave数据库,确保Web应用有较高的可用性。MySQL主从同步是一个异步复制的过程,要实现复制,首先需要在master上开启bin-log日志功能,bin-log日志用于记录在master库执行的增删改更新操作的
- 阿里云OSS跨账号迁移过程
IT_狂奔者
《玩转Linux终极指南》阿里云云计算对象存储OSS
阿里云OSS跨账号迁移过程关于OSS在线迁移服务的更新说明旧版在线迁移已停止服务,用户需切换至新版在线迁移。与旧版相比,新版在线迁移的主要区别在于身份验证方式的调整。新版不再使用AK/AS(AccessKeyID和AccessKeySecret)进行认证,而是采用了角色授权机制。这一变化旨在提升安全性和简化权限管理。用户需根据新的认证方式进行配置,以确保迁移任务的正常运行。准备工作本文以标准存储进
- 2024年Python最全人脸检测实战高级:使用 OpenCV、Python 和 dlib 完成眨眼检测
2401_84691757
程序员pythonopencv开发语言
然而,一旦人眨眼(右上),眼睛的纵横比就会急剧下降,接近于零。下图绘制了视频剪辑的眼睛纵横比随时间变化的图表。正如我们所看到的,眼睛纵横比是恒定的,然后迅速下降到接近零,然后再次增加,表明发生了一次眨眼。在下一节中,我们将学习如何使用面部标志、OpenCV、Python和dlib实现眨眼检测的眼睛纵横比。使用面部标志和OpenCV检测眨眼==============================
- Redis 功能扩展:Lua 脚本对 Redis 的扩展
cici15874
redislua数据库
Redis是一个高性能的内存数据库,支持多种数据结构,如字符串、哈希、列表、集合和有序集合。为了增强其功能,Redis引入了Lua脚本支持,使开发者可以编写自定义的脚本,确保操作的原子性并提高复杂操作的性能。本文将详细介绍如何使用Lua脚本对Redis进行扩展,重点讲解eval命令、redis.call和redis.pcall的用法。一、Lua脚本在Redis中的作用Lua脚本在Redis中的主要
- 数据库迁移同步 | 两地三中心到异地双活演变及关键技术探讨
沃趣数据库管理平台
技术专栏服务器数据库网络mysql数据库迁移
两地三中心和异地多活都是分布式系统的关键技术,用于保证系统的高可用性和容错性。其中最关键的技术无疑是数据同步、同步防环和数据冲突解决。异地容灾&两地三中心两地三中心架构是一种分布式系统的架构模式,用于保证系统的高可用性和容错性。它将整个系统划分为三个数据中心:两个位于同城,一个位于异地。其中,同城的两个数据中心分别承担主备的角色,异地数据中心则作为备份。在两地三中心架构中,同城的两个数据中心之间通
- Spring Boot 中使用 Jackson 实现全局时间格式处理(支持多格式反序列化)
喵行星
Jacksping相关java
好的,以下是整理好的CSDN博文格式内容,适合你发布为一篇讲解Jackson全局时间配置的文章:SpringBoot中使用Jackson实现全局时间格式处理(支持多格式反序列化)在实际开发中,我们经常需要处理前后端交互中的时间字段。为了统一时间格式,通常会在字段上添加@JsonFormat注解,但如果项目中字段很多,这种方式会显得重复且难以维护。本文将介绍如何通过配置Jackson的全局时间格式,
- 拦截器和过滤器的区别
MaxBruce
工作专栏拦截器过滤器
拦截器和过滤器的区别①拦截器是基于java的反射机制的,而过滤器是基于函数回调。②拦截器不依赖与servlet容器,过滤器依赖与servlet容器。③拦截器只能对action请求起作用,而过滤器则可以对几乎所有的请求起作用。④拦截器可以访问action上下文、值栈里的对象,而过滤器不能访问。⑤在action的生命周期中,拦截器可以多次被调用,而过滤器只能在容器初始化时被调用一次。⑥拦截器可以获取I
- LangChain4j在Java企业应用中的实战指南-3
在未来等你
大模型应用开发AI技术编程JavaSpring
【LangChain4j在Java企业应用中的实战指南】文章标签langchain4j,JavaAI,RAG系统,智能应用开发,LangChain4j实战,企业级AI应用,Java微服务,检索增强生成文章简述随着大语言模型(LLM)的广泛应用,企业对智能应用的需求日益增长。LangChain4j作为一款专为Java生态打造的LLM集成框架,正在成为构建RAG(检索增强生成)系统和智能应用的重要工具
- JVM调优实战 Day 14 :大数据处理中的JVM调优
在未来等你
JVM调优实战JVMJava性能优化调优虚拟机
【JVM调优实战Day14】大数据处理中的JVM调优文章标签jvm调优,大数据处理,Java性能优化,JVM参数配置,JVMGC调优,Java开发,大数据架构,Jvm实战文章简述在大数据处理场景中,Java应用通常面临内存占用高、GC频率频繁、堆内存不足等挑战。本文作为“JVM调优实战”系列的第14天,深入探讨了大数据处理中的JVM调优策略。文章从概念解析、技术原理、常见问题、诊断方法、调优策略到
- 设计模式精讲 Day 19:观察者模式(Observer Pattern)
在未来等你
23种设计模式精讲设计模式Java面向对象软件架构
【设计模式精讲Day19】观察者模式(ObserverPattern)开篇在“设计模式精讲”系列的第19天,我们聚焦于观察者模式(ObserverPattern)。作为行为型设计模式之一,观察者模式是实现对象间一对多依赖关系的经典方式,广泛应用于事件驱动系统、状态变化通知、消息订阅等场景。本篇文章将从理论到实践全面讲解观察者模式,包括其核心思想、结构组成、适用场景、代码实现、优缺点分析、实际案例和
- 关于java通过背景图生成图片
a未来永远是个未知数
#java的图片处理javajavaintellij-ideamavenspringboot图像处理
目录对接部分(碎碎念,可跳过)引入本地jar包文件路径错误尝试解决方案开发部分获取字体的方法关于二维码的生成关于在背景图上添加内容关于在背景图上写字关于在背景图上叠加图片关于保存图片第一次尝试第二次尝试第三次尝试最终方案关于文件读取为MultipartFile类型关于BufferedImage转MultipartFile最近用到了需要生成图片的开发,作为一个没有接触过这个的后端,实在头秃,记录一下
- tauri v2 开源项目学习(二)
前言:tauri2编程,前端部分和electron差不多,框架部分差别大,资料少,官网乱,AI又骗我所以在gitee上,寻找tauriv2开源项目,通过记录框架部分与rust部分的写法,对照确定编程方式tarui2插件,可以查看:https://github.com/tauri-apps/plugins-workspace1.EcoPastehttps://gitee.com/ayangweb/E
- Spring的注解积累
yijiesuifeng
spring注解
用注解来向Spring容器注册Bean。
需要在applicationContext.xml中注册:
<context:component-scan base-package=”pagkage1[,pagkage2,…,pagkageN]”/>。
如:在base-package指明一个包
<context:component-sc
- 传感器
百合不是茶
android传感器
android传感器的作用主要就是来获取数据,根据得到的数据来触发某种事件
下面就以重力传感器为例;
1,在onCreate中获得传感器服务
private SensorManager sm;// 获得系统的服务
private Sensor sensor;// 创建传感器实例
@Override
protected void
- [光磁与探测]金吕玉衣的意义
comsci
这是一个古代人的秘密:现在告诉大家
信不信由你们:
穿上金律玉衣的人,如果处于灵魂出窍的状态,可以飞到宇宙中去看星星
这就是为什么古代
- 精简的反序打印某个数
沐刃青蛟
打印
以前看到一些让求反序打印某个数的程序。
比如:输入123,输出321。
记得以前是告诉你是几位数的,当时就抓耳挠腮,完全没有思路。
似乎最后是用到%和/方法解决的。
而今突然想到一个简短的方法,就可以实现任意位数的反序打印(但是如果是首位数或者尾位数为0时就没有打印出来了)
代码如下:
long num, num1=0;
- PHP:6种方法获取文件的扩展名
IT独行者
PHP扩展名
PHP:6种方法获取文件的扩展名
1、字符串查找和截取的方法
1
$extension
=
substr
(
strrchr
(
$file
,
'.'
), 1);
2、字符串查找和截取的方法二
1
$extension
=
substr
- 面试111
文强chu
面试
1事务隔离级别有那些 ,事务特性是什么(问到一次)
2 spring aop 如何管理事务的,如何实现的。动态代理如何实现,jdk怎么实现动态代理的,ioc是怎么实现的,spring是单例还是多例,有那些初始化bean的方式,各有什么区别(经常问)
3 struts默认提供了那些拦截器 (一次)
4 过滤器和拦截器的区别 (频率也挺高)
5 final,finally final
- XML的四种解析方式
小桔子
domjdomdom4jsax
在平时工作中,难免会遇到把 XML 作为数据存储格式。面对目前种类繁多的解决方案,哪个最适合我们呢?在这篇文章中,我对这四种主流方案做一个不完全评测,仅仅针对遍历 XML 这块来测试,因为遍历 XML 是工作中使用最多的(至少我认为)。 预 备 测试环境: AMD 毒龙1.4G OC 1.5G、256M DDR333、Windows2000 Server
- wordpress中常见的操作
aichenglong
中文注册wordpress移除菜单
1 wordpress中使用中文名注册解决办法
1)使用插件
2)修改wp源代码
进入到wp-include/formatting.php文件中找到
function sanitize_user( $username, $strict = false
- 小飞飞学管理-1
alafqq
管理
项目管理的下午题,其实就在提出问题(挑刺),分析问题,解决问题。
今天我随意看下10年上半年的第一题。主要就是项目经理的提拨和培养。
结合我自己经历写下心得
对于公司选拔和培养项目经理的制度有什么毛病呢?
1,公司考察,选拔项目经理,只关注技术能力,而很少或没有关注管理方面的经验,能力。
2,公司对项目经理缺乏必要的项目管理知识和技能方面的培训。
3,公司对项目经理的工作缺乏进行指
- IO输入输出部分探讨
百合不是茶
IO
//文件处理 在处理文件输入输出时要引入java.IO这个包;
/*
1,运用File类对文件目录和属性进行操作
2,理解流,理解输入输出流的概念
3,使用字节/符流对文件进行读/写操作
4,了解标准的I/O
5,了解对象序列化
*/
//1,运用File类对文件目录和属性进行操作
//在工程中线创建一个text.txt
- getElementById的用法
bijian1013
element
getElementById是通过Id来设置/返回HTML标签的属性及调用其事件与方法。用这个方法基本上可以控制页面所有标签,条件很简单,就是给每个标签分配一个ID号。
返回具有指定ID属性值的第一个对象的一个引用。
语法:
&n
- 励志经典语录
bijian1013
励志人生
经典语录1:
哈佛有一个著名的理论:人的差别在于业余时间,而一个人的命运决定于晚上8点到10点之间。每晚抽出2个小时的时间用来阅读、进修、思考或参加有意的演讲、讨论,你会发现,你的人生正在发生改变,坚持数年之后,成功会向你招手。不要每天抱着QQ/MSN/游戏/电影/肥皂剧……奋斗到12点都舍不得休息,看就看一些励志的影视或者文章,不要当作消遣;学会思考人生,学会感悟人生
- [MongoDB学习笔记三]MongoDB分片
bit1129
mongodb
MongoDB的副本集(Replica Set)一方面解决了数据的备份和数据的可靠性问题,另一方面也提升了数据的读写性能。MongoDB分片(Sharding)则解决了数据的扩容问题,MongoDB作为云计算时代的分布式数据库,大容量数据存储,高效并发的数据存取,自动容错等是MongoDB的关键指标。
本篇介绍MongoDB的切片(Sharding)
1.何时需要分片
&nbs
- 【Spark八十三】BlockManager在Spark中的使用场景
bit1129
manager
1. Broadcast变量的存储,在HttpBroadcast类中可以知道
2. RDD通过CacheManager存储RDD中的数据,CacheManager也是通过BlockManager进行存储的
3. ShuffleMapTask得到的结果数据,是通过FileShuffleBlockManager进行管理的,而FileShuffleBlockManager最终也是使用BlockMan
- yum方式部署zabbix
ronin47
yum方式部署zabbix
安装网络yum库#rpm -ivh http://repo.zabbix.com/zabbix/2.4/rhel/6/x86_64/zabbix-release-2.4-1.el6.noarch.rpm 通过yum装mysql和zabbix调用的插件还有agent代理#yum install zabbix-server-mysql zabbix-web-mysql mysql-
- Hibernate4和MySQL5.5自动创建表失败问题解决方法
byalias
J2EEHibernate4
今天初学Hibernate4,了解了使用Hibernate的过程。大体分为4个步骤:
①创建hibernate.cfg.xml文件
②创建持久化对象
③创建*.hbm.xml映射文件
④编写hibernate相应代码
在第四步中,进行了单元测试,测试预期结果是hibernate自动帮助在数据库中创建数据表,结果JUnit单元测试没有问题,在控制台打印了创建数据表的SQL语句,但在数据库中
- Netty源码学习-FrameDecoder
bylijinnan
javanetty
Netty 3.x的user guide里FrameDecoder的例子,有几个疑问:
1.文档说:FrameDecoder calls decode method with an internally maintained cumulative buffer whenever new data is received.
为什么每次有新数据到达时,都会调用decode方法?
2.Dec
- SQL行列转换方法
chicony
行列转换
create table tb(终端名称 varchar(10) , CEI分值 varchar(10) , 终端数量 int)
insert into tb values('三星' , '0-5' , 74)
insert into tb values('三星' , '10-15' , 83)
insert into tb values('苹果' , '0-5' , 93)
- 中文编码测试
ctrain
编码
循环打印转换编码
String[] codes = {
"iso-8859-1",
"utf-8",
"gbk",
"unicode"
};
for (int i = 0; i < codes.length; i++) {
for (int j
- hive 客户端查询报堆内存溢出解决方法
daizj
hive堆内存溢出
hive> select * from t_test where ds=20150323 limit 2;
OK
Exception in thread "main" java.lang.OutOfMemoryError: Java heap space
问题原因: hive堆内存默认为256M
这个问题的解决方法为:
修改/us
- 人有多大懒,才有多大闲 (评论『卓有成效的程序员』)
dcj3sjt126com
程序员
卓有成效的程序员给我的震撼很大,程序员作为特殊的群体,有的人可以这么懒, 懒到事情都交给机器去做 ,而有的人又可以那么勤奋,每天都孜孜不倦得做着重复单调的工作。
在看这本书之前,我属于勤奋的人,而看完这本书以后,我要努力变成懒惰的人。
不要在去庞大的开始菜单里面一项一项搜索自己的应用程序,也不要在自己的桌面上放置眼花缭乱的快捷图标
- Eclipse简单有用的配置
dcj3sjt126com
eclipse
1、显示行号 Window -- Prefences -- General -- Editors -- Text Editors -- show line numbers
2、代码提示字符 Window ->Perferences,并依次展开 Java -> Editor -> Content Assist,最下面一栏 auto-Activation
- 在tomcat上面安装solr4.8.0全过程
eksliang
Solrsolr4.0后的版本安装solr4.8.0安装
转载请出自出处:
http://eksliang.iteye.com/blog/2096478
首先solr是一个基于java的web的应用,所以安装solr之前必须先安装JDK和tomcat,我这里就先省略安装tomcat和jdk了
第一步:当然是下载去官网上下载最新的solr版本,下载地址
- Android APP通用型拒绝服务、漏洞分析报告
gg163
漏洞androidAPP分析
点评:记得曾经有段时间很多SRC平台被刷了大量APP本地拒绝服务漏洞,移动安全团队爱内测(ineice.com)发现了一个安卓客户端的通用型拒绝服务漏洞,来看看他们的详细分析吧。
0xr0ot和Xbalien交流所有可能导致应用拒绝服务的异常类型时,发现了一处通用的本地拒绝服务漏洞。该通用型本地拒绝服务可以造成大面积的app拒绝服务。
针对序列化对象而出现的拒绝服务主要
- HoverTree项目已经实现分层
hvt
编程.netWebC#ASP.ENT
HoverTree项目已经初步实现分层,源代码已经上传到 http://hovertree.codeplex.com请到SOURCE CODE查看。在本地用SQL Server 2008 数据库测试成功。数据库和表请参考:http://keleyi.com/a/bjae/ue6stb42.htmHoverTree是一个ASP.NET 开源项目,希望对你学习ASP.NET或者C#语言有帮助,如果你对
- Google Maps API v3: Remove Markers 移除标记
天梯梦
google maps api
Simply do the following:
I. Declare a global variable:
var markersArray = [];
II. Define a function:
function clearOverlays() {
for (var i = 0; i < markersArray.length; i++ )
- jQuery选择器总结
lq38366
jquery选择器
1 2 3 4 5 6 7 8 9 10 11 12 13 14 15 16 17 18 19 20 21 22 23 24 25 26 27 28 29 30 31 32 33 34 35 36 37 38 39 40
- 基础数据结构和算法六:Quick sort
sunwinner
AlgorithmQuicksort
Quick sort is probably used more widely than any other. It is popular because it is not difficult to implement, works well for a variety of different kinds of input data, and is substantially faster t
- 如何让Flash不遮挡HTML div元素的技巧_HTML/Xhtml_网页制作
刘星宇
htmlWeb
今天在写一个flash广告代码的时候,因为flash自带的链接,容易被当成弹出广告,所以做了一个div层放到flash上面,这样链接都是a触发的不会被拦截,但发现flash一直处于div层上面,原来flash需要加个参数才可以。
让flash置于DIV层之下的方法,让flash不挡住飘浮层或下拉菜单,让Flash不档住浮动对象或层的关键参数:wmode=opaque。
方法如下:
- Mybatis实用Mapper SQL汇总示例
wdmcygah
sqlmysqlmybatis实用
Mybatis作为一个非常好用的持久层框架,相关资料真的是少得可怜,所幸的是官方文档还算详细。本博文主要列举一些个人感觉比较常用的场景及相应的Mapper SQL写法,希望能够对大家有所帮助。
不少持久层框架对动态SQL的支持不足,在SQL需要动态拼接时非常苦恼,而Mybatis很好地解决了这个问题,算是框架的一大亮点。对于常见的场景,例如:批量插入/更新/删除,模糊查询,多条件查询,联表查询,
 代码
代码