Android Studio移动应用开发——Android NDK开发(含:javah -jni、ndk-build配置出错的解决办法)
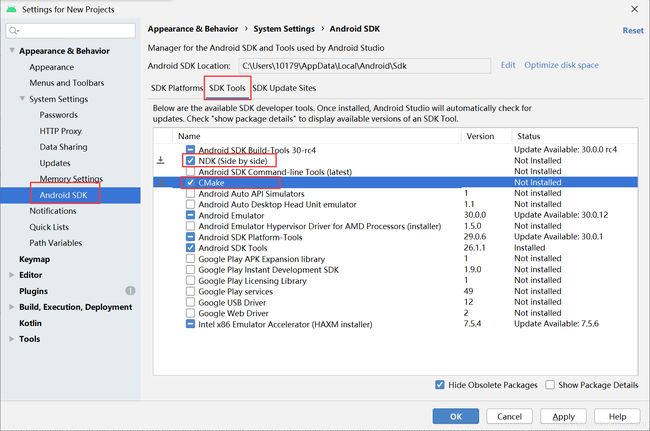
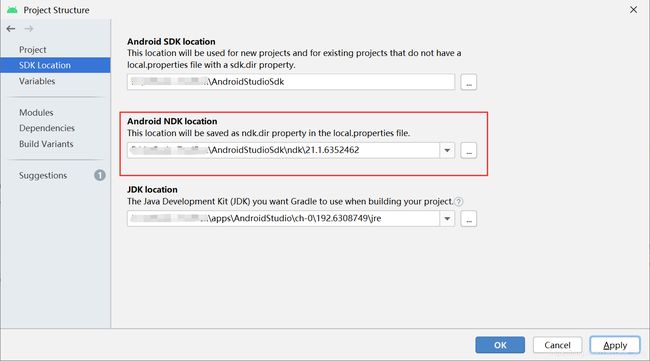
- 1.环境搭建,选择NDK
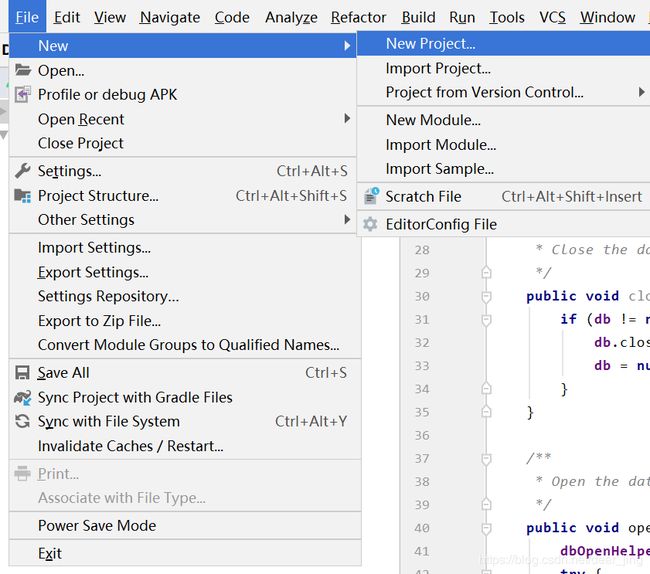
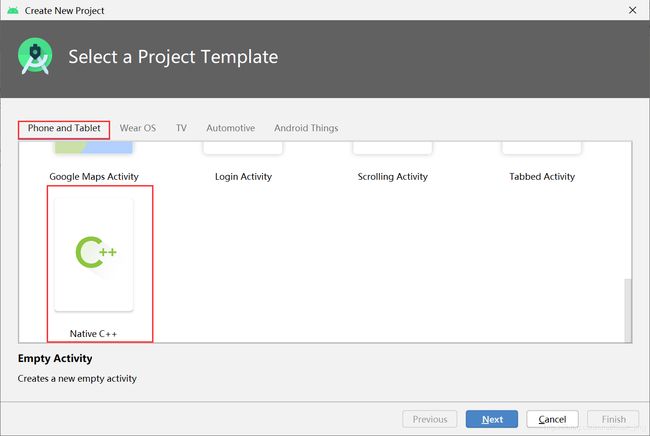
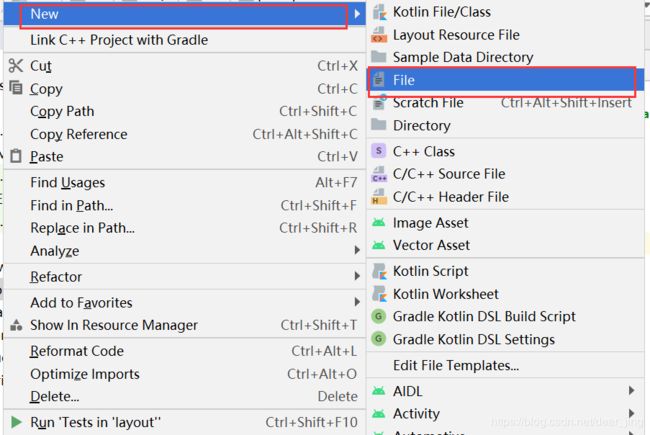
- 2.新建一个工程
- 3.编写activity.java和layout.xml代码
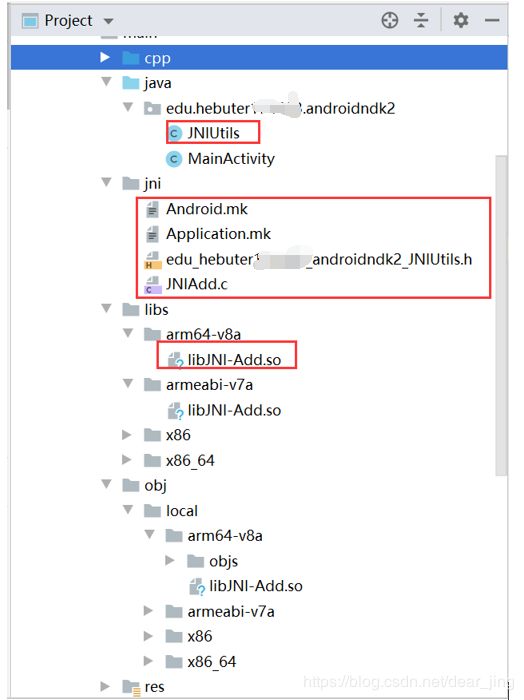
- 4.定义JNIUtils类
- 5. 对JNIUtils.java执行javah -jni操作,生成对应的.h头文件
- 6.刚刚在JNIUtils.java中只声明了native方法,下面进行定义。
- 7.创建Android.mk和Application.mk文件
- 8.使用so库
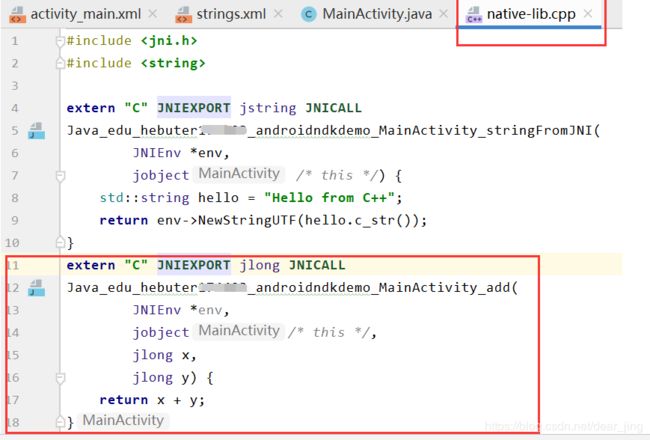
- 附:选择CMake后,只需添加如下代码即可完成。
实现:使用AndroidNdkDemo程序进行加法运算,程序会随机产生两个整数,然后调用C语言开发的共享库对这两个整数进行加法运算,最后将运算结果显示在用户界面上。
查了好多,才把这个实验完成,今天记录一下,希望能帮助到大家。
有两种方法:一种是选择CMake,另一种是不选择,选择上以后超级简单。这里主要讲一下不选择的方法。
1.环境搭建,选择NDK
2.新建一个工程
3.编写activity.java和layout.xml代码
下面这段代码表示加载一个native的库,这个库里面就是c/c++编译的。不一定放在activity.java里面,在使用到该库之前加载就行。
static {
        System.loadLibrary("JNI-Add");
    }
package edu.hebuter.androidndk2;

import androidx.appcompat.app.AppCompatActivity;

import android.os.Bundle;
import android.view.View;
import android.widget.Button;
import android.widget.TextView;

public class MainActivity extends AppCompatActivity {

    // Used to load the 'JNI-Add' library on application startup.
    static {
        System.loadLibrary("JNI-Add");
    }

    @Override
    protected void onCreate(Bundle savedInstanceState) {
        super.onCreate(savedInstanceState);
        setContentView(R.layout.activity_main);

        final TextView displayLable = (TextView) findViewById(R.id.display);
        Button btn = (Button) findViewById(R.id.add_btn);
        btn.setOnClickListener(new View.OnClickListener() {
            @Override
            public void onClick(View v) {
                long x = Math.round(Math.random() * 100);
                long y = Math.round(Math.random() * 100);
                long z = JNIUtils.add(x, y);
                String msg = x + " + " + y + " = " + z;
                displayLable.setText(msg);
            }
        });
    }
}
<LinearLayout
    xmlns:android="http://schemas.android.com/apk/res/android"
    android:layout_width="fill_parent"
    android:layout_height="fill_parent"
    android:orientation="vertical">

    <TextView
        android:id="@+id/display"
        android:layout_width="fill_parent"
        android:layout_height="wrap_content"
        android:text=""></TextView>

    <Button
        android:id="@+id/add_btn"
        android:layout_width="wrap_content"
        android:layout_height="wrap_content"
        android:text="加法运算 "></Button>
</LinearLayout>
4.定义JNIUtils类
activity.java中用到了一个类的静态函数JNIUtils.add(x, y),但是没有定义该类,下面定义这个类。文件位置没有要求。
package edu.hebuter.androidndk2;
public class JNIUtils {
    public static native long add(long x, long y);
}
在这个类中,声明了一个native的接口方法,用来访问本地C/C++方法。
5. 对JNIUtils.java执行javah -jni操作,生成对应的.h头文件
具体操作方法可以参考:android studio配置Javah 和ndk-build。选中要生成.h的文件,右键–>extern tools–>javah 就可以生成对应的.h文件。
但是,按照里面的方法配置javah和ndk-build时,总是会出现各种错误,百度了好多才解决。下面贴出我的配置方法:
Javah
Program:  $JDKPath$\bin\javah.exe    自己电脑上javah.exe的位置
Arguments:  -classpath $ModuleFileDir$/src/main/java -jni -d $ModuleFileDir$/src/main/jni $FileClass$
Working directory:  D:\AndroidStudio\AndroidNDK2\app\src\main\jni
ndk-build
Program:  D:\Sdk\ndk\21.1.6352462\ndk-build.cmd   自己电脑上ndk-build.cmd的位置
Parameters可以为空
Working directory:  D:\AndroidStudio\AndroidNDK2\app\src\main\jni
生成的.h文件内容如下:
/* DO NOT EDIT THIS FILE - it is machine generated */
#include <jni.h>
/* Header for class edu_hebuter_androidndk2_JNIUtils */

#ifndef _Included_edu_hebuter_androidndk2_JNIUtils
#define _Included_edu_hebuter_androidndk2_JNIUtils
#ifdef __cplusplus
extern "C" {
#endif
/*
 * Class:     edu_hebuter_androidndk2_JNIUtils
 * Method:    add
 * Signature: (JJ)J
 */
JNIEXPORT jlong JNICALL Java_edu_hebuter_androidndk2_JNIUtils_add
  (JNIEnv *, jclass, jlong, jlong);

#ifdef __cplusplus
}
#endif
#endif
6.刚刚在JNIUtils.java中只声明了native方法,下面进行定义。
在上方生成的jni目录内创建c/c++文件,注意:目录不要放错。
头文件可能需要根据自己电脑上jni.h文件的目录进行修改,按照编译器提示修改即可。这个文件中的内容和上一步中生成的.h文件中的内容几乎相同,区别在于:函数参数中除了数据类型,还添加了变量名;有了方法体。
//
// Created by Dear on 2020/5/18.
//

#include "jni.h"

JNIEXPORT jlong JNICALL Java_edu_hebuter_androidndk2_JNIUtils_add
        (JNIEnv *env, jobject this, jlong x, jlong y) {
    return x + y;
}
7.创建Android.mk和Application.mk文件
Android.mk
LOCAL_PATH := $(call my-dir)
include $(CLEAR_VARS)
LOCAL_MODULE := JNI-Add			//想要生成的库的名字,
								//与第一部中的System.loadLibrary("JNI-Add");相同
LOCAL_SRC_FILES := JNIAdd.c 	//新建的c/c++文件的文件名
include $(BUILD_SHARED_LIBRARY)
Application.mk
APP_ABI:=all
APP_PLATFORM := android-16
APP_ALLOW_MISSING_DEPS=true
ndk-buildjni文件夹,方法同javah -jni,区别是要对jni文件夹进行。
8.使用so库
具体操作方法参考:Android Studio 创建 NDK 步骤中的“7、使用so库”。
附:选择CMake后,只需添加如下代码即可完成。
package edu.hebuter.androidndkdemo;

import androidx.appcompat.app.AppCompatActivity;

import android.os.Bundle;
import android.view.View;
import android.widget.Button;
import android.widget.TextView;

public class MainActivity extends AppCompatActivity {

    // Used to load the 'native-lib' library on application startup.
    static {
        System.loadLibrary("native-lib");
    }

    @Override
    protected void onCreate(Bundle savedInstanceState) {
        super.onCreate(savedInstanceState);
        setContentView(R.layout.activity_main);

        final TextView displayLable = (TextView) findViewById(R.id.display);
        Button btn = (Button) findViewById(R.id.add_btn);
        btn.setOnClickListener(new View.OnClickListener() {
            @Override
            public void onClick(View v) {
                long x = Math.round(Math.random() * 100);
                long y = Math.round(Math.random() * 100);
                long z = add(x, y);
                String msg = x + " + " + y + " = " + z;
                displayLable.setText(msg);
            }
        });
    }
    /**
     * A native method that is implemented by the 'native-lib' native library,
     * which is packaged with this application.
     */
    public native String stringFromJNI();
    public native long add(long x, long y);
}
以上就是Android NDK开发方法和遇到问题的解决方法,希望能帮到大家,期间参考了很多大佬的博客,实在是太多了,就不一一贴出来了,感谢大佬们!
如果需要demo,请评论区留言。
