springboot整合editormd并完成完整的crud
写在前面:
本篇博客较长,主要解决的editormd的编辑,填充初始内容,文中图片居中,讲的是完整的crud。
这次的任务是展示人员。
首先集成editormd,官网文档https://pandao.github.io/editor.md/examples/index.html
下载源码并放到项目的static文件夹下
首先完成增:
前端页面speople.html如下:
<html class="x-admin-sm" lang="zh" xmlns:th="http://www.thymeleaf.org">
<head>
    <meta charset="UTF-8">
    <meta name="renderer" content="webkit">
    <meta http-equiv="X-UA-Compatible" content="IE=edge,chrome=1">
    <meta name="viewport"
          content="width=device-width,user-scalable=yes, minimum-scale=0.4, initial-scale=0.8,target-densitydpi=low-dpi"/>
    <title>后台管理测试title>
    <link th:href="@{/layui/css/layui.css}" rel="stylesheet">
    <link rel="stylesheet" th:href="@{/editormd/css/editormd.css}"/>
    <link rel="shortcut icon" href="https://pandao.github.io/editor.md/favicon.ico" type="image/x-icon"/>
head>
<body>
<div th:replace="common/SHeader::sheader">div>
<fieldset class="layui-elem-field layui-field-title" style="margin-top: 20px;">
    <legend>添加成员legend>
fieldset>

<form class="layui-form" name="mdEditorForm" th:action="@{/settings/addPeople}"  method="post" enctype="multipart/form-data">
    <div class="layui-form-item">
        <label for="name" class="layui-form-label">名字label>
        <div class="layui-input-inline">
            <input type="text" name="name" id="name" class="layui-input">
        div>
    div>
    <label for="a-pic" class="layui-form-label">上传照片label>
    <input type="file" name="picture" id="a-pic">
    <div class="layui-form-item">
        <label class="layui-form-label">类型label>
        <div class="layui-input-block">
            <input type="radio" name="type" value="S" title="学生" checked="">
            <input type="radio" name="type" value="T" title="老师">
        div>
    div>
    <div id="article-content">
        <textarea name="text" id="content" style="display:none;" > textarea>
    div>
    <div class="layui-form-item">
        <div class="layui-input-block">
            <button type="submit" class="layui-btn">添加成员button>
        div>
    div>
form>

<script th:src="@{/layui/layui.js}">script>
<script th:src="@{/editormd/examples/js/jquery.min.js}">script>
<script th:src="@{/editormd/editormd.js}">script>
<script>

    $(function () {
        testEditor = editormd("article-content", {
            width: "95%",
            height: 400,
            syncScrolling: "single",
            path: "../editormd/lib/",
            saveHTMLToTextarea: true,    // 保存 HTML 到 Textarea
            emoji: true,
            theme: "dark",//工具栏主题
            previewTheme: "dark",//预览主题
            editorTheme: "pastel-on-dark",//编辑主题
            tex: true,                   // 开启科学公式TeX语言支持,默认关闭
            flowChart: true,             // 开启流程图支持,默认关闭
            sequenceDiagram: true,       // 开启时序/序列图支持,默认关闭,
            //图片上传
            imageUpload: true,
            imageFormats: ["jpg", "jpeg", "gif", "png", "bmp", "webp"],
            imageUploadURL: "/settings/imageInText",
            onload: function () {
                console.log('onload', this);
            },
            /*指定需要显示的功能按钮*/
            toolbarIcons: function () {
                return ["undo", "redo", "|",
                    "bold", "del", "italic", "quote", "ucwords", "uppercase", "lowercase", "|",
                    "h1", "h2", "h3", "h4", "h5", "h6", "|",
                    "list-ul", "list-ol", "hr", "|",
                    "link", "reference-link", "image", "code", "preformatted-text",
                    "code-block", "table", "datetime", "emoji", "html-entities", "pagebreak", "|",
                    "goto-line", "watch", "preview", "fullscreen", "clear", "search", "|",
                    "help", "info"]
            },

            toolbarIconTexts: {
            },

            toolbarHandlers: {
            }
        });
    });

    layui.use('jquery', function () {
        var $ = layui.jquery;
    });
    //JavaScript代码区域
    layui.use('element', function () {
        var element = layui.element;
    });

    layui.use('form', function(){
        var form = layui.form; //只有执行了这一步,部分表单元素才会自动修饰成功
        form.render();
    });
script>
body>
html>
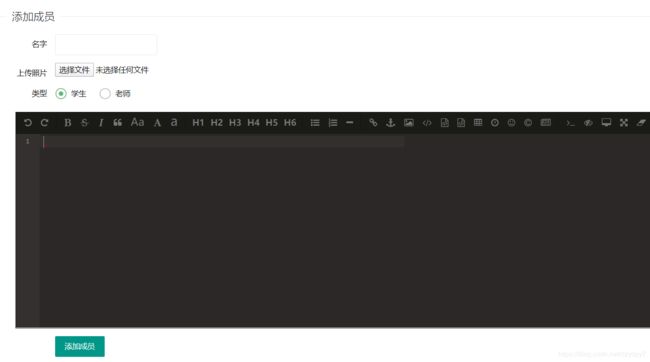
这样一个表单就做好了,包括姓名、照片、是学生还是老师,详情页的富文本,大概就是这样的:
action绑定的/settings/addPeople:
@PostMapping(value = "/addPeople")
public String addPeople(String name, MultipartFile picture, String type, String text) {
    String filename = "";
    if (!picture.isEmpty()) {
        String path = programUtils.getPicFolder();
        filename = "p-" + UUID.randomUUID().toString().replaceAll("-", "");
        File file = new File(path, filename);
        if (!file.getParentFile().exists()) {
            file.getParentFile().mkdirs();
        }
        try {
            picture.transferTo(new File(path + File.separator + filename));
        } catch (IOException e) {
            e.printStackTrace();
        }
    }
    // service 里会自动生成主键id
    peopleService.addPeople(name, filename, type, text);
    return "redirect:/LidarSet/people";
}
上传富文本中的图片所需的/settings/imageInText:
@RequestMapping("/imageInText")
@ResponseBody
public JSONObject fileUPload(@RequestParam(value = "editormd-image-file", required = true) MultipartFile file, HttpServletRequest request) throws IOException {
    String path = programUtils.getPicFolder();
    File realPath = new File(path);
    if (!realPath.exists()) {
        realPath.mkdir();
    }

    //解决文件名字问题:我们使用uuid;
    String filename = "ks-" + UUID.randomUUID().toString().replaceAll("-", "");
    //通过CommonsMultipartFile的方法直接写文件(注意这个时候)
    file.transferTo(new File(realPath + "/" + filename));

    //给editormd进行回调
    JSONObject res = new JSONObject();
    // res.put("url","/upload/"+month+"/"+ filename);
    res.put("url", "/pic/" + filename);
    res.put("success", 1);
    res.put("message", "upload success!");
    return res;
}
然后做修改和删除:
跟添加做到同一个页面,就在添加的表单后面跟个表格
<fieldset class="layui-elem-field layui-field-title" style="margin-top: 20px;">
    <legend>已有成员legend>
fieldset>

<div class="layui-form">
    <table class="layui-table">
        <thead>
        <tr>
            <td>姓名td><td>照片td><td>类型(T教师S学生)td><td>操作td>
        tr>
        thead>
        <tbody>
        <tr th:each="t: ${ts}">
            <td th:text="${t.name}">td>
            <td><img style="width: 150px; height: 200px; max-width: 300px" th:src="@{'/pic/' + ${t.picture}}" alt="tupian">td>
            <td th:text="${t.type}">td>
            <td>
                <a th:href="@{'/settings/updPeople/' + ${t.id} }">修改a>
                <a th:href="@{'/settings/delPeople/' + ${t.id} }">删除a>
            td>
        tr>
        <tr th:each="s: ${ss}">
            <td th:text="${s.name}">td>
            <td><img style="width: 150px; height: 200px; max-width: 300px" th:src="@{'/pic/' + ${s.picture}}" alt="tupian">td>
            <td th:text="${s.type}">td>
            <td>
                <a th:href="@{'/settings/updPeople/' + ${s.id} }">修改a>
                <a th:href="@{'/settings/delPeople/' + ${s.id} }">删除a>
            td>
        tr>
        tbody>
    table>
div>
页面大概是这样的:
这里使用了thymeleaf模板引擎传参,所以转向这个页面的controller如下:
@RequestMapping("/people")
public String peoplePage(Model model) {
    model.addAttribute("ts", peopleService.getAllTeacher());
    model.addAttribute("ss", peopleService.getAllStudent());
    return "speople";
}
处理表格中的修改键的controller如下:
@RequestMapping("/updPeople/{id}")
public String updPeople(@PathVariable int id, Model model) {
    People people = peopleService.getPeopleById(id);
    model.addAttribute("pp", people);
    return "speopleUpd";
}
也就是转到了另一个页面speopleUpd.html,而它的样式和添加类似,只是把原有的内容填到了输入框里,方便修改,代码如下:
<!DOCTYPE html>
<html class="x-admin-sm" lang="zh" xmlns:th="http://www.thymeleaf.org">
<head>
    <meta charset="UTF-8">
    <meta name="renderer" content="webkit">
    <meta http-equiv="X-UA-Compatible" content="IE=edge,chrome=1">
    <meta name="viewport"
          content="width=device-width,user-scalable=yes, minimum-scale=0.4, initial-scale=0.8,target-densitydpi=low-dpi"/>
    <title>后台管理测试</title>
    <link th:href="@{/layui/css/layui.css}" rel="stylesheet">
    <link rel="stylesheet" th:href="@{/editormd/css/editormd.css}"/>
    <link rel="shortcut icon" href="https://pandao.github.io/editor.md/favicon.ico" type="image/x-icon"/>
</head>
<body>
<div th:replace="common/SHeader::sheader"></div>
<fieldset class="layui-elem-field layui-field-title" style="margin-top: 20px;">
    <legend>修改成员</legend>
</fieldset>
<p style="color: red;padding-left: 20px">注:如果不需要修改照片,就不用上传照片</p>
<!--博客表单-->
<form class="layui-form" name="mdEditorForm" th:action="@{'/settings/peopleUpd/' + ${pp.id}}"  method="post" enctype="multipart/form-data">
    <div class="layui-form-item">
        <label for="name" class="layui-form-label">名字</label>
        <div class="layui-input-inline">
            <input type="text" name="name" id="name" class="layui-input" th:value="${pp.name}">
        </div>
    </div>
    <label for="a-pic" class="layui-form-label">上传照片</label>
    <input type="file" name="picture" id="a-pic">
    <div class="layui-form-item">
        <label class="layui-form-label">类型</label>
        <div class="layui-input-block">
            <input type="radio" name="type" value="S" title="学生" th:checked="${pp.type == 'S'} ? true : false">
            <input type="radio" name="type" value="T" title="老师" th:checked="${pp.type == 'T'} ? true : false">
        </div>
    </div>
    <div id="article-content">
        <textarea name="text" id="content" style="display:none;" >[[${pp.detail}]] </textarea>
    </div>
    <div class="layui-form-item">
        <div class="layui-input-block">
            <button type="submit" class="layui-btn">提交修改</button>
        </div>
    </div>
</form>

<script th:src="@{/layui/layui.js}"></script>
<script th:src="@{/editormd/examples/js/jquery.min.js}"></script>
<script th:src="@{/editormd/editormd.js}"></script>
<script>

    $(function () {
        testEditor = editormd("article-content", {
            width: "95%",
            height: 640,
            syncScrolling: "single",
            path: "../../editormd/lib/",
            saveHTMLToTextarea: true,    // 保存 HTML 到 Textarea
            emoji: true,
            theme: "dark",//工具栏主题
            previewTheme: "dark",//预览主题
            editorTheme: "pastel-on-dark",//编辑主题
            tex: true,                   // 开启科学公式TeX语言支持,默认关闭
            flowChart: true,             // 开启流程图支持,默认关闭
            sequenceDiagram: true,       // 开启时序/序列图支持,默认关闭,
            //图片上传
            imageUpload: true,
            imageFormats: ["jpg", "jpeg", "gif", "png", "bmp", "webp"],
            imageUploadURL: "/settings/imageInText",
            onload: function () {
                console.log('onload', this);
            },
            /*指定需要显示的功能按钮*/
            toolbarIcons: function () {
                return ["undo", "redo", "|",
                    "bold", "del", "italic", "quote", "ucwords", "uppercase", "lowercase", "|",
                    "h1", "h2", "h3", "h4", "h5", "h6", "|",
                    "list-ul", "list-ol", "hr", "|",
                    "link", "reference-link", "image", "code", "preformatted-text",
                    "code-block", "table", "datetime", "emoji", "html-entities", "pagebreak", "|",
                    "goto-line", "watch", "preview", "fullscreen", "clear", "search", "|",
                    "help", "info"]
            },

            toolbarIconTexts: {
            },

            /*给自定义按钮指定回调函数*/
            toolbarHandlers: {
            }
        });
    });

    layui.use('jquery', function () {
        var $ = layui.jquery;
    });
    //JavaScript代码区域
    layui.use('element', function () {
        var element = layui.element;
    });

    layui.use('form', function(){
        var form = layui.form; //只有执行了这一步,部分表单元素才会自动修饰成功
        form.render();
    });
</script>
</body>
</html>
修改的内容提交到这个controller:
@RequestMapping("/peopleUpd/{id}")
public String peopleUdp(@PathVariable int id, String name, MultipartFile picture, String type, String text) {
    String filename = null;
    if (!picture.isEmpty()) {
        String path = programUtils.getPicFolder();
        filename = "p-" + UUID.randomUUID().toString().replaceAll("-", "");
        File file = new File(path, filename);
        if (!file.getParentFile().exists()) {
            file.getParentFile().mkdirs();
        }
        try {
            picture.transferTo(new File(path + File.separator + filename));
        } catch (IOException e) {
            e.printStackTrace();
        }
    }
    People p = new People();
    p.setId(id);
    p.setName(name);
    p.setPicture(filename);
    p.setType(type);
    p.setDetail(text);
    peopleService.updatePeopleById(p);
    return "redirect:/LidarSet/people";
}
这样修改就完成了。
然后做删除,删除就简单多了,按照id删除就行了,这里就不说了。
至此,后台管理页面就完成了,然后我们要把这些内容呈现给用户,首先使用layui的卡片面板显示照片和姓名,people.html如下:
<html lang="en" xmlns:th="http://www.thymeleaf.org">
<head>
    <meta charset="UTF-8">
    <meta name="viewport" content="width=device-width, initial-scale=1, maximum-scale=1">
    <title>测试页面title>
    <link th:href="@{/layui/css/layui.css}" rel="stylesheet">
    <link th:href="@{/styles/headerStyle.css}" rel="stylesheet" media="screen and (min-width: 1180px)">
    <link th:href="@{/styles/headerMobile.css}" rel="stylesheet" media="screen and (max-width: 1179px)">
head>
<body>
<div th:replace="common/header::header">div>
<h1 align="center" style="padding-top: 60px">peopleh1>

<fieldset class="layui-elem-field layui-field-title" style="margin-top: 20px;text-align: center">
    <legend>老师legend>
fieldset>

<div style="padding: 20px; background-color: #fcfcfc;">
    <div class="layui-row layui-col-space15">
        <div class="layui-col-md3" th:each="teacher :${teachers}">
            <a th:href="@{'/LidarLab/people/' + ${teacher.id}}">
                <div class="layui-card">
                    <div class="layui-card-body" style="text-align: center">
                        <div align="center" class="stu-photo" style="width: 90%; margin: 0 auto; padding: 0;">
                            <img th:src="@{'/pic/' + ${teacher.picture}}" style="width: 100%; height: 100%">
                        div>
                    div>
                    <div class="layui-card-header">
                        <p th:text='${teacher.name}' style="text-align: center">p>
                    div>
                div>
            a>
        div>
    div>
div>

<fieldset class="layui-elem-field layui-field-title" style="margin-top: 20px;text-align: center">
    <legend>学生legend>
fieldset>
<div style="padding: 20px; background-color: #fcfcfc;">
    <div class="layui-row layui-col-space15">

        <div class="layui-col-md3" th:each="student :${students}">
            <a th:href="@{'/LidarLab/people/' + ${student.id}}">
                <div class="layui-card">
                    <div class="layui-card-body" style="text-align: center">
                        <div align="center" class="stu-photo" style="width: 90%; margin: 0 auto; padding: 0;">
                            <img th:src="@{'/pic/' + ${student.picture}}" style="width: 100%; height: 100%">
                        div>
                    div>
                    <div class="layui-card-header">
                        <p th:text='${student.name}' style="text-align: center">p>
                    div>
                div>
            a>
        div>

    div>
div>
<script th:src="@{/layui/layui.js}">script>
<script>
    layui.use('jquery', function () {
        var $ = layui.jquery;
        $(".stu-photo").css("height", $(".stu-photo").width() * 4 / 3 + 'px');
        console.log($("img").width() + 'px');
        console.log($("img").height() + 'px');
    });
    //JavaScript代码区域
    layui.use('element', function () {
        var element = layui.element;
    });
script>
body>
html>
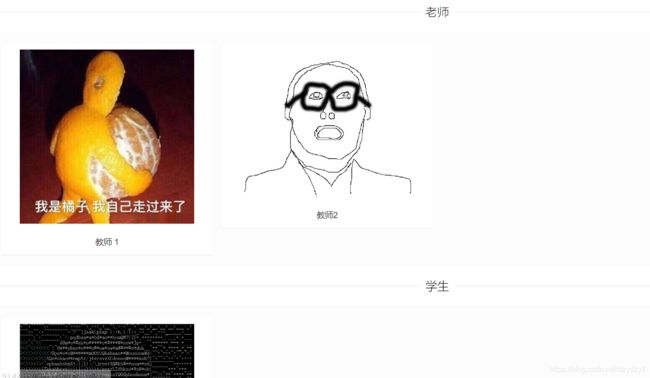
效果大概是这样的:
转到这个页面的controller如下:
@RequestMapping("/people")
public String peoplePage(Model model) {
    model.addAttribute("teachers", peopleService.getAllTeacher());
    model.addAttribute("students", peopleService.getAllStudent());
    return "people";
}
点击卡片,显示详情页的controller代码如下:
@RequestMapping("/people/{id}")
public String peopleDetail(@PathVariable("id") int id, Model model) {
    People people = peopleService.getPeopleById(id);
    model.addAttribute("people", people);
    return "peopleDetail";
}
详情页peopleDetail.html的前端代码如下:
<html lang="en" xmlns:th="http://www.thymeleaf.org">
<head>
    <meta charset="UTF-8">
    <meta name="viewport" content="width=device-width, initial-scale=1, maximum-scale=1">
    <title th:text="${people.name}">title>
    <link th:href="@{/layui/css/layui.css}" rel="stylesheet">
    <link th:href="@{/styles/headerStyle.css}" rel="stylesheet" media="screen and (min-width: 1180px)">
    <link th:href="@{/styles/headerMobile.css}" rel="stylesheet" media="screen and (max-width: 1179px)">
    <link rel="stylesheet" th:href="@{/editormd/css/editormd.preview.css}" />
head>
<body>
<div th:replace="common/header::header">div>
<h1 align="center" style="padding-top: 60px" th:text="${people.name}">h1>

<div>

    <div id="doc-content">
        <textarea style="display:none;" placeholder="markdown" th:text="${people.detail}">textarea>
    div>
div>

<script th:src="@{/layui/layui.js}">script>
<script th:src="@{/editormd/examples/js/jquery.min.js}">script>
<script th:src="@{/editormd/lib/marked.min.js}">script>
<script th:src="@{/editormd/lib/prettify.min.js}">script>
<script th:src="@{/editormd/lib/raphael.min.js}">script>
<script th:src="@{/editormd/lib/underscore.min.js}">script>
<script th:src="@{/editormd/lib/sequence-diagram.min.js}">script>
<script th:src="@{/editormd/lib/flowchart.min.js}">script>
<script th:src="@{/editormd/lib/jquery.flowchart.min.js}">script>
<script th:src="@{/editormd/editormd.js}">script>
<script>
    layui.use('jquery',function() {
        var $= layui.jquery;
        var testEditor;
        $(function () {
            testEditor = editormd.markdownToHTML("doc-content", {//注意:这里是上面DIV的id
                htmlDecode: "style,script,iframe",
                emoji: true,
                taskList: true,
                tocm: true,
                tex: true, // 默认不解析
                flowChart: true, // 默认不解析
                sequenceDiagram: true, // 默认不解析
                codeFold: true
            });
        });

        $("#doc-content").css("width", "80%").css("padding-left", "10%");

        $(function () {
            $("#doc-content").find("img").each(function () {
                $(this).css("max-width", "60%");
                // 这一句使得图片居中,editormd本身没有居中功能
                $(this).wrap("");
            });
        })
    });
    //JavaScript代码区域
    layui.use('element', function() {
        var element = layui.element;
    });
script>
body>
html>
显示出来的正文中的图片就是居中显示的:
这样完整的关于editormd的crud就做好了~


