Android查找未用类和方法
在Android中每个dex都有65535的限制,为了解决这个限制,可以采用自动拆包技术或手动拆包技术。但是由于DVM LinearAlloc的限制,在5.0以下的系统中最多只能使用4个dex,而5.0及以上系统可以使用任意数量的dex。如果老板不忍心放弃4.X的系统,且当该APP足够大的时候,就会出现方法数天花板的问题。新的功能需求因为方法数超限,导致无法进版,这个时候就只能强逼各个业务线精简代码了。
精简代码包括删除未用的方法和精简业务代码。精简业务代码需要产品确定,不属于本文研究的技术内容,本文的内容主要是针对代码中未用的方法。开发过程中由于业务变化频繁,一定会存在某些类或者方法不被使用的情况,虽然这些代码在release阶段因为混淆而删除,但是debug阶段通常不做混淆处理,很有可能导致debug包无法编译。在开发过程中,可以使用lint精简资源文件,可是并没有找到精简方法的工具。
精简代码最笨的方法就是依次打开每个类,利用AS中将未用方法置灰的特性,删除每个类中置灰的方法。该方式存在以下几个问题:
- 工作量大。人工遍历每个类,且去肉眼查看每个方法,是个十足的力气活,很容易存在漏网之鱼。处理这种工作,我们最不应该相信的就是人。
- AS的置灰功能也存在bug。当一个APP的方法数够多的时候,AS并不会置灰所有的未用方法。
- AS检查未用方法的机制存在漏洞。当一个未用的方法functionA调用functionB(仅被functionA调用)时,functionA被置灰,但是functionB因为被functionA调用,而不会被置灰。有人也许会说,删除了functionA,functionB不就置灰了吗。如果这两个方法在一个类中,这比较容易发现,但如果functionB属于另外一个存放位置靠前的类时,那么就比较难的发现了,除非再往前查看该类。
鉴于上面的问题,首先排除了人工处理,积极寻找一种自动化的解决方案。要实现自动化寻找,有两个问题必须要解决:
- 如何确定整个APP所用到的类和方法集合:{ALL}
- 如何确定哪些类和方法真正被使用了:{USED}
{ALL} - {USED}即为我们需要删除的类和方法。接下来就分别解决这两个问题。
寻找APP用到的所有类和方法
遍历类不仅仅要遍历所有的外部类,还需要遍历所有的内部类、局部类以及这些类所定义的方法。如果通过直接分析.java文件,会非常困难,因为类、方法定义的规范,格式千奇百怪,无法做到统一。我们要做的插件要适应各种业务,各种APP,这就要求不能从源码上直接入手。源码上不行,那就只能依赖编译器了。为了实现这个功能,我们想到了之前解决后台跑CPU的解决方案:为每个方法注入log日志,打印出该方法所属类、名称、执行时间、执行线程等信息。这个方案的前提就是遍历所有的类和方法,说到这,大家也许就想到了,使用javassist。在生成class文件之后,通过javassist遍历每个class,并利用getDeclaredMethods得到每个类的method,最终生成{ALL}。为了能更方便使用,我们使用了gradle plugin方式实现,在使用时,只需要一条命令即可得到我们想要的结果。
寻找APP中真正使用的类和方法
文中开始提到,gradle proguard功能通常在release过程中删除未用的类和方法,那么一个方法就是直接在proguard代码中修改,将未用的类和方法整理出来。该方案的前提是熟知proguard处理流程和原理,修改完成之后,再应用到gradle中。这个方案难度较大,消耗时间较长。除了这个方案,有个混淆的常识:release包在混淆之后会在build/outputs/mapping/release中生成一个mapping文件,该文件保存了混淆类、字段和方法的前后对照表,crash解析等都会使用这个文件进行反解析。我们是否可以利用这个表来判断呢。首先我们看看mapping的文件格式:
com.abstractclass.AbstractClass -> com.a.a:
    void () ->
    void doHandler() -> a
com.abstractclass.ITestInterface -> com.a.b:
    void onTestInterface() -> a
com.abstractclass.RealClass -> com.a.c:
    com.abstractclass.ITestInterface mTestInterface -> a
    void () ->
    void doAbstractHandler() -> b
    void doSelfHandler() -> c
    void setTestInterface(com.abstractclass.ITestInterface) -> a
com.abstractclass.TestBean -> com.a.d:
    int a -> a
    void () ->
    void setA(int) -> a
    int getA() -> a
里面有类的fullPath和方法信息,其中包含方法的返回类型、参数。very good。所以最终采用的方案是先编译一次release包,得到mapping文件,通过解析mapping文件,得到该文件中所有的类和方法。
全量类和方法遍历的实现
Android gradle为了让开发者对class做动态操作,允许我们在dex之前自定义Transform对class文件进行修改,现在大部分开发框架使用的动态处理都是采用自定义Transform来实现。具体如何自定义Transform,本文不做讲述,请各位移至https://blog.csdn.net/tscyds/article/details/78082861。
首先,自定义一个Transform:NoUsedMethodTransform,下面贴出关键代码。
 @Override
    void transform(Context context, Collection inputs, Collection referencedInputs, TransformOutputProvider outputProvider, boolean isIncremental) throws IOException, TransformException, InterruptedException {
        println 'noUsedMethod transform begin >>>.'
        mMethodUsedCheck = new MethodUsedCheck(mCheckMethodUsedExension, project);
        initInjectClassPath();
        inputs.each { TransformInput input ->

            input.directoryInputs.each { DirectoryInput directoryInput ->
                int[] resultCount = mMethodUsedCheck.checkDir(directoryInput.file.absolutePath)
                mNotUsedClassCount += resultCount[0]
                mNotUsedMethodCount += resultCount[1]
            }
        }
        println("Not used class count = " + mNotUsedClassCount)
        println("Not used method count = " + mNotUsedMethodCount)
        mMethodUsedCheck.saveTotalCount(mNotUsedClassCount, mNotUsedMethodCount)
        throw new RuntimeException("check method end successfully")
    }
mMethodUsedCheck = new MethodUsedCheck(mCheckMethodUsedExension, project);这句中MethodUsedCheck是我们查找无用类和方法的工作类,该类代码会在后面讲解, mCheckMethodUsedExension是定义的一些属性值,帮助我们适配各种情况。
initInjectClassPath();这句是为了将APP所依赖的各种jar包都加入到classpool中,如果不做此处理,会在使用javassist时抛出类无用找到的异常信息。该方法的详细代码如下:
    private void initInjectClassPath () {
        project.android.bootClasspath.each {
            mMethodUsedCheck.addClassPath((String) it.absolutePath);
        }

        //加入res modules下的依赖jar包
        File dir = project.file("../res/noexportlibs")
        if (dir != null && dir.isDirectory()) {
            dir.eachFileRecurse { File file ->
                String filePath = file.absolutePath;
                if (filePath.endsWith(".jar")) {
                    mMethodUsedCheck.addClassPath(filePath);
                }
            }
        }

        //加入本工程下的依赖jar包
        File localDir = project.file("exlibs");
        if (localDir != null && localDir.isDirectory()) {
            localDir.eachFileRecurse { File file ->
                String filePath = file.absolutePath;
                if (filePath.endsWith(".jar")) {
                    mMethodUsedCheck.addClassPath(filePath);
                }
            }
        }
        //加入其它工程的jar包
        File otherModuleDir = project.file("build/intermediates/exploded-aar");
        if (otherModuleDir != null && otherModuleDir.isDirectory()) {
            otherModuleDir.eachFileRecurse { File file ->
                String filePath = file.absolutePath;
                if (filePath.endsWith(".jar")) {
                    mMethodUsedCheck.addClassPath(filePath);
                }
            }
        }
    }
以上的代码包括本地依赖的jar包和依赖的第三方aar。注:这个不同的app使用不一样,不能copy使用。
inputs.each { TransformInput input ->
            input.directoryInputs.each { DirectoryInput directoryInput ->
                int[] resultCount = mMethodUsedCheck.checkDir(directoryInput.file.absolutePath)
                mNotUsedClassCount += resultCount[0]
                mNotUsedMethodCount += resultCount[1]
            }
        }
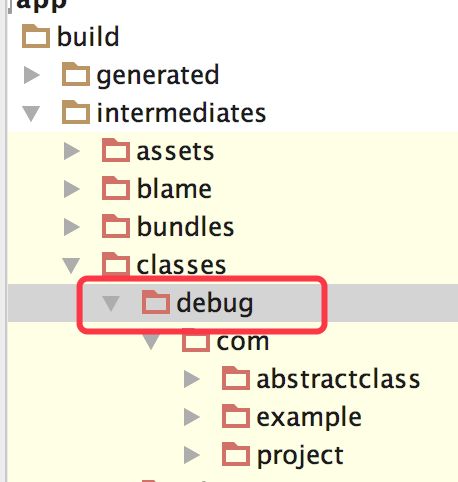
这句是遍历所有的class的所属文件夹,是查找的入口,对应的方法是mMethodUsedCheck.checkDir。由于所依赖的第三方jar包或aar包,无需处理,所以仅仅对class文件处理。directoryInput对应的文件夹为下图红色标记的debug路径。
mMethodUsedCheck.saveTotalCount(mNotUsedClassCount, mNotUsedMethodCount)throw new RuntimeException("check method end successfully")
该transform的目的是为了查找无用类和方法,并不是为了编译apk,执行完毕后,无需继续执行,所以使用了throw exception来终止操作。
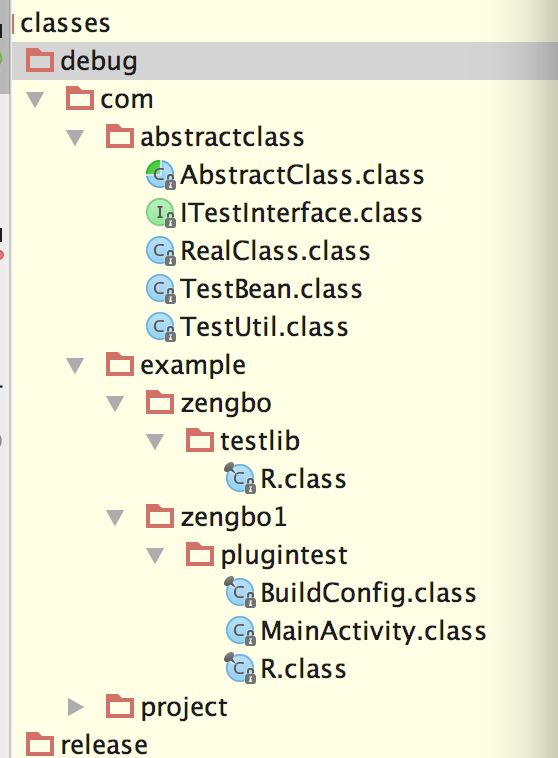
接下来我们分析mMethodUsedCheck.checkDir的实现。前面的截图知道APP中的源码在编译完成之后,所有class都存放在build/intermediates/classes/debug(release)中。
那么遍历class,只需要对debug下所有的class文件进行分析即可。
 public int[] checkDir(String path) {
        println("checkDir begin path = " + path)
        int[] resultCount = new int[2];
        pool.appendClassPath(path);
        File dir = new File(path)
        String className, methodName;
        if (dir.isDirectory()) {
            dir.eachFileRecurse { File file ->
                String filePath = file.absolutePath
                if (filePath.endsWith(SdkConstants.DOT_CLASS)) {
                    // 判断当前目录是否是在我们的应用包里面
                    className = filePath.substring(path.length() + 1, filePath.length() - SdkConstants.DOT_CLASS.length()).replaceAll(Matcher.quoteReplacement(File.separator), '.')
                    //println("className = " + className)
                    CtClass c = pool.getCtClass(className)
                    if (!isQualifiedClass(c)) {
                        return;
                    }
                    if (ReadMapping.getInstance().classHasNoUsed(className)) {
                        println("No used className = " + className)
                        resultCount[0]++;
                        FileUtil.writeFile(mResultFile, "ClassNotUsed:" + className + "\r\n")
                        return;
                    }
                    CtMethod[] methods = c.getDeclaredMethods();
                    for (CtMethod m : methods) {
                        if (!isQualifiedMethod(m)) {
                            continue;
                        }
                        methodName = getJavaMethodSignureWithReturnType(m)
                        //println("method " + className + "." + methodName)
                        if (ReadMapping.getInstance().methodHasNoUsed(className, methodName)) {
                            println("No used method " + className + "." + methodName)
                            FileUtil.writeFile(mResultFile, "MethodNotUsed:" + className + "[" + methodName + "]\r\n")
                            resultCount[1]++;
                            continue;
                        }
                    }
                }
            }
        }
        return resultCount;
    }
使用dir.eachFIleRecurse遍历debug下的所有文件,如果文件后缀为.class,则找出该类对应的full路径,比如com.example.zengbo1.plugintest.MainActivity,利用javassist的classpool加载出该类的信息pool.getCtClass(className)。在Android生成的类中,有很多R.class和BuildConfig.class,这些类是没有必要检测的,可以略过,详细处理请见isQualifiedClass方法。
private boolean isQualifiedClass(CtClass ctClass) {
        String className = ctClass.name;
        if (className.endsWith('R')
                || className.contains('R$')
                || className.endsWith('BuildConfig')) {
            return false;
        }
        return true;
}
我们先略过该类被使用的判断逻辑,先看如何遍历该类中的所有的方法:c.getDeclaredMethods()得到CtMethod类型的数组methods。通过for循环遍历methods,判断该method是否被使用。
统计无用类和方法
统计无用的类和方法,换句话说就是统计真实用到的类和方法。前面本文已经讲过,本文的方案是解析mapping文件,得到这些真实用到的类和方法。当遍历类和方法时,如果相关类和方法不在这个真实存在的集合中,则认为该类或者方法未被使用。所以前提是如何解析mapping。
Mapping文件解析
这里我们要感谢美团Robust团队,在平时使用美团热更新框架Robust时,里面包含了mapping文件的解析方案。我们先熟悉一个model类:
public class ClassMapping {
    //method 存储的信息有:返回值,方法名,参数列表,混淆后的名字
    //字段 存储的信息有:字段名,混淆后的名字

    private String className;
    private String valueName;
    private Map memberMapping = new HashMap<>();
}
其中className是混淆前的类全路径,valueName是混淆后的类全路径, memberMapping中存放的是字段和方法的混淆前后信息。
接着重点分析mapping解析关键程序
 int methodCount = 0;
        try {
            is = new FileInputStream(mappingFilePath);
            BufferedReader reader = new BufferedReader(new InputStreamReader(is, "UTF-8"), 1024);
            // 读取一行,存储于字符串列表中
            line = reader.readLine().trim();
            while (line != null) {
                line = line.trim();
                if (!needBacktrace) {
                    line = reader.readLine();
                    if (line == null) {
                        break;
                    }
                    line = line.trim();
                }
                needBacktrace = false;
                if (line.indexOf("->") > 0 && line.indexOf(":") == line.length() - 1) {
                    ClassMapping classMapping = new ClassMapping();
                    className = line.substring(0, line.indexOf("->") - 1).trim();
                    System.out.println("className:" + className);
                    classMapping.setClassName(className);
                    classMapping.setValueName(line.split("->")[1].substring(0, line.split("->")[1].length() - 1).trim());
                    line = reader.readLine();
                    while (line != null) {
                        line = line.trim();
                        if (line.endsWith(":")) {
                            needBacktrace = true;
                            break;
                        }
                        String[] lineinfo = line.split(" ");
                        if (lineinfo.length != 4) {
                            throw new RuntimeException("mapping line info is error  " + line);
                        }
                        if (lineinfo[1].contains("(") && lineinfo[1].contains(")")) {
                            //methods need return type
                            String strReturnType = lineinfo[0].trim();
                            methodName = getMethodSigureWithReturnTypeInMapping(strReturnType, lineinfo[1].trim());
                            //System.out.println("mapping methodName = " + methodName);
                            methodCount++;
                            classMapping.getMemberMapping().put(methodName, lineinfo[3].trim());
                        }
//                      else {
//                            //fields
//                            classMapping.getMemberMapping().put(lineinfo[1].trim(), lineinfo[3].trim());
//                        }
                        line = reader.readLine();
                        if (line == null) {
                            break;
                        }
                        line = line.trim();
                    }
usedClassMappingInfo.put(classMapping.getClassName(), classMapping); }首先使用FileReader按行读取mapping文件。打开mapping文件会发现一个规律,那就是所有类名混淆信息行都会以:结尾,字段和方法混淆的行中就没有,因此,我们可以通过->和:来判断该行是否为类信息行。然后按->进行split,拿到前面原始的类名路径,放到新创建的classMapping中。所有创建的classMapping会放到usedClassMappingInfo中。
private Map usedClassMappingInfo = new HashMap(); 得到一个类的类名信息后,在获取另外一个类之前,解析该类下面的字段和方法信息。我们的目的是为了检查未用方法,所以忽略对字段的解析。因为方法一定会带有(),所以如果行内容包含(),那么我们就可以认为这是方法行,就可以通过->和空格进行分割解析了。
  /***
     * @param returnTypeWithNumber
     * @param methodSignure
     * @return returnType+" "+methodSignure,just one blank
     */

    public String getMethodSigureWithReturnTypeInMapping(String returnTypeWithNumber, String methodSignure) {
        //初步观察mapping文件,使用":"来截取返回值,还可以通过寻找第一个字符,
        return getMethodSignureWithReturnType(returnTypeWithNumber.substring(returnTypeWithNumber.lastIndexOf(":") + 1), methodSignure);
    }

    public String getMethodSignureWithReturnType(String returnType, String methodSignure) {
        //只有一个空格
        return returnType + " " + methodSignure;
    }
通过getMethodSigureWithReturnTypeInMapping方法得到方法信息,当做key存放在classMapping的memberMapping中。文件遍历完成之后,所有用到的类都存放在usedClassMappingInfo中,所有类使用的方法,都放在该类对应的classMapping中的memberMapping中。这样很容易就能联想到如果usedClassMappingInfo.get(className)==null,则该类无用。若memberMapping.get(methodName) == null,则该方法无用。
我们再回到mMethodUsedCheck.checkDir()的解析代码中,回顾判断类是否使用的代码。
if (ReadMapping.getInstance().classHasNoUsed(className)) {
      println("No used className = " + className)
      resultCount[0]++;
      FileUtil.writeFile(mResultFile, "ClassNotUsed:" + className + "\r\n")
      return;
}
ReadMapping.classHasNoUsed方法定义如下:
    public boolean classHasNoUsed(String className) {
        ClassMapping classMapping = getClassMapping(className);
        if (classMapping == null) {
            return true;
        }
        return false;
    }
判断方法是否使用的逻辑:
for (CtMethod m : methods) {
    if (!isQualifiedMethod(m)) {
         continue;
    }
    methodName = getJavaMethodSignureWithReturnType(m)
    //println("method " + className + "." + methodName)
    if (ReadMapping.getInstance().methodHasNoUsed(className, methodName)) {
          println("No used method " + className + "." + methodName)
          FileUtil.writeFile(mResultFile, "MethodNotUsed:" + className + "[" + methodName + "]\r\n")
          resultCount[1]++;
          continue;
     }
 }
首先根据CtMethod获取该方法的签名信息,获取的格式一定要和解析mapping的格式一样,否则无法正常判断。getJavaMethodSignureWithReturnType方法定义如下:
    private String getJavaMethodSignureWithReturnType(CtMethod ctMethod) {
        StringBuilder methodSignure = new StringBuilder();
        methodSignure.append(ctMethod.returnType.name)
        methodSignure.append(" ")
        methodSignure.append(ctMethod.name);
        methodSignure.append("(");
        for (int i = 0; i < ctMethod.getParameterTypes().length; i++) {
            methodSignure.append(ctMethod.getParameterTypes()[i].getName());
            if (i != ctMethod.getParameterTypes().length - 1) {
                methodSignure.append(",");
            }
        }
        methodSignure.append(")")
        return methodSignure.toString();
    }
并不是所有的方法都需要检验,比如一些合成方法。
    private boolean isQualifiedMethod(CtBehavior ctBehavior) {
        // synthetic 方法暂时不aop 比如AsyncTask 会生成一些同名 synthetic方法,对synthetic 以及private的方法也插入的代码,主要是针对lambda表达式
        if ((ctBehavior.getModifiers() & AccessFlag.SYNTHETIC) != 0 && !AccessFlag.isPrivate(ctBehavior.getModifiers())) {
            return false;
        }
        return true;
    }
通过ReadMapping.methodNotUsed()方法判断该方法是否未被使用,实现如下:
    public boolean methodHasNoUsed(String className, String methodName) {
        ClassMapping classMapping = getClassMapping(className);
        if (classMapping == null) {
            return true;
        }
        if (classMapping.getMemberMapping().get(methodName) == null) {
            return true;
        }
        return false;
    }
每得到一个无用的类,都会将信息保存到文件中。当然也可以先将结果保存在内存中,最后一次性保存到文件中。最终文件内容如下:
插件使用
插件原理已经讲述完毕,由于gradle版本不一或者各APP混淆方式不同,mapping存放的路径也可能不一样,为了避免每次都通过修改代码来完善,插件也支持使用扩展属性来自定义mapping文件路径和输出路径:
checkMethodUsedExtension {
    mappingFilePath = project.buildDir.getAbsolutePath() + "/outputs/mapping/release/mapping.txt"
    outFilePath = rootProject.rootDir.getAbsolutePath() + "/NotUsedMethod.txt"
}
正常编译中通常不需要统计未用类和方法,所以通过配置属性决定是否调用该Transform。首先在APP工程目录下的gradle.properties文件中增加:
checkMethodNotUsed=true 插件中实现如下:
 if (assembleTask.isDebug) {
            def android = project.extensions.findByType(AppExtension)
            boolean checkNotUsedMethod = Boolean.parseBoolean(project.properties.get("checkMethodNotUsed"))
            if (checkNotUsedMethod) {
                android.registerTransform(new NoUsedMethodTransform(project, project.checkMethodUsedExtension))
            }
}
结语
该方案基于Android混淆结果,利用Javassist在编译过程中遍历所有的class和对应的method,得到未用的类和方法。该方案的效果完全基于混淆的设置。如果在混淆文件中keep了较多的代码,那么该方案效果就不会明显。所以在使用时,一定要注意混淆规则的设定。由于存在反射、JS反调,JNI反调等机制,在删除代码之前一定要确认这些方法是否可以真正被删除。
好了,文章终于写完了。源码已经上传至https://github.com/hanzengbo/plugindemo,该功能不仅仅包含本次提到的统计未用类和方法功能,也包含了本文提到的日志注入功能,后期该库还会不断的加入其它功能,争取成为一个学习gradle plugin的好实例。


