IDEA下创建Springboot,thymeleaf,Mybatis,Postgresql,Gradle项目
最近Springboot框架越来越流行,因为集成了tomcat,可以直接打成jar包,方便部署,又可以完全摒弃配置文件,很适用于现在流行的微服务。下面让我们来完成Springboot项目的搭建。
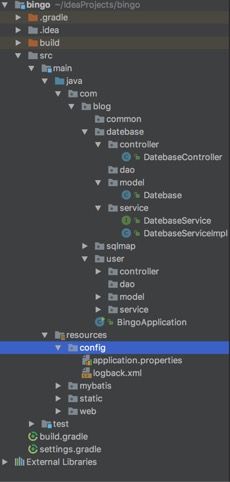
1、目录结构
2、gradle文件
下载相应的jar包
group 'bingo'
version '1.0.0'

apply plugin: 'java'

repositories {
    mavenCentral()
}

buildscript {
    ext {
        springBootVersion = '1.4.1.RELEASE'
    }
    repositories {
        mavenCentral()
    }
    dependencies {
        classpath("org.springframework.boot:spring-boot-gradle-plugin:${springBootVersion}")
    }
}

apply plugin: 'spring-boot'

jar {
    baseName = 'bingo'
    version = '1.0.0'
}
sourceCompatibility = 1.8
targetCompatibility = 1.8

repositories {
    mavenCentral()
}

dependencies {
    compile('org.springframework.boot:spring-boot-devtools')
    compile('org.springframework.boot:spring-boot-starter-thymeleaf')
    compile('org.springframework.boot:spring-boot-starter-web')
    compile('org.springframework.boot:spring-boot-starter-aop')
    compile('org.springframework.boot:spring-boot-starter-cache')
    compile('org.mybatis.spring.boot:mybatis-spring-boot-starter:1.1.1')
    compile('org.postgresql:postgresql:9.4.1212.jre7')
    testCompile('org.springframework.boot:spring-boot-starter-test')
}

task wrapper(type: Wrapper) {
    gradleVersion = '2.12'
}
3、BingoApplication启动文件
整个Springboot项目由此class中的main程序启动,由@SpringBootApplication完成对项目初始化的bean创建。其中mybatis首先需要由mybatis-spring jar中的sqlSessionFactoryBean生成SqlSessionFactory,然后再配置dateSource。最后由@MapperScan注解完成对dao的bean的生成
@SpringBootApplication
@MapperScan("com.blog.sqlmap")
public class BingoApplication {

    public static void main(String[] args) {
        new SpringApplicationBuilder().bannerMode(Banner.Mode.OFF);
        SpringApplication application = new SpringApplication(BingoApplication.class);
        application.setBannerMode(Banner.Mode.OFF);
        application.run(args);
    }

    @Bean
    @ConfigurationProperties(prefix = "spring.datasource")
    public DataSource dataSource() {
        return new org.apache.tomcat.jdbc.pool.DataSource();
    }

    @Bean
    public SqlSessionFactory sqlSessionFactoryBean() throws Exception {
        SqlSessionFactoryBean sqlSessionFactoryBean = new SqlSessionFactoryBean();
        sqlSessionFactoryBean.setDataSource(dataSource());
        PathMatchingResourcePatternResolver resolver = new PathMatchingResourcePatternResolver();
        sqlSessionFactoryBean.setMapperLocations(resolver.getResources("classpath:/mybatis/*.xml"));
        return sqlSessionFactoryBean.getObject();
    }

    @Bean
    public PlatformTransactionManager transactionManager() {
        return new DataSourceTransactionManager(dataSource());
    }
}
4、application.properties配置文件
配置了关于thymeleaf的配置和postgresql数据库连接dataSource的配置。
server.session-timeout= -1
server.tomcat.uri-encoding = UTF-8

# THYMELEAF (ThymeleafAutoConfiguration)
spring.thymeleaf.prefix=classpath:/web/
spring.thymeleaf.suffix=.html
spring.thymeleaf.mode=HTML5
spring.thymeleaf.encoding=UTF-8
spring.thymeleaf.content-type=text/html
spring.thymeleaf.cache=true

spring.mvc.favicon.enabled = false


spring.datasource.url = jdbc:postgresql://localhost/postgres
spring.datasource.username = postgres
spring.datasource.password = root
spring.datasource.driver-class-name=org.postgresql.Driver
5、Controller,server,dao,及sqlmap
dao层只需要定义一个接口,由BingoApplication中的注解@MapperScan(“com.blog.sqlmap”)完成dao bean的创建。
@RequestMapping("/datebase")
@Controller
public class DatebaseController {

    @Autowired
    private DatebaseService datebaseService;

    @RequestMapping("/page")
    public ModelAndView page(){
        List datebaseList =  datebaseService.findDatebaseList();
        ModelAndView mav = new ModelAndView("/datebase/datebase1");
        mav.addObject("test",datebaseList.get(0));
        return mav;
    }

public interface DatebaseService {
    List findDatebaseList();
}

@Service
public class DatebaseServiceImpl implements DatebaseService{

    @Autowired
    private DatebaseDao datebaseDao;

    @Override
    public List findDatebaseList() {
        return datebaseDao.findDatebaseList();
    }
}

public interface DatebaseDao {

    List findDatebaseList();
}

"1.0" encoding="UTF-8" ?>
"-//mybatis.org//DTD Mapper 3.0//EN" "http://mybatis.org/dtd/mybatis-3-mapper.dtd" >
"com.blog.sqlmap.DatebaseDao" >

    <select id="findDatebaseList" resultType="com.blog.datebase.model.Datebase">
        select * from datebase
    select>
6、datebase1 HTML页面
thymeleaf中用标签th:text=”${…}”或者 th:value=”{…}”来接受后台传出来的数据,这样就会展示从后台传过来的text对象。
<html xmlns="http://www.w3.org/1999/xhtml"
      xmlns:th="http://www.thymeleaf.org">
<meta charset="utf-8"/>

<div th:fragment="header">
    <link rel="stylesheet" href="/css/common/init.css" type="text/css"/>
    <link rel="stylesheet" href="/css/common/common.css" type="text/css"/>

    <div class="log" th:text="${test.username}">登录div>
div>
html>
现在呢,我们的Springboot项目已经完成,也已经能够跑起来了。截图呢,我也不贴了,也就是一个字段而已。
关于mybatis,目前在学习源码,以后会写几篇关于mybatis源码的博文。
如果你觉得有什么可以改进的地方,请不要吝啬你的手指,给我留言吧。
推荐一个影视公众号,感兴趣的童鞋可以顺便关注下~

