iOS 开发问与答(56-84)
56. iOS 9 以后的 Push 通知注册(swift 1)
57.如何创建一个纯色构成的背景图片,并用于设置按钮的背景色?
58. 按钮的倒计时效果
59. 如何单独安装指定的 pod?
60. 如何让两个字符串宏连接成新的字符串?
61. 如何在扩展或 Category 中定义存储属性
62. 巧妙解决 this application is modifying the autolayout engine from a background 问题
63. WebKit 报错”TypeError: null is not an object (evaluating ‘window.webkit.messageHandlers’)”
64. Swift 1.2 编译错误“performselector methods are unavailable”
65. NSPredicate 语法错误“’Unable to parse the format string “self not in %@”’”
66. evaluateJavaScript 总是报错“Error Domain=WKErrorDomain Code=4 “A JavaScript exception occurred””
67. snapkit 如何修改一个 Constraint?
68. Swift 中如何截取字符串?
69. 如何读取字符串中的数字?
70. 将 Imageview 设置为 AspectFit 后,如何知道其中 Image 的 Frame?
71. 在 Swift 中,如何反射类的所有属性
72. 在 UIWebView 中调用 javascript 方法 alert 会导致 UI 假死?
73. swift 中的预定义宏
74. 如何一次性添加一个 Dictionary 到另一个 Dictionary(swift1.2)?
75. 如何用 Safari 调试运行在 iOS 上的 webview app?
76.如何在 viewDidLoad 中获得视图的真实 frame(使用自动布局)?
77. char/Int/String 互转
78. 如何向 SwiftyJson 中添加一个 JSON?
79. SwiftyJson 复制、修改、插入综合运用
80.Source Control 报错:Xcode source control unable to index file xxxx.framework/headers
81.如何修改 table view 的 index bar 的颜色?
82.如何在上传图片时对图片进行压缩并将图片文件大小限制一定大小?
83. 如何定制 SearchBar ?
84. 自定义 segue 错误:Could not find a segue class named ‘CustomSegueClass’
56. iOS 9 以后的 Push 通知注册(swift 1)
let ver = (UIDevice.currentDevice().systemVersion as NSString).floatValue

        if application.respondsToSelector("registerUserNotificationSettings:") {
            if ver >= 8 {
                let types:UIUserNotificationType = (.Alert | .Badge | .Sound)
                let settings:UIUserNotificationSettings = UIUserNotificationSettings(forTypes: types, categories: nil)
                application.registerUserNotificationSettings(settings)
                application.registerForRemoteNotifications()
            } else {
                application.registerForRemoteNotificationTypes(.Alert | .Badge | .Sound)
            }
        }
        else {
            // Register for Push Notifications before iOS 8
            application.registerForRemoteNotificationTypes((.Alert | .Badge | .Sound))
        }
返回目录
57.如何创建一个纯色构成的背景图片,并用于设置按钮的背景色?
你可以设置按钮的背景色,通过 UIButton 的 setBackgroundColor 方法。缺点是这个方法不像 setBackgroundImage 一样有 forState 参数。因此我们无法根据按钮的 state 改变背景色。因此,我们可以先用某个颜色创建一张纯色的位图,然后用 setBackgroundImage 方法设置按钮背景为这张纯色图,这样,我们可以根据 forState 参数为按钮设置多个背景色了。
@implementation  UIButton (ButtonMagic)

- (void)setBackgroundColor:(UIColor *)backgroundColor forState:(UIControlState)state {
    [self setBackgroundImage:[UIButton imageFromColor:backgroundColor] forState:state];
}

+ (UIImage *)imageFromColor:(UIColor *)color {
    CGRect rect = CGRectMake(0, 0, 1, 1);
    UIGraphicsBeginImageContext(rect.size);
    CGContextRef context = UIGraphicsGetCurrentContext();
    CGContextSetFillColorWithColor(context, [color CGColor]);
    CGContextFillRect(context, rect);
    UIImage *image = UIGraphicsGetImageFromCurrentImageContext();
    UIGraphicsEndImageContext();
    return image;
}
@end
返回目录
58. 按钮的倒计时效果
首先,实现 UIButton 的扩展(category):
@interface UIButton(Extension)
-(void)setCountdownWithSecond:(int)second;
@end

@implementation UIButton(Extension)

-(void)setCountdownWithSecond:(int)second{
    // 初始状态
    NSString* title = [self titleForState:UIControlStateNormal];

    self.enabled = NO;
    [self setTitle:[NSString stringWithFormat:@"%d 秒",second] forState: UIControlStateNormal];
    self.layer.backgroundColor = [UIColor lightGrayColor].CGColor;
    // 调度定时器
    int countdown = second-1;// 注意定时器在1s后才会执行,这里要扣掉 1s
    NSTimer* timer=[[NSTimer alloc]init];

    // 为了向目标方法传递可变(in out)类型的参数,我们必须使用 Mutable 的集合
    NSMutableDictionary* paramObj = [NSMutableDictionary new];
    [paramObj setObject:@(countdown) forKey:@"counter"];// 计数值是可变的
    [paramObj setObject:title forKey:@"title"];
    [paramObj setObject:self.backgroundColor forKey:@"bgColor"];

    // 将 paramObj 通过 timer 的 userInfo 进行传递。注意 countDown: 方法的参数是 timer 自身而不是 userInfo。userInfo 是通过 [timer userInfo] 被传入的。
    timer = [NSTimer scheduledTimerWithTimeInterval:1.0 target:self selector:@selector(countDown:) userInfo:paramObj repeats:YES];

}
/// 这个方法会被定时器调用。
-(void)countDown:(NSTimer*)timer{
    // 从 timer 中读取 userInfo(即我们前面传入的参数)
    NSMutableDictionary* userInfo = [timer userInfo];
    int counter = ((NSNumber*)userInfo[@"counter"]).intValue;
    if (counter>0){
        [self setTitle:[NSString stringWithFormat:@"%d 秒",counter] forState: UIControlStateNormal];
        counter--;
        userInfo[@"counter"]=@(counter);
    }else{
        // 读取按钮原来的状态
        NSString* title = userInfo[@"title"];
        UIColor* color = userInfo[@"bgColor"];
        // 销毁定时器
        [timer invalidate];
        // 恢复按钮原来的状态
        self.enabled = YES;
        [self setTitle:title forState: UIControlStateNormal];
        self.layer.backgroundColor = color.CGColor;
    }
}
@end
然后在按钮的点击事件里,调用扩展方法即可:
[_btLogin setCountdownWithSecond:60];
返回目录
59. 如何单独安装指定的 pod?
当 pod update 时,所有 pod 都会被更新到你的项目中。
如果只想安装 pod,但不升级已经安装了的 pod,可以使用:
pod install --no-repo-update如果只想修改(删除/更新)某个(或某几个)pod,使用:
po update POD1 POD2 POD3 ...返回目录
60. 如何让两个字符串宏连接成新的字符串?
定义一个新宏,将所有宏和常量连接在一起(中间以空格分隔),例如:
#define s1 @"abc"
#define s2 s1 @"123" s1 @"456"

int main(int argc, const char * argv[]) {
    @autoreleasepool {

        NSLog(@"%@",s2);
    }
    return 0;
}
s2 的打印结果是:abc123abc456
注意, Swift 编译器不能识别这种拼接字符串的宏,以及所有复杂宏(除常量以外的宏)。上述代码在 Swift 中不可用。
返回目录
61. 如何在扩展或 Category 中定义存储属性
不是说无法在扩展或 Category 中定义存储属性(即实例变量 var)的吗?
让我们来看看是怎么做到的吧!
Objective-C
首先,在 Category 中定义一个属性:
@interface NSObject (AssociatedObject)
@property (nonatomic, strong) id associatedObject;
@end
然后实现这个 Category:
@implementation NSObject (AssociatedObject)
@dynamic associatedObject;

- (void)setAssociatedObject:(id)object {
     objc_setAssociatedObject(self, @selector(associatedObject), object, OBJC_ASSOCIATION_RETAIN_NONATOMIC);
}

- (id)associatedObject {
    return objc_getAssociatedObject(self, @selector(associatedObject));
}
注意:这里使用了一个枚举 OBJC_ASSOCIATION_RETAIN_NONATOMIC 这表示,用于修饰该属性的存储定义,等于我们常用的 retain、nonatomtic 等关键字。可能的取值还包括:
* OBJC_ASSOCIATION_ASSIGN
* OBJC_ASSOCIATION_COPY_NONATOMIC
* OBJC_ASSOCIATION_RETAIN
* OBJC_ASSOCIATION_COPY
每个枚举值的作用如同其字面意义。
这里的 @selector 其实只是起一个 key 的作用,保证在存储和读取自定义属性时能够找到这个对象。也可以用一个常量的 int 来代替 @selector,只要保证对于每个属性来说 key 是唯一的就好:
static char kAssociatedObjectKey;然后在在访问 associated 时使用这个常量作为第二个参数:
objc_getAssociatedObject(self, &kAssociatedObjectKey);Swift
因为 Swift 标准库中不包含 O-C 运行时库,所以我们首先 import:
import ObjectiveC然后为属性的存储定义一个 key:
// Declare a global var to produce a unique address as the assoc object handle
var AssociatedObjectKey: UInt8 = 0
然后定义属性的 getter/setter:
var previewSupport:Bool{
        // previewSupport is *effectively* a stored property
        get {
            return objc_getAssociatedObject(self, &AssociatedObjectKey) as? Bool ?? false
            // Set the initial value to false when absence
        }
        set {
            objc_setAssociatedObject(self, &AssociatedObjectKey, newValue, objc_AssociationPolicy(OBJC_ASSOCIATION_ASSIGN))
        }
    }
这样,表面上看 previewSupport 是一个计算属性,但实际上存储了一个对象在里面。
返回目录
62. 巧妙解决 this application is modifying the autolayout engine from a background 问题
有时候我们会遇到这样的错误而导致 app 崩溃:
This application is modifying the autolayout engine from a background thread, which can lead to engine corruption and weird crashes. This will cause an exception in a future release.这个问题的解决其实并不复杂。根据错误的描述,是因为我们在代码中在主线程以外的线程中更新了 UI 所导致的,因此,只需要将更新 UI 的代码包裹在 dispatch_async(dispatch_get_main_queue(), ^(void){ }); 块中即可。
问题是 Xcode 的这个错误提示非常之不明确,你在它的调用堆栈根本无法发现错误是由哪句代码导致的。
要调试这个问题,需要用到一些技巧。你可以从这里找到一个 PSPDFUIKitMainThreadGuard.m 文件。它能帮我们找出问题之所在。这是一个在 PSPDFKit 框架中用到的专门查找代码中哪些代码会在辅线程中更新 UI 的工具,但已经修改为支持 MIT 协议了,因此你可以在自己的项目中使用它。它会在背后拦截所有 UIKit 中对 setNeedsDisplay 和 setNeedsLayout 的调用。
上面的源代码需要修改某些地方才能工作。但不要担心,笔者已经替你完成这个工作了:
// Taken from the commercial iOS PDF framework http://pspdfkit.com.
// Copyright (c) 2014 Peter Steinberger, PSPDFKit GmbH. All rights reserved.
// Licensed under MIT (http://opensource.org/licenses/MIT)
//
// You should only use this in debug builds. It doesn't use private API, but I wouldn't ship it.
// PLEASE DUPE rdar://27192338 (https://openradar.appspot.com/27192338) if you would like to see this in UIKit.
#import 将这个文件的编译选项设置为 -fno-objc-arc。试着编译一下,如果顺利的话,你就可以找出项目中那些错误地在辅线程中更新 UI 的代码了。
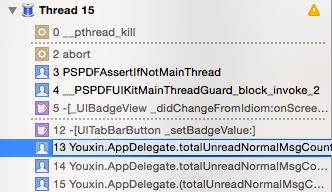
运行你的程序,当你有任何类似的错误发生时,Xcode 会在错误发生的代码停下。注意看左边的线程树:
在这里,你应该很容易找到你自己的代码,点击它,代码编辑器会跳到断点出现的地方:
这就是你需要去修改的地方。
返回目录
63. WebKit 报错”TypeError: null is not an object (evaluating ‘window.webkit.messageHandlers’)”
当你用一个新实例赋给 webView 的 userContentController 时,会导致 userContentController 注册失败:
WKUserContentController *userContentController = [WKUserContentController new];
userContentController.addScriptMessageHandler(self, name: "jockey")
userContentController.addScriptMessageHandler(self, name: "observe")
webView.configuration.userContentController = userContentController
因此我们需要直接使用 webView 现成的 userContentControllre 对象。上述代码应改为:
let conf = WKWebViewConfiguration()
webView = WKWebView(frame: self.view.frame, configuration: conf)

webView.configuration.userContentController.addScriptMessageHandler(self, name: "jockey")
webView.configuration.userContentController.addScriptMessageHandler(self, name: "observe")
返回目录
64. Swift 1.2 编译错误“performselector methods are unavailable”
苹果将这个方法隐藏了(在 Swift 2.0 中又放开了)。我们可以用方法混合再次暴露它们。
/// NSObject+PerformSelector.swift
import Foundation

private var dispatchOnceToken: dispatch_once_t = 0

private var selectors: [Selector] = [
    "performSelector:",
    "performSelector:withObject:",
    "performSelector:withObject:withObject:",
    "performSelector:withObject:afterDelay:inModes:",
    "performSelector:withObject:afterDelay:",
]

private func swizzle() {
    dispatch_once(&dispatchOnceToken) {
        for selector: Selector in selectors {
            let _selector = Selector("_\(selector)")
            let method = class_getInstanceMethod(NSObject.self, selector)

            class_replaceMethod(
                NSObject.self,
                _selector,
                method_getImplementation(method),
                method_getTypeEncoding(method)
            )
        }
    }
}

extension NSObject {

    func _performSelector(selector: Selector) -> AnyObject? {
        swizzle()
        return self._performSelector(selector)
    }

    func _performSelector(selector: Selector, withObject object: AnyObject?) -> AnyObject? {
        swizzle()
        return self._performSelector(selector, withObject: object)
    }

    func _performSelector(selector: Selector, withObject object1: AnyObject?, withObject object2: AnyObject?) -> AnyObject? {
        swizzle()
        return self._performSelector(selector, withObject: object1, withObject: object2)
    }

    func _performSelector(selector: Selector, withObject object: AnyObject?, afterDelay delay: NSTimeInterval, inModes modes: [AnyObject?]?) {
        swizzle()
        self._performSelector(selector, withObject: object, afterDelay: delay, inModes: modes)
    }

    func _performSelector(selector: Selector, withObject object: AnyObject?, afterDelay delay: NSTimeInterval) {
        swizzle()
        self._performSelector(selector, withObject: object, afterDelay: delay)
    }

}
调用示例:
let functionSelector = Selector(message.name + ":")
        if bridge != nil {
            if bridge!.respondsToSelector(functionSelector) {
                bridge!._performSelector(functionSelector, withObject: message.body)
            } else {
                NSLog("\(message.name)方法未找到!")
            }
        }
返回目录
65. NSPredicate 语法错误“’Unable to parse the format string “self not in %@”’”
用 not(self in %@) 来替代 self not in %@。
let filters = ["init","controller","setController:"];
NSPredicate* predicate = [NSPredicate predicateWithFormat:@"not(self in %@)",filters];
if ([predicate evaluateWithObject:methodName]) {
    block(methodName);
}
返回目录
66. evaluateJavaScript 总是报错“Error Domain=WKErrorDomain Code=4 “A JavaScript exception occurred””
无论执行什么 js,这个方法总是返回这个错误。这是因为你在页面未加载完成之前就调用 evaluateJavaScript 方法。解决办法,在 webView:didFinishNavigation: 委托方法之中执行 Js。
返回目录
67. snapkit 如何修改一个 Constraint?
使用 snp_updateConstraints 方法:
snp_updateConstraints { make in
    make.top.equalTo(40)
}
返回目录
68. Swift 中如何截取字符串?
答案是调用 substringWithRange 方法。
swift 中,这个方法的用法和 O-C 不太一样,假设你想这样使用它是不行的:
let x = str.substringWithRange(NSMakeRange(0, 3))
你必须这样,示例代码:
// swift 1.x
var str = "Hello, playground"
str.substringWithRange(Range(start: advance(str.startIndex,2), end: advanced(str.endIndex,-1))) //"llo, playgroun"

// swift 2.0
var str = "Hello, playground"
str.substringWithRange(Range(start: str.startIndex.advancedBy(2), end: str.endIndex.advancedBy(-1))) //"llo, playgroun"
或者将 String 转换成 NSString 使用:
let myNSString = str as NSString
myNSString.substringWithRange(NSRange(location: 0, length: 3))
返回目录
69. 如何读取字符串中的数字?
let string = "#3.14"
var alpha : Double = 0
let scanner : NSScanner = NSScanner(string: string)
scanner.scanLocation = 1 // bypass '#'
if scanner.scanDouble(&alpha){
    NSLog("\(alpha)") // 打印 3.14
}
返回目录
70. 将 Imageview 设置为 AspectFit 后,如何知道其中 Image 的 Frame?
如果将 imagView 的 UIContentMode 设置为 AspectFit 后,图片的内容会自动根据 imageView 的当前大小进行等比缩放,使图片内容始终完整显示在 imageView 中并自动居中。
关于 UIContentMode 的各种选项,如果不懂的请参考这里。
这样,图片的 frame 显然就不可能是 imageView 的 frame 了,这样,我们如何知道 image 的当前坐标(x,y)和大小(width 和 height)?
实际上你可以用 AV 框架中的 AVMakeRectWithAspectRatioInsideRect 函数:
imageView.contentMode = UIViewContentMode.ScaleAspectFit // It's very important!!
view.addSubview(imageView)

let rect = AVMakeRectWithAspectRatioInsideRect(image.size, imageView.frame);
printRect(rect)
返回目录
71. 在 Swift 中,如何反射类的所有属性?
/// 这个类用于反射出类的所有属性,基于 Swift1.2 的 refrect 方法
class Reflect:NSObject {
    func propertys()->[String]
    {
        let m = reflect(self)
        var s = [String]()
        for i in 0..if name == "super"{continue}
            s.append(name)
        }
        return s
    }
}

class CardScanResult:Reflect{
    ...
}
注意,这种方法不会反射出类的计算属性。
返回目录
72. 在 UIWebView 中调用 javascript 方法 alert 会导致 UI 假死?
这是 UIWebView 的一个 Bug,原因不明。解决办法是,封装一个 Navtive 的 alert 方法代替 javascript 原有的 alert 方法。例如:
- (BOOL)webView:(UIWebView *)webView shouldStartLoadWithRequest:(NSURLRequest *)request navigationType:(UIWebViewNavigationType)navigationType {

   switch (navigationType) {
      case UIWebViewNavigationTypeOther:
         if ([[request.URL scheme] isEqualToString:@"alert"]) {
            NSString *message = [request.URL host];
            if (SHOULD_SHOW_ALERT) {
               // the alert should be shown
               [webView stringByEvaluatingJavaScriptFromString:@"showAlert()"];
            } else {
              // don't show the alert
              // just do nothing
            }

            return NO;
         }
         break;
      default:
        //ignore
   }
   return YES;
}调用时这样用:window.location.href = "alert://MESSAGE_TEXT";
或者通过 WebViewJsBridge。
返回目录
73. swift 中的预定义宏
swift 中无法使用预定义宏。如果我们在 Build Settings > Preprocessor Macros > Debug 中设置了一个 DEBUG 宏,但这个宏只会在 O-C 编译器中存在,例如在 O-C 代码(.h/.m 文件)中可以使用这个宏:
#ifdef DEBUG
...
#endif
但是 Swift 编译器无法访问这个宏,因此不能在 .swift 类文件中使用这个宏。
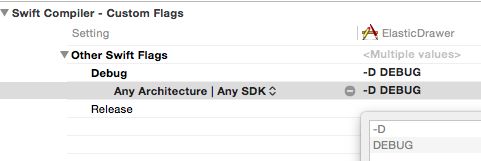
我们可以在 Swift 编译器中定义一个同名宏来解决这个问题,但是并非在 Build Settings > Preprocessor Macros 中定义,而是在 Build Settings > Swift Compiler - Custom Flags > Other Swift Flags 中定义。如下图所示:
这样,你也可以在 .swift 文件中使用 DEBUG 宏(它实际不是一个宏)了:
func DLog(message: String, function: String = __FUNCTION__) {
    #if DEBUG
    println("\(function): \(message)")
    #endif
}
...
返回目录
74. 如何一次性添加一个 Dictionary 到另一个 Dictionary(swift1.2)?
重载 += 运算符:
func +=  (inout left: [K:V], right: [K:V]) {
    for (k, v) in right {
        left.updateValue(v, forKey: k)
    }
}
然后这样使用:
var paradic : Dictionary<String, String> = ["uid" : ""]
paradic += ["deviceType": "iOS"]
返回目录
75. 如何用 Safari 调试运行在 iOS 上的 webview app?
iOS 端的设置
在要调试的设备上:设置 → Safari → 高级 → Web 检查器 → 开
Mac 上的设置
Safari → 偏好设置 → 高级 → 勾上”在菜单栏中显示“开发”菜单”。
运行 Xcode
然后将设备连接到 Xcode,以调试模式运行 app。
打开 Safari
点开 Mac 上的 Safari,点击“开发”菜单,会列出一个 iOS 设备/模拟器/ Mac名称列表,在任意一项下面又会列出所有 Safari 或 WebView 当前打开的网页,选择任意网页开始调试。
返回目录
76.如何在 viewDidLoad 中获得视图的真实 frame(使用自动布局)?
如果一个视图使用了 Autolayout,那么你无法在 viewDidLoad 方法中获得视图的真实 frame,因为此时自动布局还未运行。你可以用 setNeedsLayout 和 layoutIfNeeded 方法来让视图调用自动布局引擎,从而提前计算真实 frame:
switchBar.setNeedsLayout()
switchBar.layoutIfNeeded()
printRect(switchBar.frame)
返回目录
77. char/Int/String 互转
// 1. Charactor 转 Int
for ch in Int(("B" as UnicodeScalar).value)...Int(("Z" as UnicodeScalar).value){
    // 2. Int 转 Charactor
    let char = Character(UnicodeScalar(ch))
    // 3. Charactor 转 String
    NSLog("\(String(char))")
}
返回目录
78. 如何向 SwiftyJson 中添加一个 JSON?
// SwiftyJson 没有实现 append 方法,使用如下代码
var arr:[JSON]=json.arrayValue
arr.append(bJson)
json = JSON(arr)
返回目录
79. SwiftyJson 复制、修改、插入综合运用
// 1. 从文件中读取 json
var json = jsonFromFile("colleagues")

let aPerson = json[0]["persons"][0]

var i=0

// 2. 从 A-Z 个没间隔 1 个字母生成一个 json 节点
for ch in Int(("A" as UnicodeScalar).value)...Int(("Z" as UnicodeScalar).value){
    i++
    if i%2 == 1 {

        let char = Character(UnicodeScalar(ch))

        let name = String(count: 3, repeatedValue: char) + aPerson["name"].string!

        // 3. 从文件中取一个 json 复制,作为节点模板
        var bPerson = JSON(aPerson.dictionaryValue) // 复制一个 person 对象

        // 4. 修改 json 的属性
        bPerson["name"].string = name
        bPerson["py"].string = name.lowercaseString

        //  5. 构建 [String:JSON] 类字典
        let jsonDictionary:[String:JSON] =  ["group":JSON(String(char)), "persons":JSON([bPerson,bPerson])]

        // 6. 以 [String:JSON] 来构建新的 json
        let bJson = JSON(jsonDictionary)

        // 7. 将新 json 插入到原来的 json(即 colleagues.json) 中
        // SwiftyJson 没有实现 append 方法,使用如下代码
        var arr:[JSON]=json.arrayValue
        arr.append(bJson)
        json = JSON(arr)
    }

}
NSLog("new json:\(json)")

jsonData = json
其中,jsonFromFile() 方法定义如下:
// 从文件中加载 JSON
func jsonFromFile(filename:String)->JSON{// filename 中不需要包含 .json

    let path = NSBundle.mainBundle().pathForResource(filename, ofType: "json")
    let jsonData = NSData(contentsOfFile:path!)
    let json = JSON(data: jsonData!)
    return json

}
colleagues.json 文件内容如下:
 [
  {
  "group" : "常用联系人",
  "persons" : [
               {
               "name" : "刘馨雅",
               "py" : "lxy",
               "mobile" : "18713566542",
               "dept" : "销售部"
               },
               {
               "name" : "刘雅婷",
               "py" : "lyt",
               "mobile" : "18713566542",
               "dept" : "销售部"
               }
               ]
  }
]
返回目录
80.Source Control 报错:Xcode source control unable to index file xxxx.framework/headers
进入项目目录,改用终端提交:
git add .
git commit -m "message"
git push
返回目录
81.如何修改 table view 的 index bar 的颜色?
// 设置 index bar 的颜色
table.sectionIndexBackgroundColor = UIColor.clearColor() // 背景色透明
table.sectionIndexColor = UIColor.darkGrayColor() // 前景色深灰
返回目录
82.如何在上传图片时对图片进行压缩并将图片文件大小限制一定大小?
// 图片大小限制在 maxFileSize
// 压缩率用 0.99 而不是 1, 因为压缩率为 1 时,文件尺寸和压缩率之间不再是线性关系
var jpegData = UIImageJPEGRepresentation(info.image, 0.99)
let maxFileSize:Int = 20 * 1024 * 1024;

if jpegData.length > maxFileSize { // 图片大小超过限制,进行 jpeg 压缩
    jpegData = UIImageJPEGRepresentation(info.image, CGFloat(maxFileSize)/CGFloat(jpegData.length));
}

var urlStr = "\(BASE_URL_STRING):\(UPLOAD_FILE_POT_STRING)\(CMD_UPLOAD_FILE)"
var param=getBaseRequest()

let request:NSMutableURLRequest=AFHTTPRequestSerializer().multipartFormRequestWithMethod("POST", URLString: urlStr, parameters: param, constructingBodyWithBlock: { (formData : AFMultipartFormData!) -> Void in
            formData.appendPartWithFileData(jpegData,
                name:"file",fileName:"\(info.fileName).jpg",mimeType:"image/jpg")
        }, error: nil)

// 发起网络请求,上传图片
....
返回目录
83. 如何定制 SearchBar ?
定制 search bar 的背景色:
可以在 IB 中设置 Background 属性为一张图片(一个像素的纯色图片)。定制 search bar 的 TextField:
“`swift
if let searchTextField = searchBar.valueForKey(“_searchField”) as? UITextField{
searchTextField.layer.cornerRadius = 10.0 searchTextField.backgroundColor = UIColor.clearColor()
}
3. 让 placeholder 朝左对齐:

 可以在 placeholder 后面添加一长串空格,把 placeholder 挤到左边:

 ```swift
searchBar.placeholder = searchBar.placeholder! + String(count:50,repeatedValue:UnicodeScalar(Int((" " as UnicodeScalar).value)))
返回目录
84. 自定义 segue 错误:Could not find a segue class named ‘CustomSegueClass’
在 CustomSegueClass 类定义前使用 @objc 修饰:
@objc(CustomSegueClass)
class CustomSegueClass: UIStoryboardSegue {
    override func perform(){

    }
}
返回目录


