Android VectorDrawable与SVG 实现炫酷动画
Android VectorDrawable与SVG 实现炫酷动画
转载请标明出处:
http://blog.csdn.net/lisdye2/article/details/51967946
本文出自:【Alex_MaHao的博客】
项目中的源码已经共享到github,有需要者请移步【Alex_MaHao的github】
Android 从 5.0 提供了新的API VectorDrawable,通过该对象,我们可以使用矢量图SVG。
在编写xml文件中,通过关键的几个标签节点
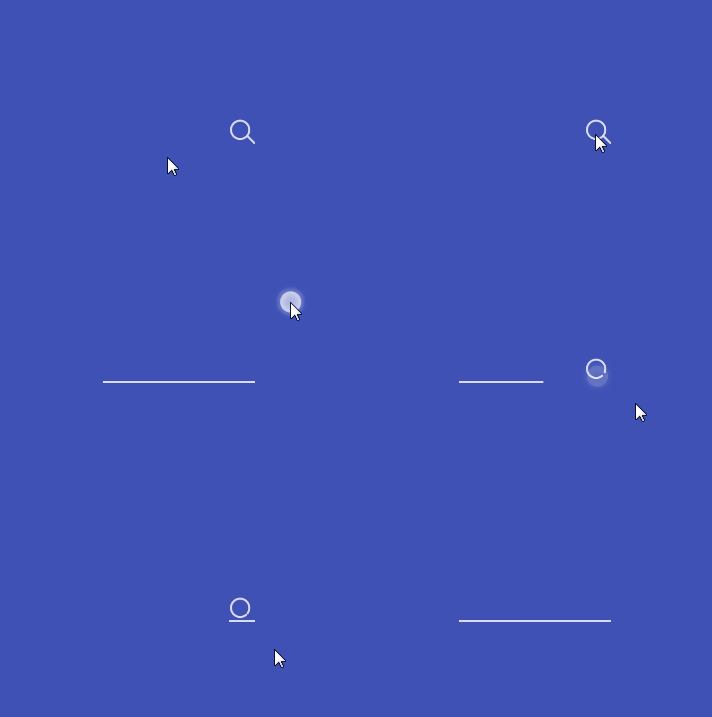
下面我们将实现两个例子来演示VectorDrawable和SVG的使用。先上实现的效果图。
登录特效
搜索特效
登录特效的实现
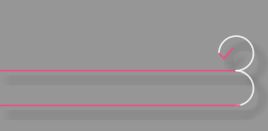
首先需要分析该特效。根据整个动画,整个特效对应的SVG 图案如下所示:
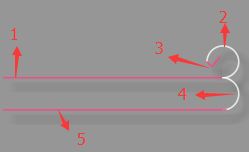
整个图案分为五个部分,两条横线,两个半圆,以及一个对号。为了凸显,所以把颜色稍微修改了一下。
那么使用
edit_login.xml :该文件存放在res-> drawable文件夹下。
<vector xmlns:android="http://schemas.android.com/apk/res/android"
    android:width="300dp"
    android:height="96dp"
    android:viewportWidth="150"
    android:viewportHeight="48">


    <path
        android:name="bar"
        android:pathData="M0,23 L140,23"
        android:strokeWidth="1"
        android:strokeColor="@color/colorAccent"
        android:strokeAlpha="0.8"
        android:strokeLineCap="square" />


    <path
        android:name="round"
        android:pathData="M138 23 A 10 10 0 1 0 128 13 "
        android:strokeWidth="1"
        android:strokeColor="@color/colorAccent"
        android:strokeAlpha="0.8"
        android:strokeLineCap="round"/>


    <path
        android:name="right"
        android:pathData="M128 13  l 3 3 l 5 -6"
        android:strokeWidth="1"
        android:strokeColor="@color/colorAccent"
        android:strokeAlpha="0.8"
        android:strokeLineCap="round"/>


    <path
        android:name="round2"
        android:pathData="M138 23 A 10 10 0 1 1 138 43 "
        android:strokeWidth="1"
        android:strokeColor="@color/colorAccent"
        android:strokeAlpha="0.8"
        android:strokeLineCap="round"/>


    <path
        android:name="bar2"
        android:pathData="M140,43 L0,43"
        android:strokeWidth="1"
        android:strokeColor="@color/colorAccent"
        android:strokeAlpha="0.8"
        android:strokeLineCap="square" />

vector>
如上代码,我们可以通过Android Studio的预览效果,直接看到图案。
在代码中出现了两个标签
width:画布的宽度。height:画布的高度。viewportWidth:将具体的宽度划分成相对的单位单元。300dp被分割成了150个单元单位。viewportHeight:将具体的高度划分成相对的单元单位。96dp被分割成48个单元单位。
name:声明一个标记。类似于id。 便于对其做动画的时候可以找到该节点。pathData:矢量图SVG 的描述。(后面会提)strokeWidth:画笔的宽度strokeColor:画笔的颜色strokeAlpha:透明度strokeLineCap:画出线条的结束点的形状。正方向或圆角矩形。。。
图案画出以后,需要针对该图案做动画,整个图案过程分为三个:
- 初次点击第一个对话框时,显示第一条横线,其余的不显示。
- 1 动画显示。2,3,4,5不显示。
- 验证输入是否正确,如果正确,显示对号。
- 1 默认显示,2,3 动画显示 4,5 隐藏
- 点击第二个对话框,第一条横线个向第二条横线过度。
- 1 动画隐藏 ,2 隐藏,3显示。 4,5动画显示。
当然,还很很多的用户交互,在此不再做实现。
根据上面的顺序,分别定义anim1.xml,anim2.xml,anim3.xml。注意,该文件存在drawable中。ps: 无视命名.
anim1.xml
<animated-vector xmlns:android="http://schemas.android.com/apk/res/android"
    android:drawable="@drawable/edit_login">

    <target
        android:name="bar"
        android:animation="@animator/anim_bar_fill" />

    <target
        android:name="round"
        android:animation="@animator/anim_default_gone" />
    <target
        android:name="right"
        android:animation="@animator/anim_default_gone" />
    <target
        android:name="round2"
        android:animation="@animator/anim_default_gone" />
    <target
        android:name="bar2"
        android:animation="@animator/anim_default_gone" />

animated-vector>
anim2.xml
<animated-vector xmlns:android="http://schemas.android.com/apk/res/android"
    android:drawable="@drawable/edit_login">
    <target
        android:name="bar"
        android:animation="@animator/anim_default" />
    <target
        android:name="round"
        android:animation="@animator/anim_round" />

    <target
        android:name="right"
        android:animation="@animator/anim_aa" />
    <target
        android:name="round2"
        android:animation="@animator/anim_default_gone" />
    <target
        android:name="bar2"
        android:animation="@animator/anim_default_gone" />

animated-vector>
anim3.xml
<animated-vector xmlns:android="http://schemas.android.com/apk/res/android"
    android:drawable="@drawable/edit_login">
    <target
        android:name="bar"
        android:animation="@animator/anim_bar_empty" />
    <target
        android:name="round"
        android:animation="@animator/anim_default_gone" />

    <target
        android:name="right"
        android:animation="@animator/anim_default" />
    <target
        android:name="round2"
        android:animation="@animator/anim_round2" />
    <target
        android:name="bar2"
        android:animation="@animator/anim_bar_fill2" />


animated-vector>
在三个文件中,最外层drawable。
drawable:目标SVG.
name: 目标文件的标识。animation:动画。
在其中定义了n多个动画。默认显示和默认不显示的动画(此时没有动画效果).ps: 动画定义的都是属性动画,所以需要放在animator文件夹中。
anim_default.xml 默认显示
<objectAnimator
    xmlns:android="http://schemas.android.com/apk/res/android"
    android:propertyName="trimPathEnd"
    android:valueFrom="1"
    android:valueTo="1"
    android:valueType="floatType"
android:duration="1" />动画属性trimPathEnd这个字段之前未出现过。它也是
同时也有一个trimPathStart,这个字段显示的也是百分比。不过其表示的是不显示的百分比。0~1代表从开始隐藏的百分比。
anim_default_gone.xml 默认隐藏
<objectAnimator
    xmlns:android="http://schemas.android.com/apk/res/android"
    android:propertyName="trimPathEnd"
    android:valueFrom="0"
    android:valueTo="0"
    android:valueType="floatType"
    android:duration="1" />
anim_bar_fill.xml —–1 的显示动画。
<objectAnimator
    xmlns:android="http://schemas.android.com/apk/res/android"
    android:propertyName="trimPathEnd"
    android:valueFrom="0"
    android:valueTo="1"
    android:valueType="floatType"
    android:duration="500"
    android:interpolator="@android:interpolator/linear_out_slow_in" />
anim_bar_empty.xml —–1 的隐藏动画。
<objectAnimator
    xmlns:android="http://schemas.android.com/apk/res/android"
    android:propertyName="trimPathEnd"
    android:valueFrom="0"
    android:valueTo="1"
    android:valueType="floatType"
    android:duration="500"
    android:interpolator="@android:interpolator/linear_out_slow_in" />
anim_round.xml – 2 的显示动画
<objectAnimator
    xmlns:android="http://schemas.android.com/apk/res/android"
    android:propertyName="trimPathStart"
    android:valueFrom="0"
    android:valueTo="1"
    android:valueType="floatType"
    android:duration="500"
    android:interpolator="@android:interpolator/linear_out_slow_in" />
anim_aa.xml – 3 的显示动画
<objectAnimator
    xmlns:android="http://schemas.android.com/apk/res/android"
    android:propertyName="trimPathStart"
    android:valueFrom="0"
    android:valueTo="1"
    android:valueType="floatType"
    android:duration="500"
    android:interpolator="@android:interpolator/linear_out_slow_in" />
anim_round2.xml – 4 的显示动画
<objectAnimator
    xmlns:android="http://schemas.android.com/apk/res/android"
    android:propertyName="trimPathStart"
    android:valueFrom="0"
    android:valueTo="1"
    android:valueType="floatType"
    android:duration="500"
    android:startOffset="501"
    android:interpolator="@android:interpolator/linear_out_slow_in" />
anim_bar_fill2.xml – 5 的显示动画
<objectAnimator
    xmlns:android="http://schemas.android.com/apk/res/android"
    android:propertyName="trimPathStart"
    android:valueFrom="0"
    android:valueTo="1"
    android:valueType="floatType"
    android:duration="500"
    android:startOffset="501"
    android:interpolator="@android:interpolator/linear_out_slow_in" />
如上的代码已经实现了图片以及动画的实现。下面就是使用,首先看布局文件:
<LinearLayout xmlns:android="http://schemas.android.com/apk/res/android"
    android:layout_width="match_parent"
    android:layout_height="match_parent"
    android:background="#fff"
    android:gravity="center_horizontal"
    android:orientation="vertical">

    <RelativeLayout xmlns:android="http://schemas.android.com/apk/res/android"
        android:layout_width="wrap_content"
        android:layout_height="wrap_content">


        <ImageView
            android:id="@+id/img1"
            android:layout_width="300dp"
            android:layout_height="96dp"
            android:layout_gravity="center"
            android:focusable="true"
            android:focusableInTouchMode="true"

            />

        <EditText
            android:id="@+id/edit1"
            android:layout_width="300dp"
            android:layout_height="45dp"
            android:layout_gravity="center"
            android:background="@null"
            android:hint="Email"
            android:paddingStart="4dp"
            android:textColor="?android:colorAccent"
            android:textColorHint="@color/colorPrimary"
            android:textSize="12sp" />

        <EditText
            android:id="@+id/edit2"
            android:layout_width="300dp"
            android:layout_height="45dp"
            android:layout_below="@+id/edit1"
            android:layout_gravity="center"
            android:background="@null"
            android:hint="Email"
            android:paddingStart="4dp"
            android:textColor="?android:colorAccent"
            android:textColorHint="@color/colorPrimary"
            android:textSize="12sp" />
    RelativeLayout>

    <EditText
        android:layout_width="wrap_content"
        android:layout_height="wrap_content"
        android:layout_marginTop="20dp"
        android:hint="dsadsadsadssadsad" />
LinearLayout>
两个文本框之间要有间隔,用以显示我们的动画。
由于文本框的存在,导致打开页面是自动弹出键盘,所以把焦点定在了ImageView上,防止打开页面时自动弹出软键盘。
/**
 * SVG 动画
 * Created by MH on 2016/7/19.
 */
public class SVGMainActivity extends AppCompatActivity implements View.OnFocusChangeListener, TextWatcher {


    private ImageView img1;

    private EditText edit1, edit2;

    // 显示
    private AnimatedVectorDrawable anim1, anim2, anim3;


    @Override
    protected void onCreate(Bundle savedInstanceState) {
        super.onCreate(savedInstanceState);
        setContentView(R.layout.activity_svg);


        img1 = ((ImageView) findViewById(R.id.img1));
        edit1 = ((EditText) findViewById(R.id.edit1));
        edit2 = ((EditText) findViewById(R.id.edit2));

        // 加载SVG
        anim1 = (AnimatedVectorDrawable) getResources().getDrawable(R.drawable.anim1);
        anim2 = (AnimatedVectorDrawable) getResources().getDrawable(R.drawable.anim2);
        anim3 = (AnimatedVectorDrawable) getResources().getDrawable(R.drawable.anim3);

        // 设置焦点变化的监听
        edit1.setOnFocusChangeListener(this);
        edit2.setOnFocusChangeListener(this);

        // 文本变化的监听
        edit1.addTextChangedListener(this);
    }


    @Override
    public void onFocusChange(View v, boolean hasFocus) {
        switch (v.getId()) {
            case R.id.edit1:
                if (hasFocus) {
                    img1.setImageDrawable(anim1);
                    anim1.start();
                }
                break;
            case R.id.edit2:
                if (hasFocus) {
                    img1.setImageDrawable(anim3);
                    anim3.start();
                }
                break;
        }

    }

    @Override
    public void beforeTextChanged(CharSequence s, int start, int count, int after) {

    }

    @Override
    public void onTextChanged(CharSequence s, int start, int before, int count) {

    }

    @Override
    public void afterTextChanged(Editable s) {
        // 内容变化之后,判断内容
        if (!TextUtils.isEmpty(s) && edit1.getText().toString().trim().equals("1234")) {
            Toast.makeText(SVGMainActivity.this, "right", Toast.LENGTH_SHORT).show();
            img1.setImageDrawable(anim2);
            anim2.start();
        }


    }
}
核心的三个步骤;
anim1 = (AnimatedVectorDrawable) getResources().getDrawable(R.drawable.anim1);,将之前编写drawable,同时强转为AnimatedVectorDrawable。img.setImageDrawable(anim1)设置Drawable。anim1.start():启动动画
因为细节的处理上比较麻烦。所以此处只是做了一个简单的实现。
SVG Path Data
在上面的实现中,定义SVG 图像时,pathData中,用字符和数字描绘了一个图案。
其中主要有如下命令:
- M : move to 移动绘制点
- L : line to 直线
- Z : close 闭合
- C : cubic bezier 三次贝塞尔曲线
- Q : quatratic bezier 二次贝塞尔曲线
- A : 圆弧
每个命令都有大写和小写,大写代表绝对位置。小写代表当前点的相对位置。
在使用中,唯一个需要说的便是圆弧(A)问题。
在代码中使用了M138 23 A 10 10 0 1 0 128 13。
M138 23:先画笔移动到(138,23)的位置。A 10 10 0 1 0 128 13: 画圆弧。分别对应: x轴半径,y轴半径,x轴偏移量,弧度(0代表取小弧度,1代表大弧度) ,方向(0取逆时针,1为顺时针),目标X坐标,目标y坐标。
搜索特效的实现
按照之前的步骤,分别如下实现:
- 定义SVG图像。
- 定义
VectorDrawable的xml文件。 - 定义动画。
- 加载,使用。
search_bar.xml 画出SVG.
<vector xmlns:android="http://schemas.android.com/apk/res/android"
    android:width="150dp"
    android:height="24dp"
    android:viewportWidth="150"
    android:viewportHeight="24">


    <path
        android:name="search"
        android:pathData="M141,17 A9,9 0 1,1 142,16 L149,23"
        android:strokeWidth="2"
        android:strokeColor="#ffffff"
        android:strokeAlpha="0.8"
        android:strokeLineCap="round" />


    <path
        android:name="bar"
        android:pathData="M0,23 L149,23"
        android:strokeWidth="2"
        android:strokeColor="#ffffff"
        android:strokeAlpha="0.8"
        android:strokeLineCap="square" />

vector>
anim_bar_to_search.xml 下划线向搜索图案的过渡。
<animated-vector xmlns:android="http://schemas.android.com/apk/res/android"
    android:drawable="@drawable/search_bar" >
    <target
        android:animation="@animator/anim_search_fill"
        android:name="search"/>
    <target
        android:animation="@animator/anim_bar_empty"
        android:name="bar"/>
animated-vector>
anim_search_to_bar.xml 搜索向下划线过渡的动画
<animated-vector
    xmlns:android="http://schemas.android.com/apk/res/android"
    android:drawable="@drawable/search_bar">

    <target
        android:name="search"
        android:animation="@animator/anim_search_empty" />

    <target
        android:name="bar"
        android:animation="@animator/anim_bar_fill" />

animated-vector>
下划线消失和隐藏的动画使用的是上一个例子的动画。代码不在贴。
搜索框的动画和下划线动画类似。
<objectAnimator
    xmlns:android="http://schemas.android.com/apk/res/android"
    android:propertyName="trimPathEnd"
    android:valueFrom="1"
    android:valueTo="0"
    android:valueType="floatType"
    android:duration="500"
    android:interpolator="@android:interpolator/fast_out_slow_in" />


<objectAnimator xmlns:android="http://schemas.android.com/apk/res/android"
    android:duration="500"
    android:interpolator="@android:interpolator/linear_out_slow_in"
    android:propertyName="trimPathEnd"
    android:valueFrom="0"
    android:valueTo="1"
    android:valueType="floatType" />
布局文件:
<LinearLayout xmlns:android="http://schemas.android.com/apk/res/android"
    android:layout_width="match_parent"
    android:layout_height="match_parent"
    android:background="?android:colorPrimary"
    android:gravity="center"
    android:onClick="lost_focus">

    <FrameLayout
        android:layout_width="wrap_content"
        android:layout_height="wrap_content"
        android:focusable="true"
        android:focusableInTouchMode="true">

        <ImageView
            android:id="@+id/search"
            android:layout_width="150dp"
            android:layout_height="24dp"
            android:onClick="animate"
            android:src="@drawable/search_bar" />

        <EditText
            android:id="@+id/text"
            android:layout_width="121dp"
            android:layout_height="22dp"
            android:alpha="0"
            android:background="@null"
            android:paddingStart="4dp"
            android:textColor="?android:colorAccent"
            android:textSize="12sp" />

    FrameLayout>

LinearLayout>
布局文件,在最外层添加点击事件,当点击文本框之外时,显示搜索图标。点击图标时显示下划线。同时,将焦点设置移开文本框。
在activity中设置:
/**
 *
 * 搜索动画的实现
 * Created by MH on 2016/7/19.
 */
public class SVGMain2Activity extends AppCompatActivity {

    private ImageView iv;
    private TextView text;
    private AnimatedVectorDrawable searchToBar;
    private AnimatedVectorDrawable barToSearch;

    @Override
    protected void onCreate(Bundle savedInstanceState) {
        super.onCreate(savedInstanceState);
        setContentView(R.layout.activity_svg2);

        iv = (ImageView) findViewById(R.id.search);
        text = (TextView) findViewById(R.id.text);
        // 加载SVG
        searchToBar = (AnimatedVectorDrawable) getResources().getDrawable(R.drawable.anim_search_to_bar);
        barToSearch = (AnimatedVectorDrawable) getResources().getDrawable(R.drawable.anim_bar_to_search);

        // 设置监听
        iv.setOnClickListener(new View.OnClickListener() {
            @Override
            public void onClick(View v) {
                iv.setImageDrawable(searchToBar);
                searchToBar.start();
            }
        });
    }

    public void lost_focus(View view) {
        // 点击文本框之外时,隐藏下划线
        iv.setImageDrawable(barToSearch);
        barToSearch.start();
    }

}


