linux下搭建PHP+apache+mysql环境
本篇讲述的东西是我自己在开发PHP扩展时搭建起来的环境,已经很久了,是从自己总结的文档中提取出来的,所有东西都自己遇到过,希望对于一些需要搭建环境的朋友有帮助,同时也是对自己的总结记录。
1. 安装apache
1.1 安装gcc、gcc-c++,因为安装apache需要先安装一些依赖包
[root@localhost /]# yum install gcc gcc-c++
1.2 安装apr,apr-util
地址:http://apr.apache.org
a.安装apr-1.4.6.tar.gz,安装路径为/usr/local/apr
[root@localhost local]# mkdir -p apr
[root@localhost local]# tar -zxf apr-1.4.6.tar.gz
[root@localhost local]# cd apr-1.4.6
[root@localhost apr-1.4.6]# ./configure --prefix=/usr/local/apr
[root@localhost apr-1.4.6]# make
[root@localhost apr-1.4.6]# make install
安装apr时,报错rm: cannot remove `libtoolT': No such file or directory
解决方法:
直接打开/usr/local/apr-1.4.6/configure 把 $RM“$cfgfile” 那行删除掉
$RM“$cfgfile” 大约在 42302行
[root@localhost apr-1.4.6]#grep -n RM configure
[root@localhost apr-1.4.6]#sed -i '/$RM "$cfgfile"/d' configure
然后再重新运行 ./configure --prefix=/usr/local/apr 就可以了.
b.安装apr-util-1.5.1.tar.gz,安装路径为/usr/local/apr-util
[root@localhost local]# mkdir -p apr-util
[root@localhost local]# tar -zxf apr-util-1.5.1.tar.gz
[root@localhost local]# cd apr-util-1.5.1
[root@localhost apr-util-1.5.1]# ./configure --prefix=/usr/local/apr-util -with-apr=/usr/local/apr/bin/apr-1-config
[root@localhost apr-util-1.5.1]# make
[root@localhost apr-util-1.5.1]# make install
1.3 安装pcre-8.20.tar.gz,安装路径为/usr/local/pcre
[root@localhost local]# mkdir -p pcre
[root@localhost local]# tar -zxf pcre-8.20.tar.gz
[root@localhost local]# cd pcre-8.20
[root@localhost pcre-8.20]# ./configure --prefix=/usr/local/pcre
[root@localhost pcre-8.20]# make
[root@localhost pcre-8.20]# make install
1.4 安装apache,下载httpd-2.4.3.tar.gz,地址是:http://httpd.apache.org/ ,上传至/usr/local,安装目录为/usr/local/apache2
[root@localhost local]# mkdir -p /usr/local/apache2
[root@localhost local]# tar zxvf httpd-2.4.3.tar.gz
[root@localhost local]# cd httpd-2.4.3
[root@localhost httpd-2.4.3]# ./configure --prefix=/usr/local/apache2 --with-pcre=/usr/local/pcre --with-apr=/usr/local/apr --with-apr-util=/usr/local/apr-util
[root@localhost httpd-2.4.3]# make
[root@localhost httpd-2.4.3]# make install
[root@localhost httpd-2.4.3]# /usr/local/apache2/bin/apachectl start
1.5 启动apache
[root@localhost apache2]# /usr/local/apache2/bin/apachectl start
1.6 启动时的提示
AH00558: httpd: Could not reliably determine the server's fully qualified domain name, using 127.0.0.1. Set the 'ServerName' directive globally to suppress this message
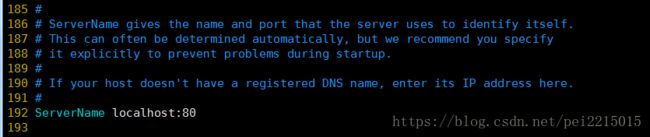
这个提示不会影响apache的运行,所以不修改也可以的,就是每次启动时都会有这个提示,想要不显示的话,找到下面的文件/usr/local/apache/conf/httpd.conf,搜索关键字ServerName,找到如下的注释,大概意思就是叫我们自己指定自身的名称和端口

在后面加上ServerName localhost:80,提示信息就不显示了,如下
1.7 验证apache安装是否成功
在浏览器的地址中输入localhost就行访问,如果如下图则证明安装成功

有些没有显示It works!,而是其他的一些显示,也是安装成功的,只不过暴露了网站的目录结构,让别人知道你的网站目录结构直接查看你目录下的所有文件是很危险的一个事情,可以修改/usr/local/apache/conf/httpd.conf文件
找到:Options indexes FollowSymLinks
改为:Options FollowSymLinks
当直接访问某个目录时显示下图就表明设置成功了。

2. 安装PHP
2.1 安装libxml2,安装路径为/usr/local/libxml2
[root@localhost local]# mkdir -p libxml2
[root@localhost local]# tar -zxvf libxml2-2.7.4.tar.gz
[root@localhost local]# cd libxml2-2.7.4
[root@localhost libxml2-2.7.4]# ./configure --prefix=/usr/local/libxml2
[root@localhost libxml2-2.7.4]# make
[root@localhost libxml2-2.7.4]# make install
2.2 安装php7.1.2,安装路径为/usr/local/phpinstall/php-7.1.2
[root@localhost local]# mkdir -p php
[root@localhost local]# tar -zxvf php-5.6.3.tar.gz
[root@localhost local]# cd php-5.6.3
[root@localhost php-7.1.2]#./configure --prefix=/usr/local/phpinstall/php-7.1.2 --enable-mysqlnd --with-apxs2=/usr/local/apache2/bin/apxs --with-libxml-dir=/usr/local/libxml2 --with-mysqli=/usr/bin/mysql_config --enable-embedded-mysqli --with-pdo-mysql=/usr --enable-maintainer-zts
如果出现没有找到mysql.h文件等其他一些有关数据库的问题,可以先安装mysql-devel包
yum install mysql-devel
Thank you for using PHP.
config.status: creating php5.spec
config.status: creating main/build-defs.h
config.status: creating scripts/phpize
config.status: creating scripts/man1/phpize.1
config.status: creating scripts/php-config
config.status: creating scripts/man1/php-config.1
config.status: creating sapi/cli/php.1
config.status: creating sapi/cgi/php-cgi.1
config.status: creating ext/phar/phar.1
config.status: creating ext/phar/phar.phar.1
config.status: creating main/php_config.h
config.status: executing default commands
[root@localhost php-7.1.2]#make
[root@localhost php-7.1.2]#make install
安装成功。
2.3 配置PHP,在源码根路径下,把php.ini-production文件移动到安装路径下的lib中,并重命名为php.ini
[root@localhost php-7.1.2]# cp php.ini-production /usr/local/phpinstall/php-7.1.2/lib/php.ini
2.4 配置 httpd.conf 让apache支持PHP
# vi /usr/local/apache2/conf/httpd.conf
a. 找到 AddType application/x-gzip .gz .tgz 在其下添加如下内容
AddType application/x-httpd-php .php (.前面有空格)
AddType application/x-httpd-php-source .phps (.前面有空格)
b. 在DirectoryIndex增加index.php,以便Apache识别PHP格式的index
# vi /usr/local/apache/conf/httpd.conf
DirectoryIndex index.html index.php
3. 安装mysql
由于CentOS 7 版本将MySQL数据库软件从默认的程序列表中移除,用mariadb代替了,所以我们直接安装mariadb即可。
[root@localhost local]#yum install mariadb-server mariadb
mariadb数据库的相关命令是:
systemctl start mariadb #启动MariaDB
systemctl stop mariadb #停止MariaDB
systemctl restart mariadb #重启MariaDB
systemctl enable mariadb #设置开机启动
所以先启动数据库[root@localhost local]# systemctl start mariadb
然后就可以正常使用mysql了
4. 配置mysql
[root@localhost local]# mysql
出现了“mysql>”提示符,恭喜你,安装成功!
增加了密码后的登录格式如下:
[root@localhost local]#mysql -u root -p
Enter password: (输入密码)
其中-u后跟的是用户名,-p要求输入密码,回车后在输入密码处输入密码。
注意:这个mysql文件在/usr/bin目录下,与后面讲的启动文件/etc/init.d/mysql不是一个文件。
[root@localhost local]#/usr/bin/mysqladmin -u root password '123456'
对你连接的主机分配权限
>mysql GRANT SELECT,INSERT,UPDATE,DELETE ON *.* TO [email protected] identified by '123456'; //xxx.xxx.x.xx是你的IP
更改Mysql默认字符集
# cp my-medium.cnf /etc/my.cnf
在[client]下加入 default-character-set=utf8
在[mysqld]下加入 default-character-set=utf8
5. 数据库有关的命令
注意:MySQL中每个命令都要以分号结尾。
显示数据库
mysql>show database;
显示数据库中的表
mysql>use mysql; (打开库,对每个库进行操作都要打开此库)
mysql>show tables;
显示数据表数构
mysql>describe 表名;
显示表中的记录
mysql>select * from 表名;
建库
mysql>create database 库名;
建表
mysql>use 库名;
mysql>create table 表名(字段设定列表);
增加记录
mysql>insert into 表名(列名) values(....);
修改记录
mysql>update ...;
删除记录
mysql>delete from 表名 where ...;
删库和删表
mysql>drop database 库名;
mysql>drop table 表名;
删除匿名帐号:
mysql>delete from user where user='' ;
mysql>delete from user where password='';
mysql>delete from user where host<>'localhost' ;
使命令生效
mysql>flush privileges;
退出MYSQL
mysql>exit;
mysql> GRANT ALL PRIVILEGES ON *.* TO root@"%" IDENTIFIED BY "root";//为root添加远程连接的能