Android使用ViewGroup实现流式标签布局(靠左,靠右,居中)
在此之前都所使用的的布局都是第三方的,看了一些资料,自己稍微修改了下,今天借此机会来实现一个简单的流式布局,左对齐,右对齐和 居中三种模式。作为一个little tinny note吧,哈哈哈!
大致的实现思路:
1.继承ViewGroup重写onMeasure()和onLayout()方法;
2.在onMeasure()方法中测量所有子View的宽和高,此处会使用一个List来存储每一行所能放置的最大子View数量,并且记录下每一行所需要的宽度;方便后续在onLayout()方 法中进行布局。
3.在onLayout()方法中,根据设定的模式(setDefaultDisplayMode()方法包含两种模式:
//靠左放置标签
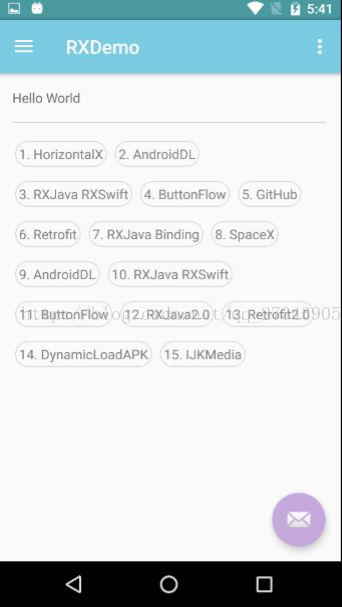
public static final int START_FROM_LEFT = 1;
//居中放置标签
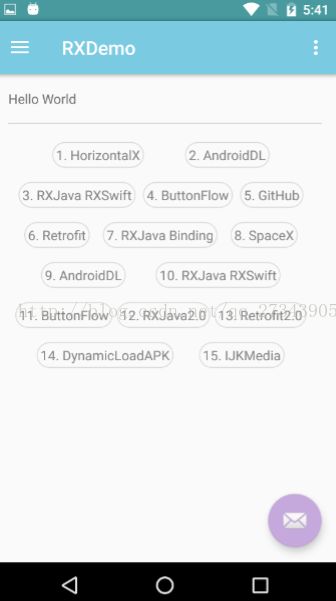
public static final int START_FROM_CENTER = 0;
//靠右放置标签
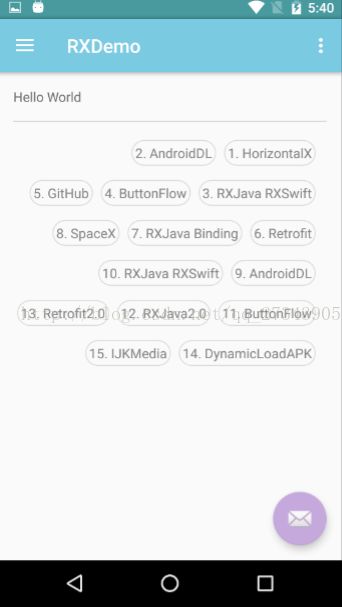
public static final int START_FROM_RIGHT = -1;
效果图:
1.
2.
3.
贴代码代码:
1.自定义标签布局SQLFlowLayout类(继承自ViewGroup)
public class SQLFlowLayout extends ViewGroup {
    //靠左放置标签
    public static final int START_FROM_LEFT = 1;
    //居中放置标签
    public static final int START_FROM_CENTER = 0;
    //靠右放置标签
    public static final int START_FROM_RIGHT = -1;

    private int lineMode = START_FROM_LEFT;
    // 水平间距,单位为px
    private int horizontalSpacing = 25;
    // 竖直间距,单位为px
    private int verticalSpacing = 45;
    // 行集合
    private List<Line> lines = new ArrayList<Line>();
    // 当前的行
    private Line line;
    // 当前行使用的空间
    private int lineUsedSize = 0;

    public void setDefaultDisplayMode(int lineMode) {
        this.lineMode = lineMode;
    }

    public SQLFlowLayout(Context context) {
        super(context);
    }

    public SQLFlowLayout(Context context, AttributeSet attrs) {
        super(context, attrs);
    }

    public SQLFlowLayout(Context context, AttributeSet attrs, int defStyleAttr) {
        super(context, attrs, defStyleAttr);
    }

    /**
     * 计算出所有子控件的宽和高,从而确定当前父布局的宽和高
     *
     * @param widthMeasureSpec
     * @param heightMeasureSpec
     */
    @Override
    protected void onMeasure(int widthMeasureSpec, int heightMeasureSpec) {
        super.onMeasure(widthMeasureSpec, heightMeasureSpec);

        // 实际可以用的宽和高(去除 padding 内边距)
        int width = MeasureSpec.getSize(widthMeasureSpec) - getPaddingLeft() - getPaddingRight();
        int height = MeasureSpec.getSize(heightMeasureSpec) - getPaddingBottom() - getPaddingTop();
        int widthMode = MeasureSpec.getMode(widthMeasureSpec);
        int heightMode = MeasureSpec.getMode(heightMeasureSpec);
        // Line初始化
        restoreLine();
        initLine();

        for (int count = getChildCount(), i = 0; i < count; i++) {
            View child = getChildAt(i);
            // 测量所有的childView
            int childWidthMeasureSpec = MeasureSpec.makeMeasureSpec(width,
                    widthMode == MeasureSpec.EXACTLY ? MeasureSpec.AT_MOST : widthMode);
            int childHeightMeasureSpec = MeasureSpec.makeMeasureSpec(height,
                    heightMode == MeasureSpec.EXACTLY ? MeasureSpec.AT_MOST : heightMode);
            //也可以 measureChild(child, childWidthMeasureSpec, childHeightMeasureSpec);
            child.measure(childWidthMeasureSpec, childHeightMeasureSpec);
            // 计算当前行已使用的宽度
            int measuredWidth = child.getMeasuredWidth();
            // 如果添加进去后宽度超过可用的宽度,需要换行,否则childView继续添加到当前的行上
            if (lineUsedSize + measuredWidth > width) {
                // 先换行,先将上一行保存到 lines 集合中,再换行
                saveAndNewLine();
            }
            //存储当前行已使用的宽度
            line.setUsedLineSize(lineUsedSize += measuredWidth + horizontalSpacing);
            //继续添加到当前行 line
            line.addChild(child);
        }

        // 如果有最后一行(未填满)把它记录到集合中
        if (line != null && !lines.contains(line)) {
            saveAndNewLine();
        }

        // 把所有行的高度加上
        int totalHeight = 0;
        for (Line curLine: lines) {
            totalHeight += curLine.getHeight();
        }
        // 加上行的竖直间距
        totalHeight += verticalSpacing * (lines.size() - 1);
        // 加上上下padding
        totalHeight += getPaddingBottom();
        totalHeight += getPaddingTop();

        /**
         * 设置自身尺寸,设置布局的宽高,宽度直接采用父 View 传递过来的最大宽度,而不用考虑子view是否填满宽度
         * 因为该布局的特性就是填满一行后,再换行。
         * 高度根据设置的模式来决定采用所有子View的高度之和还是采用父view传递过来的高度
         */
        setMeasuredDimension(MeasureSpec.getSize(widthMeasureSpec),
                resolveSize(totalHeight, heightMeasureSpec));
    }

    /**
     * 指定所有childView的位置,调用Line对象中的layout方法。
     * @param changed
     * @param l
     * @param t
     * @param r
     * @param b
     */
    @Override
    protected void onLayout(boolean changed, int l, int t, int r, int b) {
        int paddingLeft = getPaddingLeft();
        int paddingTop = getPaddingTop();
        int totalUsableWidth = getMeasuredWidth() - paddingLeft - paddingTop;
        for (Line curLine : lines) {
            curLine.layout(lineMode, paddingLeft, paddingTop, totalUsableWidth, horizontalSpacing);
            // 计算下一行 Y 轴起点坐标
            paddingTop = paddingTop + curLine.getHeight() + verticalSpacing;
        }
    }

    /**
     * 与当前ViewGroup对应的LayoutParams
     */
    @Override
    public LayoutParams generateLayoutParams(AttributeSet attrs) {
        return new MarginLayoutParams(getContext(), attrs);
    }

    private void initLine() {
        if (line == null) {
            // 创建新一行
            line = new Line();
        }
    }

    private void restoreLine() {
        lines.clear();
        line = new Line();
        lineUsedSize = 0;
    }

    /**
     * 换行,先将上一行保存到 lines 集合中,再换行
     */
    private void saveAndNewLine() {
        //过滤 当前行最后一个子控件末尾 horizontalSpacing
        if (lineUsedSize > 0) {
            line.setUsedLineSize(lineUsedSize - horizontalSpacing);
        }
        // 把之前的行记录下来加入到行集合中
        if (line != null) {
            lines.add(line);
        }
        //重置已用宽度为0
        lineUsedSize = 0;
        // 创建新的一行
        line = new Line();
    }

    //TODO................new class here..........
}
2.封装的存储每一行子View的类Line:
public class Line {
    // 子控件集合
    private List<View> childList = new ArrayList<View>();
    // 行高
    private int height;
    // 当前行已经使用的宽度
    private int lineUsedSize = 0;

    /**
     * 添加childView
     *
     * @param childView 子控件
     */
    public void addChild(View childView) {
        childList.add(childView);
        // 更新行高为当前最高的一个childView的高度
        if (height < childView.getMeasuredHeight()) {
            height = childView.getMeasuredHeight();
        }
    }

    /**
     * 设置childView的绘制区域
     *
     * @param left 左上角x轴坐标
     * @param top  左上角y轴坐标
     */
    public void layout(int lineMode, int left, int top, int totalUsableWidth, int horizontalSpacing) {
        // 当前childView的左上角x轴坐标
        switch (lineMode) {
            case SQLFlowLayout.START_FROM_LEFT:
                for (View view : childList) {
                    // 设置childView的绘制区域
                    view.layout(left, top,
                            left + view.getMeasuredWidth(), top + view.getMeasuredHeight());
                    // 计算下一个childView的位置
                    left += view.getMeasuredWidth() + horizontalSpacing;
                }
                break;

            case SQLFlowLayout.START_FROM_CENTER:
                int square = (horizontalSpacing * (childList.size() - 1) + totalUsableWidth - lineUsedSize)
                        / (childList.size() + 1);
                for (View view : childList) {
                    // 设置childView的绘制区域
                    left += square;
                    view.layout(left, top,
                            left + view.getMeasuredWidth(), top + view.getMeasuredHeight());
                    // 计算下一个childView的位置
                    left += view.getMeasuredWidth();
                }
                break;

            case SQLFlowLayout.START_FROM_RIGHT:
                left += totalUsableWidth - lineUsedSize;
                if (childList.size() > 0) {
                    for (int index = childList.size() - 1; index >= 0; index --) {
                        // 设置childView的绘制区域
                        childList.get(index).layout(left, top,
                                left + childList.get(index).getMeasuredWidth(), top + childList.get(index).getMeasuredHeight());
                        // 计算下一个childView的位置
                        left += childList.get(index).getMeasuredWidth() + horizontalSpacing;
                    }
                }
                break;
        }

    }

    public int getHeight() {
        return height;
    }

    public int getChildCount() {
        return childList.size();
    }

    public void setUsedLineSize(int lineUsedSize) {
        this.lineUsedSize = lineUsedSize;
    }
}
3.在MainActivity中测试效果:
private String[] mTags = new String[]{
        "1. HorizontalX", "2. AndroidDL", "3. RXJava RXSwift", "4. ButtonFlow", "5. GitHub", "6. Retrofit",
        "7. RXJava Binding", "8. SpaceX", "9. AndroidDL", "10. RXJava RXSwift", "11. ButtonFlow",
        "12. RXJava2.0", "13. Retrofit2.0", "14. DynamicLoadAPK", "15. IJKMedia"};

private SQLFlowLayout mFlowLayout;
private LayoutInflater mInflater;

@Override
protected void onCreate(Bundle savedInstanceState) {
    super.onCreate(savedInstanceState);
    setContentView(R.layout.activity_main);
initView();
    mInflater = LayoutInflater.from(this);
    mFlowLayout = (SQLFlowLayout) findViewById(R.id.layout_flow);
//设置mFlowLayout布局显示模式
mFlowLayout
.setDefaultDisplayMode
(
SQLFlowLayout
.
START_FROM_RIGHT
)
;
//将子View添加到容器中......
for (String textName : mTags) {
    TextView tv = (TextView) mInflater.inflate(R.layout.view_tv, mFlowLayout, false);
    tv.setText(textName);
    mFlowLayout.addView(tv);
}
TextView XML布局文件:
xml version="1.0" encoding="utf-8"?>
<TextView xmlns:android="http://schemas.android.com/apk/res/android"
    android:padding="4dp"
    android:textSize="14sp"
    android:text="Hello Wordld"
    android:textColor="@color/colorGrayDark"
    android:background="@drawable/shape_line_backround_gray"
    android:layout_width="wrap_content"
    android:layout_height="wrap_content">
TextView>
TextView背景shape_line_backround_gray.xml文件:
”
xml version="1.0" encoding="utf-8"?>
<shape xmlns:android="http://schemas.android.com/apk/res/android">
    <corners android:radius="16dp" />
    <stroke
        android:width="1dp"
        android:color="#d9d9d9" />
shape>
MainActivity布局文件:
<RelativeLayout xmlns:android="http://schemas.android.com/apk/res/android"
    xmlns:app="http://schemas.android.com/apk/res-auto"
    xmlns:tools="http://schemas.android.com/tools"
    android:id="@+id/content_main"
    android:layout_width="match_parent"
    android:layout_height="match_parent"
    android:paddingBottom="@dimen/activity_vertical_margin"
    android:paddingLeft="@dimen/activity_horizontal_margin"
    android:paddingRight="@dimen/activity_horizontal_margin"
    android:paddingTop="@dimen/activity_vertical_margin"
    app:layout_behavior="@string/appbar_scrolling_view_behavior"
    tools:context="com.example.admins.rxdemo.MainActivity"
    tools:showIn="@layout/app_bar_main">

    <TextView
        android:id="@+id/tv_type"
        android:layout_width="wrap_content"
        android:layout_height="wrap_content"
        android:text="Hello World" />

    <View
        android:layout_below="@+id/tv_type"
        android:layout_marginTop="16dp"
        android:id="@+id/driver_h"
        android:layout_width="match_parent"
        android:layout_height="1dp"
        android:background="@color/colorGrayLight">View>

    <com.example.admins.rxdemo.common.view.SQLFlowLayout
        android:layout_below="@+id/driver_h"
        android:padding="3dp"
        android:layout_marginTop="16dp"
        android:id="@+id/layout_flow"
        android:layout_width="match_parent"
        android:layout_height="wrap_content">
    com.example.admins.rxdemo.common.view.SQLFlowLayout>


RelativeLayout>


