单体Istio部署
前言:北京时间 2020 年 3 月 6 日 凌晨发布了 1.5 版本,该版本最大的变化是将控制平面的所有组件组合成一个单体结构叫 istiod。

在 Istio 1.5 中,饱受诟病的 Mixer 终于被废弃了,新版本的 HTTP 遥测默认基于 in-proxy Stats filter,同时可使用 WebAssembly[1] 开发 in-proxy 扩展。更详细的说明请参考 Istio 1.5 发布公告。
在部署 Istio 之前,首先需要确保 Kubernetes 集群(kubernetes 版本建议在 1.14 以上)已部署并配置好本地的 kubectl 客户端。
一、Kubernetes 环境准备
1.1、前提条件
下载kubernetes 离线安装包
下载最新版本sealos
务必同步服务器时间
主机名不可重复
1.2、安装 kubernetes 集群
sealos init --master 192.168.3.47 \
    --node 192.168.3.120 \
    --node 192.168.3.91 \
    --user root \
    --passwd 123456 \
    --version v1.17.0 \
    --pkg-url /opt/tools/kube1.17.0.tar.gz
检查安装是否正常:
$ kubectl get node
NAME      STATUS   ROLES    AGE   VERSION
node120   Ready       25h   v1.17.0
node47    Ready    master   25h   v1.17.0
node91    Ready       25h   v1.17.0
二、部署Istio
2.1、下载Istio部署文件
你可以从 GitHub 的 release 页面下载 istio,或者直接通过下面的命令下载:
$ curl -L https://istio.io/downloadIstio | sh -
下载完成后会得到一个 istio-1.5.0 目录,里面包含了:
- install/kubernetes : 针对 Kubernetes 平台的安装文件
- samples : 示例应用
- bin : istioctl 二进制文件,可以用来手动注入 sidecar proxy
进入 istio-1.5.0 目录。
$ cd istio-1.5.0

$ tree -L 1 ./
./
├── bin
├── install
├── LICENSE
├── manifest.yaml
├── README.md
├── samples
└── tools

4 directories, 4 files
将 istioctl 拷贝到 /usr/local/bin/ 中:
$ cp bin/istioctl /usr/local/bin/
2.2、开启 istioctl 的自动补全功能
bash将 tools 目录中的 istioctl.bash 拷贝到 $HOME 目录中:
$ cp tools/istioctl.bash ~/
在 ~/.bashrc 中添加一行:
$ source ~/istioctl.bash
应用生效:
$ source ~/istioctl.bash
zsh将 tools 目录中的 _istioctl 拷贝到 $HOME 目录中:
$ cp tools/_istioctl ~/
在 ~/.zshrc 中添加一行:
$ source ~/_istioctl
应用生效:
$ source ~/.zshrc
2.3、部署Istio
istioctl 提供了多种安装配置文件,可以通过下面的命令查看:
$ ll install/kubernetes/operator/profiles

-rw-r--r-- 1 root root  18K 3月   4 20:40 default.yaml
-rw-r--r-- 1 root root 3.2K 3月   4 20:40 demo.yaml
-rw-r--r-- 1 root root  964 3月   4 20:40 empty.yaml
-rw-r--r-- 1 root root  913 3月   4 20:40 minimal.yaml
-rw-r--r-- 1 root root  579 3月   4 20:40 remote.yaml
-rw-r--r-- 1 root root  554 3月   4 20:40 separate.yaml
它们之间的差异如下:
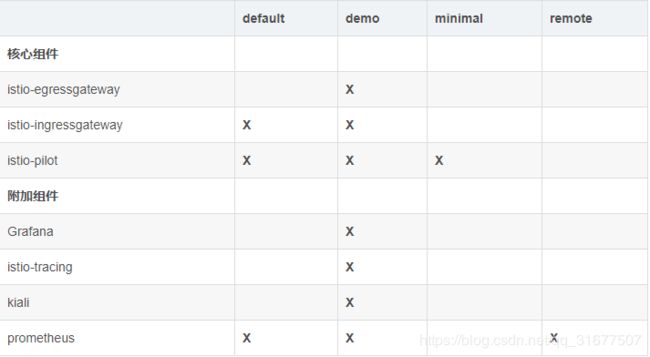
其中标记 X 表示该安装该组件。
如果只是想快速试用并体验完整的功能,可以直接使用配置文件 demo 来部署。
Istio CNI Plugin
当前实现将用户 pod 流量转发到 proxy 的默认方式是使用 privileged 权限的 istio-init 这个 init container 来做的(运行脚本写入 iptables),需要用到 NET_ADMIN capabilities。对 linux capabilities 不了解的同学可以参考 Linux capabilities 系列。
Istio CNI 插件的主要设计目标是消除这个 privileged 权限的 init container,换成利用 Kubernetes CNI 机制来实现相同功能的替代方案。具体的原理就是在 Kubernetes CNI 插件链末尾加上 Istio 的处理逻辑,在创建和销毁 pod 的这些 hook 点来针对 istio 的 pod 做网络配置:写入 iptables,让该 pod 所在的 network namespace 的网络流量转发到 proxy 进程。
详细内容请参考官方文档。
Kubernetes 关键插件(Critical Add-On Pods)
众所周知,Kubernetes 的核心组件都运行在 master 节点上,然而还有一些附加组件对整个集群来说也很关键,例如 DNS 和 metrics-server,这些被称为关键插件。一旦关键插件无法正常工作,整个集群就有可能会无法正常工作,所以 Kubernetes 通过优先级(PriorityClass)来保证关键插件的正常调度和运行。要想让某个应用变成 Kubernetes 的关键插件,只需要其 priorityClassName 设为 system-cluster-critical 或 system-node-critical,其中 system-node-critical 优先级最高。
注意:关键插件只能运行在 kube-system namespace 中!
详细内容可以参考官方文档。
接下来正式安装 Istio,首先部署 Istio operator:
$ istioctl operator init
该命令会创建一个 namespace istio-operator,并将 Istio operator 部署在此 namespace 中。
$ kubectl -n istio-operator get pod

NAME                              READY   STATUS    RESTARTS   AGE
istio-operator-7c69599466-bz8lp   1/1     Running   0          3h29m
然后创建一个 CR IstioOperator:
$ kubectl create ns istio-system
$ cat < /root/istio/IstioOperator.yaml
apiVersion: install.istio.io/v1alpha1
kind: IstioOperator
metadata:
  namespace: istio-system
  name: example-istiocontrolplane
spec:
  profile: demo
  components:
    cni:
      enabled: true
      namespace: kube-system
    ingressGateways:
    - enabled: true
      k8s:
        service:
          type: ClusterIP
        strategy:
          rollingUpdate:
            maxUnavailable: 100%
            maxSurge: 0%
        nodeSelector:
          kubernetes.io/hostname: node120
  values:
    cni:
      excludeNamespaces:
       - istio-system
       - kube-system
       - monitoring
      logLevel: info
EOF

$ istioctl manifest apply -f IstioOperator.yaml
其中各个字段的详细含义请参考 IstioOperator API 文档,这里我简要说明一下:
- istio-ingressgateway 的 Service 默认类型为 LoadBalancer,需将其改为 ClusterIP。
- 为防止集群资源紧张,更新配置后无法创建新的 Pod,需将滚动更新策略改为先删除旧的,再创建新的。
- 将 istio-ingressgateway 调度到指定节点。
- 默认情况下除了 istio-system namespace 之外,istio cni 插件会监视其他所有 namespace 中的 Pod,然而这并不能满足我们的需求,更严谨的做法是让 istio CNI 插件至少忽略 kube-system、istio-system 这两个 namespace,如果你还有其他的特殊的 namespace,也应该加上,例如 monitoring。
部署完成后,查看各组件状态:
$ kubectl -n istio-system get pod
NAME                                    READY   STATUS    RESTARTS   AGE
grafana-5cc7f86765-vbqwt                1/1     Running   0          17h
istio-egressgateway-57999c5b76-nqv5s    1/1     Running   0          17h
istio-ingressgateway-85c6575cf7-ljdq9   1/1     Running   0          17h
istio-tracing-8584b4d7f9-8x4qs          1/1     Running   0          17h
istiod-86798869b8-b2vhv                 1/1     Running   0          17h
kiali-76f556db6d-ntplh                  1/1     Running   0          17h
prometheus-6fd77b7876-xzdqz             2/2     Running   0          17h
$ kubectl -n kube-system get pod -l k8s-app=istio-cni-node

NAME                   READY   STATUS    RESTARTS   AGE
istio-cni-node-4dlfb   2/2     Running   0          3h12m
istio-cni-node-4s9s7   2/2     Running   0          3h12m
istio-cni-node-8g22x   2/2     Running   0          3h12m
istio-cni-node-x2drr   2/2     Running   0          3h12m
可以看到 cni 插件已经安装成功,查看配置是否已经追加到 CNI 插件链的末尾:
$ cat /etc/cni/net.d/10-calico.conflist
{
  "name": "k8s-pod-network",
  "cniVersion": "0.3.1",
  "plugins": [
    {
      "type": "calico",
      "log_level": "info",
      "datastore_type": "kubernetes",
      "nodename": "node47",
      "mtu": 1440,
      "ipam": {
        "type": "calico-ipam"
      },
      "policy": {
        "type": "k8s"
      },
      "kubernetes": {
        "kubeconfig": "/etc/cni/net.d/calico-kubeconfig"
      }
    },
    {
      "type": "portmap",
      "snat": true,
      "capabilities": {
        "portMappings": true
      }
    },
    {
      "cniVersion": "0.3.1",
      "name": "istio-cni",
      "type": "istio-cni",
      "log_level": "info",
      "kubernetes": {
        "kubeconfig": "/etc/cni/net.d/ZZZ-istio-cni-kubeconfig",
        "cni_bin_dir": "/opt/cni/bin",
        "exclude_namespaces": [
          "istio-system",
          "kube-system",
          "monitoring"
        ]
      }
    }
  ]
}
2.4、暴露 Dashboard
通过 Ingress Controller 暴露就好了,可以参考 Istio 1.0 部署。如果使用 Contour 的可以参考我的另一篇文章:Contour 学习笔记(一):使用 Contour 接管 Kubernetes 的南北流量。
2.5、暴露 Gateway
为了暴露 Ingress Gateway,我们可以使用 hostport 暴露端口,并将其调度到某个固定节点,上面的部署方法就是这么做的。如果你的 CNI 插件不支持 hostport,可以使用 HostNetwork 模式运行,但你会发现无法启动 ingressgateway 的 Pod,因为如果 Pod 设置了 HostNetwork=true,则 dnsPolicy 就会从 ClusterFirst 被强制转换成 Default。而 Ingress Gateway 启动过程中需要通过 DNS 域名连接 pilot 等其他组件,所以无法启动。
我们可以通过强制将 dnsPolicy 的值设置为 ClusterFirstWithHostNet 来解决这个问题,详情参考:Kubernetes DNS 高阶指南。
修改后的 ingressgateway deployment 配置文件如下:
apiVersion: extensions/v1beta1
kind: Deployment
metadata:
  name: istio-ingressgateway
  namespace: istio-system
  ...
spec:
  ...
  template:
    metadata:
    ...
    spec:
      affinity:
        nodeAffinity:
          ...
          requiredDuringSchedulingIgnoredDuringExecution:
            nodeSelectorTerms:
            - matchExpressions:
              - key: kubernetes.io/hostname
                operator: In
                values:
                - sealos02   # 假设你想调度到这台主机上
      ...
      dnsPolicy: ClusterFirstWithHostNet
      hostNetwork: true
      restartPolicy: Always
      ...
接下来我们就可以在浏览器中通过 Gateway 的 URL 来访问服务网格中的服务了。
声明:本文基于https://blog.csdn.net/alex_yangchuansheng/article/details/104707947/文档加上自己实操后总结编写。