基于SSM框架的登陆注册demo
一、使用Mybatis-Generator自动生成Dao、Model、Mapping相关文件
1.相关文件截图
其中java是空的目录,利用Mybatis-Generator自动生成的相关文件后,会出现在java文件下,本demo中的数据库名是ssmdemo,需要读者先去MySql简历ssmdemo表,再运行上图中的ssmdemo.sql文件才可以进行下一步
2.相关文件下载
百度云下载:https://pan.baidu.com/s/1raIP5cjUR39LX9YCnCeD3w
3.生成Dao、Model、Mapping相关文件
修改generator.xml文件
generator.xml文件中标记序号的地方,都需要根据自己实际情况进行修改
回到文件所在目录,按着shift键,右击鼠标,打开powershell窗口,执行自动生成语句
java -jar mybatis-generator-core-1.3.2.jar -configfile generator.xml -overwrite打开java文件,就可以看见生成的Dao、Model、Mapping相关文件已经在里面了,接下来把这些文件移动到workspace里相对应项目的java文件夹
二、整合SSM框架
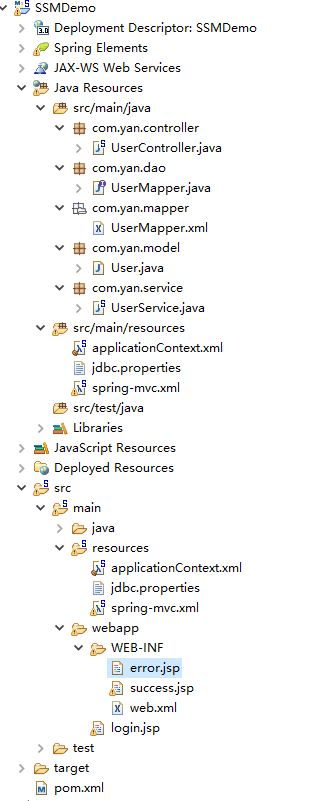
1.SSMDemo的目录结构
配置文件的名称和存放的位置,建议和图上的一致,但是包的名称是会根据实际情况而改变的
配置文件:web.xml,applicationContext.xml,spring-mvc.xml,jdbc.properties
包:com.yan.controller,com.yan.dao,com.yan.service,com.yan.mapper
2.web.xml
        contextConfigLocation

            classpath:applicationContext.xml


        org.springframework.web.context.ContextLoaderListener


        org.springframework.web.util.IntrospectorCleanupListener


        encodingFilter
        org.springframework.web.filter.CharacterEncodingFilter

            encoding
            UTF-8


            forceEncoding
            true


        encodingFilter
        /*


        dispatcher
        org.springframework.web.servlet.DispatcherServlet


            contextConfigLocation
            classpath:spring-mvc.xml

        1


        dispatcher
        /


        login.jsp
3.applicationContext.xml(根据实际情况修改1,2,3中的包的名称)
4.spring-mvc.xml(根据实际情况修改1中的包的名称)
text/html;charset=UTF-8
5.jdbc.properties
driver=com.mysql.jdbc.Driver
#根据实际情况修改数据库名ssmdemo和端口3306
url=jdbc:mysql://localhost:3306/ssmdemo?useUnicode=true&characterEncoding=utf-8
name=root
password=root
#定义初始连接数
initialSize=0
#定义最大连接数
maxActive=20
#定义最大空闲
maxIdle=20
#定义最小空闲
minIdle=1
#定义最长等待时间
maxWait=60000
6.UserController.java
package com.yan.controller;


import org.springframework.beans.factory.annotation.Autowired;
import org.springframework.context.annotation.Scope;
import org.springframework.stereotype.Controller;
import org.springframework.web.bind.annotation.RequestMapping;
import org.springframework.web.bind.annotation.RequestMethod;
import org.springframework.web.bind.annotation.ResponseBody;
import org.springframework.web.servlet.ModelAndView;

import com.yan.model.User;
import com.yan.service.UserService;

import javax.servlet.http.HttpServletRequest;

//@Controller注解用于标示本类为web层控制组件
@Controller
//在默认情况下springmvc的实例都是单例模式,以使用scope域将其注解为每次都创建一个新的实�?
@Scope("prototype")
public class UserController {

    @Autowired
    UserService userService;

    @RequestMapping("/login")
	public String login(User user,HttpServletRequest request){
    	//调用Service层
    	boolean loginType = userService.login(user.getUsername(),user.getPassword());
    	//登陆成功
    	if(loginType){
    			//如果验证通过,则将用户信息传到前台
    			request.setAttribute("user",user);
    			//并跳转到success.jsp页面
    			return "success";
    	//登陆失败
    	}else{
    		request.setAttribute("message","用户名密码错误!");
    		return "error";
    	}
    }

//    //使用ModelAndView控制页面跳转和传递数据
//    @RequestMapping(value = "/login",method = RequestMethod.POST)
//	public ModelAndView login(User user,HttpServletRequest request){
//    	boolean loginType = userService.login(user.getUsername(),user.getPassword());
//    	if(loginType){
//    		//直接使用ModelAndView构造方法指定返回的页面名称success
//        	ModelAndView mav = new ModelAndView("success");
//        	//使用addObject()设置需要返回的数据
//        	mav.addObject("message", "使用ModelAndView控制页面跳转和传递数据");
//        	return mav;
//    	}else{
//    		//直接使用ModelAndView构造方法指定返回的页面名称success
//        	ModelAndView mav = new ModelAndView();
//        	//通过setViewName()方法跳转到指定的页面
//        	mav.setViewName("error");
//        	//使用addObject()设置需要返回的数据
//        	mav.addObject("message", "使用ModelAndView控制页面跳转和传递数据");
//        	return mav;
//    	}
//    }

}
7.UserService.java
package com.yan.service;

import org.springframework.beans.factory.annotation.Autowired;
import org.springframework.stereotype.Service;

import com.yan.dao.UserMapper;
import com.yan.model.User;

@Service
public class UserService {
	 @Autowired
	 UserMapper userMapper;
    //登录方法的实现,从jsp页面获取username与password
    public boolean login(String username, String password) {
        //调用DAO层
        User user = userMapper.selectByName(username);
        if (user != null) {
            if (user.getUsername().equals(username) && user.getPassword().equals(password))
                return true;
        }
        return false;
    }
}
8.UserMapper.java
package com.yan.dao;

import com.yan.model.User;

public interface UserMapper {
    int deleteByPrimaryKey(Integer id);

    int insert(User record);

    int insertSelective(User record);

    User selectByPrimaryKey(Integer id);

    int updateByPrimaryKeySelective(User record);

    int updateByPrimaryKey(User record);

    //上面的都是由Mybatis-Generator自动生成的
    //下面这条是用来实现登陆功能的
    User selectByName(String username);
}
9.UserMapper.xml
id, password, username
delete from tb_user
where id = #{id,jdbcType=INTEGER}
insert into tb_user (id, password, username
)
values (#{id,jdbcType=INTEGER}, #{password,jdbcType=VARCHAR}, #{username,jdbcType=VARCHAR}
)
insert into tb_user
id,
password,
username,
#{id,jdbcType=INTEGER},
#{password,jdbcType=VARCHAR},
#{username,jdbcType=VARCHAR},
update tb_user
password = #{password,jdbcType=VARCHAR},
username = #{username,jdbcType=VARCHAR},
where id = #{id,jdbcType=INTEGER}
update tb_user
set password = #{password,jdbcType=VARCHAR},
username = #{username,jdbcType=VARCHAR}
where id = #{id,jdbcType=INTEGER}
10.User.java
package com.yan.model;

public class User {
    private Integer id;

    private String password;

    private String username;

    public Integer getId() {
        return id;
    }

    public void setId(Integer id) {
        this.id = id;
    }

    public String getPassword() {
        return password;
    }

    public void setPassword(String password) {
        this.password = password == null ? null : password.trim();
    }

    public String getUsername() {
        return username;
    }

    public void setUsername(String username) {
        this.username = username == null ? null : username.trim();
    }
}
11.login.jsp
<%@ page contentType="text/html;charset=UTF-8" language="java" %>
<%
String path = request.getContextPath();
String basePath = request.getScheme()+"://"+request.getServerName()+":"+request.getServerPort()+path+"/";
%>
12.SSMdemo源码下载
百度云下载:https://pan.baidu.com/s/1qEdFpA9zeq0jwIFZ-kgQsg
三、总结
1、DAO层: 持久层 主要与数据库进行交互
DAO层主要是做数据持久层的工作,主要与数据库进行交互。DAO层首先会创建DAO接口,然后会在配置文件中定义该接口的实现类,
接着就可以在模块中就可以调用DAO 的接口进行数据业务的而处理,并且不用关注此接口的具体实现类是哪一个类。DAO 层的数据源和数据库连接的参数数都是在配置文件中进行配置的。
2、Entity层(domain层) 实体层 数据库在项目中的类
3、Service层(biz):业务层 控制业务
Service层主要负责业务模块的逻辑应用设计。和DAO层一样都是先设计接口,再创建要实现的类,然后在配置文件中进行配置其实现的关联。接下来就可以在service层调用接口进行业务逻辑应用的处理。
封装Service层的业务逻辑有利于业务逻辑的独立性和重复利用性。
4、Controller层:(action层) 控制层 控制业务逻辑
Controller层负责具体的业务模块流程的控制,controller层主要调用Service层里面的接口控制具体的业务流程,控制的配置也需要在配置文件中进行。
5、View层 此层与控制层结合比较紧密,需要二者结合起来协同工发。View层主要负责前台jsp页面的表示,
Conroller层和Service层的区别是:Controlle层负责具体的业务模块流程的控制;Service层负责业务模块的逻辑应用设计;
总结:在具体的项目中,其流程为:Controller层调用Service层的方法,Service层调用Dao层中的方法,其中调用的参数是使用Entity层进行传递的。


