LNMP环境搭建Wordpress博客
目录
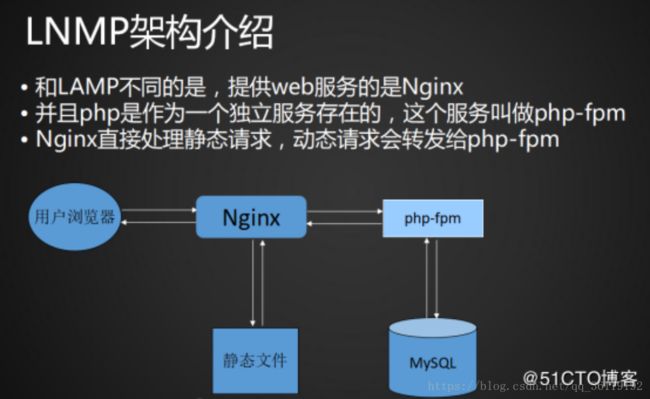
LNMP架构工作原理
yum源安装
网站源包安装
LNMP是Linux Nginx MySQL/MariaDB Php/perl/python 的简称,是近些年才逐渐发展起来的构架,发展非常迅速,服务器以其轻巧快速而得到许多站长的青睐。 Nginx特点在于其相当的稳定、功能丰富、安装配置简单、低系统资源。
LNMP方式的优点:占用VPS资源较少,Nginx配置起来也比较简单,利用fast-cgi的方式动态解析PHP脚本。
LNMP方式的缺点:php-fpm组件的负载能力有限,在访问量巨大的时候,php-fpm进程容易僵死,容易发生502 bad gateway错误
LNMP架构工作原理
下面就开始在LNMP环境下搭建Wordpress博客!
yum源安装
Nginx的配置
- 安装Ngnix: yum -y install nginx
- 开启nginx服务:systemctl start nginx
- 设置nginx开机自启:systemctl enable nginx
PHP组件的安装
- 安装nginx支持php的组件: yum -y install php-fpm
- 安装php连接mysql的组件: yum -y install php-mysql
数据库的配置
- 安装mysql: yum -y install mariadb-server ,
- 开启数据库: systemctl start mariadb
- 并且设置为开机自启: systemctl enable mariadb
- 初始化数据库,设置root密码: mysql_secure_installation
- 登录数据库: mysql -uroot -p
- 创建discuz的数据库: mysql> create database wordpress;
- 给discuz创建一个用户,并且赋予权限: grant all on wordpress.* to test@'localhost' identified by '123';
- 刷新权限: flush privileges;
wordpress的配置
安装wordpress: yum -y install wordpress
网站被安装在 /usr/share/wordpress 下了,所以我们得再去修改nginx的配置文件/etc/nginx/conf.d/default.conf
location / {
        root   /usr/share/wordpress/;
        index   index.php index.html index.htm;         //在这里加上 index.php
   }
location ~ \.php$ {
        root           /usr/share/wordpress/;    //修改为网站目录
        fastcgi_pass   127.0.0.1:9000;
        fastcgi_index  index.php;
        fastcgi_param  SCRIPT_FILENAME  $document_root$fastcgi_script_name;  //修改行
        include        fastcgi_params;
    }
然后我们再去修改wordpress的配置文件 /usr/share/wordpress/wp-config.php , 将下面几行信息修改了
define('DB_NAME', 'wordpress');

/** MySQL database username */
define('DB_USER', 'test');

/** MySQL database password */
define('DB_PASSWORD', '123');

/** MySQL hostname */
define('DB_HOST', 'localhost');
然后现在就可以去访问我们的页面了,用yum安装的默认是英文版。
我们可以下载wordpress的中文版,然后找到里面wp-content目录下的language包: 链接: Wordpress中文版 提取码: ch96
然后将其移动到 /usr/share/wordpress/wp-content/ 目录下,然后在wordpress的配置文件wp-config.conf 内加上一行: define('WPLANG', 'zh_CN');
网站源包安装
Nginx的配置
- 安装Ngnix: yun -y install nginx
- 开启nginx服务:systemctl start nginx
- 设置nginx开机自启:systemctl enable nginx
PHP组件的安装
- 安装nginx支持php的组件: yum -y install php-fpm
- 安装php连接mysql的组件: yum -y install php-mysql
- 修改nginx的配置文件 /etc/nginx/conf.d/default.conf
location / {
        root   /usr/share/nginx/html;
        index   index.php index.html index.htm;         //在这里加上 index.php
   }
location ~ \.php$ {
        root           /usr/share/nginx/html/;    //修改为网站目录
        fastcgi_pass   127.0.0.1:9000;
        fastcgi_index  index.php;
        fastcgi_param  SCRIPT_FILENAME  $document_root$fastcgi_script_name;  //修改行
        include        fastcgi_params;
    }
- 开启php-fpm:systemctl start php-fpm
- nginx重载配置文件: nginx -s reload
数据库的配置
- 安装mysql: yum -y install mariadb-server
- 开启数据库: systemctl start mariadb
- 并且设置为开机自启: systemctl enable mariadb
- 初始化数据库,设置root密码: mysql_secure_installation
- 登录数据库: mysql -uroot -p
- 创建discuz的数据库: mysql> create database wordpress;
- 给discuz创建一个用户,并且赋予权限: grant all on wordpress.* to test@'localhost' identified by '123'
- 刷新权限: flush privileges;
wordpress的配置
我们去下载wordpress的中文源码包,链接: Wordpress中文版 提取码: igys
然后解压: tar -xzvf wordpress-4.9.4-zh_CN.tar.gz
进入解压目录,将里面所有内容移动至/usr/share/nginx/html/ 目录下: mv * /usr/share/nginx/html/
将 wp-config-sample.php重命名为 wp-config.php: mv wp-config-sample.php wp-config.php
然后修改下面几行
define('DB_NAME', 'wordpress');

/** MySQL database username */
define('DB_USER', 'test');

/** MySQL database password */
define('DB_PASSWORD', '123');

/** MySQL hostname */
define('DB_HOST', 'localhost');
然后就可以去访问我们的网站了
相关文章:Linux中Nginx服务器的部署和配置
Linux中数据库的安装和配置(MySQL与Maria DB)

