Axis1.4 服务器端和客户端搭建
学以致用,欢迎转载,更多联系QQ:289325414
一、创建Maven-web项目
eclipse
(请参考)https://blog.csdn.net/qq_37203082/article/details/100557128
idea
https://www.cnblogs.com/zhangchengzi/p/9865546.html
二、pom.xml 引用JAR包
  4.0.0

  com.spdb
  axis
    war
  0.0.1-SNAPSHOT

  axis

  http://maven.apache.org


    UTF-8
    1.7
    1.7


      junit
      junit
      4.11
      test


			junit
			junit
			4.11
			test


			javax.servlet
			javax.servlet-api
			4.0.0


			axis
			axis
			1.4


			axis
			axis-wsdl4j
			1.5.1


			javax.mail
			mail
			1.4.7


            com.alibaba
            fastjson
            1.2.28


  	axis


          maven-clean-plugin
          3.1.0


          maven-resources-plugin
          3.0.2


          maven-compiler-plugin
          3.8.0


          maven-surefire-plugin
          2.22.1


          maven-jar-plugin
          3.0.2


          maven-install-plugin
          2.5.2


          maven-deploy-plugin
          2.8.2


          maven-site-plugin
          3.7.1


          maven-project-info-reports-plugin
          3.0.0
三、编写简单的业务逻辑
实现类
package com.spdb.axis.impl;

import java.sql.Date;
import java.text.SimpleDateFormat;

import com.alibaba.fastjson.JSON;
import com.alibaba.fastjson.JSONArray;
import com.alibaba.fastjson.JSONObject;
import com.spdb.axis.service.StudentService;
import com.spdb.axis.util.StudAppUtil;


/**
 *
 * 公共学生信息服务的实现类
 *
 * @author CJW
 *
 */
public class StudentServiceImpl implements StudentService {


	@Override
	public String getStudentMarks(String strInfoDo) {
		JSONObject map = JSON.parseObject(strInfoDo);
		return StudAppUtil.invokeInnerService(map, "getStudentMarks");
	}

	@Override
	public String getStudentList(String strInfoDo) {
		SimpleDateFormat format=new SimpleDateFormat("yyyy-MM-dd HH:mm:ss");
		Date date=new Date(System.currentTimeMillis());
	    String time=format.format(date);
	    System.out.println(time);
		JSONArray list = JSON.parseArray(strInfoDo);
		System.out.println(list.get(0));
		return String.valueOf(list.size());
	}

}
接口类
package com.spdb.axis.service;

/**
 *
 * 公共的学生信息服务接口
 *
 * @author CJW
 *
 */
public interface StudentService {


	/**
	 * 根据学号和学科号获取成绩
	 *
	 * @param studentNo
	 *            学生学号
	 * @param subjectNo
	 *            学科号
	 * @return 成绩
	 */
	String getStudentMarks(String strInfoDo);


	/**
	 * 获取大量LIST
	 *
	 * @param studentNo
	 *            学生学号
	 * @param subjectNo
	 *            学科号
	 * @return 成绩
	 */
	String getStudentList(String strInfoDo);


}
一个工具类
package com.spdb.axis.util;

import java.util.Map;

/**
 *
 * 公共学生信息工具类
 *
 * @author CJW
 *
 */
public class StudAppUtil {

	/**
	 *
	 * 调用内部服务
	 *
	 * @param dataMap
	 *            请求数据集
	 * @param txnCode
	 *            交易码
	 * @return 返回交易的结果信息
	 */
	public static String invokeInnerService(Map dataMap, String txnCode) {

		String responseInfo = "";

		 if("getStudentMarks".equals(txnCode)){
			String studentNo = (String)dataMap.get("studentNo");
			String subjectNo = (String)dataMap.get("subjectNo");
			responseInfo = "学号=" + studentNo +",学科号="+subjectNo + ",成绩=98";
		}
		System.out.println(responseInfo);
		return responseInfo;
	}
}
四、配置WEB.xml
  Archetype Created Web Application


        AxisServlet
        org.apache.axis.transport.http.AxisServlet


        AxisServlet
        /services/*
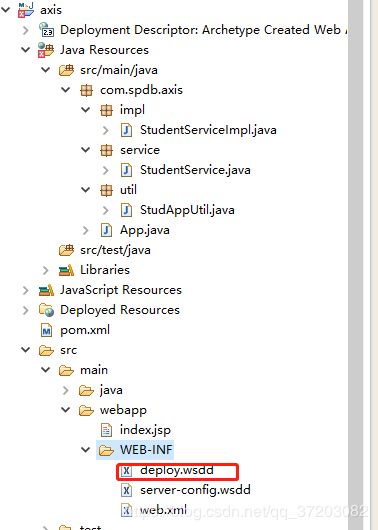
创建deploy.wsdd 文件
  Archetype Created Web Application


        AxisServlet
        org.apache.axis.transport.http.AxisServlet


        AxisServlet
        /services/*
五、创建 server-config.wsdd
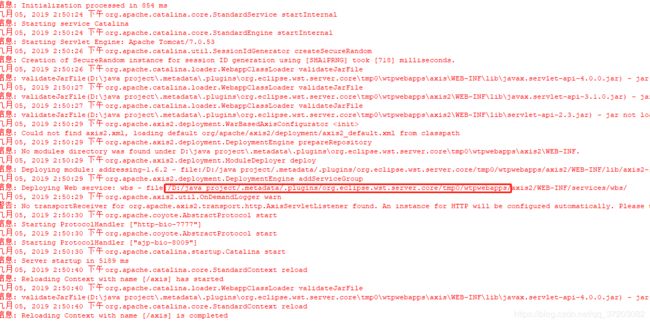
1.DOS命令窗口下切换到我们应用的部署路径下面,我的本地的部署路径为:D:\MyDeveloper\normal\workspace.metadata.plugins\org.eclipse.wst.server.core\tmp0\wtpwebapps\axis\WEB-INF
(tomcat启动打印的内容,能找到部署路径)
2.在该路径下执行如下一行命令:
java -Djava.ext.dirs=lib org.apache.axis.client.AdminClient -l http://127.0.0.1:7777/axis/services deploy.wsdd
执行成功后如下图:说明server-config.wsdd文件生成成功了
六、复制server-config.wsdd到项目中去
七、启动TOMCAT
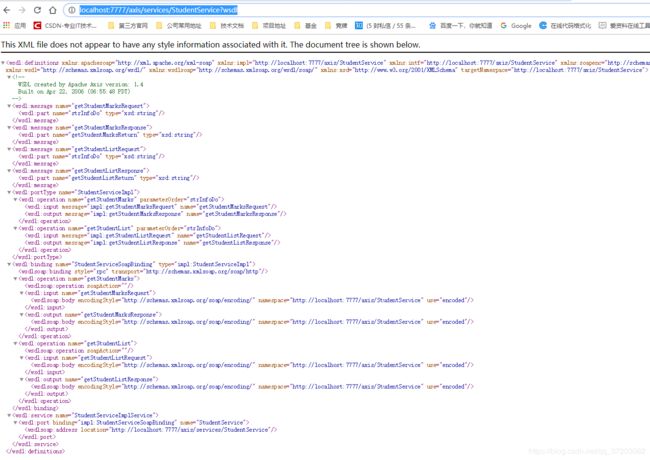
浏览器输入后
http://localhost:7777/axis/services/StudentService?wsdl
显示如下即表示成功
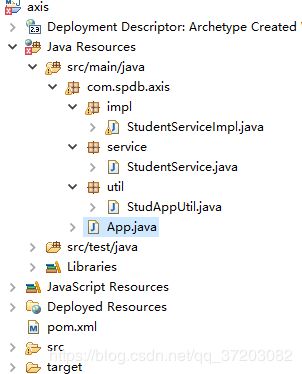
以上就是服务器端的全部代码结构
下面创建一个简单的客户端验证报文发送
一、创建maven项目
二、Pom.xml 添加jar引用
  4.0.0

  com.spdb
  axisCus
  0.0.1-SNAPSHOT
  war

  axisCus Maven Webapp

  http://www.example.com


    UTF-8
    1.7
    1.7


      junit
      junit
      4.11
      test


            axis
            axis
            1.4


            axis
            axis-wsdl4j
            1.5.1


            javax.mail
            mail
            1.4.7


    axisCus


          maven-clean-plugin
          3.1.0


          maven-resources-plugin
          3.0.2


          maven-compiler-plugin
          3.8.0


          maven-surefire-plugin
          2.22.1


          maven-war-plugin
          3.2.2


          maven-install-plugin
          2.5.2


          maven-deploy-plugin
          2.8.2
建立一个程序Test文件
package com;


import java.rmi.RemoteException;

import javax.xml.rpc.ServiceException;

import org.apache.axis.client.Call;
import org.apache.axis.client.Service;

import javax.xml.namespace.QName;

public class Test {

	public static void main(String[] args) {
		 try {

			    String xmlStr="123";
	            String result2= invoke("http://localhost:7777/axis/services/StudentService","getStudentInfo",xmlStr);
	            System.out.println(result2);
	        } catch (Exception e) {
	        	e.printStackTrace();
	        }
	}

    /*
     * 调用webservice路口
     * @param endpoint 地址
     * @param methodName 调用的方法
     * @param xmlStr 传递的xml字符串参数
     * @return
     */
    public static String invoke(String endpoint, String methodName, String xmlStr) {
        Service service = new Service();
        Call call = null;
        try {
            call = (Call) service.createCall();
        } catch (ServiceException e) {
            e.printStackTrace();
        }
        QName qn = new QName(methodName);
        call.setOperationName(qn);
        call.setTargetEndpointAddress(endpoint);
        call.setUseSOAPAction(true);
        String result = "";
        try {
            // 给方法传递参数,并且调用方法
            result = (String) call.invoke(new Object[]{xmlStr});
        } catch (RemoteException e) {
            e.printStackTrace();
        }
        return result;
    }
}
启动运行,有值返回则说明服务器端和客户端。通信成功
源码:
服务器端:https://github.com/chenjunwei111/axis1.4
客户端:https://github.com/chenjunwei111/axisCus
参考:
https://blog.csdn.net/jack_david/article/details/86532983#tomcat_228


