Android Camera 四 Camera HAL 分析
Android Camera 一 源码路径
Android Camera 二 JNI JAVA和C/CPP图像数据传输流程分析
Android Camera 三 CameraService 和 Client 链接到 HAL
Android Camera 四 Camera HAL 分析
Android Camera 五 Camera HAL v1
Linux v4l2 一 应用层
Linux v4l2 二 驱动和 usb 摄像头
frameworks/av/services/camera/libcameraservice/common/CameraModule.cpp
frameworks/av/services/camera/libcameraservice/device3/Camera3Device.cpp
frameworks/av/services/camera/libcameraservice/common/CameraModule.cpp
hardware/libhardware/include/hardware/camera_common.h
hardware/libhardware/include/hardware/hardware.h
hardware/qcom/camera/QCamera2/QCamera2Hal.cpp
hardware/qcom/camera/QCamera2/QCamera2Factory.cpp
hardware/qcom/camera/QCamera2/HAL/QCameraMuxer.cpp
hardware/qcom/camera/QCamera2/HAL/QCamera2HWI.cpp
hardware/qcom/camera/QCamera2/stack/mm-camera-interface/src/mm_camera_interface.c
hardware/qcom/camera/QCamera2/stack/mm-camera-interface/src/mm_camera.h
hardware/qcom/camera/QCamera2/stack/mm-camera-interface/src/mm_camera.c
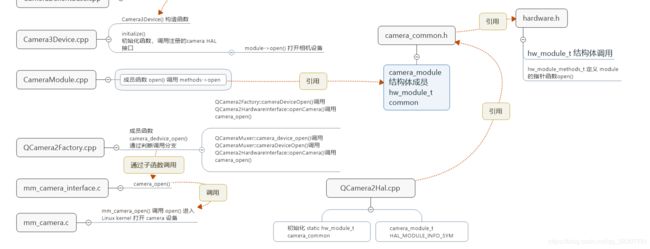
在上一节讲到Camera3Device::initialize( CameraModule *module) 进入 HAL 层。
接下来从分析 CameraModule 的open() 成员函数开始分析。
关于 Android 中的 HAL 模块的注册机制,不做展开。
// frameworks/av/services/camera/libcameraservice/device3/Camera3Device.cpp
//  该函数中 module->open() ,调用HAL层注册的相机模块 open 函数
status_t Camera3Device::initialize(CameraModule *module)
{
 ......

    /** Open HAL device */

    status_t res;
    String8 deviceName = String8::format("%d", mId);

    camera3_device_t *device;

    ATRACE_BEGIN("camera3->open");
    res = module->open(deviceName.string(),
            reinterpret_cast(&device));  // 打开相机设备

    ATRACE_END();
 ......
}
各厂商遵从 Android HAL 规则,编写驱动代码,适配 Android系统。
CameraModule::open() 成员函数根据 HAL 规则,调用各厂商适配的相机驱动打开对应的相机设备。
// frameworks/av/services/camera/libcameraservice/common/CameraModule.cpp
// camera_module_t *mModule
int CameraModule::open(const char* id, struct hw_device_t** device) {
    int res;
    ATRACE_BEGIN("camera_module->open");
    res = filterOpenErrorCode(mModule->common.methods->open(&mModule->common, id, device));
    ATRACE_END();
    return res;
}
来看看 camera_module_t 结构体,该结构体定义的指针函数成员,类似 CPP 的抽象类封装。
这种方式把各厂商的相机驱动和 HAL 层衔接起来,让 Android 适配更多的相机设备。
// hardware/libhardware/include/hardware/camera_common.h
typedef struct camera_module {
    /**
	 * 相机模块的常用方法。该结构体必须是 camera_module 模块的第一个成员,
	 * 因为该结构的用户将在已知 hw_module_t 模块引用 camera_module 模块的上下文中,
     *
     * The return values for common.methods->open for camera_module are:
     *
     * 0:           On a successful open of the camera device.
     *
     * -ENODEV:     The camera device cannot be opened due to an internal
     *              error.
     *
     * -EINVAL:     The input arguments are invalid, i.e. the id is invalid,
     *              and/or the module is invalid.
     *
     * -EBUSY:      The camera device was already opened for this camera id
     *              (by using this method or open_legacy),
     *              regardless of the device HAL version it was opened as.
     *
     * -EUSERS:     The maximal number of camera devices that can be
     *              opened concurrently were opened already, either by
     *              this method or the open_legacy method.
     *
     * All other return values from common.methods->open will be treated as
     * -ENODEV.
     */
    hw_module_t common;

    /**
     * get_number_of_cameras:
     *
     * 返回可通过相机模块访问的相机设备数量。摄像机设备编号为0到 N-1,其中 N 是此调用返回的值。
	 * The name of the camera device for open() is
     * simply the number converted to a string. That is, "0" for camera ID 0,
     * "1" for camera ID 1.
     */
    int (*get_number_of_cameras)(void);


    int (*get_camera_info)(int camera_id, struct camera_info *info);

    int (*set_callbacks)(const camera_module_callbacks_t *callbacks);


    void (*get_vendor_tag_ops)(vendor_tag_ops_t* ops);

    int (*open_legacy)(const struct hw_module_t* module, const char* id,
            uint32_t halVersion, struct hw_device_t** device);

    int (*set_torch_mode)(const char* camera_id, bool enabled);

    int (*init)();

    /* reserved for future use */
    void* reserved[5];
} camera_module_t;
hw_module_t common 结构体是保存设备驱动在 HAL 注册的信息。
// hardware/libhardware/include/hardware/hardware.h
typedef struct hw_module_t
{
    /** tag must be initialized to HARDWARE_MODULE_TAG */
    uint32_t tag;

    uint16_t module_api_version;

#define version_major module_api_version
    uint16_t hal_api_version;
#define version_minor hal_api_version

    /** Identifier of module */
    const char *id;

    /** Name of this module */
    const char *name;

    /** Author/owner/implementor of the module */
    const char *author;

    /** Modules methods */
    /** 结构体中定义模块指针函数 open() */
    struct hw_module_methods_t* methods;

    /** module's dso */
    void* dso;

#ifdef __LP64__
    uint64_t reserved[32-7];
#else
    /** padding to 128 bytes, reserved for future use */
    uint32_t reserved[32-7];
#endif

} hw_module_t;


// struct hw_module_methods_t* methods
// mModule->common.methods->open(&mModule->common, id, device) 的 open() 函数
typedef struct hw_module_methods_t {
    /** Open a specific device */
    int (*open)(const struct hw_module_t* module, const char* id,
            struct hw_device_t** device);

} hw_module_methods_t;
通过上述代码知道 CameraModule::open() 方法是调用 hw_module_methods_t 结构体中的成员指针函数 method->open() ,
搜索关键字 hw_module_methods_t 查找哪里定义并注册 hw_module_methods_t 指针函数 method->open() 。
grep -R "hw_module_t" hardware/qcom/camera/
打开文件 QCamera2Hal.cpp
QCamera2Hal.cpp 声明并初始化了 hw_module_t 和 camera_module_t 结构体变量。
静态变量 camera_common 中注册了 指针函数 method->open() ,
methods = &qcamera::QCamera2Factory::mModuleMethods; 开始顺藤摸瓜,找到真正打开 camera 设备的函数。
// hardware/qcom/camera/QCamera2/QCamera2Hal.cpp
#include "QCamera2Factory.h"
#include "HAL3/QCamera3VendorTags.h"

static hw_module_t camera_common = {
    .tag                    = HARDWARE_MODULE_TAG,
    .module_api_version     = CAMERA_MODULE_API_VERSION_2_4,
    .hal_api_version        = HARDWARE_HAL_API_VERSION,
    .id                     = CAMERA_HARDWARE_MODULE_ID,
    .name                   = "QCamera Module",
    .author                 = "Qualcomm Innovation Center Inc",
    .methods                = &qcamera::QCamera2Factory::mModuleMethods,  // 打开相机的方法
    .dso                    = NULL,
    .reserved               = {0}
};

camera_module_t HAL_MODULE_INFO_SYM = {
    .common                 = camera_common,
    .get_number_of_cameras  = qcamera::QCamera2Factory::get_number_of_cameras,
    .get_camera_info        = qcamera::QCamera2Factory::get_camera_info,
    .set_callbacks          = qcamera::QCamera2Factory::set_callbacks,
    .get_vendor_tag_ops     = qcamera::QCamera3VendorTags::get_vendor_tag_ops,
    .open_legacy            = qcamera::QCamera2Factory::open_legacy,
    .set_torch_mode         = qcamera::QCamera2Factory::set_torch_mode,
    .init                   = NULL,
    .reserved               = {0}
};
从 QCamera2Factory::mModuleMethods 定位到 QCamera2Factory 类
// hardware/qcom/camera/QCamera2/QCamera2Factory.cpp
struct hw_module_methods_t QCamera2Factory::mModuleMethods =
{
    .open = QCamera2Factory::camera_device_open,
};


int QCamera2Factory::camera_device_open(
    const struct hw_module_t *module, const char *id,
    struct hw_device_t **hw_device)
{
    int rc = NO_ERROR;
    if(module != &HAL_MODULE_INFO_SYM.common)
    {
        LOGE("Invalid module. Trying to open %p, expect %p",
             module, &HAL_MODULE_INFO_SYM.common);
        return INVALID_OPERATION;
    }
    if(!id)
    {
        LOGE("Invalid camera id");
        return BAD_VALUE;
    }
#ifdef QCAMERA_HAL1_SUPPORT
    if(gQCameraMuxer)
        rc =  gQCameraMuxer->camera_device_open(module, id, hw_device);
    else
#endif
        rc = gQCamera2Factory->cameraDeviceOpen(atoi(id), hw_device);
    return rc;
}
两个分支的调用流程:
- QCamera2Factory::cameraDeviceOpen() → QCamera2HardwareInterface::openCamera() → camera_open()
- QCameraMuxer::camera_device_open() → QCameraMuxer::cameraDeviceOpen() → QCamera2HardwareInterface::openCamera() → camera_open()
两个分支经过不同的路径调用函数 camera_open() 。
mm_camera_interface.c 的函数 camera_open() 调用
- mm_camera_open() → open(dev_name, O_RDWR | O_NONBLOCK);
打开相机设备
// hardware/qcom/camera/QCamera2/stack/mm-camera-interface/src/mm_camera_interface.c
int32_t camera_open(uint8_t camera_idx, mm_camera_vtbl_t **camera_vtbl)
{
    ......

    rc = mm_camera_open(cam_obj);

    ......

}
mm_camera.c 中函数 mm_camera_open() → open() 真正的打开了 camera 设备。
在执行 open() 后,从 HAL 层进入 Linux kernel 。即将离开 Android ,进入 Linux 的世界。
Linux的思想:一切皆文件,对文件的操作分为三个步骤:
- 打开设备 open();
- 读写设备 read()/write();
- 关闭设备 close()。
如下代码所示, 调用 open() 打开了 camera 设备。 read()/write()/close() 不做叙述。
// hardware/qcom/camera/QCamera2/stack/mm-camera-interface/src/mm_camera.c
int32_t mm_camera_open(mm_camera_obj_t *my_obj)
{
    ......
    do
    {
        n_try--;
        errno = 0;
        my_obj->ctrl_fd = open(dev_name, O_RDWR | O_NONBLOCK);
        l_errno = errno;
        LOGD("ctrl_fd = %d, errno == %d", my_obj->ctrl_fd, l_errno);
        if((my_obj->ctrl_fd >= 0) || (errno != EIO && errno != ETIMEDOUT) || (n_try <= 0))
        {
            break;
        }
        LOGE("Failed with %s error, retrying after %d milli-seconds",
             strerror(errno), sleep_msec);
        usleep(sleep_msec * 1000U);
    }
    while(n_try > 0);
    ......
}
打开设备之后,如何获取图像呢? v4l2 是 Linux的视频框架,Android 也是使用类似的方式获取视频图像。
这里给出 mm_camera.h 和 Linux V4L2 类似的接口函数声明,简化对 camera 底层框架理解。
// hardware/qcom/camera/QCamera2/stack/mm-camera-interface/src/mm_camera.h

extern int32_t mm_camera_open(mm_camera_obj_t *my_obj);
extern int32_t mm_camera_close(mm_camera_obj_t *my_obj);
extern int32_t mm_camera_register_event_notify(mm_camera_obj_t *my_obj,
                                               mm_camera_event_notify_t evt_cb,
                                               void * user_data);
extern int32_t mm_camera_qbuf(mm_camera_obj_t *my_obj,
                              uint32_t ch_id,
                              mm_camera_buf_def_t *buf);
extern int32_t mm_camera_get_queued_buf_count(mm_camera_obj_t *my_obj,
        uint32_t ch_id, uint32_t stream_id);
extern int32_t mm_camera_query_capability(mm_camera_obj_t *my_obj);
extern int32_t mm_camera_set_parms(mm_camera_obj_t *my_obj,
                                   parm_buffer_t *parms);
extern int32_t mm_camera_get_parms(mm_camera_obj_t *my_obj,
                                   parm_buffer_t *parms);
extern int32_t mm_camera_map_buf(mm_camera_obj_t *my_obj,
                                 uint8_t buf_type,
                                 int fd,
                                 size_t size,
                                 void *buffer);
extern int32_t mm_camera_map_bufs(mm_camera_obj_t *my_obj,
                                  const cam_buf_map_type_list *buf_map_list);
extern int32_t mm_camera_unmap_buf(mm_camera_obj_t *my_obj,
                                   uint8_t buf_type);
通过跟踪 Android 7.1 源码 “open camera ”的流程分析完成:
- framework层的JNI → hardware → Linux
感兴趣的朋友继续分析 Camera 的 read()/write()/close()的流程,加深理解 Camera 框架。