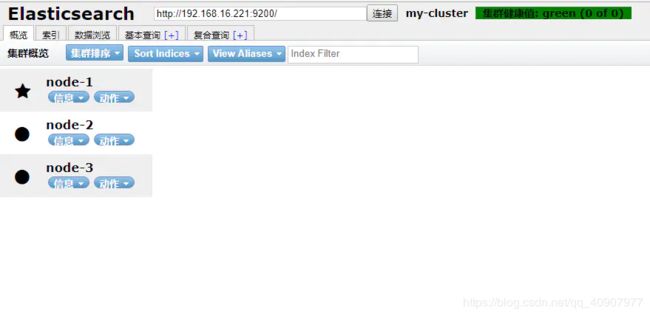
EFK6.3+kafka+logstash日志分析平台集群
转载来源 :EFK6.3+kafka+logstash日志分析平台集群 :https://www.jianshu.com/p/f956ebbb2499
架构解读 :
第一层、数据采集层
安装filebeat做日志采集,同时把采集的日志发送给kafka broker+zookeeper集群。
第二层、数据转发层
Logstash节点会实时去kafka broker集群拉数据,接受到的日志经过格式处理,然后转发到ES集群
第三层、数据检索,数据展示
ES Master + Kibana 主要协调ES集群,处理数据检索请求,数据展示。
所有服务器环境准备
$ systemctl stop firwalld
$ setenforce 0
$ yum -y install java
1. Elasticsearch集群服务安装:
ES各节点创建用户组
$ groupadd elsearch
$ useradd -g elsearch elsearch
$ chown -R elsearch:elsearch  elasticsearch
设置系统的相关参数,如果不设置参数将会存在相关的问题导致不能启动
$ vim /etc/security/limits.conf
# End of file
* soft nproc 65535
* hard nproc 65535
* soft nofile 65536
* hard nofile 65536
elsearch soft memlock unlimited
elsearch hard memlock unlimited
修改最大线程数的配置
$ vim /etc/security/limits.d/20-nproc.conf
 *         soft    nproc     65536
root       soft    nproc     unlimited
$ vim /etc/sysctl.conf
vm.max_map_count=262144
fs.file-max=6553
$ sysctl -p
修改配置文件
$ vim /usr/local/elasticsearch/config/elasticsearch.yml
network.host: 0.0.0.0 (允许所有网段访问9200)
http.port: 9200
启动程序
$  su - elsearch
$  /usr/local/elasticsearch/bin/elasticsearch  -d
验证有没有启动成功.
$ curl  192.168.16.221:9200
{
  "name" : "fhASdIt",
  "cluster_name" : "elasticsearch",
  "cluster_uuid" : "lo_I0yMkTJu0TMl8gCwelw",
  "version" : {
    "number" : "6.3.1",
    "build_flavor" : "default",
    "build_type" : "tar",
    "build_hash" : "eb782d0",
    "build_date" : "2018-06-29T21:59:26.107521Z",
    "build_snapshot" : false,
    "lucene_version" : "7.3.1",
    "minimum_wire_compatibility_version" : "5.6.0",
    "minimum_index_compatibility_version" : "5.0.0"
  },
  "tagline" : "You Know, for Search"
}
将Elasticsearch复制到另外两台节点服务器中,只需要更改配置文件即可.
Es-master (192.168.16.221)
 $ cat > elasticsearch.yml <<EOF
# ======================== Elasticsearch Configuration =========================
#集群的名称,同一个集群该值必须设置成相同的
cluster.name: my-cluster
#该节点的名字
node.name: node-1
#该节点有机会成为master节点
node.master: true
#该节点可以存储数据
node.data: true
path.data: /usr/local/elasticsearch/data
path.logs: /usr/local/elasticsearch/logs
bootstrap.memory_lock: true
#设置绑定的IP地址,可以是IPV4或者IPV6
network.bind_host: 0.0.0.0
#设置其他节点与该节点交互的IP地址
network.publish_host: 192.168.16.221
#该参数用于同时设置bind_host和publish_host
network.host: 0.0.0.0
#设置节点之间交互的端口号
transport.tcp.port: 9300
#设置是否压缩tcp上交互传输的数据
transport.tcp.compress: true
#设置http内容的最大大小]
http.max_content_length: 100mb
#是否开启http服务对外提供服务
http.enabled: true
http.port: 9200
discovery.zen.ping.unicast.hosts: ["192.168.16.221:9300","192.168.251:9300", "192.168.16.252:9300"]
discovery.zen.minimum_master_nodes: 2
http.cors.enabled: true
http.cors.allow-origin: "*"
EOF
DataNode01节点(192.168.16.251)
$ cat >elasticsearch.yml  <<EOF
# ======================== Elasticsearch Configuration =========================
#集群的名称,同一个集群该值必须设置成相同的
cluster.name: my-cluster
#该节点的名字
node.name: node-2
#该节点有机会成为master节点
node.master: true
#该节点可以存储数据
node.data: true
path.data: /usr/local/elasticsearch/data
path.logs: /usr/local/elasticsearch/logs
bootstrap.memory_lock: true
#设置绑定的IP地址,可以是IPV4或者IPV6
network.bind_host: 0.0.0.0
#设置其他节点与该节点交互的IP地址
network.publish_host: 192.168.16.251
#该参数用于同时设置bind_host和publish_host
network.host: 0.0.0.0
#设置节点之间交互的端口号
transport.tcp.port: 9300
#设置是否压缩tcp上交互传输的数据
transport.tcp.compress: true
#设置http内容的最大大小]
http.max_content_length: 100mb
#是否开启http服务对外提供服务
http.enabled: true
http.port: 9200
discovery.zen.ping.unicast.hosts: ["192.168.16.221:9300","192.168.16.251:9300", "192.168.16.252:9300"]
discovery.zen.minimum_master_nodes: 2
http.cors.enabled: true
http.cors.allow-origin: "*"
EOF
DataNode02节点(192.168.16.252)
$ cat > elasticsearch.yml <<EOF
# ======================== Elasticsearch Configuration =========================
#集群的名称,同一个集群该值必须设置成相同的
cluster.name: my-cluster
#该节点的名字
node.name: node-3
#该节点有机会成为master节点
node.master: true
#该节点可以存储数据
node.data: true
path.data: /usr/local/elasticsearch/data
path.logs: /usr/local/elasticsearch/logs
bootstrap.memory_lock: true
#设置绑定的IP地址,可以是IPV4或者IPV6
network.bind_host: 0.0.0.0
#设置其他节点与该节点交互的IP地址
network.publish_host: 192.168.16.252
#该参数用于同时设置bind_host和publish_host
network.host: 0.0.0.0
#设置节点之间交互的端口号
transport.tcp.port: 9300
#设置是否压缩tcp上交互传输的数据
transport.tcp.compress: true
#设置http内容的最大大小]
http.max_content_length: 100mb
#是否开启http服务对外提供服务
http.enabled: true
http.port: 9200
discovery.zen.ping.unicast.hosts: ["192.168.16.221:9300","192.168.16.251:9300", "192.168.16.252:9300"]
discovery.zen.minimum_master_nodes: 2
http.cors.enabled: true
http.cors.allow-origin: "*"
EOF
各节点启动
/usr/local/elasticsearch/bin/elasticsearch -d
2.在master节点部署kibana
$ ln -s kibana-5.6.2-linux-x86_64 kibana
##修改配置文件
$ vim kibana.yml
server.port: 5601
server.host: "192.168.16.221"
server.name: "Esmaster-Kibana"
elasticsearch.url: http://192.168.16.221:9200
## 启动kibana
$ nohup  sh /usr/local/kibana/bin/kibana &
3. Zookeeper+Kafka集群部署:
下载软件包(需注意版本兼容问题)
$ wget http://mirrors.hust.edu.cn/apache/zookeeper/zookeeper-3.4.10/zookeeper-3.4.10.tar.gz
$ wget http://mirror.bit.edu.cn/apache/kafka/1.1.0/kafka_2.12-1.1.0.tgz
三台主机hosts如下,必须保持一致.
cat  > /etc/hosts <<EOF
127.0.0.1   localhost localhost.localdomain localhost4 localhost4.localdomain4
::1         localhost localhost.localdomain localhost6 localhost6.localdomain6
192.168.16.222 kafka-01
192.168.16.237 kafka-02
192.168.16.238 kafka-03
EOF
安装zookeeper
master节点
$ tar -zxvf zookeeper-3.4.10.tar.gz -C /usr/local/
$ cd /usr/local/
$ ln -s zookeeper-3.4.10 zookeeper
$ cd zookeeper/conf/
$ cp zoo_sample.cfg zoo.cfg
$ vim  zoo.cfg
tickTime=2000
initLimit=10
syncLimit=5
dataDir=/tmp/zookeeper
clientPort=2181
server.1=kafka-01:2888:3888
server.2=kafka-02:2888:3888
server.3=kafka-03:2888:3888
创建dataDir目录创建/tmp/zookeeper
在master节点上
$ mkdir /tmp/zookeeper
$ echo 1 > /tmp/zookeeper/myid
将zookeeper文件复制到另外两个节点:
$  scp -r zookeeper-3.4.10/ kafka-02:/usr/local/
$  scp -r zookeeper-3.4.10/ kafka-03:/usr/local/
在两个slave节点创建目录和文件
#ZooKeeper-Kafka-02节点:
 $ ln -s zookeeper-3.4.10 zookeeper
$ mkdir /tmp/zookeeper
$ echo 2 > /tmp/zookeeper/myid
#ZooKeeper-Kafka-03节点
 $ ln -s zookeeper-3.4.10 zookeeper
$  mkdir /tmp/zookeeper
$  echo 3 > /tmp/zookeeper/myid
分别在每个节点上启动 zookeeper测试:
$ ./bin/zkServer.sh start
$ ./bin/zkServer.sh start
$ ./bin/zkServer.sh start
所有节点启动后查看状态:
$ ./bin/zkServer.sh status
ZooKeeper JMX enabled by default Using config: /usr/local/zookeeper/bin/../conf/zoo.cfg
Mode: follower
$ ./bin/zkServer.sh status
ZooKeeper JMX enabled by default Using config: /usr/local/zookeeper/bin/../conf/zoo.cfg
Mode: leader
$ ./bin/zkServer.sh status
ZooKeeper JMX enabled by default Using config: /usr/local/zookeeper/bin/../conf/zoo.cfg
Mode: follower
至此zookeeper集群安装完成!
4.Kafka集群安装配置
$ tar zxf   kafka_2.12-1.1.0.tgz  -C /usr/local/
$ cd  /usr/local/
$ ln -s kafka_2.12-1.1.0/  kafka
$ cd   kafka/config
$ cat > server.properties <<EOF
broker.id=0
listeners=PLAINTEXT://kafka-01:9092
advertised.listeners=PLAINTEXT://kafka-01:9092
num.network.threads=3
num.io.threads=8
socket.send.buffer.bytes=102400
socket.receive.buffer.bytes=102400
socket.request.max.bytes=104857600
log.dirs=/tmp/kafka-logs
num.partitions=5
num.recovery.threads.per.data.dir=1
offsets.topic.replication.factor=1
transaction.state.log.replication.factor=1
transaction.state.log.min.isr=1
log.retention.hours=24
log.segment.bytes=1073741824
log.retention.check.interval.ms=300000
zookeeper.connect=kafka-01:2181,kafka-02:2181,kafka-03:2181
zookeeper.connection.timeout.ms=6000
group.initial.rebalance.delay.ms=0
delete.topic.enable=true
EOF
将 kafka_2.12-1.1.0 文件夹复制到另外两个节点下
$ scp -r  kafka_2.12-1.1.0/    kafka-02:/usr/local/
$ scp -r  kafka_2.12-1.1.0/    kafka-03:/usr/local/
修改每个节点对应的 server.properties 文件的 broker.id和listeners、advertised.listeners的名称.
kafka-02
broker.id=1
listeners=PLAINTEXT://kafka-02:9092
advertised.listeners=PLAINTEXT://kafka-02:9092
kafka-02

broker.id=2
listeners=PLAINTEXT://kafka-03:9092
advertised.listeners=PLAINTEXT://kafka-03:9092
所有节点执行启动
$ /usr/local/kafka/bin/kafka-server-start.sh -daemon  /usr/local/kafka/config/server.properties
查看状态
$  tail -f /usr/local/kafka/logs/server.log   # 日志最后一条,显示已经启动
...
[2017-12-19 16:10:05,542] INFO [KafkaServer id=3] started (kafka.server.KafkaServer)
创建topic 测试
$  bin/kafka-topics.sh --create --zookeeper kafka-01:2181, kafka-02:2181,kafka-03:2181 --replication-factor 3 --partitions 3 --topic test
 Created topic "test".
显示topic
$ bin/kafka-topics.sh --describe --zookeeper kafka-01:2181, kafka-02:2181,kafka-03:2181 --topic test
 OpenJDK 64-Bit Server VM warning: If the number of processors is
 expected to increase from one, then you should configure the number of parallel GC threads appropriately using -XX:ParallelGCThreads=N
 Topic:test PartitionCount:3    ReplicationFactor:3 Configs:
    Topic: test Partition: 0    Leader: 0   Replicas: 0,1,2 Isr: 0,1,2
    Topic: test Partition: 1    Leader: 1   Replicas: 1,2,0 Isr: 1,2,0
    Topic: test Partition: 2    Leader: 2   Replicas: 2,0,1 Isr: 2,0,1
列出topic
$ bin/kafka-topics.sh --list --zookeeper kafka-01:2181, kafka-02:2181,kafka-03:2181
OpenJDK 64-Bit Server VM warning: If the number of processors is expected to increase from one, then you should configure the number of parallel GC threads appropriately using -XX:ParallelGCThreads=N
test
创建 producer(生产者);
在master节点上 测试生产消息
$ bin/kafka-console-producer.sh --broker-list kafka-01:9092 -topic test
OpenJDK 64-Bit Server VM warning: If the number of processors is expected to increase from one, then you should configure the number of parallel GC threads appropriately using -XX:ParallelGCThreads=N
>hello world
>elk
创建 consumer(消费者):
在kafka-02节点上 测试消费
$ bin/kafka-console-consumer.sh --zookeeper kafka-01:2181,kafka-02:2181,kafka-03:2181 -topic test --from-beginning

Using the ConsoleConsumer with old consumer is deprecated and will be removed in a future major release. Consider using the new consumer by passing [bootstrap-server] instead of [zookeeper].
hello world
elk
创建 consumer(消费者):
在kafka-03节点上 测试消费
$ bin/kafka-console-consumer.sh --zookeeper kafka-01:2181,kafka-02:2181,kafka-03:2181 -topic test --from-beginning

Using the ConsoleConsumer with old consumer is deprecated and will be removed in a future major release. Consider using the new consumer by passing [bootstrap-server] instead of [zookeeper].
hello world
elk
在 producer 里输入消息,consumer 中就会显示出同样的内容,表示消费成功!
删除 topic
$ bin/kafka-topics.sh --delete --zookeeper kafka-01:2181, kafka-02:2181,kafka-03:2181 --topic test
列出topics已经为空
$ bin/kafka-topics.sh --list --zookeeper kafka-01:2181, kafka-02:2181,kafka-03:2181
启动和关闭服务:
#启动服务:
$ /usr/local/kafka/bin/kafka-server-start.sh -daemon /usr/local/kafka/config/server.properties
#停止服务:
$ bin/kafka-server-stop.sh
5.安装配置filebeat
filebeat.prospectors:
- input_type: log
encoding: GB2312 #字符集
fields_under_root: true
fields:  ##添加字段
  serverip: 192.168.16.100
  indexname: zam
enabled: True
paths:
      - /app/zamtomcat/logs/catalina.out
multiline.pattern: '^\['  #java报错过滤
multiline.negate:  true
multiline.match: after
tail_files: false
#----------------------------- Logstash output --------------------------------
output.kafka:
enabled: true
hosts: ["192.168.16.222:9092","192.168.16.237:9092","192.168.16.238:9092"]
topic: "zam-filebeat"
partition.hash:
  reachable_only: true
compression: gzip
max_message_bytes: 1000000
required_acks: 1
logging.to_files: true
启动filebeat
$ nohup ./filebeat -e -c zam.yml >/dev/null 2>&1 &
kafka查看是否有 “zam-filebeat” topic
$ bin/kafka-topics.sh --list --zookeeper kafka-01:2181, kafka-02:2181,kafka-03:2181
zam-filebeat
启动消费者查看是否有数据
 $ bin/kafka-console-consumer.sh --bootstrap-server kafka-01:9092,kafka-02:9092,kafka-03:9092 --topic zam-filebeat --from-beginning
--------------
注意:如没有数据,需在filebeat主机hosts文件中添加kafka集群地址解析
6.配置logstash
input{
kafka{
bootstrap_servers => "kafka-01:9092,kafka-02:9092,kafka-03:9092"
topics => "zam-filebeat"
consumer_threads => 1
decorate_events => true
codec => "json"
auto_offset_reset => "latest"
}
}
filter {
ruby {
code => "event.timestamp.time.localtime" ##时区设置
}
mutate {
remove_field => ["beat"] #删除自带字段
}
grok {
match => {"message" => "\[(?
} #正则过滤
}
}
output {
elasticsearch {
hosts => ["192.168.16.221:9200","192.168.16.251:9200","192.168.16.252:9200"]
index => "zam-%{+YYYY-MM-dd}"
}
}
注意:索引名称不能大写,注意特殊字符,DNS问题需添加kafka集群hosts文件解析
启动 logstash
$ nohup ./bin/logstash -f filebeat.conf > /dev/null 2>&1 &
在head插件上查看索引
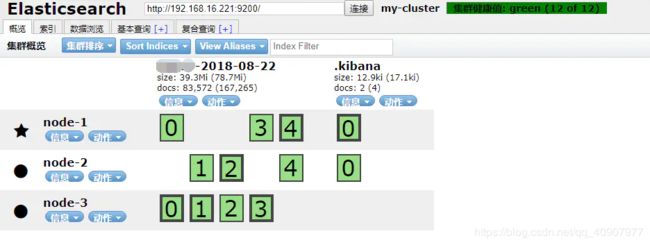
在kibana添加索引
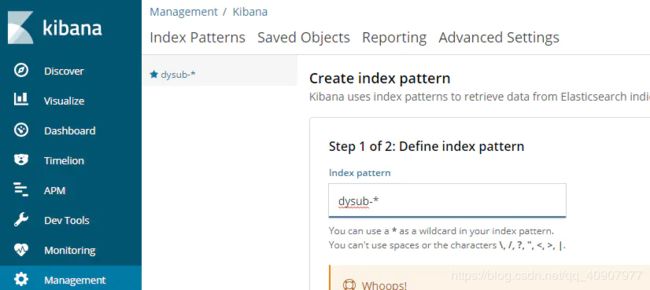
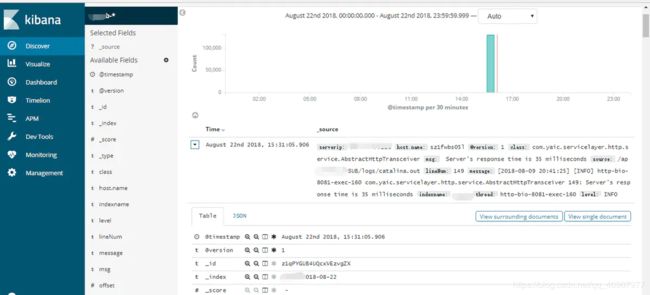
免安装head插件部署http://www.unmin.club/?p=139
参考:http://www.cnblogs.com/saneri/p/8822116.html
