用sysbench测试数据库吞吐量指标
1. 在Github上下载最新版本的SysBench,
# wget -O sysbench-1.0.14.tar.gz https://github.com/akopytov/sysbench/archive/1.0.14.tar.gz,文件下载为sysbench-1.0.14.tar.gz
2. tar -vzxf sysbench-0.4.12.14.tar.gz 解压缩,生成新目录sysbench-1.0.14
3. 进入该目录,安装depnedency,
yum -y install make automake libtool pkgconfiglibaio-devel成功
yum -y install mariadb-devel 成功
4. 运行 ./autogen.sh,提示
configure.ac:49: error: possibly undefinedmacro: AC_LIB_PREFIX
If this token and others are legitimate,please use m4_pattern_allow.
See the Autoconf documentation.
5. 安装gettext,提示已经安装,安装gettext-devel,
yum install gettext-devel
成功
6. 再次运行./autogen.sh,成功
Libtoolized with: libtoolize (GNUlibtool) 2.4.2
Automade with: automake (GNU automake)1.13.4
Configured with: autoconf (GNU Autoconf)2.69
7. 因为运行SysBenchconfigure 需要MySql include和lib文件,到MySql官网选择MySQL Community Server, GA, 5.7.21, Linux –Generic, 64 bit.下载,
#wget https://dev.mysql.com/get/Downloads/MySQL-5.7/mysql-5.7.21-linux-glibc2.12-x86_64.tar.gz
#md5sum mysql-5.7.11-linux-glibc2.5-x86_64.tar.gz //检查下载文件是否正确完整
9. 执行 # tar -zxvfmysql-5.7.11-linux-glibc2.5-x86_64.tar.gz
解压缩,生成新目录mysql-5.7.11-linux-glibc2.5-x86_64
11. 运行#ln -s mysql-5.7.11-linux-glibc2.5-x86_64 mysql
建立一个mysql 的软连接,是为了以后方便配置与操作。
12. cd 到sysbench-1.0.14目录,运行
./configure --with-mysql-includes=/opt/mysql/include--with-mysql-libs=/opt/mysql/lib && make &&make install
成功
13.运行 sysbench,报错提示
sysbench: error while loading sharedlibraries: libmysqlclient.so.20: cannot open shared object file:No such file or directory
原因是/usr/lib64/下面没有这个文件,而mysql的安装目录下有
运行ln -s /opt/mysql/lib/libmysqlclient.so.20/usr/lib64/libmysqlclient.so.20
再运行./sysbench成功, 提示缺少参数
14. 运行如下命令,准备测试DB数据
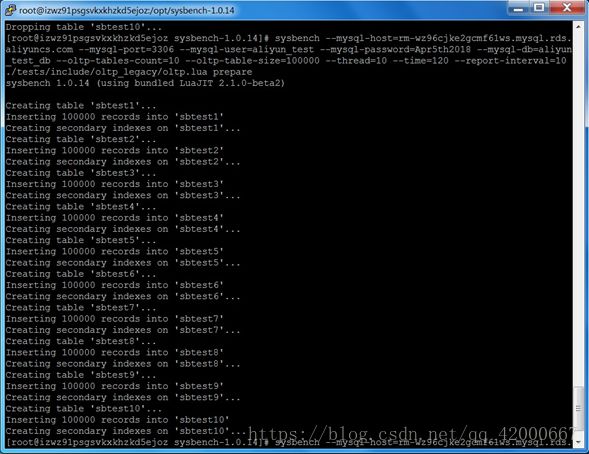
sysbench --mysql-host=xxxx --mysql-port=3306 --mysql-user=aliyun_test --mysql-password=xxxx --mysql-db=aliyun_test_db--oltp-tables-count=10 --oltp-table-size=100000 --threads=10 --time=120--report-interval=10 ./tests/include/oltp_legacy/oltp.lua prepare
其中,mysql-host后面是数据库服务器的名称或者IP地址,可以是本机地址,也可以是网络上某个服务器的地址。执行模式为complex,使用了10个表,每个表有10万条数据,客户端的并发线程数为10,执行时间为120秒,每10秒生成一次报告。
执行过程输出如下图:
从数据库管理软件登录,可以看到DB “aliyun_test_db”下生成了10张表,sbtest1~sbtest10, 选中某个表右键,打开表,可以查看表内记录,因为是免费版,最多只能翻页1000行,点击上面的“总行数”,显示有100,000行。
15. 执行测试
将测试结果导出到文件中,便于后续分析
sysbench --mysql-host=xxxx --mysql-port=3306 --mysql-user=aliyun_test --mysql-password=xxxx--mysql-db=aliyun_test_db --oltp-tables-count=10 --oltp-table-size=100000--threads=10 --time=120 --report-interval=10./tests/include/oltp_legacy/oltp.lua run >> /home/aliyun_test/mysysbench.log
执行2分钟后完毕
16. 查看执行结果
Vim /home/aliyun_test/mysysbench.log
其中Number of threads, 即客户端的并发连接数为10,TPS,即每秒Transaction是191.93,QPS,即每秒queries是3838.68。延时在95th percentil为68.05ms。
17. 清理数据
sysbench --mysql-host=xxxx --mysql-port=3306--mysql-user=aliyun_test --mysql-password=xxxx --mysql-db=aliyun_test_db--oltp-tables-count=10 --oltp-table-size=100000 ./tests/include/oltp_legacy/oltp.luacleanup
从数据库管理工具可以看到aliyun_test_db中数据已经清空
