带你从Vue入门到进阶
系统学习前端Vue框架,笔记记录于B站的why老师,具体视频链接,在此感谢老师的悉心授课。我的github笔记地址
欢迎访问我的博客
My Blog: https://coderblue.cn/
Github:https://github.com/CoderBleu
My Project:https://coderblue.cn/project/
初始化Vue
初始Vue
<script src="../js/vue.js"></script>
  <div id="hi">Hello {{name}}</div>
  <div class="movie">
      <ul>
          <li v-for="item in movies">
              {{item}}
          </li>
      </ul>
  </div>
  <script>
      const hi = new Vue({
          el: "#hi",
          data: {
              name: 'Vue.js'
          }
      })

      let movie = new Vue({
          el: '.movie',
          data: {
              movies: ["星际穿越", '大话西游', '海贼王之黄金城', '复仇者联盟']
              // 注意:可以通过movie.movies.push('盗梦空间')
          }
      })
  </script>
简易计数器
<body>

<div id="count">
    <h2>{{counter}}h2>
    <button v-on:click="add">+button>
    <button v-on:click="sub">-button>

div>
<ol>
    <li>原因是你的body中的div中没有设置id,vue没有绑定li>
    <li>解决:body中加 div id="app" li>
    <li>双向绑定:view,model,ViewModelli>
ol>
body>
<script>
    // proxy: model
    const obj = {
        counter: 0
    }

    // ViewModel
    let count = new Vue({
        el: "#count",
        data: obj,
        methods: {
            add: function() {
                this.counter++;
            },
            sub: function(){
                this.counter--;
            }
        }
    })
script>
Vue中的MVVM
MVVM简介
MVVM 是Model-View-ViewModel 的缩写,它是一种基于前端开发的架构模式,其核心是提供对View 和 ViewModel 的双向数据绑定,这使得ViewModel 的状态改变可以自动传递给 View,即所谓的数据双向绑定。
Vue.js 是一个提供了 MVVM 风格的双向数据绑定的 Javascript 库,专注于View 层。它的核心是 MVVM 中的 VM,也就是 ViewModel。 ViewModel负责连接 View 和 Model,保证视图和数据的一致性,这种轻量级的架构让前端开发更加高效、便捷。
MVVM模型
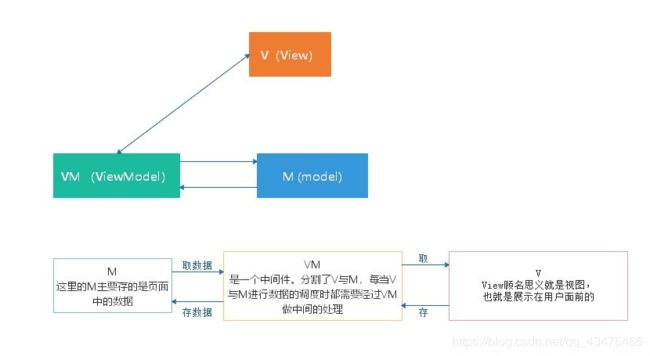
MVVM拆开来即为Model-View-ViewModel,有View,ViewModel,Model三部分组成。
- View层:是视图、模版,负责将数据模型转化为UI展现出来。
- Model层:是模型、数据,可以在Model层中定义数据修改和操作的业务逻辑。
- ViewModel层:View层和Model层并没有直接联系,而是通过ViewModel层进行交互。ViewModel层通过双向数据绑定将View层和Model层连接了起来,使得View层和Model层的同步工作完全是自动的。
Vue.js中mvvm的体现
Vue.js的实现方式,对数据(Model)进行劫持,当数据变动时,数据会出发劫持时绑定的方法,对视图进行更新。

实例分析如下:

Vue.js关于双向数据绑定的一些实现细节
vue是采用Object.defineProperty的getter和setter,并结合观察者模式来实现数据绑定的。当把一个普通的javascript对象传给Vue实例来作为它的data选项时,Vue将遍历它的属性,用Object.defineProperty将它们转为getter/setter。用户看不到getter/setter,但是在内部它们让Vue追踪依赖。在属性被访问和修改时通知变化。

- Observer相当于Model层观察vue实例中的data数据,当数据发生变化时,通知Watcher订阅者。
- Compile指令解析器位于View层,初始化View的视图,将数据变化与更新函数绑定,传给Watcher订阅者。
- Watcher是整个模型的核心,对应ViewModel层,连接Observer和Compile。所有的Watchers存于Dep订阅器中,Watcher将Observer监听到的数据变化对应相应的回调函数,处理数据,反馈给View层更新界面视图。
- Dep消息订阅器,内部维护了一个数组,用来收集订阅者(watcher),数据变动触发notify函数,再调用订阅者的update方法。
基本模板语法
<html lang="zh-CN">
<head>
  <meta charset="UTF-8">
  <meta name="viewport" content="width=device-width, initial-scale=1.0">
  <meta http-equiv="X-UA-Compatible" content="ie=edge">
  <title>Documenttitle>
  <script src="../js/vue.js">script>
  <style>
    [v-cloak] {
      display: none !important;
    }
  style>
head>

<body>
  <div id="app">

    <h4 >Hello {{count}}h4>
  div>

  <script>
    setTimeout(() => {
      let app = new Vue({
      el: '#app',
      data: {
        count: 'v-cloak'
      },
      methods: {

      },
      beforeMount () {
        alert("有趣");
      }
    });
    }, 1000);
  script>
body>

html>
动态绑定属性
class的绑定
传给 v-bind:class 一个对象,以动态地切换 class(语法糖:’:表示’)
根据isActive的true,false变化,动态绑定单个class
<div :class="{ active: isActive==true }">div>
计算属性的方式绑定class
<div :class="classObject"></div>
data: {
  isActive: true,
  error: null
},
computed: {
  classObject: function () {
    return {
      active: this.isActive && !this.error,	//isActive为true,且error不为null
      'text-danger': this.error && this.error.type === 'fatal'
        //error为null且this.error.type === 'fatal'
    }
  }
}
数组的方式绑定class
<div v-bind:class="[activeClass, errorClass]"></div>
data: {
  activeClass: 'active',
  errorClass: 'text-danger'
}
渲染为:
<div class="active text-danger"></div>
三元表达式动态切换class(推荐)
<div :class="[isActive ? activeClass : '', errorClass]">div>
style的绑定
v-bind:style 的对象语法十分直观——看着非常像 CSS,但其实是一个 JavaScript 对象。CSS 属性名可以用驼峰式 (camelCase) 或短横线分隔 (kebab-case,记得用单引号括起来) 来命名:
<div v-bind:style="{ color: activeColor, fontSize: fontSize + 'px' }">div>
data: {
  activeColor: 'red',
  fontSize: 30
}
直接绑定到一个样式对象通常更好,这会让模板更清晰:
<div :style="styleObject">div>
data: {
  styleObject: {
    color: 'red',
    fontSize: '13px'
  }
}
v-bind:style 的数组语法可以将多个样式对象应用到同一个元素上:
<div v-bind:style="[baseStyles, overridingStyles]">div>
计算属性
<body>
  <div id="app">
    <h3> {{fullName}}h3>
  div>

  <script>
    let app = new Vue({
      el: '#app',
      data: {
        fisrtName: 'Lom',
        lastName: 'Name'
      },
      computed: {
        // fullName: function(){
        //     return this.fisrtName + ' ' + this.lastName;
        // }

        // fullName: {
        //   get: function () {
        //     return this.fisrtName + ' ' + this.lastName;
        //   }
        // }

        // 底层方法
        fullName: {
          set: function (newValue) {
            console.log("---------", newValue);
            //split() 方法用于把一个字符串分割成字符串数组。
            const value = newValue.split(' ');
            this.fisrtName = value[0];
            this.lastName = value[1];
          },
          get: function () {
            return this.fisrtName + ' ' + this.lastName;
          }
        }
      }
    });
  script>
body>
计算属性和methods的对比
<body>
  <div id="app">

    <h3> {{fisrtName}} {{lastName}}h3>

    <h3> {{getFullName()}}h3>

    <h3> {{fullName}}h3>
  div>

  <script>
    const app = new Vue({
      el: '#app',
      data: {
        fisrtName: 'Lom',
        lastName: 'Name'
      },
      methods: {
        getFullName: function(){
          console.log("fullName");
          return this.fisrtName + ' ' + this.lastName;
        }
      },
      computed: {
        fullName: {
          get: function () {
            console.log("fullName");
            return this.fisrtName + ' ' + this.lastName;
          }
        }
      }
    });
  script>
body>
事件监听
v-on的基本使用
<body>
    <div id="app">
        <h3>{{counter}}h3>

        <button @click="increment">+button>

        <button v-on:click="decrement()">-button>
    div>

    <script>
        let app = new Vue({
            el: '#app',
            data: {
                counter: 0
            },
            methods: {
                increment(){
                    this.counter++
                },
                decrement(){
                    this.counter--
                }
            }
        });
    script>
body>
v-on的参数问题
<body>
    <div id="app">

        <button @click="btn0Click">+button>

        <button @click="btn1Click()">+button>

        <button @click="btn2Click(value)">+button>

        <button @click="btn3Click(value, $event)">+button>
    div>

    <script>
        let app = new Vue({
            el: '#app',
            data: {
                value: 13
            },
            methods: {
                btn0Click() {
                    console.log("btn1Click");
                },
                btn1Click() {
                    console.log("======", event);
                },
                btn2Click(value) {
                    console.log("------", value);
                },
                btn3Click(value, event) {
                    console.log("+++++", value, event);
                }
            },
        });
    script>
body>
v-on的修饰符
<body>
  <div id="app">

    <div @click="divClick">
      <button @click.stop="btnClick">点击button>
    div>


    <form action="">
      <input type="submit" value="提交" @click.prevent="submitClick">button>
    form>


    <input @keyup="keyup">松开input>
    <br>
    <input @click.keyup="keyup">鼠标点击松开input>

    <br>

    <input @keyup.enter="enter">回车input>

    <br>

    <button @click.once="once">只能点击一次button>
  div>

  <script>
    let app = new Vue({
      el: '#app',
      data: {

      },
      methods: {
        btnClick(){
          console.log("btnClick")
        },
        divClick(){
          console.log("divClick")
        },
        submitClick(){
          console.log("submitClick")
        },
        keyup(){
          console.log("keyup")
        },
        enter(){
          console.log("enter")
        },
        once(){
          console.log("once")
        }
      }
    });
  script>
body>
条件判断
v-if的基本使用
<body>
  <div id="app">

    <h2 v-if="isShow">
        <div>abcdiv>
        <div>abcdiv>
        <div>abcdiv>
        <div>abcdiv>
        <div>abcdiv>
        {{message}}
    h2>
  div>

  <script>
    let app = new Vue({
      el: '#app',
      data: {
        message: '哈哈',
        isShow: true
      },
      methods: {

      }
    });
  script>
body>
v-if和v-else的使用
<body>
  <div id="app">

    <h2 v-if="isShow">
        <div>abcdiv>
        <div>abcdiv>
        <div>abcdiv>
        <div>abcdiv>
        <div>abcdiv>
        {{message}}
    h2>
    <h2 v-else>当v-if为false的时候,我就开始显示了,我和v-if要紧连着使用h2>
  div>

  <script>
    let app = new Vue({
      el: '#app',
      data: {
        message: '哈哈',
        isShow: true
      },
      methods: {

      }
    });
  script>
body>
v-if和v-else-if和v-else的使用
<body>
  <div id="app">
    <p v-if="score >= 90">优秀p>
    <p v-else-if="score >= 80">良好p>
    <p v-else-if="score >= 60">及格p>
    <p v-else>不及格p>
  div>

  <script>
    let app = new Vue({
      el: '#app',
      data: {
        score: 99
      }
    });
  script>
body>
用户登录切换的案例
<body>
  <div id="app">
    <span v-if="isShowUserName">
      <label for="userName">用户名label>
      <input type="text" id="userName" placeholder="请输入用户名">
    span>
    <span v-else>
      <label for="email">用户邮箱label>
      <input type="text" id="email" placeholder="请输入用户邮箱">
    span>
    <button @click="isShowUser">切换类型1button>
    <button @click="isShowUserName = !isShowUserName">切换类型2button>
  div>

  <script>
    let app = new Vue({
      el: '#app',
      data: {
        isShowUserName: true
      },
      methods: {
        isShowUser() {
          this.isShowUserName = !this.isShowUserName
        }
      }
    });
  script>
body>
用户登录切换的案例(复用的小问题)
<body>
  <div id="app">

    <span v-if="isShowUserName">

      <label for="userName">用户名label>
      <input type="text" id="userName" placeholder="请输入用户名" key="userName">
    span>
    <span v-else>
      <label for="email">用户邮箱label>
      <input type="text" id="email" placeholder="请输入用户邮箱" key="userName">
    span>
    <button @click="isShowUser">切换类型1button>
  div>

  <script>
    let app = new Vue({
      el: '#app',
      data: {
        isShowUserName: true
      },
      methods: {
        isShowUser() {
          this.isShowUserName = !this.isShowUserName,
          //第二种方式:使用js将input框值清空
          document.getElementById("userName").value = '';
          document.getElementById("email").value = '';
        }
      }
    });
  script>
body>
v-show的使用
<body>
  <div id="app">

    <span v-if="isShow" id="isShow">V-ifspan>
    <span v-show="isShow" id="VShow">V-showspan>
  div>

  <script>
    const app = new Vue({
      el: '#app',
      data: {
        isShow: true
      },
      methods: {

      }
    });
  script>
body>
循环遍历
v-for遍历数组
<body>
  <div id="app">

    <ul>
      <li v-for="item in movies">{{item}}li>
    ul>
    <br>

    <ul>
      <li v-for="(item, index) in movies">{{index + 1}}.{{item}}li>
    ul>
    <br>

    <ul>
      <li v-for="(item, index) in movies" @click="showIndex(index)">{{index + 1}}.{{item}}li>
    ul>
  div>

  <script>
    const app = new Vue({
      el: '#app',
      data: {
        movies: ['海王', '大话西游', '星际争霸', '三傻大闹宝莱坞']
      },
      methods: {
        showIndex(index) {
          console.log('第' + (index + 1) + '个值');
        }
      }
    });
  script>
body>
v-for遍历对象
<body>
  <div id="app">

    <ul>
      <li v-for="item in obj">{{item}}li>
    ul>
    <br>

    <ul>
      <li v-for="(item, key) in obj">{{item}}--{{key}}li>
    ul>
    <br>

    <ul>
      <li v-for="(value, key, index) in obj">{{value}}--{{key}}--{{index+1}}li>
    ul>
    <br>
  div>

  <script>
    const app = new Vue({
      el: '#app',
      data: {
        obj: {
          id: 12,
          name: 'Luck',
          height: 1.78
        }
      },
      methods: {

      }
    });
  script>
body>
v-for使用过程添加key
<body>

  <div id="app">
    <ul>


      <li v-for="item in obj" :key="item">{{item}}li>
    ul>
  div>

  <script>
    const app = new Vue({
      el: '#app',
      data: {
        obj: ['A', 'B', 'C', 'D', 'E']
      },
      methods: {

      }
    });
  script>
body>
哪些数组的方法是响应式的
<body>
  <div id="app">
    <ul>
      <li v-for="item in obj" :key="item">{{item}}li>
    ul>
    <button @click="btnClick">点击button>
  div>

  <script>
    let myDate = new Date();
    const app = new Vue({
      el: '#app',
      data: {
        obj: ['R', 'C', 'B', 'D', 'E'],
      },
      methods: {
        btnClick() {
          //1.push()方法
          // this.obj.push('F')
          //2.pop()方法,从末尾依次删除
          // this.obj.pop()
          //3.shift()方法,从头开始依次删除
          // this.obj.shift()
          //4.unshift(),从头开始依次添加元素
          // this.obj.unshift('G','L')
          //5.splice(),方法向/从数组中添加/删除/替换元素,然后返回被删除的项目。
          //this.obj.splice(4) //去除数组第五个值
          //6.sort(),对数组的元素进行排序
          // this.obj.sort()
          //7.reverse(),对数组进行反转
          // this.obj.reverse()

          //注意:通过索引值修改数组中的元素方法,不可取,vue不会帮我渲染修改后的值
          // this.obj[0] = 'M'
          //解决方法:
          //删除第五个
          // this.obj.splice(3, 4, 'N')
          //①:在第三个位置修改成 N
          // this.obj.splice(2, 1, 'N')
          //②:建议:Vue自带的修改方法
          Vue.set(this.obj, 2, 'G')
        }
      }
    });
  script>
body>
对遍历出的列表,点击后对应的能变红
<body>
  <div id="app">
    <ul>

      <li v-for="(item, index) in obj" :key="item"
        :class="{active: currentIndex === index}" @click="changeColor(index)">{{item}}li>
    ul>
  div>

  <script>
    let myDate = new Date();
    const app = new Vue({
      el: '#app',
      data: {
        obj: ['R', 'C', 'B', 'D', 'E'],
        currentIndex: 0
      },
      methods: {
        changeColor(index) {
          this.currentIndex = index;
        }
      }
    });
  script>
body>
书籍购物车案例
此案例包含JavaScript的高阶函数用法
// javascript的高阶函数:
const nums = [10, 20, 30, 40, 50];

// 编程式范式:命令式编程/声明式编程
// 编程式编程(第一公民:对象),函数式编程(第一公民:函数)
// filter/map/reduce高阶函数
// ①:
// filter高阶函数的使用: 它的回调函数有一个要求,必须返回一个boolean值
// true:当返回true时,函数内部会自动将这次回调的n加入到新的数组中去
// false:当返回false时,函数内部会过滤掉这次的 n
let newNum1 = nums.filter(function (n) {
  return n < 100;
})
console.log('newNum1==filter==' + newNum1);

// ②:
// map高阶函数的使用
let newNum2 = newNum1.map(function (n) {
  return n * 2;
})
console.log('newNum2==map==' + newNum2);
let newNum21 = nums.map(function (n) {
  // 判断条件无效,输出结果与上面一样,看来还是需要filter来过滤
  if (n < 80) {
    return n * 2;
  } else {
    return;
  }
})
console.log('newNum21==map==' + newNum21);

// ③:
//6.reduce高阶函数的使用: 对数组中的所有数据进行汇总(相加,相乘......)
let total = newNum2.reduce(function (preValue, value) {
  return preValue + value;
}, 0)
console.log('total===' + total);
// 长度为 5
//         preValue   value
//第一次:    0         20
//第二次:    20        40
//第三次:    60        60
//第四次:    120       80
//第五次:    200       100
//输出        300

//④:将上面三个函数综合起来使用:
let sum = nums.filter(function (n) {
  return n < 50
}).map(function (n) {
  return n * 2
}).reduce(function (preValue, value) {
  return preValue + value
}, 0)
console.log('sum===' + sum);

//⑤:使用箭头函数将上面三个函数综合起来使用(类似lombda表达式)
let sum1 = nums.filter(n => n < 50).map(n => n * 2).reduce((pre, value) => pre + value);
console.log('sum1===' + sum1);
index.html
<html lang="en">

<head>
  <meta charset="UTF-8">
  <meta name="viewport" content="width=device-width, initial-scale=1.0">
  <meta http-equiv="X-UA-Compatible" content="ie=edge">
  <title>Documenttitle>
  <link rel="stylesheet" href="style.css">
head>

<body>
  <div id="app">
    <div v-if="isFull">
      <table>
        <thead>
          <tr>
            <th>编号th>
            <th>书名th>
            <th>出版日期th>
            <th>价格th>
            <th>数量th>
            <th>操作th>
          tr>
        thead>
        <tbody>
          <tr v-for="(item,index) in books" :class="{changeColor: number == 1}" @mouseenter="change(index)"
            @mouseleave="remove(index)">
            <td>{{item.id}}td>
            <td>{{item.name}}td>
            <td>{{item.date}}td>


            <td>{{item.price | showPrice}}td>
            <td>
              <button @click="subBtn(index)">-button>
              {{item.count}}
              <button @click="addBtn(index)">+button>
            td>
            <td>
              <button v-if="exchange" @click="addItemBtn(index)">新增button>
              <button v-else @click="removeBtn(index)">移除button>
              <button @click="changeType()">切换类型button>
            td>
          tr>
        tbody>
      table>
      <br>
      <span>总价格:{{showTotalPrice | showPrice}}span>
    div>
    <h2 v-else>购物车清空h2>
  div>
body>
<script src="../js/vue.js">script>
<script src="main.js">script>

html>
main.js
const app = new Vue({
  el: '#app',
  data: {
    books: [{
        id: 1,
        name: '算法导论',
        date: '2019-2',
        price: 87.21,
        count: 1,
        exchange: true
      },
      {
        id: 2,
        name: 'UNIX编程艺术',
        date: '2019-4',
        price: 97.21,
        count: 2,
        exchange: true
      },
      {
        id: 3,
        name: '编程珠玑',
        date: '2012-2',
        price: 77.21,
        count: 1,
        exchange: true
      },
      {
        id: 4,
        name: '大话西游',
        date: '2019-7',
        price: 100,
        count: 1,
        exchange: true
      }
    ],
    number: 2,
    exchange: false,
    isFull: true
  },
  computed: {
    showTotalPrice() {
      let totalPrice = 0;
      //1.普通for循环
      // for (let i = 0; i < this.books.length; i++) {
      //   totalPrice += this.books[i].price * this.books[i].count
      // }
      // return totalPrice

      //2.index是索引
      // for (let index in this.books) {
      //   totalPrice += this.books[index].price * this.books[index].count
      // }

      //3.for of
      // for (let item of this.books) {
      //   totalPrice += item.price * item.count
      // }

      //4.利用reduce函数来写
      return this.books.reduce(function (preValue, book) {
        return preValue + book.price * book.count
      }, 0)

      return totalPrice
    }
  },
  methods: {
    // 行内按钮操作
    subBtn(index) {
      if (this.books[index].count > 0) {
        this.books[index].count--
      }
    },
    addBtn(index) {
      this.books[index].count++
    },
    removeBtn(index) {
      this.books.splice(index, 1)
      if (this.books.length <= 0) {
        this.isFull = !this.isFull
      }
    },
    // 鼠标移动进区域,改变背景颜色
    change(index) {
      // this
      this.number = 1;
      this.active = ".changeColor{ background-color: #cae6e6}"
    },
    remove(index) {
      this.number = 2
    },
    // 改变按钮类型
    changeType() {
      this.exchange = !this.exchange
    },
    addItemBtn() {
      const obj = [5, '数值分析', '2018-8', 96.10, 2];
      this.books.push(obj)
    },
    // 格式化价格
    getfinalPrice(price) {
      return '¥' + price.toFixed(2);
    }
  },
  filters: {
    showPrice(price) {
      //.toFixed(2):保留小数点后两位
      return '¥' + price.toFixed(2);
    }
  }
})
style.css
table {
  border: 1px solid #cccccc;
  /* 消除表格的边框内距 */
  border-collapse: collapse;
  border-spacing: 0;
  width: 700px;
}
table thead {
  background-color: lightskyblue;
}
/* table tr:hover {
  background-color: pink;
} */
table tr th {
  border: 1px solid #cccccc;
}
table tr td {
  border: 1px solid #cccccc;
  text-align: center;
  padding: 20px;
}
.changeColor {
  background-color: #cae6e6
}
v-model的使用
v-model双向绑定的基本原理
<body>
  <div id="app">

    <input type="text" v-model="message">{{message}}
    <br>


    <input type="text" v-on:input="changeInput($event)">
    <input type="text" @input="changeInput">
    <br>

    <input type="text" v-bind:value="message" v-on:input="message = $event.target.value">
    <input type="text" :value="message" @input="message = $event.target.value">
  div>

  <script>
    const app = new Vue({
      el: '#app',
      data: {
        message: '你好呀'
      },
      methods: {
        changeInput(event) {
          this.message = event.target.value;
        }
      }
    });
  script>
body>
v-model结合radio单选框使用
<body>
  <div id="app">

    <label for="male">
      <input type="radio" name="sex" value="男" id="male" v-model="message">男
    label>
    <label for="female">
      <input type="radio" name="sex" value="女" id="female" v-model="message">女
    label>
    <br>
    {{'你选中的值:' + message}}
  div>

  <script>
    const app = new Vue({
      el: '#app',
      data: {
        message: ''
      },
      methods: {

      }
    });
  script>
body>
v-model结合checkbox多选框使用
<body>
  <div id="app">

    <label for="agreeLisence">
      <input type="checkbox" v-model="isAgree">统一协议
    label>
    <button :disabled="!isAgree">下一步button>
    <br>

    <input type="checkbox" value="唱" v-model="hobbies">唱
    <input type="checkbox" value="跳" v-model="hobbies">跳
    <input type="checkbox" value="rap" v-model="hobbies">rap
    <input type="checkbox" value="打篮球" v-model="hobbies">打篮球
    你选择的兴趣爱好是:{{hobbies}}
  div>

  <script>
    const app = new Vue({
      el: '#app',
      data: {
        isAgree: false, //单选框
        hobbies: [] //多选框
      },
      methods: {

      }
    });
  script>
body>
v-model结合select下拉框使用
<body>
  <div id="app">

    <select name="demo" v-model="fruit">
      <option value="香蕉">香蕉option>
      <option value="苹果">苹果option>
      <option value="葡萄">葡萄option>
      <option value="梨子">梨子option>
    select>
    <h3>你选择的水果是:{{fruit}}h3>
    <br>

    <select name="demo" v-model="fruits" multiple>
      <option value="香蕉">香蕉option>
      <option value="苹果">苹果option>
      <option value="葡萄">葡萄option>
      <option value="梨子">梨子option>
    select>
    <h3>你选择的水果是:{{fruits}}h3>
  div>

  <script>
    const app = new Vue({
      el: '#app',
      data: {
        fruit: '香蕉',
        fruits: []
      },
      methods: {

      }
    });
  script>
body>
v-model结合v-for使用
<body>
  <div id="app">

    <label v-for="(item, index) in originalHobbies">

      <input type="checkbox" v-model="hobbies" :id="index+1" :value="item">{{item}}
    label>
    你选择的兴趣爱好是:{{hobbies}}
  div>

  <script>
    const app = new Vue({
      el: '#app',
      data: {
        isAgree: false, //单选框
        hobbies: [], //多选框
        originalHobbies: ['唱', '跳', 'rap', '打篮球']
      },
      methods: {

      }
    });
  script>
body>
v-model的修饰符使用
<body>
  <div id="app">

    <input type="text" v-model.lazy="message">{{message}}
    <hr>

    <input type="number" v-model="age">
    <h3>{{age}}--{{typeof age}}h3>

    <input type="number" v-model.number="height">
    <h3>{{height}}--{{typeof height}}h3>
    <hr>

    <input type="text" v-model.trim="name">

    <input type="number" v-model.lazy.number="height">
    <h3>{{name}}h3>
  div>

  <script>
    const app = new Vue({
      el: '#app',
      data: {
        message: '你好呀',
        age: 0,
        height: 1,
        name: ''
      },
      methods: {

      }
    });
  script>
body>
组件化开发
组件化的基本使用
<body>
  <div id="app">
    <my-cpn>my-cpn>
    <my-cpn>my-cpn>
    <my-cpn>my-cpn>
    <my-cpn>my-cpn>
  div>

  <script>
    // 创建组件构造器
    const cpnC = Vue.extend({
      // ES6语法:` 号可以支持内容里面换行比 ''更好使用
      //如果有多个标签使用,必须有个div包裹起来,否则内容显示不完全
      template: `

          组件化
          我是,哈哈哈哈
          我是,呵呵呵呵

      `
    })
    // 注册组件
    Vue.component('my-cpn', cpnC)

    const app = new Vue({
      el: '#app',
      data: {

      },
      methods: {

      }
    });
  script>
body>
全局组件和局部组件
<body>
  <div id="app">
    <cpn>cpn>
    <cpn>cpn>
    <cpn>cpn>
    <cpn>cpn>
  div>
  <div id="app2">
    <cpn>cpn>
  div>
  <script>
    const cpnC = Vue.extend({
      template: `

          组件化
          我是,哈哈哈哈
          我是,呵呵呵呵

      `
    })

    // 注册全局组件
    Vue.component("cpn", cpnC)

    const app = new Vue({
      el: '#app',
      data: {

      },
      components: {
        // 注册局部组件,即只能在app里使用cpn这个组件
        cpn: cpnC
      }
    });

    const app2 = new Vue({
      el: '#app2',
    });
  script>
body>
父组件和子组件
<body>
<div id="app">
<cpn2>cpn2>
div>
<script>
const cpnC = Vue.extend({
template: `
子组件
我是,哈哈哈哈
我是,呵呵呵呵
`
})
// 父组件:root组件
const cpnC2 = Vue.extend({
template: `
父组件
我是,哈哈哈哈
我是,呵呵呵呵
// 这个子组件需要先注册
组件的语法糖注册方式
<body>
  <div id="app">
    <cpn1>cpn1>
    <cpn2>cpn2>
  div>
  <script>
    // const cpnC = Vue.extend()

    // 语法糖注册全局组件
    Vue.component("cpn1", {
      template: `

          我是cpn1
          我是,哈哈哈哈

      `
    })

    const app = new Vue({
      el: '#app',
      data: {

      },
      components: {
        // 语法糖注册局部组件,即只能在app里使用这个组件
        'cpn2': {
          template: `

            我是cpn2
            我是,呵呵呵呵

        `
        }
      }
    });

  script>
body>
组件模块的分离写法
<body>

  <div id="app">
    <cpn>cpn>
    <cpn1>cpn1>
  div>


  <script type="text/x-template" id="cpn">
    <div>
      <h2>我是cpn1</h2>
      <h3>我是,哈哈哈哈</h3>
    </div>
  script>


  <template id="cpn1">
    <div>
      <h2>我是cpn1h2>
      <h3>我是,哈哈哈哈h3>
    div>
  template>


  <script>
    // const cpnC = Vue.extend()

    // 语法糖注册全局组件
    Vue.component("cpn", {
      // '#cpn'
      template: '#cpn1'
    })

    const app = new Vue({
      el: '#app',
      data: {

      }
    });
  script>
body>
组件中的数据存放问题
<body>

  <div id="app">
    <cpn>cpn>
    <cpn>cpn>
  div>

  <template id="cpn1">
    <div>
      <h2>我是cpn1h2>
      <h3>我是,哈哈哈哈h3>

      <h3>{{title}}h3>
    div>
  template>


  <script>
    // const cpnC = Vue.extend()

    // 语法糖注册全局组件
    Vue.component("cpn", {
      // '#cpn'
      template: '#cpn1',
      data() {
        return {
          title: '好好学习,天天向上'
        }
      }
    })

    const app = new Vue({
      el: '#app',
      data: {
        // 模板里的title不能获取到此值
        title: '好好学习,天天向上'
      }
    });
  script>
body>
组件中的data为什么必须是函数
<body>

  <div id="app">
    <cpn>cpn>
    <cpn>cpn>
    <hr>
    <cpn1>cpn1>
    <cpn1>cpn1>
  div>

  <template id="cpn1">
    <div>
      <h3>当前计数:{{count}}h3>
      <button @click="increment">+button>
      <button @click="decrement">-button>
    div>
  template>

  <template id="cpn2">
    <div>
      <h3>当前计数:{{count}}h3>
      <button @click="increment">+button>
      <button @click="decrement">-button>
    div>
  template>

  <script>
    // 推荐:count数据不会共享
    // 使用data函数:不会引起连锁反应。即每个都是个新对象,值地址不一样,
    Vue.component("cpn", {
      // '#cpn'
      template: '#cpn1',
      data() {
        return {
          count: 0
        }
      },
      methods: {
        increment() {
          this.count++
        },
        decrement() {
          this.count--
        }
      }
    })

    // count数据共享
    // 都是使用的这个obj常量
    const obj = {
      count: 0
    };
    Vue.component("cpn1", {
      // '#cpn'
      template: '#cpn2',
      data() {
        return obj
      },
      methods: {
        increment() {
          this.count++
        },
        decrement() {
          this.count--
        }
      }
    })

    const app = new Vue({
      el: '#app',
    });
  script>
body>
组件通信-父组件向子组件传递数据
<body>
  <div id="app">
    {{movies.toString()}}
    <hr>

    <cpn v-bind:vmoives="movies" :vmessage="message">cpn>
    <hr>

    <cpn vmoives="movies" vmessage="message">cpn>
  div>

  <template id="cpn">
    <div>
      <h2>{{vmessage}}h2>
      <ul v-for="(item,index) in vmoives">
        <li>{{index}}.{{item}}li>
      ul>
    div>
  template>

  <script>
    const cpn = {
      template: '#cpn',
      props: ['vmoives', 'vmessage'], //这种其实是表示变量名字,不能当成字符串
      data() {
        return {}
      },
      methods: {

      }
    }

    // 注册全局组件
    // Vue.component('cpn', cpn)

    const app = new Vue({
      el: '#app',
      data: {
        movies: ['海王', '海贼王', '航空母舰'],
        message: '真香'
      },
      components: {
        // ES6中的高阶写法,等同于 cpn: cpn
        cpn
      }
    });
  script>
body>
组件通信-props用法详解
<body>
  <div id="app">
    {{movies.toString()}}
    <hr>
    <cpn v-bind:propF="movies" :propC="message">cpn>
    <hr>
  div>

  <template id="cpn">
    <div>
      <h2>{{propC}}h2>
      <ul v-for="(item,index) in propF">
        <li>{{index}}.{{item}}li>
      ul>
    div>
  template>

  <script>
    const cpn = {
      template: '#cpn',
      props: {
        // 基础的类型检查('null'匹配任何类型)
        propA: Number,
        // 多个可能的类型
        propB: [String, Number],
        // 必填的字符串
        propC: {
          type: String,
          required: true,
          default: '你好呀'
        },
        // 带有默认值的数字
        propD: {
          type: Number,
          default: 100
        },
        // 注意:类型是对象/数组时,默认值必须是一个函数
        // 带有默认值的对象
        propE: {
          type: Object,
          default: function () {
            return {
              message: 'hello'
            }
          }
        },
        // 带有默认值的对象
        propF: {
          type: Array,
          default() {
            return ['大话西游', '造梦西游']
          }
        },
        // 自定义验证函数
        propG: {
          validator: function (value) {
            // 这个值必须匹配下列字符串的一个
            return ['success', 'warning', 'danger'].indexOf(value) !== -1
          }
        }
      },
      data() {
        return {}
      }
    }

    const app = new Vue({
      el: '#app',
      data: {
        movies: ['海王', '海贼王', '航空母舰'],
        message: '真香'
      },
      components: {
        cpn
      }
    });
  script>
body>
组件通信-父传子(props不支持驼峰标识)
<body>
  <div id="app">
    <cpn v-bind:prop-f="movies" v-bind:prop-g="message">cpn>
    <hr>
  div>

  <template id="cpn">
    <div>
      <h2>{{propG}}h2>
      <ul v-for="(item,index) in propF">
        <li>{{index}}.{{item}}li>
      ul>
    div>
  template>

  <script>
    const cpn = {
      template: '#cpn',
      props: {
        // 带有默认值的对象
        propE: {
          type: Object,
          default: function () {
            return {
              message: 'hello'
            }
          }
        },
        // 带有默认值的对象
        propF: {
          type: Array,
          default() {
            return ['大话西游', '造梦西游']
          }
        },
        // 自定义验证函数
        propG: {
          validator: function (value) {
            // 这个值必须匹配下列字符串的一个:如果要检索的字符串值没有出现,则该方法返回 -1。
            console.log(['success', 'warning', 'danger'].indexOf(value) !== -1);
            // 校验失败:Invalid prop: custom validator check failed for prop "propG".
            return ['success', 'warning', 'danger'].indexOf(value) !== -1
          }
        }
      },
      data() {
        return {}
      }
    }

    const app = new Vue({
      el: '#app',
      data: {
        movies: ['海王', '海贼王', '航空母舰'],
        message: 'succe'
      },
      components: {
        cpn
      }
    });
  script>
body>
组件通信-父子组件通信的案例
<body>
  <div id="app">

    <cpn v-on:item-click="cpnClick">cpn>
    <hr>
    <cpn @item-click="cpnClick($event)">cpn>
  div>

  <template id="cpn">
    <div>
      <button v-for="(item,index) in categories" @click="btnClick(item)">{{item.name}}button>
    div>
  template>

  <script>
    /*步骤:
    1.子组件:触发监听的事件,比如被点击了,
    2.然后发送自定义事件this.$emit('cpn中的自定义事件名', item)
    3.调用Vue中的事件监听函数,如若在html文件中,不饿能使用驼峰命名自定义函数
    */
    // 子组件
    const cpn = {
      template: '#cpn',
      data() {
        return {
          categories: [
            {id: 'a1', name: '热门推荐'},
            {id: 'a2', name: '手机数码'},
            {id: 'a3', name: '家用家电'},
            {id: 'a4', name: '电脑办公'}
          ]
        }
      },
      methods: {
        btnClick(item) {
          //发射事件:自定义事件(父组件的cpn中接收此事件的名字)
          // html不区分大小写,这里不能使用驼峰命名
          this.$emit('item-click', item)
        }
      }
    }

    //
    const app = new Vue({
      el: '#app',
      components: {
        cpn
      },
      methods: {
        cpnClick(item) {
          console.log('cpnClick', item);
        }
      },
    });
  script>
body>
组件通信-数字游戏-1
<body>
  <div id="app">
    <cpn :number1="num1" :number2="num2">cpn>
  div>

  <template id="cpn">
    <div>
      <h2>双向绑定的是num1:{{dnum1}}h2>
      <h2>props:{{number1}}h2>
      <input type="text" v-model="dnum1">
      <h2>双向绑定的是num2:{{dnum2}}h2>
      <h2>props:{{number2}}h2>
      <input type="text"  v-model="dnum2">
    div>
  template>
  <script>
    const app = new Vue({
      el: '#app',
      data: {
        num1: 0,
        num2: 1
      },
      components: {
        cpn: {
          template: '#cpn',
          props: {
            number1: Number,
            number2: Number
          },
          data() {
            return {
              /*
              Property or method "num2" is not defined on the instance but referenced during render.
              Make sure that this property is reactive, either in the data option,
              or for class-based components, by initializing the property
              即需要添加data(){}
              */
              dnum1: this.number1,
              dnum2: this.number2
            }
          }
        }
      },
      methods: {

      }
    });
  script>
body>
组件通信-数字游戏-2
<body>
  <div id="app">

    <cpn :number1="num1" :number2="num2" @change1props="change1props" @change2props="change2props">cpn>

  div>

  <template id="cpn">
    <div>
      <h2>双向绑定的是num1:{{dnum1}}h2>
      <h2>props:{{number1}}h2>

      <input type="text" :value="dnum1" @input="changeInputValue1">
      <h2>双向绑定的是num2:{{dnum2}}h2>
      <h2>props:{{number2}}h2>
      <input type="text" :value="dnum2" @input="changeInputValue2">
    div>
  template>
  <script>
    const app = new Vue({
      el: '#app',
      data: {
        num1: 0,
        num2: 1
      },
      components: {
        cpn: {
          template: '#cpn',
          props: {
            number1: Number,
            number2: Number
          },
          data() {
            return {
              dnum1: this.number1,
              dnum2: this.number2
            }
          },
          methods: {
            changeInputValue1(event) {
              // 1.将input的值赋值到 dnum1 中去
              this.dnum1 = event.target.value;

              // 2.为了让父组件可以修改值,发送一个事件
              this.$emit('change1props', this.dnum1)

              // 将下面输入框的props值: 变成1/2
              this.dnum2 = this.dnum1 / 2
              this.$emit('change2props', this.dnum2)
            },
            changeInputValue2() {
              this.dnum2 = event.target.value;
              this.$emit('change2props', this.dnum2)

              // 将上面输入框的props值: 变成2倍
              this.dnum1 = this.dnum2 * 2
              this.$emit('change1props', this.dnum1)
            }
          },
        }
      },
      methods: {
        change1props(value) {
          // 改变 prop 中的num1的值
          console.log('dum1' + value);
          this.num1 = parseFloat(value);
        },
        change2props(value) {
          console.log('dum2' + value);
          this.num2 = parseFloat(value);
        }
      }
    });
  script>
body>
组件通信-父访问子-children-refs
<body>
  <div id="app">
    <cpn>cpn>
    <cpn>cpn>
    <cpn ref="refA">cpn>
    <button @click="btnClick">按钮button>
  div>

  <template id="cpn">
    <div>
      我是子组件
    div>
  template>

  <script>
    const app = new Vue({
      el: '#app',
      data: {
        message: 'Lemon'
      },
      methods: {
        btnClick() {
          // 1. $.chlidren
          for (let item of this.$children) {
            console.log(item.name);
            item.showMessage()
          }

          // 2. $.refs: 仅仅会调动带有refs标示的
          // 这样有时候我们想即使在新增数据后,依旧能操控它
          console.log('refs' + this.$refs.refA.name);
        }
      },
      components: {
        cpn: {
          template: '#cpn',
          data() {
            return {
              name: 'Lemon',
              id: 1,
              height: 1.78
            }
          },
          methods: {
            showMessage() {
              console.log(this.id);
            }
          },
        }
      }
    });
  script>
body>
组件通信-子访问父-parent-root
<body>
  <div id="app">
    <cpn>cpn>
    <hr>
    <ccpn>ccpn>
  div>

  <template id="cpn">
    <div>我是cpn子组件div>
  template>


  <template id="ccpn">
    <div>
      <h3>我是cpn的子组件h3>
      <button @click="btnClick">ccpn按钮button>
    div>
  template>

  <script>
    const ccpn = Vue.component('ccpn', {
              template: '#ccpn',
              methods: {
                btnClick() {
                  // 按理这个是cpn的子组件,this应该指ccpn对象,
                  // 调用this.$parent时,访问的是ccpn的父组件cpn,即返回对象是vuecomponents
                  // 调用this.$root时,访问的才应该是cpn的父组件,即返回对象是vue
                  // 可是我放在cpn的components里说ccpn没有注册
                  console.log('ccpn=', this.$root.message)
                }
              }
            })

    const app = new Vue({
      el: '#app',
      data: {
        message: 'Lemon'
      },
      methods: {

      },
      components: {
        cpn: {
          template: '#cpn',
          data() {
            return {
              name: '我是cpn的name'
            }
          },
          components: {
            ccpn
          }
        }
      }
    });
  script>
body>
组件化高级
slot-插槽的基本使用
<body>

  <div id="app">
    <cpn>嘻嘻嘻cpn>
    <cpn><button>按钮button>cpn>
    <cpn>哈哈哈cpn>
    <cpn>cpn>
  div>

  <template id="cpn">
    <div>
      <h3>组件化开发h3>
      <slot><button>按钮button>slot>
    div>
  template>

  <script>
    const app = new Vue({
      el: '#app',
      data: {

      },
      methods: {

      },
      components: {
        cpn: {
          template: '#cpn'
        }
      }
    });
  script>
body>
slot-具名插槽的使用
<body>
  <div id="app">
    <cpn>嘻嘻嘻cpn>
    <cpn><span slot="right">哈哈哈span>cpn>
  div>

  <template id="cpn">
    <div>
      <slot name="left">左边slot>
      <slot name="center">中间slot>
      <slot name="right">右边slot>
      <slot>右边slot>
    div>
  template>

  <script>
    const app = new Vue({
      el: '#app',
      data: {

      },
      methods: {

      },
      components: {
        cpn: {
          template: '#cpn'
        }
      }
    });
  script>
body>
什么是编译的作用域
<body>

  <div id="app">

    <cpn v-show="isShow">cpn>
  div>

  <template id="cpn">
    <div>
      <h2>我是组件h2>

      <h3 v-show="isShowCpn">我是哈哈哈h3>
    div>
  template>

  <script>
    const app = new Vue({
      el: '#app',
      data: {
        isShow: true
      },
      methods: {

      },
      components: {
        cpn: {
          template: '#cpn',
          data() {
            return {
              isShow: false,
              isShowCpn: true
            }
          }
        }
      }
    });
  script>
body>
作用域插槽的准备
<body>

  <div id="app">
    <cpn>cpn>
    <hr>

    <cpn>
      哈哈哈哈·

      <template>
        <div slot-scope="slot">
          <span v-for="(item,index) in slot.data">- {{item}} {{item}} - span>
          <hr>
        div>
      template>
    cpn>
    <hr>

    <cpn>

      <template v-slot:todo="slotProps">
        <div>
          加join():<span>- {{slotProps.data.join(' - ')}}span><br>
          <span>{{slotProps.data}}span>
        div>
      template>
    cpn>
  div>

  <template id="cpn">
    <div>

      <slot :data="pLanguages"  name="todo">
        <ul>
          <li v-for="(item,index) in pLanguages">
            {{item}}
          li>
        ul>
      slot>
    div>
  template>

  <script>
    const app = new Vue({
      el: '#app',
      data: {

      },
      methods: {

      },
      components: {
        cpn: {
          template: '#cpn',
          data() {
            return {
              pLanguages: ['Java', 'C', 'C++', 'Python', 'C#']
            }
          }
        }
      }
    });
  script>
body>
前端模块化
ES模块化的实现
aaa.js
var name = '小红'
let age = 18
var flag = true

function sum(num1, num2) {
  return num1 + num2
}

if (flag) {
  console.log(sum(200, 300));
}

export {
  flag, sum
}
bbb.js
var name = '小红'
var flag = false

// var name = '小明'
// let age = 18
// var flag = true

// function sum(num1, num2) {
//   return num1 + num2
// }

// if (flag) {
//   console.log(sum(20, 30));
// }

// export {
//   flag, sum
// }
index.html
<html lang="en">
<head>
  <meta charset="UTF-8">
  <meta name="viewport" content="width=device-width, initial-scale=1.0">
  <meta http-equiv="X-UA-Compatible" content="ie=edge">
  <title>Documenttitle>
head>
<body>

  <script src="aaa.js" type="module">script>
  <script src="bbb.js" type="module">script>
  <script src="mmm.js" type="module">script>
body>
html>
mmm.js
import {flag} from "./aaa.js";

if (flag) {
  console.log('小明是天才,哈哈哈哈');
}
webpack使用
webpack的起步
info.js
export const name = 'why'
export const age = 18
export const height = 1.78
main.js
// 1.使用commonjs的模块化规范
const {add, mul} = require('./mathUtils.js')

console.log(add(20, 30));
console.log(mul(25, 30));

// 2.使用ES6的模块化的规范
import {name, age, height} from "./info";

console.log(name);
console.log(age);
console.log(height);
mathUtils.js
function add(num1, num2) {
  return num1 + num2
}

function mul(num1, num2) {
  return num1 * num2
}

module.exports = {
  add,
  mul
}
index.html
<html lang="en">
<head>
  <meta charset="UTF-8">
  <meta name="viewport" content="width=device-width, initial-scale=1.0">
  <meta http-equiv="X-UA-Compatible" content="ie=edge">
  <title>Documenttitle>
head>
<body>


  <script src="./dist/bundle.js">script>
body>
html>
webpack的配置
webpack.config.js
const path = require('path')

// npm init; npm install

module.exports = {
  entry: './src/main.js',
  output: {
    // 动态获取路径:resolve拼接地址
    path: path.resolve(__dirname, 'dist'),
    filename: 'bundle.js'
  },
}
package.json
{
  "name": "meetwebpack",
  "version": "1.0.0",
  "description": "",
  "main": "webpack.config.js",
  "scripts": {
    "test": "echo \"Error: no test specified\" && exit 1",
    "build": "webpack"
  },
  "author": "",
  "license": "ISC",
  "devDependencies": {
    "webpack": "^3.6.0"
  }
}
webpack配置loader和vue
webpack.config.js
const path = require('path')

// npm init; npm install

module.exports = {
  entry: './src/main.js',
  output: {
    // 动态获取路径:resolve拼接地址
    path: path.resolve(__dirname, 'dist'),
    filename: 'bundle.js',
    // 可以显示加载后的图片
    // publicPath: '/dist'
    publicPath: 'dist/'
  },
  module: {
    rules: [{
        test: /\.css$/i,
        use: ['style-loader', 'css-loader'],
      }, {
        test: /\.less$/,
        use: [{
          loader: "style-loader" // creates style nodes from JS strings
        }, {
          loader: "css-loader" // translates CSS into CommonJS
        }, {
          loader: "less-loader" // compiles Less to CSS
        }]
      }, {
        test: /\.(png|jpg|gif)$/,
        use: [{
          loader: 'url-loader',
          options: {
            // 如果limit小于文件大小 * 1024,就会报错,Cannot find module 'file-loader'
            // 一般配置成8kb
            limit: 8192,
            name: 'img/[name].[hash:8].[ext]'
          }
        }]
      }, {
        test: /\.js$/,
        // 排除
        exclude: /(node_modules|bower_components)/,
        use: {
          loader: 'babel-loader',
          options: {
            presets: ['es2015']
          }
        }
      }
    ],
  },
}
html
index.html
<html lang="en">

<head>
  <meta charset="UTF-8">
  <meta name="viewport" content="width=device-width, initial-scale=1.0">
  <meta http-equiv="X-UA-Compatible" content="ie=edge">
  <title>Documenttitle>
head>

<body>

  <script src="./dist/bundle.js">script>
body>

html>
js
main.js
// 1.使用commonjs的模块化规范
const {add, mul} = require('./js/mathUtils.js')
console.log(add(20, 30));
console.log(mul(25, 30));
// 2.使用ES6的模块化的规范
import {name, age, height} from "./js/info";
console.log(name);
console.log(age);
console.log(height);
// 3.依赖css文件
require('./css/normal.css')
// 4.依赖less文件
require('./css/special.less')
document.writeln('你好呀,李银河
')
info.js
export const name = 'why'
export const age = 18
export const height = 1.78
mathUtils.js
function add(num1, num2) {
  return num1 + num2
}

function mul(num1, num2) {
  return num1 * num2
}

module.exports = {
  add,
  mul
}
css
normal.css
body {
  /* background: mediumaquamarine; */
  background: url("../img/timg1.jpg")
}
special.less
@fontSize: 50px;
@fontColor: orange;

body {
  font-size: @fontSize;
  color: @fontColor
}
模块展示

vue-cli3使用
App.vue
<template>
  <div id="app">
    <img alt="Vue logo" src="./assets/logo.png">
    <HelloWorld msg="Welcome to Your Vue.js App"/>
  div>
template>

<script>
import HelloWorld from './components/HelloWorld.vue'

export default {
  name: 'app',
  components: {
    HelloWorld
  }
}
script>

<style>
#app {
  font-family: 'Avenir', Helvetica, Arial, sans-serif;
  -webkit-font-smoothing: antialiased;
  -moz-osx-font-smoothing: grayscale;
  text-align: center;
  color: #2c3e50;
  margin-top: 60px;
}
style>
HelloWorld.vue
<template>
  <div class="hello">
    <h1>{{ msg }}h1>
  div>
template>

<script>
export default {
  name: 'HelloWorld',
  props: {
    msg: String
  }
}
script>

<style scoped>
h3 {
  margin: 40px 0 0;
}
ul {
  list-style-type: none;
  padding: 0;
}
li {
  display: inline-block;
  margin: 0 10px;
}
a {
  color: #42b983;
}
style>
main.js
import Vue from 'vue'
import App from './App.vue'

Vue.config.productionTip = false

new Vue({
  // 使用的是runtime-only
  render: h => h(App),
  // render: h => {
  //   return h(App)
  // }
}).$mount('#app')