自定义View实现TextView中的DrawableLeft缺陷
自定义View实现TextView中的DrawableLeft
一、前言
1、本次的自定义View主要实现TextView的DrawableLeft的图片和文字并排效果,有人说这样的效果需要自定义控件吗?一个ImageView和一个TextView在一个水平的LinearLayout即可搞定。但是我想请问CPU在渲染这三个组件速度快,还是渲染一个自定义View组件速度快?很明显后者性能更佳。另一方面Android在TextView中的已经有了DrawableLeft等几个可以插入的图片的属性,但是个人感觉在使用DrawableLeft过程中对其中图片的定位不是很好控制,个人感觉是一个缺陷,不好控制图片和文字的距离,特别当整个TextView布满整个父控件时,然后设置gravity=”center”会发现文字是居中但是图片就不行了,很难看,处理很麻烦就不得不使用一个ImageView和一个TextView在一个水平的LinearLayout.因为最近在研究自定义View所以就看看能不能实现该效果。
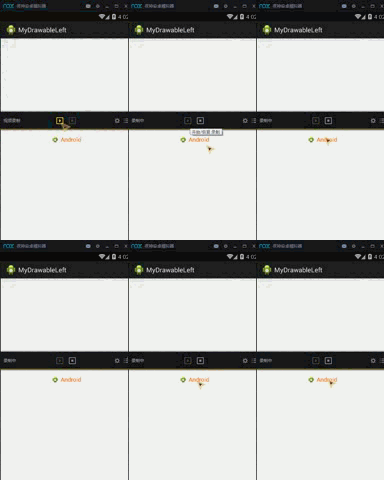
2、本次自定义View的实现功能:默认是图片和文字整个居中显示,并且有myTextAndImgPadding自定义属性用于设置,文字和图片之间的间隔距离;可以通过myImageWidth,myImageHeight自定义属性对图片的大小进行设置;myImageScaleType设置图片的定位方式:FillXY,center等,并且图片的高度和宽度可以动态修改,文本内容等都可以动态修改。
二、实现自定义View的四个基本步骤:
1、在res/values文件夹下新建一个attrs.xml文件去定义View的属性,然后在其中并且去声明属性,就类似与要使用一个函数或者变量的时候首先得去定义改变量然后去声明该变量,最后去使用
`@定义并声明自定义属性code:
` 2、然后就是定义一个class然后去继承View类,然后去重写3个构造方法,分别是1个参数的、2个参数的、3个参数的。然后2个参数的构造器调用3个参数的构造器,1个参数的构造器调用2个参数的构造器,最后在3个参数的构造器中去获取我们自定义的属性,注意:一点就是在获取属性值的时候:array.getIndexCount();获取的不是attrs.xml中总共定义了多少个属性,而是获取的是我们在布局文件中真正引用多少个属性。
`@获取自定义属性code:
 public myDrawableLeft(Context context, AttributeSet attrs, int defStyleAttr) {
    super(context, attrs, defStyleAttr);
    TypedArray array=context.obtainStyledAttributes(attrs, R.styleable.ZqhDrawableLeft, defStyleAttr, 0);
    for (int i = 0; i < array.getIndexCount(); i++) {
        int attr=array.getIndex(i);//这步类似取出Map集合的key值
        switch (attr) {//然后根据key值去取出相应的value
        case R.styleable.ZqhDrawableLeft_myText:
            myText=array.getString(attr);
            break;
        case R.styleable.ZqhDrawableLeft_myTextSize:
            myTextSize=array.getDimensionPixelSize(attr, (int) TypedValue.applyDimension(TypedValue.COMPLEX_UNIT_SP, 16, getResources().getDisplayMetrics()));
            break;
        case R.styleable.ZqhDrawableLeft_myTextColor:
            myTextColor=array.getColor(attr, Color.BLACK);
            break;
        case R.styleable.ZqhDrawableLeft_myTextAndImgPadding:
            myTextAndImgPadding= array.getDimensionPixelSize(attr, (int) TypedValue.applyDimension(TypedValue.COMPLEX_UNIT_DIP, 10, getResources().getDisplayMetrics()));
            break;
        case R.styleable.ZqhDrawableLeft_myImageSrc:
            myImageSrc=BitmapFactory.decodeResource(getResources(), array.getResourceId(attr, 0));
            break;
        case R.styleable.ZqhDrawableLeft_myImageScaleType:
            myImageScaleType=array.getInt(attr, 0);
            break;
        case R.styleable.ZqhDrawableLeft_myImageWidth:
            myImageWidth=array.getDimensionPixelSize(attr, (int) TypedValue.applyDimension(TypedValue.COMPLEX_UNIT_DIP, 40, getResources().getDisplayMetrics()));
            break;
        case R.styleable.ZqhDrawableLeft_myImageHeight:
            myImageHeight=array.getDimensionPixelSize(attr, (int) TypedValue.applyDimension(TypedValue.COMPLEX_UNIT_DIP, 40, getResources().getDisplayMetrics()));
            break;
        default:
            break;
        }
    }
    array.recycle();
    rect=new Rect();
    myTextBound=new Rect();
    myPaint=new Paint();
    myPaint.setTextSize(myTextSize);
    myPaint.getTextBounds(myText, 0, myText.length(), myTextBound);
}`
3、然后接着就是重写onMesure测量组件高度和宽度的方法:
`@onMeasure code:
    protected void onMeasure(int widthMeasureSpec, int heightMeasureSpec) {
    //super.onMeasure(widthMeasureSpec, heightMeasureSpec);
    int widthMode=MeasureSpec.getMode(widthMeasureSpec);
    int heightMode=MeasureSpec.getSize(heightMeasureSpec);
    int widthSize=MeasureSpec.getSize(widthMeasureSpec);
    int heightSize=MeasureSpec.getSize(heightMeasureSpec);
    /**
     * @author zhongqihong
     * 此处的处理是:当指定明确的图片的尺寸时,我们就直接获取指定的尺寸大小,如果为0则表示没有指定图片
     * 大小那么就直接使用myImageSrc.getHeight(),myImageSrc.getWidth()图片本身的尺寸
     * */
    if (myImageHeight==0) {
          myImageHeight=myImageSrc.getHeight();
        }
        if (myImageWidth==0) {
            myImageWidth=myImageSrc.getWidth();
        }
    //测量宽度
    if (widthMode==MeasureSpec.EXACTLY) {
        myWidth=widthSize;
    }else{
        int desired=getPaddingLeft()+myImageSrc.getWidth()+myTextAndImgPadding+myTextBound.width()+getPaddingRight();
        if (widthMode==MeasureSpec.AT_MOST) {
            myWidth=Math.min(desired, widthSize);
        }
    }
    //测量高度
    if (heightMode==MeasureSpec.EXACTLY) {
        myHeight=heightSize;
    }else{
        int maxDesiredHeight=Math.max(myTextBound.height(), myImageSrc.getHeight());
        System.out.println("myImageSrc.getHeight------>"+myImageSrc.getHeight()+"    maxDesiredHeight----->"+maxDesiredHeight);
        int desired=getPaddingTop()+maxDesiredHeight+getPaddingBottom();
        System.out.println("desired------>"+desired);
        myHeight=Math.min(desired, heightSize);
    }
    setMeasuredDimension(myWidth, myHeight);
    System.out.println("I am onMeasure:---myWidth----->"+myWidth+"------------>myHeight---->"+myHeight);
}`
4、最后就是重写onDraw方法,实现具体的逻辑:
`@onDraw code:
/*
 * @author zhongqihong
 * 重写onDraw方法
 *
 */
@Override
protected void onDraw(Canvas canvas) {
    //绘制整个组件的边框即外围边框
    myPaint.setStrokeWidth(4);
    myPaint.setStyle(Paint.Style.STROKE);
    myPaint.setColor(Color.RED);
    canvas.drawRect(0, 0, getMeasuredWidth(), getMeasuredHeight(), myPaint);*
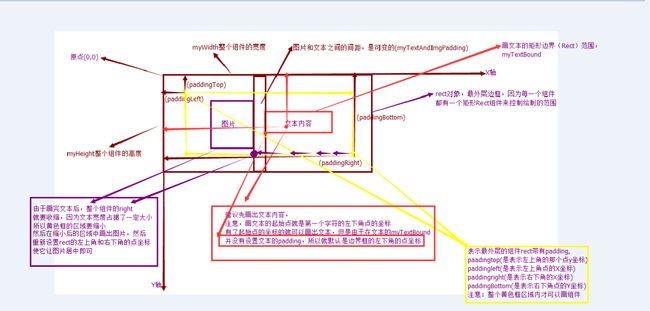
    rect.left=getPaddingLeft();
    rect.right=myWidth-getPaddingRight();
    rect.top=getPaddingTop();
    rect.bottom=myHeight-getPaddingBottom();
    myPaint.setColor(myTextColor);
    myPaint.setStyle(Style.FILL);
    int textX=(myWidth-(myImageWidth+myTextAndImgPadding+myTextBound.width()))/2+(myImageWidth+myTextAndImgPadding);
    int textY=myTextBound.height()+(myHeight-myTextBound.height())/2;
    if (myTextBound.width()>myWidth) {
        TextPaint paint=new TextPaint(myPaint);
        System.out.println("over-------------------->");
        String msg=TextUtils.ellipsize(myText, paint, myWidth-getPaddingLeft()-myImageWidth-myTextAndImgPadding, TextUtils.TruncateAt.END).toString();
        canvas.drawText(msg,textX, textY, myPaint);
    }else{
        System.out.println("not over--------------------->");
        canvas.drawText(myText,textX, textY, myPaint);
    }
    rect.right-=(myTextBound.width()+myTextAndImgPadding+((myWidth-(myImageWidth+myTextAndImgPadding+myTextBound.width()))/2))+getPaddingRight();
    if (myImageScaleType==IMAGE_SCALE_FILLXY) {
        canvas.drawBitmap(myImageSrc, null, rect, myPaint);
        System.out.println("scale_xy");
    }else if (myImageScaleType==IMAGE_SCALE_CENTER) {
        rect.top=myHeight/2-myImageHeight/2;
        rect.bottom=myImageHeight+(myHeight-myImageHeight)/2;
        rect.left=(myWidth-(myImageWidth+myTextAndImgPadding+myTextBound.width()))/2;
        canvas.drawBitmap(myImageSrc, null, rect, myPaint);
    }
}`
5、重写或定义其他的方法,可以动态更新View:
`@其他方法:
 /**
 * @author zhongqihong
 * 重写setMyText()方法
 * invalidate()方法的调用主要是用来刷新View的,必须在主线程(UI线程)使用,比如在修改某个View的显示时
 * 只有调用invalidate()方法才会重新绘制UI界面,invalidate作用主要是将原来的旧的View从主UI线程给POP掉
 * requestLayout()方法调用主要是用来在重新绘制组件时,调用invalidate方法后,需要重新计算或者重新测量新绘制的
 * View的高度和宽度,否则会出现新的View显示不完全,因为没调用该方法,还是使用原来旧的View尺寸。
 * */
public void setMyText(String str){
    myText=str;
    invalidate();
    requestLayout();
}
/**
 * @author zhongqihong
 * 重写getMyText()方法
 * */
public String getMyText(){
    return myText;
}
/**
 * @author zhongqihong
 * 重写setMyImageSource()方法
 * */
public void setMyImageSource(int imageId){
    myImageSrc=BitmapFactory.decodeResource(getResources(), imageId);
    invalidate();
    requestLayout();
}
/**
 * @author zhongqihong
 * 重写setImageDimesion(int ImageWidth,int ImageHeight)
 * */
public void setImageDimension(int ImageWidth,int ImageHeight){
    myImageWidth=ImageWidth;
    myImageHeight=ImageHeight;
    invalidate();
    requestLayout();
}
`

