spring boot集成elasticsearch详细及报错修正
spring boot,es版本众多,经常遇到版本不兼容的问题,现在提供一个兼容的版本springboot-1.5.2.RELEASE,elasticsearch-2.3.5, 密码:mbzr,官网下载速度很慢,这里提供一个下载地址。
安装linux 安装es:
解压压缩包 tar -xvf elasticsearch-2.3.5.tar.gz。
启动es ./elasticsearch-2.3.5/bin/elasticsearch
访问 http://localhost:9200/ 看到如下说明启动成功
es默认只能本机访问,要取消限制,需修改安装目录下/config/elasticsearch.yml文件,network.host: 0.0.0.0
启动报错解决:
(1)can not run elasticsearch as root:(es-2.x以上版本,不能使用root用户启动)
groupadd es #增加es组
useradd es -g es -p pwd #增加es用户并附加到es组
chown -R es:es elasticsearch-2.3.5 #给目录权限
su es #切换到es用户 ./bin/elasticsearch-2.3.5 -d #后台运行es
(2)max virtual memory areas vm.max_map_count [65530]is too low, increase to at least [262144]:
修改/etc/sysctl.conf配置文件 添加vm.max_map_count=262144
或者su root
cat /proc/sys/vm/max_map_count
echo 262144 > /proc/sys/vm/max_map_count
(3)max file descriptors [4096] for elasticsearch process likely too low, increase to at least [65536]
vi /etc/security/limits.conf
添加如下内容:
* soft nofile 65536
* hard nofile 131072
* soft nproc 2048
* hard nproc 4096
安装head插件:
首先安装node.js
wget https://npm.taobao.org/mirrors/node/latest-v4.x/node-v4.4.7-linux-x64.tar.gz
tar -zxvf node-v4.4.7-linux-x64.tar.gz
配置环境变量:vim /etc/profile
#node.js
export NODE_HOME=/usr/local/node-v4.4.7-linux-x64
export PATH=$PATH:$NODE_HOME/bin
export NODE_PATH=$NODE_HOME/lib/node_modules
执行source /etc/profile 刷新
(npm安装:curl --silent --location https://rpm.nodesource.com/setup_10.x | bash -)
安装grunt (head插件需要借助grunt运行)
npm install -g grunt-cli
检查是否安装成功,grunt -version
下载head插件: wget https://github.com/mobz/elasticsearch-head/archive/master.zip
解压:unzip master.zip
cd /opt/elasticsearch-head-master
npm install --save-dev //执行后会生成node_modules文件夹
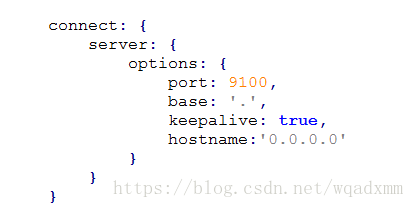
修改vim elasticsearch-head-master/Gruntfile.js
修改文件vim elasticsearch-head-master/_site/app.js
grunt server & 后台启动
访问http://ip:9100
出现输入显示,vim/elasticsearch-2.3.5/config/elasticsearch.yml,末尾加入
http.cors.allow-headers: Authorization,X-Requested-With,Content-Length,Content-Type
http.cors.enabled: true
http.cors.allow-origin: "*"
重启head插件。
如果单次读取的行数较多需要修改:(根据实际情况)
index.query.bool.max_clause_count: 10240
下面是spring boot 和elasticsearch整合:
spring boot项目(可以使用idea 创建非常快捷)添加依赖:
添加es配置:
data:
elasticsearch:
cluster-name: wk-elasticsearch
cluster-nodes: 192.168.0.57:9300
local: false
创建es 实体:
@Document(indexName = "my_index",type = "my_user")
public class UserES implements Serializable{

    private static final long serialVersionUID = 6184266621648505324L;

    @Field(type = FieldType.Integer)
    @Id
    private Integer userId;

    @Field(type = FieldType.Integer)
    private Integer upUserId;

    private String name;

    @Field(type = FieldType.Integer)
    private Integer lv;

    @Field(type = FieldType.String)
    private String pollCode;

    @Field(type = FieldType.String)
    private String userCode;

    private String createTime;

    private List userHostList;

    public Integer getLv() {
        return lv;
    }

    public void setLv(Integer lv) {
        this.lv = lv;
    }

    public Integer getUpUserId() {
        return upUserId;
    }

    public void setUpUserId(Integer upUserId) {
        this.upUserId = upUserId;
    }

    public List getUserHostList() {
        return userHostList;
    }

    public void setUserHostList(List userHostList) {
        this.userHostList = userHostList;
    }

    public Integer getUserId() {
        return userId;
    }

    public void setUserId(Integer userId) {
        this.userId = userId;
    }

    public String getName() {
        return name;
    }

    public void setName(String name) {
        this.name = name;
    }

    public String getPollCode() {
        return pollCode;
    }

    public void setPollCode(String pollCode) {
        this.pollCode = pollCode;
    }

    public String getUserCode() {
        return userCode;
    }

    public void setUserCode(String userCode) {
        this.userCode = userCode;
    }

    public String getCreateTime() {
        return createTime;
    }

    public void setCreateTime(String createTime) {
        this.createTime = createTime;
    }
@Document注解里面的几个属性,类比mysql的话是这样:
index –> DB
type –> Table
@Id注解加上后,在Elasticsearch里相应于该列就是主键了
创建Repository:
public interface EsUserRepository extends ElasticsearchRepository {

}
创建UserES 业务类
@Service
public class EsUserServiceImpl implements EsUserService {

    @Autowired
    EsUserRepository esRepository;

     //保存数据
    @Override
    public void saveUserES(UserES userEs) {
        esRepository.save(userEs);
    }

    //简单复合查询:
     Override
     public List findUserByUserIds(ESSearchConditionVO condition) {

        BoolQueryBuilder builder = QueryBuilders.boolQuery();
        builder.should(QueryBuilders.termQuery("status",2));//相当于or
         builder.should(QueryBuilders.termQuery("status",3));
         builder.must(QueryBuilders.termQuery("lv",3));//相当于and
         SearchQuery searchQuery = new NativeSearchQueryBuilder().withQuery(QueryBuilders.indicesQuery(builder)).build();
        return esRepository.search(searchQuery).getContent();
    }

    //删除
    @Override
    public void delUserES(Integer userEsId) {
       esRepository.delete(userEsId);
    }
}
到此spring boot 整合elasticsearch完毕,初次使用,不足之处欢迎指出。


