Vue+ElementUI整合记录
一、软件安装
按网上的安装过程,先装node.js,再装vue,再装ElementUI,Axios,再装Electron,还有生成实验数据的Mock。总之用到什么装什么。安装完成后开始整合配置。
二、初始化一个vue项目
使用vue init webpack vue002
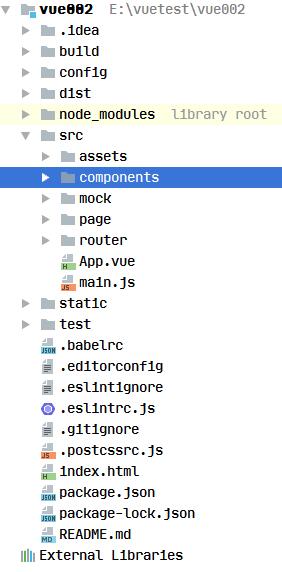
基本目录结构如图,其中mock是后建的,在项目目录内,使用命令行输入
npm run dev试着运行一下这个项目,如果可以看到
就说明之前的安装都正确,如果不正确在编译时,命令行窗口会提示错误。
三、接下来整合ElementUI
在main.js中加入
import ElementUI from 'element-ui'
import 'element-ui/lib/theme-chalk/index.css'

Vue.use(ElementUI)
四、配置路由
为测试ElementUI,建立一个新页面,再配置一下路由
在components目录下新建EnterPage.vue
{{ msg }}
Element UI Button
默认按钮
主要按钮
文字按钮
再配置一下router目录下的index.js
import Vue from 'vue'
import Router from 'vue-router'
import CopClass from '@/components/EnterPage'

Vue.use(Router)

export default new Router({
  routes: [
    {
      path: '/enter/',
      name: 'CopName',
      component: CopClass
    }
  ]
})
其中的path是访问的路由,name是EnterPage.vue页面中加载的
记得要是路由中加上这个页面的访问路由
接下来就可以实验一下了,npm run dev,打开页面随意输入用户名密码,登录后会看到返回的token,就成功了!
保存的token:sadfsadfasdfasdfasdfsadf十二、跨域的axiox数据交互配置
服务端不支持跨域请求,会提示
No 'Access-Control-Allow-Origin' header is present on the requested resource. 跨域的axios数据交互,网上查了一下,可以有两种方法:一是修改服务端,二是用代理
我的服务端使用SpringBoot,所以在服务端接收跨域请求的方法上添加注解
@CrossOrigin(origins = "*")但有时服务端是自己不可修改的,所以还是推荐使用第二种方法,配置代理。
配置代理分两种:一是在config/index.js中添加在dev,proxyTable中添加代理,二是使用nginx
第一种只在开发阶段可用,第二种开发生产阶段都可用。
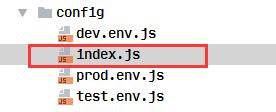
1、在config/index.js中添加代理配置
proxyTable: {
      "/api":{
        target: 'http://远程服务IP:8080',
        security: false,
        changeOrigin: true,
        pathRewrite:{
          '^/api':''
        }
      }
    }
发起的请求都是/api开头,再通过代理替换掉/api
如果不想修改方法名,可以在axios的配置中加入
Axios.defaults.baseURL = '/api'这样就会在每个请求前自动加上/api
2、使用Nginx
下载和安装Nginx,可以网上搜索,windows版的不用安装,解压即可
在conf/nginx.conf添加代理配置
#user  nobody;
worker_processes  1;//处理器数量

#error_log  logs/error.log;
error_log  logs/error.log  notice;//日志
#error_log  logs/error.log  info;

#pid        logs/nginx.pid;


events {
    worker_connections  1024;
}


http {
    include       mime.types;
    default_type  application/octet-stream;

    log_format  main  '$remote_addr - $remote_user [$time_local] "$request" '
                      '$status $body_bytes_sent "$http_referer" '
                      '"$http_user_agent" "$http_x_forwarded_for"';

    #access_log  logs/access.log  main;

    sendfile        on;
    #tcp_nopush     on;

    #keepalive_timeout  0;
    keepalive_timeout  65;//连接超时

    #gzip  on;

    server {
        listen       9002;//Nginx服务监听端口
        server_name  localhost;//Nginx服务器名

        #charset koi8-r;

        #access_log  logs/host.access.log  main;

        location / {
            root   html;
            index  index.html index.htm;
        }

        location /api {//代理配置
            rewrite  ^/api/(.*)$ /$1 break;
            proxy_pass http://远程服务IP;
        }

        #error_page  404              /404.html;

        # redirect server error pages to the static page /50x.html
        #
        error_page   500 502 503 504  /50x.html;
        location = /50x.html {
            root   html;
        }

        # proxy the PHP scripts to Apache listening on 127.0.0.1:80
        #
        #location ~ \.php$ {
        #    proxy_pass   http://127.0.0.1;
        #}

        # pass the PHP scripts to FastCGI server listening on 127.0.0.1:9000
        #
        #location ~ \.php$ {
        #    root           html;
        #    fastcgi_pass   127.0.0.1:9000;
        #    fastcgi_index  index.php;
        #    fastcgi_param  SCRIPT_FILENAME  /scripts$fastcgi_script_name;
        #    include        fastcgi_params;
        #}

        # deny access to .htaccess files, if Apache's document root
        # concurs with nginx's one
        #
        #location ~ /\.ht {
        #    deny  all;
        #}
    }


    # another virtual host using mix of IP-, name-, and port-based configuration
    #
    #server {
    #    listen       8000;
    #    listen       somename:8080;
    #    server_name  somename  alias  another.alias;

    #    location / {
    #        root   html;
    #        index  index.html index.htm;
    #    }
    #}


    # HTTPS server
    #
    #server {
    #    listen       443 ssl;
    #    server_name  localhost;

    #    ssl_certificate      cert.pem;
    #    ssl_certificate_key  cert.key;

    #    ssl_session_cache    shared:SSL:1m;
    #    ssl_session_timeout  5m;

    #    ssl_ciphers  HIGH:!aNULL:!MD5;
    #    ssl_prefer_server_ciphers  on;

    #    location / {
    #        root   html;
    #        index  index.html index.htm;
    #    }
    #}

}
以上配置可以实现基本的代理功能,将页面文件放入Nginx的html目录内,启动Nginx,输入localhost:9002,可以看到静态页面了。
十三、axios数据交互
我在测试中报了415错误,查了一下是好像是数据的类型不匹配的原因造成的。
之前在Axios的拦截设置中使用QS.stringify(config.data)来包装上传参数,而后台接收数据用的是JSONObject。
QS包装的数据是form格式的,所以要改成JSON.stringify(config.data)来包装数据。
再设置Axios请求头类型
config.headers = {'Content-Type': 'application/json'}如果请求头中要加入认证信息
config.headers = {'Authorization': saveToken}十四、路由中添加访问控制
在main.js中添加路由配置
// router配置
router.beforeEach((to, from, next) => {
  // 获取用户登录成功后储存的登录标志
  let jobNo = saveToken
  // 如果是已经登陆状态
  if (jobNo !== '') {
    next()
  } else {
    // 判断是否需要登陆
    if (to.meta.needLogin === true) {
      router.push('/login')
    } else {
      next()
    }
  }
})
在路由配置文件中加入是否需要登录标识
    {
      path: '/enter/',
      name: 'CopName',
      component: CopClass,
      meta: {
        needLogin: true
      }
    },
    {
      path: '/login/',
      name: 'Login',
      component: Login
    }
然后就可以测试一下,未登录状态下会自动转到登录页面。
十五、使用Electron打包导出的vue项目
在vue项目目录下,输入命令
npm run build会在项目中生成dist目录,目录下有一个static目录和一个index.html文件
最终Electron打包就用到这两个,可以把这两个文件拷贝到一个Electron项目中打包,也可以试着将Electron整合到vue项目中来。


