Android流式布局FlowLayout
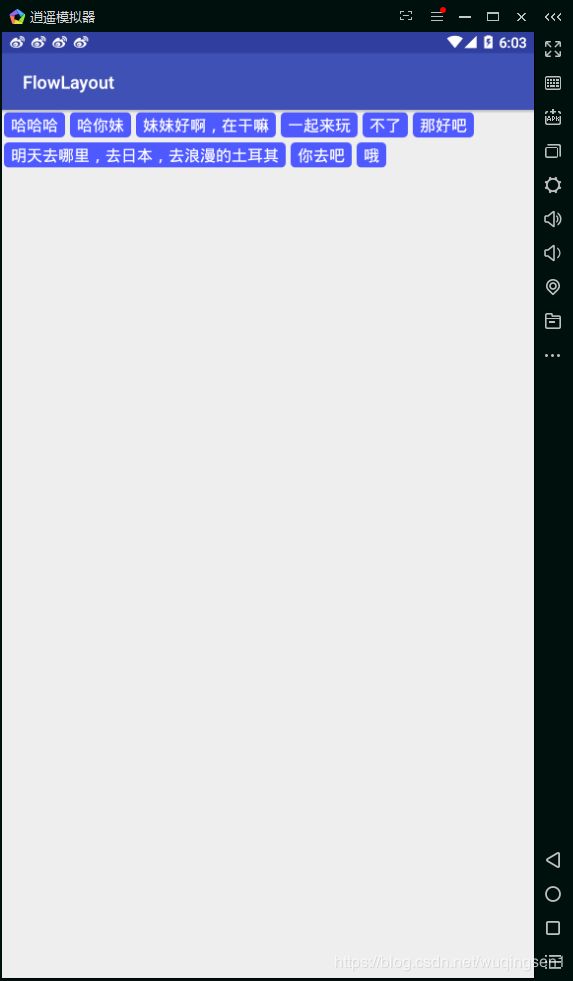
下面是流式布局的简单实用,先看效果图:
下面是针对流式布局 FlowLayout 的内容:
- 工具类 FlowLayout
- MainActivity 中使用
GitHub 下载地址:https://github.com/wuqingsen/FlowLayout
CSDN 下载地址:https://download.csdn.net/download/wuqingsen1/10808706
1.工具类 FlowLayout
不多说,代码虽多,但复制既可用:
import android.content.Context;
import android.util.AttributeSet;
import android.view.View;
import android.view.ViewGroup;
import java.util.ArrayList;
import java.util.List;

/**
 * 流式布局
 */
public class FlowLayout extends ViewGroup {

    public FlowLayout(Context context, AttributeSet attrs, int defStyle) {
        super(context, attrs, defStyle);
    }

    public FlowLayout(Context context, AttributeSet attrs) {
        this(context, attrs, 0);
    }

    public FlowLayout(Context context) {
        this(context, null);
    }

    @Override
    protected void onMeasure(int widthMeasureSpec, int heightMeasureSpec) {

        int sizeWidth = MeasureSpec.getSize(widthMeasureSpec);
        int modeWidth = MeasureSpec.getMode(widthMeasureSpec);
        int sizeHeight = MeasureSpec.getSize(heightMeasureSpec);
        int modeHeight = MeasureSpec.getMode(heightMeasureSpec);

        // 如果是warp_content情况下,记录宽和高
        int width = 0;
        int height = 0;

        // 记录每一行的宽度与高度
        int lineWidth = 0;
        int lineHeight = 0;

        // 得到内部元素的个数
        int cCount = getChildCount();

        for (int i = 0; i < cCount; i++) {
            // 通过索引拿到每一个子view
            View child = getChildAt(i);
            // 测量子View的宽和高,系统提供的measureChild
            measureChild(child, widthMeasureSpec, heightMeasureSpec);
            // 得到LayoutParams
            MarginLayoutParams lp = (MarginLayoutParams) child
                    .getLayoutParams();

            // 子View占据的宽度
            int childWidth = child.getMeasuredWidth() + lp.leftMargin
                    + lp.rightMargin;
            // 子View占据的高度
            int childHeight = child.getMeasuredHeight() + lp.topMargin
                    + lp.bottomMargin;

            // 换行 判断 当前的宽度大于 开辟新行
            if (lineWidth + childWidth > sizeWidth - getPaddingLeft() - getPaddingRight()) {
                // 对比得到最大的宽度
                width = Math.max(width, lineWidth);
                // 重置lineWidth
                lineWidth = childWidth;
                // 记录行高
                height += lineHeight;
                lineHeight = childHeight;
            } else
            // 未换行
            {
                // 叠加行宽
                lineWidth += childWidth;
                // 得到当前行最大的高度
                lineHeight = Math.max(lineHeight, childHeight);
            }
            // 特殊情况,最后一个控件
            if (i == cCount - 1) {
                width = Math.max(lineWidth, width);
                height += lineHeight;
            }
        }
        setMeasuredDimension(
                modeWidth == MeasureSpec.EXACTLY ? sizeWidth : width + getPaddingLeft() + getPaddingRight(),
                modeHeight == MeasureSpec.EXACTLY ? sizeHeight : height + getPaddingTop() + getPaddingBottom()//
        );
    }

    /**
     * 存储所有的View
     */
    private List> mAllViews = new ArrayList>();
    /**
     * 每一行的高度
     */
    private List mLineHeight = new ArrayList();

    @Override
    protected void onLayout(boolean changed, int l, int t, int r, int b) {
        mAllViews.clear();
        mLineHeight.clear();

        // 当前ViewGroup的宽度
        int width = getWidth();

        int lineWidth = 0;
        int lineHeight = 0;

        // 存放每一行的子view
        List lineViews = new ArrayList();

        int cCount = getChildCount();

        for (int i = 0; i < cCount; i++) {
            View child = getChildAt(i);
            MarginLayoutParams lp = (MarginLayoutParams) child
                    .getLayoutParams();

            int childWidth = child.getMeasuredWidth();
            int childHeight = child.getMeasuredHeight();

            // 如果需要换行
            if (childWidth + lineWidth + lp.leftMargin + lp.rightMargin > width - getPaddingLeft() - getPaddingRight()) {
                // 记录LineHeight
                mLineHeight.add(lineHeight);
                // 记录当前行的Views
                mAllViews.add(lineViews);

                // 重置我们的行宽和行高
                lineWidth = 0;
                lineHeight = childHeight + lp.topMargin + lp.bottomMargin;
                // 重置我们的View集合
                lineViews = new ArrayList();
            }
            lineWidth += childWidth + lp.leftMargin + lp.rightMargin;
            lineHeight = Math.max(lineHeight, childHeight + lp.topMargin
                    + lp.bottomMargin);
            lineViews.add(child);
        }// for end
        // 处理最后一行
        mLineHeight.add(lineHeight);
        mAllViews.add(lineViews);
        // 设置子View的位置
        int left = getPaddingLeft();
        int top = getPaddingTop();
        // 行数
        int lineNum = mAllViews.size();
        for (int i = 0; i < lineNum; i++) {
            // 当前行的所有的View
            lineViews = mAllViews.get(i);
            lineHeight = mLineHeight.get(i);

            for (int j = 0; j < lineViews.size(); j++) {
                View child = lineViews.get(j);
                // 判断child的状态
                if (child.getVisibility() == View.GONE) {
                    continue;
                }

                MarginLayoutParams lp = (MarginLayoutParams) child
                        .getLayoutParams();

                int lc = left + lp.leftMargin;
                int tc = top + lp.topMargin;
                int rc = lc + child.getMeasuredWidth();
                int bc = tc + child.getMeasuredHeight();

                // 为子View进行布局
                child.layout(lc, tc, rc, bc);

                left += child.getMeasuredWidth() + lp.leftMargin
                        + lp.rightMargin;
            }
            left = getPaddingLeft();
            top += lineHeight;
        }
    }

    /**
     * 与当前ViewGroup对应的LayoutParams
     */
    @Override
    public LayoutParams generateLayoutParams(AttributeSet attrs) {
        return new MarginLayoutParams(getContext(), attrs);
    }

}
2. MainActivity 中使用
工具类写好,就开始使用了,首先在布局文件 activity_main 中添加流式布局:
然后在 MainActivity 中添加代码:
public class MainActivity extends AppCompatActivity {
    private FlowLayout flowLayout;
    private List list;

    @Override
    protected void onCreate(Bundle savedInstanceState) {
        super.onCreate(savedInstanceState);
        setContentView(R.layout.activity_main);
        flowLayout = findViewById(R.id.flowLayout);
        //添加数据
        list = new ArrayList<>();
        list.add("哈哈哈");
        list.add("哈你妹");
        list.add("妹妹好啊,在干嘛");
        list.add("一起来玩");
        list.add("不了");
        list.add("那好吧");
        list.add("明天去哪里,去日本,去浪漫的土耳其");
        list.add("你去吧");
        list.add("哦");
        //设置流式布局
        setFlowLayout();
    }

    private void setFlowLayout() {
        flowLayout.removeAllViews();
        for (int i = 0; i < list.size(); i++) {
            LayoutInflater mInflater = LayoutInflater.from(this);
            TextView tv = (TextView) mInflater.inflate(
                    R.layout.flow_layout, flowLayout, false);
            tv.setText(list.get(i));
            //点击事件
            final int position = i;
            tv.setOnClickListener(new View.OnClickListener() {
                @Override
                public void onClick(View v) {
                    Toast.makeText(MainActivity.this, list.get(position), Toast.LENGTH_SHORT).show();
                }
            });
            flowLayout.addView(tv);//添加到父View
        }
    }
}
这样就 OK 了,最后是布局 flow_layout 的代码:
流式布局到这里就可以实现了。
