CAS之5.2x版本之服务管理-yellowcong
单点登录,提供了服务管理,管理员可以在线配置添加网站登录到cas服务器上。需要注意的有点,必须保证cas服务端和management端,两个的用户信息一致,不然就会报授权失败。这个服务管理站点,搭建,需要一下步骤:1、启动服务端,2、配置manager的application.properties,添加证书认证,配置cas站点,和静态用户信息,3、配置静态信息用户的数据。4、启动管理平台。
项目地址
#官方原版
https://github.com/apereo/cas-management-overlay

#俺放在码云的原版(5.2.2)
https://gitee.com/yellowcong/springboot_cas/tree/master/cas-management-overlay
源码地址
我自己的源码地址,不是官方的management的模板。
https://gitee.com/yellowcong/springboot_cas/tree/master/cas-management架构说明
| 节点 | 服务 | 目录 |
|---|---|---|
| https://yellowcong.com:9000 | cas服务端 | cas-server-login |
| https://yellowcong.com:8444/cas-management | manager管理 | cas-services-management-overlay |
配置management
1、配置application.properties
需要配置证书,必须保证证书一致性,不然就会有验证问题,
##
# CAS Thymeleaf Views
#
spring.thymeleaf.cache=false
spring.thymeleaf.mode=HTML
spring.thymeleaf.order=1


#配置项目和端口号
#https://yellowcong.com:8444/cas-management
server.context-path=/cas-management
server.port=8444

##
# Embedded CAS Tomcat Container
#
#SSL配置 开启https
server.ssl.enabled=true
server.ssl.key-store=classpath:tomcat.keystore
server.ssl.key-store-password=yellowcong
#查看别名,别名不是瞎写的
#keytool -list -keystore D:/tomcat.keystore
server.ssl.keyAlias=tomcat

##
# Log4J Configuration
#
server.context-parameters.isLog4jAutoInitializationDisabled=true
# logging.config=file:/etc/cas/log4j2.xml

##
# CAS
# 配置cas服务的地址
cas.server.name=https://yellowcong.com:9000
cas.server.prefix=${cas.server.name}

#项目管理地址
cas.mgmt.serverName=https://yellowcong.com:${server.port}

#用户授权信息
cas.mgmt.userPropertiesFile=classpath:/user-details.properties
#默认语言包
cas.mgmt.defaultLocale=zh_CN

##
# CAS Authentication Attributes
#
cas.authn.attributeRepository.stub.attributes.uid=uid
cas.authn.attributeRepository.stub.attributes.givenName=givenName
cas.authn.attributeRepository.stub.attributes.eppn=eppn

##
# CAS Web Application Config
#
server.session.timeout=1800
server.session.cookie.http-only=true
server.session.tracking-modes=COOKIE

##
# CAS Cloud Bus Configuration
# Please leave spring.cloud.bus.enabled set to false
#
spring.cloud.bus.enabled=false

##
# Actuator Endpoint Security Defaults
#
endpoints.sensitive=true
endpoints.enabled=false
endpoints.actuator.enabled=false
2、配置用户
我上面是配置的静态用户,这个方式是为了实验的需要,所以设置为了静态的,实际开发中,需要结合mysql,mongodb等。
cas.mgmt.userPropertiesFile=classpath:/user-details.properties配置用户信息,必须保证cas登录的用户,与这个静态文件的用户信息匹配上,如果不存在,就会授权失败
# 静态用户处理

# This file lists the set of users that are allowed access to the management app.
#
# The syntax of each entry should be in the form of:
#
# username=password,grantedAuthority[,grantedAutority][,enabled|disabled]

# 必须配置了才能进入后台页,否则不给于进入
yellowcong=yellowcong,ROLE_ADMIN,ROLE_ACTUATOR
zhangsan=xxx,ROLE_ADMIN
启动服务
需要先启动服务端,然后再启动management
#直接通过run的方式启动,如果通过debug启动方式,可能和cas服务端,有冲突
build.cmd run
登录测试
登录地址:https://yellowcong.com:8444/cas-management
cas服务地址:https://yellowcong.com:9000
我输入登录管理网站的url,然后就会跳转到cas服务器上登录验证,验证成功后,返回到管理站点。
测试登录
常见问题
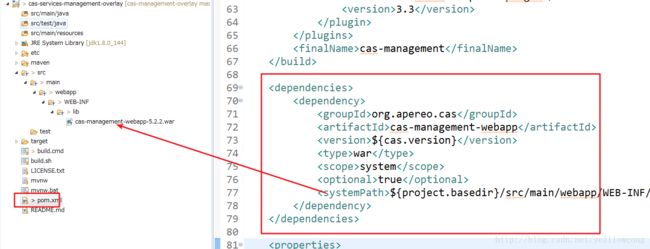
1、war包下载不下来
这还用说啥,肯定是你的网络不行呗,对吧。需要单独下载。
#下载地址
https://oss.sonatype.org/content/repositories/releases/org/apereo/cas/cas-management-webapp/

#个人下载地址
http://yellowcong.qiniudn.com/cas-management-webapp-5.2.2.war
http://yellowcong.qiniudn.com/cas-management-webapp-5.2.1.war
配置到pom.xml文件中
  <dependencies>
      <dependency>
          <groupId>org.apereo.casgroupId>
          <artifactId>cas-management-webappartifactId>
          <version>${cas.version}version>
          <type>wartype>
          <scope>systemscope>
    <optional>trueoptional>
    <systemPath>${project.basedir}/src/main/webapp/WEB-INF/lib/cas-management-webapp-${cas.version}.warsystemPath>
      dependency>
  dependencies>
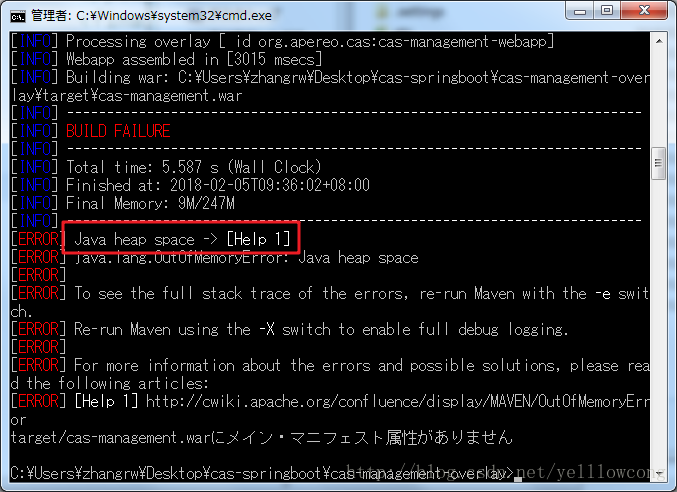
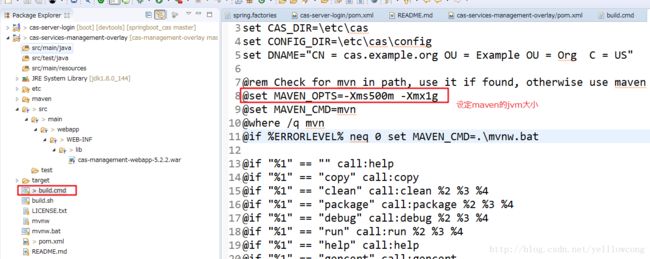
2、 Java heap space
Maven的内存不够,解决办法,就是在build.cmd中添加配置@set MAVEN_OPTS=-Xms500m -Xmx1g

3、登录成功,但是被拒绝访问
导致这个问题的原因是,你cas存在的用户,在cas-management配置中,不存在,所以报错了。

参考地址
http://blog.csdn.net/u010475041/article/details/78028658


