Junit4使用教程详解
- 下载Junit4相关Jar包(一般eclipse等IDE已经集成):
资源链接:
https://download.csdn.net/download/yl405001832/11580748
- 将jar包导入项目
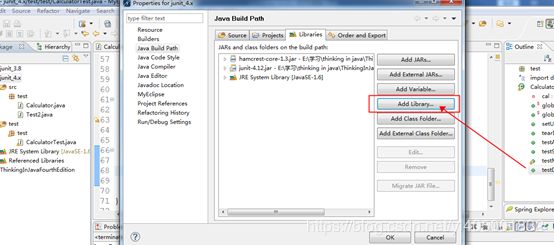
右键点击项目,点击Build Path选择 Configure Build Path
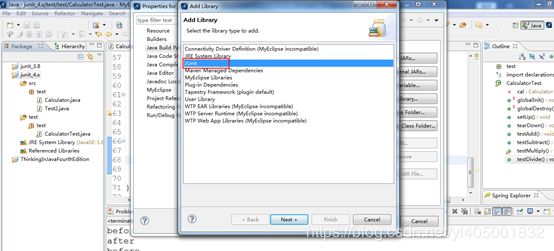
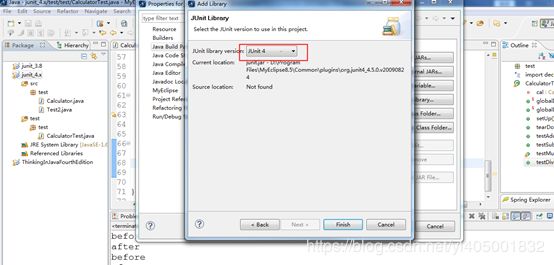
如果采用eclipse集成的jar包:
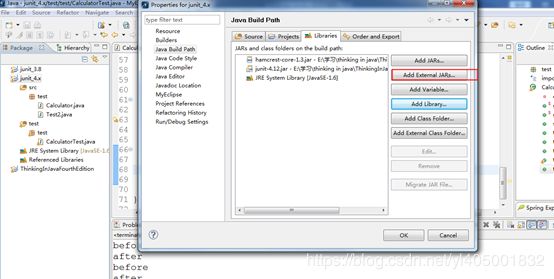
如果采用自己下载的jar包:
- 使用Junit的最佳实践:
1) 新建一个名为test的source folder,用于存放测试类源代码。
2) 目标类与测试类应该位于同一个包下面,这样测试类中就不必导入源代码所在的包,因为他们位于同一个包下面。
3) 在一个测试类中,所有被@Test注解所修饰的public,void方法都是test case,可以被JUnit所执行。
4) 虽然JUnit4并不要求方法名以test开头,但是我们最好还是按照JUnit3.8的要求那样,以test作为测试方法名的开头。
- Junit4注解详解:
@Test:
- 定义:
@Retention(RetentionPolicy.RUNTIME)
@Target({ElementType.METHOD})
public @interface Test
- 所有被@Test注解所修饰的public,void方法都是test case,可以被JUnit所执行。
- 可选的expected为一个继承自Throwable的Class对象,如果@Test加上这个属性,表示Junite期待相关的test case 抛出该Throwable异常,如果没有抛出该异常,则单元测试failure.
代码示例:
- 可选的timeout为一个long类型,如果@Test加上这个属性,表示Junite期待相关的test case 运行的时间不超过该数值,否则则单元测试failure。
代码示例:
@Before:
- 定义:
@Retention(RetentionPolicy.RUNTIME)
@Target(ElementType.METHOD)
public @interface Before
- 所有被@Before注解所修饰的public, void方法将会在每个test case执行之前执行:一般对于test case都需要执行的初始化操作可以放到这个方法里面,比如创建输入、输出流。
代码示例:
@After:
- 定义:
@Retention(RetentionPolicy.RUNTIME)
@Target(ElementType.METHOD)
public @interface After
所有被@After注解所修饰的public, void方法将会在每个test case执行之后执行:一般对于所有test case执行完毕后需要处理的逻辑可以放到这个方法里面,比如关闭输入、输出流。
代码示例:
@BeforeClass:
- 定义:
@Retention(RetentionPolicy.RUNTIME)
@Target(ElementType.METHOD)
public @interface BeforeClass
- 所有被@BeforeClass注解所修饰的方法必须为:public, static,void且无参数。对于整个测试类需要统一初始化处理的逻辑放到这个方法里,比如创建数据库连接等。
代码示例:
@AfterClass:
- 定义:
@Retention(RetentionPolicy.RUNTIME)
@Target(ElementType.METHOD)
public @interface AfterClass
- 所有被@AfterClass注解所修饰的方法必须为:public, static,void且无参数。对于整个测试类需要统一善后处理的逻辑放到这个方法里,比如关闭数据库连接等。
代码示例:
@Ignore:
- 定义:
@Retention(RetentionPolicy.RUNTIME)
@Target({ElementType.METHOD, ElementType.TYPE})
public @interface Ignore
- @Ignore注解可用于修饰方法,也可以用于修饰类。
- 所有被@Ignore修饰的test case,将不会被JUnit所执行。
- @Ignore修饰在类上,表示该类下的所有test case都不会被执行。
- 可选的value为一个String类型参数,可以提示下用户。
- 代码示例:
代码示例:
- 待测试的类:Calculator.java
package test;
public class Calculator {
public int add(int a, int b) {
try {
Thread.sleep(500);
} catch (InterruptedException e) {
e.printStackTrace();
}
return a + b;
}
public int subtract(int a, int b) {
return a - b;
}
public int multiply(int a, int b) {
return a * b;
}
public int divide(int a, int b) throws Exception {
if(0 == b)
throw new Exception("除数不能为0");
return a / b;
}
}
- 测试类:CalculatorTest.java
package test;
import static org.junit.Assert.assertEquals;
import org.junit.After;
import org.junit.AfterClass;
import org.junit.Before;
import org.junit.BeforeClass;
import org.junit.Ignore;
import org.junit.Test;
public class CalculatorTest {
private Calculator cal;
@BeforeClass
public static void globalInit() {
System.out.println("globalInit invoked!");
}
@AfterClass
public static void globalDestroy() {
System.out.println("globalDestroy invoked!");
}
@Before
public void setUp() {
cal = new Calculator();
System.out.println("before");
}
@After
public void tearDown() {
System.out.println("after");
}
@Test(timeout = 600)
@Ignore("哎呦,还没想好怎么测试呢!")
public void testAdd() {
int result = cal.add(3, 5);
assertEquals(8, result);
}
@Test
public void testSubtract() {
int result = cal.subtract(1, 6);
assertEquals(-5, result);
}
@Test
public void testMultiply() {
int result = cal.multiply(5, 9);
}
@Test(expected = Exception.class)
public void testDivide() throws Exception {
cal.divide(1, 0);
}
}
- Junit4参数化测试(Parameters)详解:
- 参数化测试(Parameters):当一个测试类使用参数化运行器运行时,需要在类的声明处加上@RunWith(Parameterized.class)注解,表示该类将不使用JUnit内建的运行器运行,而使用参数化运行器运行;在参数化运行类中提供参数的方法(该方法为public static类型)上要使用@Parameters注解来修饰,同时在测试类的构造方法中为各个参数赋值(构造方法是由JUnit调用的),最后编写测试类,它会根据参数的组数来运行测试多次。
- 代码示例:
参数化测试类:ParametersTest.java
package test;
import static org.junit.Assert.*;
import java.util.Arrays;
import java.util.Collection;
import org.junit.Before;
import org.junit.Test;
import org.junit.runner.RunWith;
import org.junit.runners.Parameterized;
import org.junit.runners.Parameterized.Parameters;
//使用参数化器运行,必须指定运行器,否则将会用内置的运行期运行
@RunWith(Parameterized.class)
public class ParametersTest {
private int expected;
private int input1;
private int input2;
private Calculator cal = null;
@SuppressWarnings("unchecked")
@Parameters
public static Collection preparaData() {
Object[][] object = { { 3, 1, 2 }, { -4, -1, -3 }, { 5, 2, 3 },
{ 4, -4, 8 } };
return Arrays.asList(object);
}
public ParametersTest(int expected, int input1, int input2) {
this.expected = expected;
this.input1 = input1;
this.input2 = input2;
}
@Before
public void setUp() {
cal = new Calculator();
}
@Test
public void testAdd() {
assertEquals(this.expected, cal.add(this.input1, this.input2));
}
}
- Junit4套件测试(Suit)详解:
- 在JUnit 4中,如果想要同时运行多个测试,需要使用两个注解:@RunWith(Suite.class)以及@Suite.SuiteClasses(),通过这两个注解分别指定使用Suite运行器来运行测试,以及指定了运行哪些测试类,其中的@SuiteClasses中可以继续指定Suite,这样JUnit会再去寻找里面的测试类,一直找到能够执行的Test Case并执行之。
- 代码示例:
参数化测试类:TestAll.java
package test;
import org.junit.runner.RunWith;
import org.junit.runners.Suite;
/**
* @author liangxiong
* Using Suite as a runner allows you to manually build a
* suite containing tests from many classes. It is the JUnit 4
* equivalent of the JUnit 3.8.x static Test suite() method. To use it,
* annotate a class with @RunWith(Suite.class) and
* @SuiteClasses(TestClass1.class, ...). When you run this class, it will run
* all the tests in all the suite classes
*
*/
@RunWith(Suite.class)
@Suite.SuiteClasses( { CalculatorTest.class, LargestTest.class,
ParametersTest.class })
// 类名不重要,主要看注解!
public class TestAll {
}
补充Largest.java以及LargestTest.java
package test;
public class Largest {
public int getLargest(int[] array) throws Exception {
if(null == array || 0 == array.length) {
throw new Exception("数组不能为空");
}
int result = array[0];
for(int i = 0; i < array.length; i++) {
if(result < array[i])
result = array[i];
}
System.out.println(result);
return result;
}
}
package test;
import static org.junit.Assert.fail;
import org.junit.After;
import org.junit.Before;
import org.junit.Test;
public class LargestTest {
private Largest largest;
@Before
public void setUp() throws Exception {
largest = new Largest();
}
@After
public void tearDown() throws Exception {
}
@Test
public void testGetLargest() {
int[] array = {1, 9, -10, -20, 23, 34};
try {
largest.getLargest(array);
} catch (Exception e) {
fail("测试失败");
}
}
@Test(expected = Exception.class)
// @Ignore
public void testGetLargest2() throws Exception {
largest.getLargest(null);
}
@Test(expected = Exception.class)
public void testGetLargest3() throws Exception {
largest.getLargest(new int[] {});
}
}


