Linux上安装NetCat
简述:
在网络工具中有“瑞士军刀”美誉的NetCat(以下简称nc),在我们用了N年了至今仍是爱不释手。因为它短小精悍(这个用在它身上很适合,现在有人已经将其修改成大约10K左右,而且功能不减少)。
一个简单而有用的工具,透过使用TCP或UDP协议的网络连接去读写数据。它被设计成一个稳定的后门工具,能够直接由其它程序和脚本轻松驱动。
安装方式一:yum安装
yum install -y netcat
或者
yum install -y nc
安装方式二:编译安装
1.下载
https://download.csdn.net/download/z1941563559/10577879
2.上传到linux服务器并解压
进入netcat-0.7.1.tar.gz所在目录,并执行下面的命令:
tar -zxvf netcat-0.7.1.tar.gz -C /usr/local/
3.编译并安装netcat
进入解压之后的目录
cd /usr/local/netcat-0.7.1/
执行编译安装的命令:
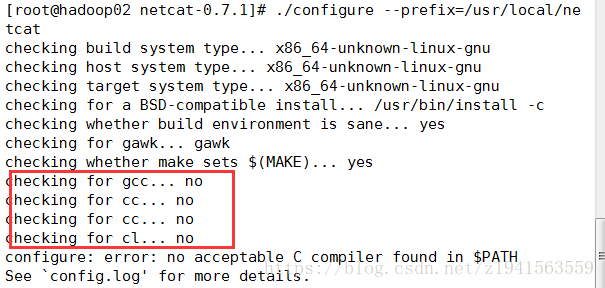
[root@hadoop02 netcat-0.7.1]# ./configure –prefix=/usr/local/netcat
错误出现原因是没有gcc编译器,使用yum安装gcc即可
[root@hadoop02 netcat-0.7.1]# yum install -y gcc
重新执行
[root@hadoop02 netcat-0.7.1]# ./configure –prefix=/usr/local/netcat
编译和安装
[root@hadoop02 netcat-0.7.1]# make && make install
编译安装成功,进入netcat目录:
[root@hadoop02 netcat-0.7.1]# cd /usr/local/netcat
[root@hadoop02 netcat]# ll
total 16
drwxr-xr-x. 2 root root 4096 Aug 1 20:40 bin
drwxr-xr-x. 2 root root 4096 Aug 1 20:40 info
drwxr-xr-x. 3 root root 4096 Aug 1 20:40 man
drwxr-xr-x. 3 root root 4096 Aug 1 20:40 share
注:此处的/usr/local/netcat−0.7.1/相当于源码文件,安装成功的文件是/usr/local/netcat,这里可以将/usr/local/netcat−0.7.1/删除 注 : 此 处 的 / u s r / l o c a l / n e t c a t − 0.7.1 / 相 当 于 源 码 文 件 , 安 装 成 功 的 文 件 是 / u s r / l o c a l / n e t c a t , 这 里 可 以 将 / u s r / l o c a l / n e t c a t − 0.7.1 / 删 除
4.配置环境变量
[root@hadoop02 netcat]# vi /etc/profile
export NETCAT_HOME=/usr/local/netcat
export PATH=$PATH:$NETCAT_HOME/bin
重新载入配置文件:
[root@hadoop02 netcat]# source /etc/profile
5.测试是否安装成功
nc –help
或 netcat –help
安装成功的效果:
[root@hadoop02 netcat]# nc --help
GNU netcat 0.7.1, a rewrite of the famous networking tool.
Basic usages:
connect to somewhere:  nc [options] hostname port [port] ...
listen for inbound:    nc -l -p port [options] [hostname] [port] ...
tunnel to somewhere:   nc -L hostname:port -p port [options]

Mandatory arguments to long options are mandatory for short options too.
Options:
  -c, --close                close connection on EOF from stdin
  -e, --exec=PROGRAM         program to exec after connect
  -g, --gateway=LIST         source-routing hop point[s], up to 8
  -G, --pointer=NUM          source-routing pointer: 4, 8, 12, ...
  -h, --help                 display this help and exit
  -i, --interval=SECS        delay interval for lines sent, ports scanned
  -l, --listen               listen mode, for inbound connects
  -L, --tunnel=ADDRESS:PORT  forward local port to remote address
  -n, --dont-resolve         numeric-only IP addresses, no DNS
  -o, --output=FILE          output hexdump traffic to FILE (implies -x)
  -p, --local-port=NUM       local port number
  -r, --randomize            randomize local and remote ports
  -s, --source=ADDRESS       local source address (ip or hostname)
  -t, --tcp                  TCP mode (default)
  -T, --telnet               answer using TELNET negotiation
  -u, --udp                  UDP mode
  -v, --verbose              verbose (use twice to be more verbose)
  -V, --version              output version information and exit
  -x, --hexdump              hexdump incoming and outgoing traffic
  -w, --wait=SECS            timeout for connects and final net reads
  -z, --zero                 zero-I/O mode (used for scanning)

Remote port number can also be specified as range.  Example: '1-1024'
