webpack4+配置及优化
1. 安装
首先安装webpack,参考https://blog.csdn.net/zl13015214442/article/details/96117592一文。
2. 配置
webpack通过webpack.config.js来配置,来看一下文件构造(zlpack可以忽略):

在webpack.config.js中基本的配置有:
// 基于node的 遵循commonJS规范
let path = require('path');
module.exports = {
    entry: "./src/index.js",  // 入口
    output: {
        filename: 'build.js',
        // 这个路径必须是绝对路径,path.resolve就是根据当前的路径解析返回一个绝对路径
        path: path.resolve('./build')
    },  // 出口
    devServer: {},  // 开发服务器
    module: {}, // 模块配置
    plugins: [],  //插件的配置
    mode: 'development', // 可以更改模式
    resolve: {},  // 配置解析
}
这样配置之后,执行npx webpack就会自动生成build/build.js,将入口文件打包到build.js中,而且在配置文件中设置了mode之后,我们就不需要再执行webpack命令的时候设置mode了。打包后得到的build.js也可以在浏览器中执行。
3. 配置开发服务器
现在的问题是我们每次执行打包命令都会生成一个真实的文件build.js,为了提高性能,我们应该在内存中打包,这就联系到我们在webpack中应该如何配置开发服务器–webpack-dev-server。
- 安装
webpack-dev-server

安装好之后,我们如果执行的话一般通过npx命令来执行,但是有些麻烦,因此我们可以在package.json文件的scripts中配置一些我们自定义的脚本:

那我们就可以直接执行npm run start来运行开发服务器了。
PS:json文件中一定不能写注释!!!
执行结果:

可以看到起了一个端口号8080,而不是真正的生成一个文件,并且提示webpack的输出来自根目录webpack-public下,我们打开看一下,可以看到根目录下所有的文件:

而我们真正想看的是build下的文件,而不是所有的,所以需要在配置文件中设置直接定位到build文件下,并且在执行执行之前先把我们目录下的build.js文件删掉:
// 基于node的 遵循commonJS规范
let path = require('path');
module.exports = {
    entry: "./src/index.js",
    output: {
        filename: 'build.js',
        path: path.resolve('./build')
    },
    devServer: {
        contentBase: './build'
    },  // 开发服务器
    module: {}, // 模块配置
    plugins: [],  //插件的配置
    mode: 'development', // 可以更改模式
    resolve: {},  // 配置解析
}
刷新页面:

这个时候再来看我们的文件目录,没有生成真正的文件build.js,但是在浏览器中可以访问到:
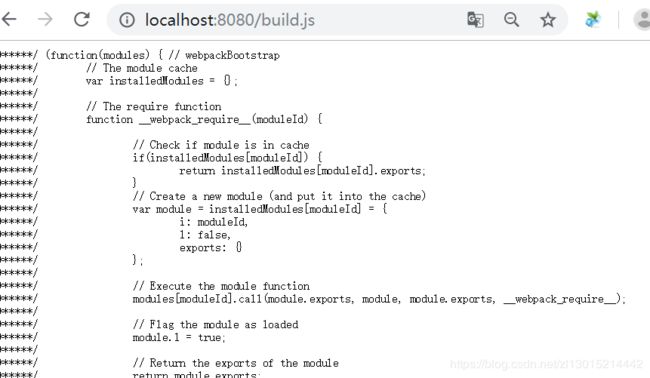
另外我们可以访问在build文件夹创建的其他文件。还可以配置端口号、压缩等其他参数:
    devServer: {
        contentBase: './build',
        port: 3000,
        compress: true,  // 服务器压缩
        open: true  // 自动打开浏览器localhost:3000
    },  // 开发服务器
而我们想要打包出一个真实的文件时,执行在scripts中我们配置的命令npm run build就可以了。
而我们想要在浏览器中查看效果时,不能每次都在build文件夹下新建index.html引入打包后的build.js文件,理想的情况是在src中创建一个html文件,然后打包后的文件引入到该html文件中,引完再打包到build文件夹下,这一步可以通过配置插件自动地来实现。
4. 配置插件
通过配置插件html-webpack-plugin可以将html文件打包到build下,可以自动引入生产的js文件。
(1)html-webpack-plugin插件
-
引入
通过require引入,然后new一个实例,传入对象,确定我们是以index.html这个文件为固定模板自动引入生产的js文件,而无需我们手动导入,首先在src目录下新建index.html:

在配置文件中配置:
// 基于node的 遵循commonJS规范
let path = require('path');
let HtmlWebpackPlugin = require('html-webpack-plugin');
module.exports = {
    entry: "./src/index.js",
    output: {
        filename: 'build.js',
        path: path.resolve('./build')
    },  // 出口
    devServer: {
        contentBase: './build',
        port: 3000,
        compress: true,
        open: true
    },
    module: {}, // 模块配置
    plugins: [ //插件的配置
        new HtmlWebpackPlugin({
            template: './src/index.html'
        })
    ],
    mode: 'development', // 可以更改模式
    resolve: {},  // 配置解析
}
我们可以运行npm run build打包出一个真实的build.js文件,打包之后我们可以发现在build文件夹下已经打包出两个实体文件了:

并且打包生成的index.html中已经自动引入了打包后的build.js:

这时候我们希望修改title标签的内容,可以在配置文件中设置参数:
    plugins: [ //插件的配置
        new HtmlWebpackPlugin({
            template: './src/index.html',
            title: 'excellent coder!'
        })
    ],
在打包前的src/index.html中通过ejs模板设置:

再次打包看打包后的build/index.html:

其中的title标签的内容已经换成了我们设置的excellent coder!了。当我们执行npm run build,要将代码打包上线,那么我们希望打包出来的代码压缩成一行并且删除掉属性的双引号,可以继续配置:
    plugins: [ //插件的配置
        new HtmlWebpackPlugin({
            template: './src/index.html',
            title: 'excellent coder!',
            minify: {
                removeAttributeQuotes: true,  // 删除双引号
                collapseWhitespace: true  // 代码折叠成一行
            }
        })
    ],
执行npm run build,打包出来的文件:
// build/index.html
excellent coder! happy coding!
达到了我们想要实现的效果。
我们还希望每次知道打包出来的文件都是最新的,可以配置hash这个参数,每次打包出来的文件后都跟一个hash值:
    plugins: [ //插件的配置
        new HtmlWebpackPlugin({
            template: './src/index.html',
            title: 'excellent coder!',
            // minify: {
            //     removeAttributeQuotes: true,  // 删除双引号
            //     collapseWhitespace: true  // 代码折叠成一行
            // },
            hash: true
        })
    ],
看打包之后文件:

build.js后面跟了一串值,相当于每次打包的版本号。还有一种常见的打包出来的情况类似如下:

这是怎么生成的呢?在output中:
    output: {
        filename: 'build.[hash:8].js',
        path: path.resolve('./build')
    },
表示生成中间生成八位的随机数,看一下打包的效果:
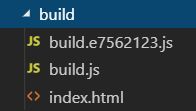
打包出了区别于之前build.js的新文件,而且在打包出的index.html中也引入了新的文件:

这些都是清缓存的。
但是我们不希望每次重复的累积生成的build.js文件,而是希望每次打包时把旧的build文件夹内容清空,然后生成新的build.js文件,这就需要另外一个插件clean-webpack-plugin。
(2)clean-webpack-plugin插件
// 基于node的 遵循commonJS规范
let path = require('path');
let HtmlWebpackPlugin = require('html-webpack-plugin');
const { CleanWebpackPlugin } = require('clean-webpack-plugin');
module.exports = {
    entry: "./src/index.js",
    output: {
        filename: 'build.[hash:8].js',
        path: path.resolve('./build')
    },
    devServer: {
        contentBase: './build',
        port: 3000,
        compress: true,
        open: true
    },
    module: {}, // 模块配置
    plugins: [
        // 会先清空build文件夹 然后打包到该文件夹中
        new CleanWebpackPlugin({templapte: './build'}),
        new HtmlWebpackPlugin({
            template: './src/index.html',
            title: 'excellent coder!',
            // minify: {
            //     removeAttributeQuotes: true,  // 删除双引号
            //     collapseWhitespace: true  // 代码折叠成一行
            // },
            hash: true
        })
    ],
    mode: 'development', // 可以更改模式
    resolve: {},  // 配置解析
}
在这里引入并使用插件的时候一定要看官方文档,就想这个插件的引入方式在webpack4+里就改了let { CleanWebpackPlugin } = require('clean-webpack-plugin');,并且注意options里的书写方式只能为对象,写成之前的方式会报错。下面我们执行一下打包,看下效果:

可见我们的build文件夹中的打包内容已经更新了。关于clean-webpack-plugin插件的使用见官方文档https://www.npmjs.com/package/clean-webpack-plugin。
(3)clean-webpack-plugin插件(热更新)
// src/a.js
module.exports = "be foolish, be hungry!";
// src/index.js
let str = require('./a.js')
document.getElementById('app').innerHTML = str;
当我们页面有更改时,我们希望只刷新我们更改的那一部分,我们要用到webpack自带的一个功能–热更新,只需要引入webpack:
let webpack = require('webpack');
devserver中填写字段hot:true:
    devServer: {
        contentBase: './build',
        port: 3000,
        compress: true,
        open: true,
        hot: true
    },
然后实例化:
    plugins: [
        new webpack.HotModuleReplacementPlugin(),
        new CleanWebpackPlugin({templapte: './build'}),
        new HtmlWebpackPlugin({
            template: './src/index.html',
            title: 'excellent coder!',
            hash: true
        })
    ],
但这个时候我们还没有设置热更新哪个文件,比如这里我们要监控a.js的改动,就可以在index.js中这么写:
let str = require('./a.js')
document.getElementById('app').innerHTML = str;

if(module.hot) {
    module.hot.accept('./a.js', function() {
        let str = require('./a.js')
        document.getElementById('app').innerHTML = str;
    })
}
然后重新npm run start试一下改变a.js导出的内容,会发现页面会实时的变化。但是在显示中我们不会去分别监控每一个文件内容的改变,我们希望只要页面改了,我就更新,可以这么写:
// 入口文件 src/index.js
let str = require('./a.js')
document.getElementById('app').innerHTML = str;

if(module.hot) {
    module.hot.accept();
}
这样当我们src目录下的入口文件或是所依赖的文件内容发生改变都会引起热更新,页面发生改变。
5. loader
在webpack中默认只支持js模块,所以当我们在src下新建一个index.css文件或是style.less文件并在index.js中引入后,打包时是会报错的。
// src/index.css
body {
    background: lightcoral
}
// src/style.less
body {
    font-size: 30px;
}
// src/index.js
let str = require('./a.js');
document.getElementById('app').innerHTML = str;
import './index.css';
import './style.less';

if(module.hot) {
    module.hot.accept();
}
我们就需要配置loader,对非js模块进行解析然后再打包了。我们需要安装style-loader以及css-loader,可以将引入的css文件变成css模块然后插入到style标签中,当然现在对于一些流行的css预处理器less、sass、stylus也有相应的loader需要安装才能够解析成浏览器能够执行的语言。下面我们来进行安装:
![]()
安装之后可以到package.json文件中查看。之后在配置文件中进行loader的配置,将对于模块的处理放到module中,并给设置一些规则,要注意设置loader的顺序是倒着来的,比如对于引入的css文件的处理,先通过css-loader将css文件转化为css模块,然后再通过style-loader将模块插入到style标签中:
    module: {
        rules: [
            {test: /\.css$/, use: [{
                loader: 'style-loader'
            },{
                loader: 'css-loader'
            }]},
            {test: /\.less$/, use: [{
                loader: 'style-loader'
            },{
                loader: 'css-loader'
            },{
                loader: 'less-loader'
            }]}
        ]
    },
然后我们打包看一下:
![]()
在浏览器localhost: 3000,可见css和less文件已经被打包进来,设置的样式起了作用:

而且我们在css文件中修改样式,可以发现页面是同步变化的,其实在css-loader中支持了热更新的功能,不需要我们再去配置了。但是我们发现其实样式是被打包到mian.js中去了,当我们样式有很多的时候,main.js的体积就会变得很庞大,所以我们希望将样式抽离出来,抽离到一个css文件,通过css文件的方式在任何地方通过link标签引用,而不是通过style标签,这就需要用到插件extract-text-webpack-plugin或mini-css-extract-plugin:
![]()
将我们已经配置的webpack.config.js另存一份,已经配置好的配置文件如下:
// 基于node的 遵循commonJS规范
let path = require('path');
let HtmlWebpackPlugin = require('html-webpack-plugin');
let { CleanWebpackPlugin } = require('clean-webpack-plugin');
let webpack = require('webpack');
module.exports = {
    entry: ['./src/index.js'],
    output: {
        filename: 'build.[hash:8].js',
        path: path.resolve('./build')
    },
    devServer: {
        contentBase: './build',
        port: 3000,
        compress: true,
        open: true,
        hot: true
    },
    module: {
        rules: [
            {test: /\.css$/, use: [{
                loader: 'style-loader'
            },{
                loader: 'css-loader'
            }]},
            {test: /\.less$/, use: [{
                loader: 'style-loader'
            },{
                loader: 'css-loader'
            },{
                loader: 'less-loader'
            }]}
        ]
    },
    plugins: [
        new webpack.HotModuleReplacementPlugin(),
        new CleanWebpackPlugin({templapte: './build'}),
        new HtmlWebpackPlugin({
            template: './src/index.html',
            title: 'excellent coder!',
            hash: true
        })
    ],
    mode: 'development', // 可以更改模式
    resolve: {},  // 配置解析
}
(1)先配置extract-text-webpack-plugin:
// 基于node的 遵循commonJS规范
let path = require('path');
let HtmlWebpackPlugin = require('html-webpack-plugin');
let { CleanWebpackPlugin } = require('clean-webpack-plugin');
let webpack = require('webpack');
let ExtractTextWebpackPlugin = require('extract-text-webpack-plugin');
module.exports = {
    entry: ['./src/index.js'],
    output: {
        filename: 'build.[hash:8].js',
        path: path.resolve('./build')
    },
    devServer: {
        contentBase: './build',
        port: 3000,
        compress: true,
        open: true,
        hot: true
    },
    module: {
        rules: [
            {test: /\.css$/, use: ExtractTextWebpackPlugin.extract({
                use: [{
                    loader: 'css-loader'
                }]
            })},
            {test: /\.less$/, use: ExtractTextWebpackPlugin.extract({
                use: [{
                    loader: 'css-loader'
                },{
                    loader: 'less-loader'
                }]
            })}
        ]
    },
    plugins: [
        new ExtractTextWebpackPlugin({
            filename: 'css/index.css' // 表示抽离成css文件夹下的index.css
        }),
        new webpack.HotModuleReplacementPlugin(),
        new CleanWebpackPlugin({templapte: './build'}),
        new HtmlWebpackPlugin({
            template: './src/index.html',
            title: 'excellent coder!',
            hash: true
        })
    ],
    mode: 'development', // 可以更改模式
    resolve: {},  // 配置解析
}
然后npm run build看一下是否成功,可以看到打包文件夹build下生成了css/index.css:

看一下index.css文件中的内容:
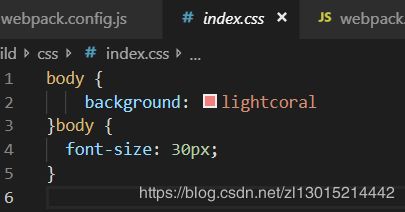
已经把src/style.less和src/index.css文件下的样式打包到build/css/index.css当中了。
如果我们想要将这两个文件的样式分别抽离到两个文件中,就需要new两次,然后分别抽离:
// 基于node的 遵循commonJS规范
let path = require('path');
let HtmlWebpackPlugin = require('html-webpack-plugin');
let { CleanWebpackPlugin } = require('clean-webpack-plugin');
let webpack = require('webpack');
let ExtractTextWebpackPlugin = require('extract-text-webpack-plugin');
// new两次 分别抽离
let lessExtract = new ExtractTextWebpackPlugin('css/less.css');
let cssExtract = new ExtractTextWebpackPlugin('css/css.css');
module.exports = {
    entry: ['./src/index.js'],
    output: {
        filename: 'build.[hash:8].js',
        path: path.resolve('./build')
    },
    devServer: {
        contentBase: './build',
        port: 3000,
        compress: true,
        open: true,
        hot: true
    },
    module: {
        rules: [
            {test: /\.css$/, use: cssExtract.extract({
                use: [{
                    loader: 'css-loader'
                }]
            })},
            {test: /\.less$/, use: lessExtract.extract({
                use: [{
                    loader: 'css-loader'
                },{
                    loader: 'less-loader'
                }]
            })}
        ]
    },
    plugins: [
        cssExtract,
        lessExtract,
        new webpack.HotModuleReplacementPlugin(),
        new CleanWebpackPlugin({templapte: './build'}),
        new HtmlWebpackPlugin({
            template: './src/index.html',
            title: 'excellent coder!',
            hash: true
        })
    ],
    mode: 'development', // 可以更改模式
    resolve: {},  // 配置解析
}
打包后可以看到我们的build文件夹下抽离出两个文件,分别有src下两个样式文件的内容:

并且在build/index.html中,这两个样式文件以link标签引了进来:

然后我们可以npm run start来执行一下,看下效果:

这时我们修改style.less文件中的样式:

可以观察页面,样式没有生效,说明这样分开抽离并没有启动热更新。所以我们一般希望在上线的时候才需要抽离,而在开发过程中是不需要抽离的,还是需要热更新插件生效。所以在开发过程中设置new成实例的时候禁用该抽离插件,然后跳回到style-loader:
// 基于node的 遵循commonJS规范
let path = require('path');
let HtmlWebpackPlugin = require('html-webpack-plugin');
let { CleanWebpackPlugin } = require('clean-webpack-plugin');
let webpack = require('webpack');
let ExtractTextWebpackPlugin = require('extract-text-webpack-plugin');
// new两次 分别抽离
let lessExtract = new ExtractTextWebpackPlugin({
    filename: 'css/less.css',
    disable: true
});
let cssExtract = new ExtractTextWebpackPlugin({
    filename: 'css/css.css',
    disable: true
});
module.exports = {
    entry: ['./src/index.js'],
    output: {
        filename: 'build.[hash:8].js',
        path: path.resolve('./build')
    },
    devServer: {
        contentBase: './build',
        port: 3000,
        compress: true,
        open: true,
        hot: true
    },
    module: {
        rules: [
            {test: /\.css$/, use: cssExtract.extract({
                fallback: 'style-loader',
                use: [{
                    loader: 'css-loader'
                }]
            })},
            {test: /\.less$/, use: lessExtract.extract({
                fallback: 'style-loader',
                use: [{
                    loader: 'css-loader'
                },{
                    loader: 'less-loader'
                }]
            })}
        ]
    },
    plugins: [
        cssExtract,
        lessExtract,
        new webpack.HotModuleReplacementPlugin(),
        new CleanWebpackPlugin({templapte: './build'}),
        new HtmlWebpackPlugin({
            template: './src/index.html',
            title: 'excellent coder!',
            hash: true
        })
    ],
    mode: 'development', // 可以更改模式
    resolve: {},  // 配置解析
}
再次npm run start,修改style.less或是index.css文件中的样式,这次热更新起作用了。
(2)插件purifycss-webpack
现在我们在src/index.js中值引入一个css文件:
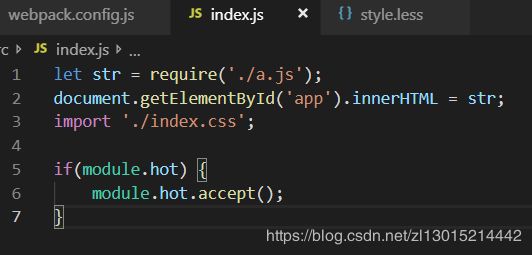
同时在配置文件中删掉有关less文件的代码:
// 基于node的 遵循commonJS规范
let path = require('path');
let HtmlWebpackPlugin = require('html-webpack-plugin');
let { CleanWebpackPlugin } = require('clean-webpack-plugin');
let webpack = require('webpack');
let ExtractTextWebpackPlugin = require('extract-text-webpack-plugin');
let cssExtract = new ExtractTextWebpackPlugin({
    filename: 'css/css.css'
});
module.exports = {
    entry: ['./src/index.js'],
    output: {
        filename: 'build.[hash:8].js',
        path: path.resolve('./build')
    },
    devServer: {
        contentBase: './build',
        port: 3000,
        compress: true,
        open: true,
        hot: true
    },
    module: {
        rules: [
            {test: /\.css$/, use: cssExtract.extract({
                fallback: 'style-loader',
                use: [{
                    loader: 'css-loader'
                }]
            })}
        ]
    },
    plugins: [
        cssExtract,
        new webpack.HotModuleReplacementPlugin(),
        new CleanWebpackPlugin({templapte: './build'}),
        new HtmlWebpackPlugin({
            template: './src/index.html',
            title: 'excellent coder!',
            hash: true
        })
    ],
    mode: 'development', // 可以更改模式
    resolve: {},  // 配置解析
}
运行一下npm run start,打包成功。有时候我们引入一个css文件, 但是里面会有很多没有用到的样式,比如index.css文件:

那么就希望将多余的代码都清除过滤掉,也就是这部分没有用到的代码就不用参与打包,这是就需要配置插件purifycss-webpack,首先需要安装:
![]()
首先在配置文件中引入:
let PurifycssWebpack = require('purifycss-webpack');
let glob = require('glob');
并且该插件使用的时候是有顺序的,必须放在hmtlwebapckplugin后面:
    plugins: [
        cssExtract,
        new webpack.HotModuleReplacementPlugin(),
        new CleanWebpackPlugin({templapte: './build'}),
        new HtmlWebpackPlugin({
            template: './src/index.html',
            title: 'excellent coder!',
            hash: true
        }),
        // 没用到的css会被消除
        new PurifycssWebpack({
            paths: glob.sync(path.resolve('src/*.html'))
        })
    ],
运行npm run build,看抽离出的css文件中的内容多余的样式是否被消除掉:

确实是打包抽离出我们用到的样式,其他的样式都被消除了。
有时有些样式为了兼容不同的浏览器,需要加上代表不同浏览器的私有属性前缀,比如-moz代表firefox浏览器私有属性,-ms代表ie浏览器私有属性,-webkit代表safari、chrome私有属性,那么我们希望打包的时候可以为需要添加前缀的这些css样式自动添加前缀,就需要postcss-loader,首先安装:
![]()
然后给index.css文件中能够加上样式transform:
body {
    background: lightcoral;
    transform: translate(45deg);
}
.a {
    width: 100px;
    height: 100px;
}
.son {
    display: flex;
    align-items: center;
}
#dad {
    background-color: lightblue;
}
在配置文件中执行css-loader之前,要先经过postcss-loader,一定要注意loader是倒着加的:
    module: {
        rules: [
            {test: /\.css$/, use: cssExtract.extract({
                fallback: 'style-loader',
                use: [
                    { loader: 'css-loader'},
                    { loader: 'postcss-loader'}
                ]
            })}
        ]
    },
接下来我们要在根目录下创建一个postcss.config.js:

然后打包之后看生成的css文件:
(3)插件mini-css-extract-plugin
这是webpack4+官方推荐的新的抽离样式插件,把我们事先保存的那份配置文件取出,这个插件的弱点是只能抽离到一个文件当中,不能各自抽离各自的。
// 基于node的 遵循commonJS规范
let path = require('path');
let HtmlWebpackPlugin = require('html-webpack-plugin');
let { CleanWebpackPlugin } = require('clean-webpack-plugin');
let webpack = require('webpack');
let MiniCssTractPlugin = require('mini-css-extract-plugin');
module.exports = {
    entry: ['./src/index.js'],
    output: {
        filename: 'build.[hash:8].js',
        path: path.resolve('./build')
    },
    devServer: {
        contentBase: './build',
        port: 3000,
        compress: true,
        open: true,
        hot: true
    },
    module: {
        rules: [
            {test: /\.css$/, use: [
                MiniCssTractPlugin.loader,
                { loader: 'css-loader' }
            ]},
            {test: /\.less$/, use: [
                MiniCssTractPlugin.loader,
                { loader: 'css-loader' },
                { loader: 'less-loader' }
            ]}
        ]
    },
    plugins: [
        new MiniCssTractPlugin({
            filename: 'css/index.css'
        }),
        new webpack.HotModuleReplacementPlugin(),
        new CleanWebpackPlugin({templapte: './build'}),
        new HtmlWebpackPlugin({
            template: './src/index.html',
            title: 'excellent coder!',
            hash: true
        })
    ],
    mode: 'development', // 可以更改模式
    resolve: {},  // 配置解析
}
然后npm run build执行,看下结果:

两个样式文件已经被抽离到index.css文件当中了:

这两个插件进行样式抽离的时候都要把style-loader删掉,因为我们要抽离成css文件,用link的方式导入,而不是style标签,所以就不需要配置这个loader了。
(4)插件copy-webpack-plugin
有些时候我们希望src中的某个文件不经过打包,原封不动的拷贝到build文件夹下,就要用到插件copy-webpack-plugin,首先安装:
![]()
然后引入并使用:
let CopyWebpackPlugin = require('copy-webpack-plugin');
    plugins: [
        new CopyWebpackPlugin([
            {
                from: './src/doc',
                to: 'public'
            }
        ])
    ]
下面我们在src下新建一个doc文件夹,doc文件夹下创建个文档copy.txt:
// src/doc/copy.txt
this is the origin text!
然后打包运行一下:
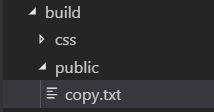
可以看到public文件夹被拷贝过来了,并且其中copy.txt的内容也没有改变:

6. 配置多entry和多output
一般我们从入口文件src/index.js,打包,然后去找该文件依赖的文件,一起打包,如果我们在index.js中没有require引入a.js文件,那么打包就和a.js没有关系了。那么我们又希望可以将a.js和index.js都打包出来,怎么做呢?可以在entry配置成数组的形式:
entry: ['./src/index.js', './src/a.js'],
// src/a.js
console.log("be foolish, be hungry!");
// src/index.js
console.log("I am pretty sure!");
这样就会将a.js和index.js打包到一起,然后打包到build中,我们在浏览器看下效果:
![]()

可见即使a.js和index.js没有定义依赖关系,也被打包出来了。现在是一个单页的效果,即一个index.html中引入了多个js文件,我们要实现多页的时候,即index.html引用的index.js,a.html引用的a.js,可以这样配置entry为对象的形式:
    entry: {
        index: './src/index.js',
        a: './src/a.js'
    },
但是现在我们相当于有多个入口,出口却只定义了一个,想要实现index.html引用的index.js,a.html引用的a.js的效果,需要改一下output,把打包出固定的build写成[name],就代表入口文件中对象的属性,就会打包生成两个文件了:
    entry: {
        index: './src/index.js',
        a: './src/a.js'
    },
    output: {
        filename: '[name].[hash:8].js',
        path: path.resolve('./build')
    },
我们来试一下:

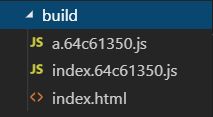
可以看到chunk出a.js和index.js文件,但是现在仍然是index.html中引入了这两个文件:
// 基于node的 遵循commonJS规范
let path = require('path');
let HtmlWebpackPlugin = require('html-webpack-plugin');
const { CleanWebpackPlugin } = require('clean-webpack-plugin');
module.exports = {
    // entry可以写个数组
    // entry: ['./src/index.js', './src/a.js'],
    entry: {
        index: './src/index.js',
        a: './src/a.js'
    },
    output: {
        filename: '[name].[hash:8].js',
        path: path.resolve('./build')
    },
    devServer: {
        contentBase: './build',
        port: 3000,
        compress: true,
        open: true
    },
    module: {},
    plugins: [
        new CleanWebpackPlugin({templapte: './build'}),
        new HtmlWebpackPlugin({
            filename: 'a.html',
            template: './src/index.html',
            title: 'excellent coder!',
            hash: true,
            chunks: ['a']
        }),
        new HtmlWebpackPlugin({
            filename: 'index.html',
            template: './src/index.html',
            title: 'excellent coder!',
            hash: true,
            chunks: ['index']
        })
    ],
    mode: 'development', // 可以更改模式
    resolve: {},  // 配置解析
}


