进阶Frida--Android逆向之Hook动态加载dex(三)(上篇)
前言:前段时间看到有朋友在问在怎么使用frida去hook动态加载的dex之类的问题,确实关于如何hook动态加载的dex,网上的资料很少,更不用说怎么使用frida去hook动态加载的dex了。(frida的官方文档已经无力吐槽…)后来偶然的情况下发现了一道CTF题目可以作为很好的案例,所以花了很多心思将文章写下来分享给大家,涉及的内容比较多,我打算用上下篇将frida hook动态加载的dex的方法将清楚,上篇主要是引导及一些前置的知识。
-
- 文章涉及内容及使用到的工具
- 0x00 使用到的工具
- 0x01 涉及知识点
- apk的安装和分析
- 0x02 apk安装及使用
- 0x03 静态代码分析
- 0x04 Robust热修复框架原理
- JavaScript代码构造
- 0x05 hook点分析
- 0x06 hook代码构造
- 0x07 执行py脚本获取结果
- 总结
- 文章涉及内容及使用到的工具
文章涉及内容及使用到的工具
0x00 使用到的工具
- ADT(Android Developer Tools)
- Jadx-gui
- JEB
- frida
- apktool
- 010 editor
- 天天模拟器(genymotion,实体机等亦可)
0x01 涉及知识点
- Robust热修复框架原理
- Java 反射
- Robust类 hook
apk的安装和分析
文章使用的是DDCTF2018的android逆向第二题Hello Baby Dex
示例地址:下载
0x02 apk安装及使用
程序功能很简单,就是输入密码并验证,错误会Toast出一些信息,按这个惯性,可能得输入某些正确的值才能获取flag吧,废话不多说,直接反编译看看。

0x03 静态代码分析
一般情况下,我是直接扔到jadx中去看反编译后的代码,可是这次jadx反编译出来的结果有很多错误,这里我就不贴图了,大家可以尝试一下,看看是什么错误。后面放到jeb工具中,便没有报错,所以查看反编译的效果时,大家可以多尝试几个反编译器对比效果,查看AndroidManifest.xml,找到了程序的入口MainActivity。
 <activity android:name="cn.chaitin.geektan.crackme.MainActivity">
            <intent-filter>
                <action android:name="android.intent.action.MAIN" />
                <category android:name="android.intent.category.LAUNCHER" />
            intent-filter>
activity>在此同时,在cmd中通过apktool d [apk],再将apk文件反编译出来。
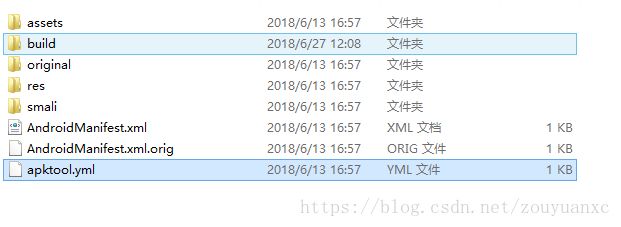
接下来直接定位到MainActivity的onCreate()方法,可以看到代码是混淆过的,阅读上稍微有点小困难,但是在onCreate()方法中,我们还是可以发现一些可疑的方法及变量,比如PatchProxy,changeQuickRedirect等。
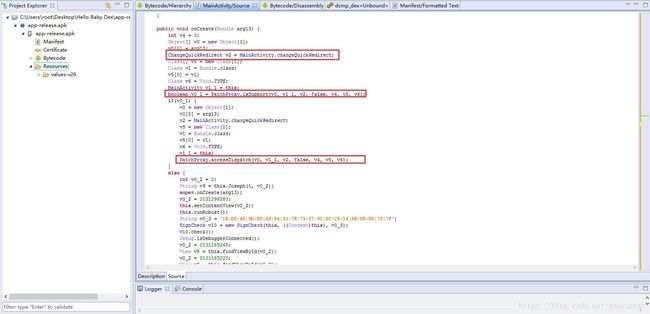
继续搜索有用的信息,我们可以发现在onCreate()方法的else逻辑中调用了this.runRobust(),并且我们发现在类中每一个方法里面都会存在一些changeQuickRedirect变量,以及isSupport(),accessDispatch()方法。
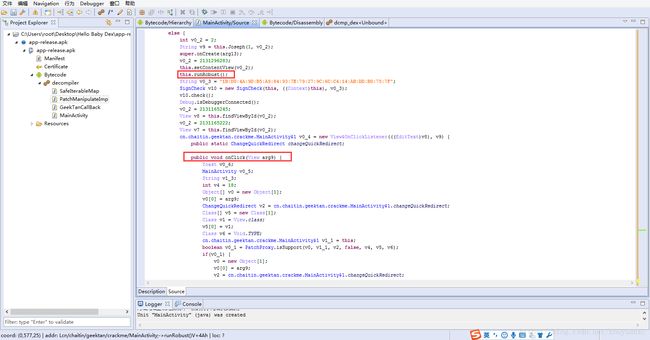
上面的先放一边,我们来看看runRobust()方法中写了什么,在else条件语句中可以看到它实例化了一些对象。
 private void runRobust() {
  //固定格式的changeQuickRedirect,isSupport,accessDispatch
        int v4 = 4;
        Object[] v0 = new Object[0];
        ChangeQuickRedirect v2 = MainActivity.changeQuickRedirect;
        Class[] v5 = new Class[0];
        Class v6 = Void.TYPE;
        MainActivity v1 = this;
        boolean v0_1 = PatchProxy.isSupport(v0, v1, v2, false, v4, v5, v6);
        if(v0_1) {
            v0 = new Object[0];
            v2 = MainActivity.changeQuickRedirect;
            v5 = new Class[0];
            v6 = Void.TYPE;
            v1 = this;
            PatchProxy.accessDispatch(v0, v1, v2, false, v4, v5, v6);
        }
        else {
            Context v1_1 = this.getApplicationContext();
            //实例化PatchManipulateImp类
            PatchManipulateImp v2_1 = new PatchManipulateImp();
            //以及实例化PatchExecutor类
            PatchExecutor v0_2 = new PatchExecutor(v1_1, ((PatchManipulate)v2_1), new GeekTanCallBack());
            v0_2.start();
        }
}跟进PatchManipulateImp类,可以发现在fetchPatchList方法中,它调用了getAssets().open("GeekTan.BMP");从资源文件夹中,加载了一个BMP的图片文件,并将这个BMP文件内容写入GeekTan.jar中。
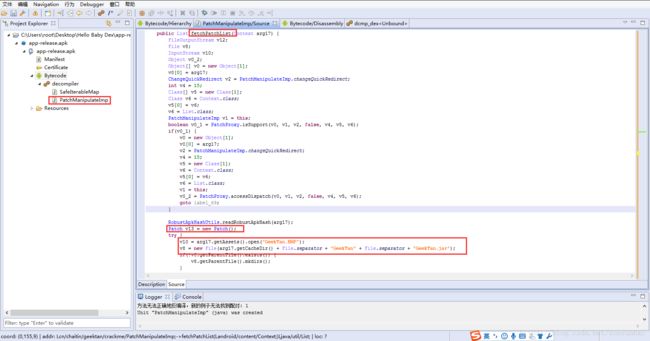
具体代码如下:
        try {
            v10 = arg17.getAssets().open("GeekTan.BMP");
            v8 = new File(arg17.getCacheDir() + File.separator + "GeekTan" + File.separator + "GeekTan.jar");
            if(!v8.getParentFile().exists()) {
                v8.getParentFile().mkdirs();
            }
        }
        catch(Exception v9) {
            goto label_171;
        }
    //将v8通过FileOutputStream方法赋值v12
        try {
            v12 = new FileOutputStream(v8);
        }
        catch(Throwable v0_3) {
            goto label_17;
        }

        int v0_4 = 1024;
        try {
            byte[] v7 = new byte[v0_4];
            while(true) {
            //v10是GeekTan.BMP赋值v11,
                int v11 = v10.read(v7);
                if(v11 <= 0) {
                    break;
                }
      //最终写入到v12中,而v12是new FileOutputStream(v8);
                ((OutputStream)v12).write(v7, 0, v11);
            }
        }
        catch(Throwable v0_3) {
            goto label_88;
        }
显然这个BMP文件很可疑,我们放到010 editor中看看二进制的内容,发现它真正的文件格式是一个压缩包,并且可以直观的看到在压缩包中存在一个dex文件。
 。
。
同时我们还可以发现,方法中实例化了一个Patch对象。
Patch v13 = new Patch();并在fetchPatchList()方法的最后,调用
v0_6 = "cn.chaitin.geektan.crackme.PatchesInfoImpl";
v13.setPatchesInfoImplClassFullName(v0_6);
回到runRobust(),接下来实例化了PatchExecutor类,可以看到第二个参数即为PatchManipulateImp类的实例。
Context v1_1 = this.getApplicationContext();
PatchManipulateImp v2_1 = new PatchManipulateImp();
PatchExecutor v0_2 = new PatchExecutor(v1_1, ((PatchManipulate)v2_1), new GeekTanCallBack());这个PatchExecutor类是在com.meituan.robust包下的,这是一个第三方的包,目前官方已经将其开源,因为直接看混淆的代码还是比较费时的,在此暂停上面的分析,简单学习一下Robust。
0x04 Robust热修复框架原理
我们先简单了解一下Robust是什么,Robust是美团出的一款热修复框架,可以在github上面下载它的最新的源码。
Robust的基本原理,我们主要了解这4个步骤就能清晰明白了。
1. 将apk代码中每个函数都在编译打包阶段自动的插入一段代码。
例如,原函数:
public long getIndex() {
        return 100;
    }
它会被处理成这样:
//在该类中声明一个接口变量changeQuickRedirect
public static ChangeQuickRedirect changeQuickRedirect;

//在要修复的方法中添加以下逻辑代码
    public long getIndex() {
        if(changeQuickRedirect != null) {
            //PatchProxy中封装了获取当前className和methodName的逻辑,并在其内部最终调用了changeQuickRedirect的对应函数
            if(PatchProxy.isSupport(new Object[0], this, changeQuickRedirect, false)) {
                return ((Long)PatchProxy.accessDispatch(new Object[0], this, changeQuickRedirect, false)).longValue();
            }
        }
        return 100L;
    }
“可以看到Robust为每个class增加了个类型为ChangeQuickRedirect的静态成员,而在每个方法前都插入了使用changeQuickRedirect相关的逻辑,当changeQuickRedirect不为null时,会执行到accessDispatch方法从而替换掉之前老的逻辑,达到修复的目的”。
2.生成需要修复的类及方法的类文件并打包成dex。
接下来你可能已经将需要修复的类及方法写好了,这个时候调用Robust的autopatch文件夹中的类及方法会生成如下主要文件:PatchesInfoImpl.java,xxxPatchControl.java(其中xxx为原类的名字)。
PatchesInfoImpl.java的内是由PatchesInfoFactory类的createPatchesInfoClass生成的,这是它生成PatchesInfoImpl逻辑,可以看到,这个类其实是用拼接得到的。
 private CtClass createPatchesInfoClass() {
        try {
        //创建PatchesInfoImpl类
            CtClass ctPatchesInfoImpl = classPool.makeClass(Config.patchPackageName + ".PatchesInfoImpl");
            ctPatchesInfoImpl.getClassFile().setMajorVersion(ClassFile.JAVA_7);
            ctPatchesInfoImpl.setInterfaces(new CtClass[]{classPool.get("com.meituan.robust.PatchesInfo")});
            StringBuilder methodBody = new StringBuilder();
            //拼接类中的内容
            methodBody.append("public java.util.List getPatchedClassesInfo() {");
            methodBody.append("  java.util.List patchedClassesInfos = new java.util.ArrayList();");
            for (int i = 0; i < Config.modifiedClassNameList.size(); i++) {
                if (Constants.OBSCURE) {
                    methodBody.append("com.meituan.robust.PatchedClassInfo patchedClass" + i + " = new com.meituan.robust.PatchedClassInfo(\"" + ReadMapping.getInstance().getClassMappingOrDefault(Config.modifiedClassNameList.get(i)).getValueName() + "\",\"" + NameManger.getInstance().getPatchControlName(Config.modifiedClassNameList.get(i).substring(Config.modifiedClassNameList.get(i).lastIndexOf('.') + 1)) + "\");");
                } else {
                    methodBody.append("com.meituan.robust.PatchedClassInfo patchedClass" + i + " = new com.meituan.robust.PatchedClassInfo(\"" + Config.modifiedClassNameList.get(i) + "\",\"" + NameManger.getInstance().getPatchControlName(Config.modifiedClassNameList.get(i).substring(Config.modifiedClassNameList.get(i).lastIndexOf('.') + 1)) + "\");");
                }
                methodBody.append("patchedClassesInfos.add(patchedClass" + i + ");");
            }
            methodBody.append(Constants.ROBUST_UTILS_FULL_NAME + ".isThrowable=!" + Config.catchReflectException + ";");
            methodBody.append("return patchedClassesInfos;\n" +
                    "    }");
            CtMethod m = make(methodBody.toString(), ctPatchesInfoImpl);
            ctPatchesInfoImpl.addMethod(m);
            return ctPatchesInfoImpl;
        } catch (Exception e) {
            e.printStackTrace();
            throw new RuntimeException(e);
        }
    }
生成的PatchesInfoImpl类形式如下。
public class PatchesInfoImpl implements PatchesInfo {
    public List getPatchedClassesInfo() {
        List arrayList = new ArrayList();
        arrayList.add(new PatchedClassInfo("cn.chaitin.geektan.crackme.MainActivity", "cn.chaitin.geektan.crackme.MainActivityPatchControl"));
        arrayList.add(new PatchedClassInfo("cn.chaitin.geektan.crackme.MainActivity$1", "cn.chaitin.geektan.crackme.MainActivity$1PatchControl"));
        EnhancedRobustUtils.isThrowable = false;
        return arrayList;
    }
}
另外还会生成一个xxxPatchControl类,通过PatchesControlFactory的createControlClass()方法生成,具体的逻辑和生成PatchesInfoImpl类类似,大家可以自行去查看源代码,其中每个Control类中都存在以下静态成员变量和方法。
public class xxxPatchControl implements ChangeQuickRedirect
{

public static final String MATCH_ALL_PARAMETER = "(\\w*\\.)*\\w*";

private static final Map keyToValueRelation = new WeakHashMap();

//获取函数的参数的方法
public Object getRealParameter(Object obj){..具体逻辑..}

//判断是否支持修复
public boolean isSupport(String methodName, Object[] paramArrayOfObject)
{..具体逻辑.}

//执行到accessDispatch方法替换旧的类方法
public Object accessDispatch(String methodName, Object[] paramArrayOfObject) {.具体逻辑..}
}

//解决boolean被优化成byte的问题
private static Object fixObj(Object booleanObj) {.具体逻辑..}

}
将含有PatchesInfoImpl.java和xxxPatchControl.java,以及xxxPatch.java(具体修复的类)打包成dex文件。
3.动态加载dex文件,以反射的方式修改替换旧类。
在此,我们回到刚刚暂停的地方,我们跟进PatchExecutor类看看。
//可以看到PatchExecutor继承线程类Thread
public class PatchExecutor extends Thread {
    protected Context context;
    protected PatchManipulate patchManipulate;
    protected RobustCallBack robustCallBack;
    //构造函数
    public PatchExecutor(Context context, PatchManipulate patchManipulate, RobustCallBack robustCallBack) {
        this.context = context.getApplicationContext();
        this.patchManipulate = patchManipulate;
        this.robustCallBack = robustCallBack;
    }
    public void run() {
        try {
            //拉取补丁列表
            List patches = fetchPatchList();
            //应用补丁列表
            applyPatchList(patches);
        } catch (Throwable t) {
            Log.e("robust", "PatchExecutor run", t);
            robustCallBack.exceptionNotify(t, "class:PatchExecutor,method:run,line:36");
        }
    }
    ...
    }
在run方法中,主要做了2件事。
1. 获取补丁列表。
List patches = fetchPatchList();
//PatchManipulateImp类的fetchPatchList方法
protected List fetchPatchList() {
        return patchManipulate.fetchPatchList(context);
    }
2.应用补丁。
 applyPatchList(patches);

 protected void applyPatchList(List patches) {
        if (null == patches || patches.isEmpty()) {
            return;
        }
        Log.d("robust", " patchManipulate list size is " + patches.size());
        for (Patch p : patches) {
            if (p.isAppliedSuccess()) {
                Log.d("robust", "p.isAppliedSuccess() skip " + p.getLocalPath());
                continue;
            }
            if (patchManipulate.ensurePatchExist(p)) {
                boolean currentPatchResult = false;
                try {
                //真正应用补丁的方法patch()
                    currentPatchResult = patch(context, p);
                } catch (Throwable t) {
                    robustCallBack.exceptionNotify(t, "class:PatchExecutor method:applyPatchList line:69");
                }
                if (currentPatchResult) {
                    //设置patch 状态为成功
                    p.setAppliedSuccess(true);
                    //统计PATCH成功率 PATCH成功
                    robustCallBack.onPatchApplied(true, p);

                } else {
                    //统计PATCH成功率 PATCH失败
                    robustCallBack.onPatchApplied(false, p);
                }

                Log.d("robust", "patch LocalPath:" + p.getLocalPath() + ",apply result " + currentPatchResult);

            }
        }
    }
跟进patch()方法,我们具体分析一下。
protected boolean patch(Context context, Patch patch) {
    //验证patch的hash
        if (!patchManipulate.verifyPatch(context, patch)) {
            robustCallBack.logNotify("verifyPatch failure, patch info:" + "id = " + patch.getName() + ",md5 = " + patch.getMd5(), "class:PatchExecutor method:patch line:107");
            return false;
        }
    //调用DexClassLoader动态加载dex
        DexClassLoader classLoader = new DexClassLoader(patch.getTempPath(), context.getCacheDir().getAbsolutePath(),
                null, PatchExecutor.class.getClassLoader());
        patch.delete(patch.getTempPath());

        Class patchClass, oldClass;

        Class patchsInfoClass;
        PatchesInfo patchesInfo = null;
        try {
        //动态加载PatchesInfoImpl,获取要patch的类
            patchsInfoClass = classLoader.loadClass(patch.getPatchesInfoImplClassFullName());
            patchesInfo = (PatchesInfo) patchsInfoClass.newInstance();
            Log.d("robust", "PatchsInfoImpl ok");
        } catch (Throwable t) {
            robustCallBack.exceptionNotify(t, "class:PatchExecutor method:patch line:108");
            Log.e("robust", "PatchsInfoImpl failed,cause of" + t.toString());
            t.printStackTrace();
        }

        if (patchesInfo == null) {
            robustCallBack.logNotify("patchesInfo is null, patch info:" + "id = " + patch.getName() + ",md5 = " + patch.getMd5(), "class:PatchExecutor method:patch line:114");
            return false;
        }

        //classes need to patch

        //获取要打补丁的类patchedClasses
        List patchedClasses = patchesInfo.getPatchedClassesInfo();
        if (null == patchedClasses || patchedClasses.isEmpty()) {
            robustCallBack.logNotify("patchedClasses is null or empty, patch info:" + "id = " + patch.getName() + ",md5 = " + patch.getMd5(), "class:PatchExecutor method:patch line:122");
            return false;
        }

          //循环类名,将patchedClasses中的类打补丁
        for (PatchedClassInfo patchedClassInfo : patchedClasses) {
            String patchedClassName = patchedClassInfo.patchedClassName;
            String patchClassName = patchedClassInfo.patchClassName;
            if (TextUtils.isEmpty(patchedClassName) || TextUtils.isEmpty(patchClassName)) {
                robustCallBack.logNotify("patchedClasses or patchClassName is empty, patch info:" + "id = " + patch.getName() + ",md5 = " + patch.getMd5(), "class:PatchExecutor method:patch line:131");
                continue;
            }
            Log.d("robust", "current path:" + patchedClassName);
            try {
            //将oldClass的changeQuickRedirectField的值设置为null
                oldClass = classLoader.loadClass(patchedClassName.trim());
                Field[] fields = oldClass.getDeclaredFields();
                Log.d("robust", "oldClass :" + oldClass + "     fields " + fields.length);
                Field changeQuickRedirectField = null;
                for (Field field : fields) {
                    if (TextUtils.equals(field.getType().getCanonicalName(), ChangeQuickRedirect.class.getCanonicalName()) && TextUtils.equals(field.getDeclaringClass().getCanonicalName(), oldClass.getCanonicalName())) {
                        changeQuickRedirectField = field;
                        break;
                    }
                }
                if (changeQuickRedirectField == null) {
                    robustCallBack.logNotify("changeQuickRedirectField  is null, patch info:" + "id = " + patch.getName() + ",md5 = " + patch.getMd5(), "class:PatchExecutor method:patch line:147");
                    Log.d("robust", "current path:" + patchedClassName + " something wrong !! can  not find:ChangeQuickRedirect in" + patchClassName);
                    continue;
                }
                Log.d("robust", "current path:" + patchedClassName + " find:ChangeQuickRedirect " + patchClassName);
                try {
             //动态加载补丁类
                    patchClass = classLoader.loadClass(patchClassName);
                    Object patchObject = patchClass.newInstance();
                    changeQuickRedirectField.setAccessible(true);
             //将它的changeQuickRedirectField设置为patchObject实例。
                    changeQuickRedirectField.set(null, patchObject);
                    Log.d("robust", "changeQuickRedirectField set sucess " + patchClassName);
                } catch (Throwable t) {
                    Log.e("robust", "patch failed! ");
                    t.printStackTrace();
                    robustCallBack.exceptionNotify(t, "class:PatchExecutor method:patch line:163");
                }
            } catch (Throwable t) {
                Log.e("robust", "patch failed! ");
                t.printStackTrace();
                robustCallBack.exceptionNotify(t, "class:PatchExecutor method:patch line:169");
            }
        }
        Log.d("robust", "patch finished ");
        return true;
    }
4.isSupport和accessDispatch
接下来我们再来看看onCreate()中的代码,虽然混淆后代码看起来很冗长,但是通过刚刚我们对Robust原理的简单分析,现在已经可以清晰的知道,这其实就是isSupport()和accessDispatch()。
public void onCreate(Bundle arg13) {
        int v4 = 3;
        Object[] v0 = new Object[1];
        v0[0] = arg13;
        ChangeQuickRedirect v2 = MainActivity.changeQuickRedirect;
        Class[] v5 = new Class[1];
        Class v1 = Bundle.class;
        v5[0] = v1;
        Class v6 = Void.TYPE;
        MainActivity v1_1 = this;
        boolean v0_1 = PatchProxy.isSupport(v0, v1_1, v2, false, v4, v5, v6);
        if(v0_1) {
            v0 = new Object[1];
            v0[0] = arg13;
            v2 = MainActivity.changeQuickRedirect;
            v5 = new Class[1];
            v1 = Bundle.class;
            v5[0] = v1;
            v6 = Void.TYPE;
            v1_1 = this;
            PatchProxy.accessDispatch(v0, v1_1, v2, false, v4, v5, v6);
        }
        else {

           .....
           }
我们看看源码中的isSupport()具体做了什么。
public static boolean isSupport(Object[] paramsArray, Object current, ChangeQuickRedirect changeQuickRedirect, boolean isStatic, int methodNumber, Class[] paramsClassTypes, Class returnType) {
        //Robust补丁优先执行,其他功能靠后
        if (changeQuickRedirect == null) {
            //不执行补丁,轮询其他监听者
            if (registerExtensionList == null || registerExtensionList.isEmpty()) {
                return false;
            }
            for (RobustExtension robustExtension : registerExtensionList) {
                if (robustExtension.isSupport(new RobustArguments(paramsArray, current, isStatic, methodNumber, paramsClassTypes, returnType))) {
                    robustExtensionThreadLocal.set(robustExtension);
                    return true;
                }
            }
            return false;
        }
        //获取 classMethod = className + ":" + methodName + ":" + isStatic + ":" + methodNumber;
        String classMethod = getClassMethod(isStatic, methodNumber);
        if (TextUtils.isEmpty(classMethod)) {
            return false;
        }
        Object[] objects = getObjects(paramsArray, current, isStatic);
        try {
        /*调用changeQuickRedirect.isSupport,还记得这个changeQuickRedirect
        吗,他是在第3步中changeQuickRedirectField.set(null, patchObject);
        得到的补丁类的实例。*/
            return changeQuickRedirect.isSupport(classMethod, objects);
        } catch (Throwable t) {
            return false;
        }
    }
通过上面的分析,可以知道只有当存在补丁的类changeQuickRedirect.isSupport()才会返回值。这个时候我们把刚刚第二步打包的dex反编译看看,我们可以看到在xxxPatchControl类中存在isSupport,它返回的值其实就是methodNumber。
public boolean isSupport(String methodName, Object[] paramArrayOfObject) {
        return "3:6:".contains(methodName.split(":")[3]);
    }
accessDispatch()方法,方法替换。
public static Object accessDispatch(Object[] paramsArray, Object current, ChangeQuickRedirect changeQuickRedirect, boolean isStatic, int methodNumber, Class[] paramsClassTypes, Class returnType) {
//如果changeQuickRedirect为null...
        if (changeQuickRedirect == null) {
            RobustExtension robustExtension = robustExtensionThreadLocal.get();
            robustExtensionThreadLocal.remove();
            if (robustExtension != null) {
                notify(robustExtension.describeSelfFunction());
                return robustExtension.accessDispatch(new RobustArguments(paramsArray, current, isStatic, methodNumber, paramsClassTypes, returnType));
            }
            return null;
        }
        //同样获取 classMethod = className + ":" + methodName + ":" + isStatic + ":" + methodNumber;
        String classMethod = getClassMethod(isStatic, methodNumber);
        if (TextUtils.isEmpty(classMethod)) {
            return null;
        }
        notify(Constants.PATCH_EXECUTE);

        Object[] objects = getObjects(paramsArray, current, isStatic);
        //返回changeQuickRedirect.accessDispatch。
        return changeQuickRedirect.accessDispatch(classMethod, objects);
    }
具体看看PatchControl类中的accessDispatch。
    public Object accessDispatch(String methodName, Object[] paramArrayOfObject) {
        try {
            MainActivityPatch mainActivityPatch;
            //判断classMethod的isStatic是否为false,其实在调用accessDispatch传递的就是false。
            if (methodName.split(":")[2].equals("false")) {
                MainActivityPatch mainActivityPatch2;
                if (keyToValueRelation.get(paramArrayOfObject[paramArrayOfObject.length - 1]) == null) {
                    mainActivityPatch2 = new MainActivityPatch(paramArrayOfObject[paramArrayOfObject.length - 1]);
                    keyToValueRelation.put(paramArrayOfObject[paramArrayOfObject.length - 1], null);
                } else {
                    mainActivityPatch2 = (MainActivityPatch) keyToValueRelation.get(paramArrayOfObject[paramArrayOfObject.length - 1]);
                }
                mainActivityPatch = mainActivityPatch2;
            } else {
                mainActivityPatch = new MainActivityPatch(null);
            }
            //根据methodNumber,选取要执行的patch方法。
            Object obj = methodName.split(":")[3];
            if ("3".equals(obj)) {
                mainActivityPatch.onCreate((Bundle) paramArrayOfObject[0]);
            }
            if ("6".equals(obj)) {
                return mainActivityPatch.Joseph(((Integer) paramArrayOfObject[0]).intValue(), ((Integer) paramArrayOfObject[1]).intValue());
            }
        } catch (Throwable th) {
            th.printStackTrace();
        }
        return null;
    }
花了比较多的篇幅把Robust的基本原理给大家介绍了,接下来完全回到这个apk。
JavaScript代码构造
0x05 hook点分析
经过我们对Robust的分析,我们现在已经比较清晰的知道了我们需要攻克的难点,它是通过Robust热修复框架将一些方法热修复了,所以我们这里必须知道,它修复了哪些类及方法,当然在上面我们已经零星看到了一些细节,现在我们来具体看看。
我们先将assets文件夹下的GeekTan.BMP改成GeekTan.rar,并解压,得到dex文件直接扔到jadx中分析。在PatchesInfoImpl类中可以看到2个要被修复的类信息。
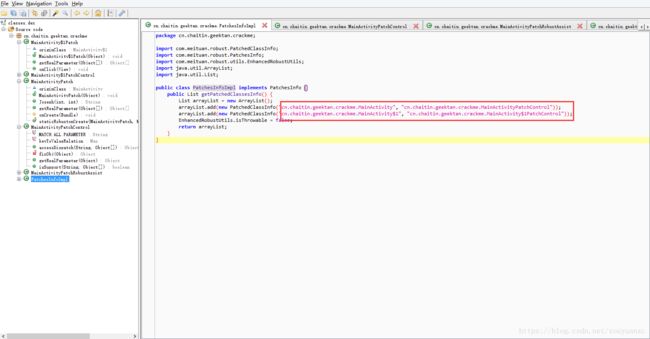
先看MainActivityPatchControl类,我们看到在accessDispatch(),onCreate()和Joseph()方法将会通过判断ethodNumber来选取。

继续查看MainActivity$1PatchControl类,同样发现onClick被修复了。

所以这个时候,我们必须知道onClick真正执行的逻辑是什么。查看MainActivity$1Patch类中的真正的onClick方法。很明显的两句提示语,可以明确我们要的答案就在这里。

仔细分析onClick方法,可以发现很多invokeReflectStaticMethod,getFieldValue,invokeReflectMethod方法,同样我们还能发现flag就在这里面。
//flag是通过append将字符串以及Joseph(int,int)的返回值拼接构成的。
String str = "DDCTF{";
str = (String) EnhancedRobustUtils.invokeReflectMethod("Joseph", obj2, getRealParameter(new Object[]{new Integer(5), new Integer(6)}), new Class[]{Integer.TYPE, Integer.TYPE}, MainActivity.class);
str = (String) EnhancedRobustUtils.invokeReflectMethod("Joseph", obj2, getRealParameter(new Object[]{new Integer(7), new Integer(8)}), new Class[]{Integer.TYPE, Integer.TYPE}, MainActivity.class);
str = "}";
//最终将我们输入的值与上面构造的equals比较,判断是否准确。
if (((Boolean) EnhancedRobustUtils.invokeReflectMethod("equals", obj, getRealParameter(new Object[]{str2}), new Class[]{Object.class}, String.class)).booleanValue()) {...}
通过上面的分析,可以发现hook有2个思路:
1.hook EnhancedRobustUtils类下的方法获取方法执行的返回值。
2.hook 动态加载的类MainActivityPatch的Joseph方法,直接调用它获取返回值。(下篇)
0x06 hook代码构造
先来看看EnhancedRobustUtils类下的方法invokeReflectMethod。
public static Object invokeReflectMethod(String methodName, Object targetObject, Object[] parameters, Class[] args, Class declaringClass) {
        try {
            //可以看到这里是通过反射的方法拿到类实例
            Method method = getDeclaredMethod(targetObject, methodName, args, declaringClass);
            //代入参数,调用方法
            return method.invoke(targetObject, parameters);
        } catch (Exception e) {
            e.printStackTrace();
        }
        if (isThrowable) {
            throw new RuntimeException("invokeReflectMethod error " + methodName + "   parameter   " + parameters + " targetObject " + targetObject.toString() + "  args  " + args);
        }
        return null;
}我们再看看invokeReflectConstruct。
public static Object invokeReflectConstruct(String className, Object[] parameter, Class[] args) {
        try {
            //通过Class.forName(className)反射得到一个Class对象
            Class clazz = Class.forName(className);
            //获得构造器
            Constructor constructor = clazz.getDeclaredConstructor(args);
            constructor.setAccessible(true);
            //返回该类的实例
            return constructor.newInstance(parameter);
        } catch (Exception e) {
            e.printStackTrace();
        }
        if (isThrowable) {
            throw new RuntimeException("invokeReflectConstruct error " + className + "   parameter   " + parameter);
        }
        return null;
    }
很简单,通过反射得到类的实例及方法,最终通过invoke代入参数执行方法。这里很幸运,我们发现这个EnhancedRobustUtils 是Robust自带的类,并不是动态加载的。
那hook就非常简单了,我们只需要简单的hook invokeReflectMethod获取Joseph的返回值,以及equals的参数即可。
完整python脚本:下载
Java.perform(function(){
//获得EnhancedRobustUtils类的wapper
        var robust = Java.use("com.meituan.robust.utils.EnhancedRobustUtils");
//hook invokeReflectMethod方法
        robust.invokeReflectMethod.implementation = function(v1,v2,v3,v4,v5){
        //不破坏原来的逻辑,只在原来的逻辑中打印出Joseph,equals的值
            var result = this.invokeReflectMethod(v1,v2,v3,v4,v5);
            if(v1=="Joseph"){
                console.log("functionName:"+v1);
                console.log("functionArg3:"+v3);
                console.log("functionArg4:"+v4);
                send(v4);
                console.log("return:"+result);
                console.log("-----------------------------------------------------")
            }

            else if(v1=="equals"){
                console.log("functionName:"+v1);
                console.log("functionArg3:"+v3);
                console.log("functionArg4:"+v4);
                send(v4);
                console.log("return:"+result);
            }
            return result;
        }
});
0x07 执行py脚本获取结果
- 打开模拟器,adb shell进入终端并启动frida。
- 开启端口转发。
adb forward tcp:27043 tcp:27043
adb forward tcp:27043 tcp:27043 - 启动应用后,执行Python脚本。

最终获得结果如下:

总结
上篇我们主要采用第一种方法Robust自带的工具类来hook,得到我们想要的答案,从做题的角度来说是一种很好很快的办法,但是从学习的角度,可能这道题用hook DexClassLoader的方式更有趣味和意义,下篇我会详细介绍怎么hook DexClassLoader动态加载的类及方法,来获得最终答案。