Linux VNC安装手册
转载于 https://blog.csdn.net/wlzjsj/article/details/52149547
VNC主要是用于远程桌面控制,所以我们的思路是装vnc需要把一些桌面环境,字体包全部装好。
一、检查环境
root@devgp01 /# ps -ef | grep vnc
root     25769  3442  0 08:46 pts/1    00:00:00 grep vnc
root@devgp01 /#  rpm -qa | grep vnc
tigervnc-1.1.0-16.el6.centos.x86_64
tigervnc-server-1.1.0-16.el6.centos.x86_64
root@devgp01 /#
二、安装vnc server
2.1 cnetos利用自带的yum安装
yum install tigervnc tigervnc-server -y 2.2 检查完成后确认
root@devgp01 /#  rpm -qa | grep vnc
tigervnc-1.1.0-16.el6.centos.x86_64
tigervnc-server-1.1.0-16.el6.centos.x86_64
root@devgp01 /#
三、安装桌面环境
3.1 安装gnome
yum install -y gnome* 四、配置VNC
4.1 配置vncserver config
root@devgp01 /# vim /etc/sysconfig/vncservers
# The VNCSERVERS variable is a list of display:user pairs.
#
# Uncomment the lines below to start a VNC server on display :2
# as my 'myusername' (adjust this to your own).  You will also
# need to set a VNC password; run 'man vncpasswd' to see how
# to do that.
#
# DO NOT RUN THIS SERVICE if your local area network is
# untrusted!  For a secure way of using VNC, see this URL:
# https://access.redhat.com/knowledge/solutions/7027

# Use "-nolisten tcp" to prevent X connections to your VNC server via TCP.

# Use "-localhost" to prevent remote VNC clients connecting except when
# doing so through a secure tunnel.  See the "-via" option in the
# `man vncviewer' manual page.

# VNCSERVERS="2:myusername"
# VNCSERVERARGS[2]="-geometry 800x600 -nolisten tcp -localhost"
 VNCSERVERS="1:root"
 #VNCSERVERARGS[1]="-geometry 800x600 -nolisten tcp -localhost"
VNCSERVERARGS[1]="-geometry 800x600"4.2配置xstartup
为了防黑屏,需要修改一下/root/.vnc/xstartup
root@devgp01 /# vim /root/.vnc/xstartup
#!/bin/sh

[ -r /etc/sysconfig/i18n ] && . /etc/sysconfig/i18n
export LANG
export SYSFONT
vncconfig -iconic &
unset SESSION_MANAGER
unset DBUS_SESSION_BUS_ADDRESS
OS=`uname -s`
if [ $OS = 'Linux' ]; then
  case "$WINDOWMANAGER" in
    *gnome*)
      if [ -e /etc/SuSE-release ]; then
        PATH=$PATH:/opt/gnome/bin
        export PATH
      fi
      ;;
  esac
fi
if [ -x /etc/X11/xinit/xinitrc ]; then
  exec /etc/X11/xinit/xinitrc
fi
if [ -f /etc/X11/xinit/xinitrc ]; then
  exec sh /etc/X11/xinit/xinitrc
fi
[ -r $HOME/.Xresources ] && xrdb $HOME/.Xresources
xsetroot -solid grey
#xterm -geometry 80x24+10+10 -ls -title "$VNCDESKTOP Desktop" &
#twm &
gnome-session &
保存退出;
说明:使用的是gnome图像界面,则需要注释掉以下两行,
xterm -geometry 80x24+10+10 -ls -title “$VNCDESKTOP Desktop” &
twm &
并添加以下这行:
gnome-session &
xterm -geometry 80x24+10+10 -ls -title “$VNCDESKTOP Desktop” &
twm &
并添加以下这行:
gnome-session &
4.3 变更xstartup的权限
很多利用vnc连接发现黑屏问题,很大一个原因是xtartup的权限不够。
授权:chmod 777 /root/.vnc/xstartup
六、防火墙设置
vncserver启动后,默认是5901端口,这里也跟sysctl里设置有关系。可以根据实际启动的端口进行设置,这个步骤可以在vncserver启动之前,也可以在启动之后。
一个用户一个端口,第一个为5901 后面为5902,....
root@devgp01 /# vim /etc/sysconfig/iptables
# Generated by iptables-save v1.4.7 on Thu Dec 14 14:29:36 2017
*filter
:INPUT ACCEPT [290:54245]
:FORWARD ACCEPT [0:0]
:OUTPUT ACCEPT [268:65326]
-A INPUT -m state --state NEW -m tcp -p tcp --dport 8500 -j ACCEPT
-A INPUT -m state --state NEW -m tcp -p tcp --dport 5901 -j ACCEPT
COMMIT
# Completed on Thu Dec 14 14:29:36 2017vncpasswd修改vnc的连接密码
七、启动vncserver
root@devgp01 /# service vncserver restart
Shutting down VNC server: 1:root                           [FAILED]
Starting VNC server: 1:root
New 'devgp01:1 (root)' desktop is devgp01:1

Starting applications specified in /root/.vnc/xstartup
Log file is /root/.vnc/devgp01:1.log

                                                           [  OK  ]
验证起来了
root@devgp01 /# ps aux  | grep vnc
root     26340  0.2  0.1 113004 11524 pts/1    S    08:57   0:00 /usr/bin/Xvnc :1 -desktop devgp01:1 (root) -auth /root/.Xauthority -geometry 800x600 -rfbwait 30000 -rfbauth /root/.vnc/passwd -rfbport 5901 -fp catalogue:/etc/X11/fontpath.d -pn
root     26361  0.0  0.0  50148  2028 pts/1    S    08:57   0:00 vncconfig -iconic
root     26457  0.0  0.0 103252   824 pts/1    S+   08:57   0:00 grep vnc
八、安装vnc客户端
在windows下安装vnc客户端 ,下载地址:http://pan.baidu.com/s/1pJFkIIB;如该地址失效,可以单独找我。软件包名称,RealVNC_cngr.rar,
windows安装vnc viewer省略。
ip:1进行连接
安装完成后如下:
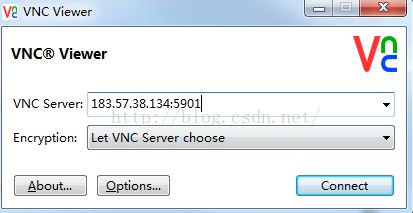
我这里使用的外网,是因为我的windows机器不能直连idc的内网,当然如果你们使用了打通,或者使用其它任何方式可以直接ping通内网,完全不需要外网连接。
点击connect后,输入密码,该密码即前面设置的vnc访问密码
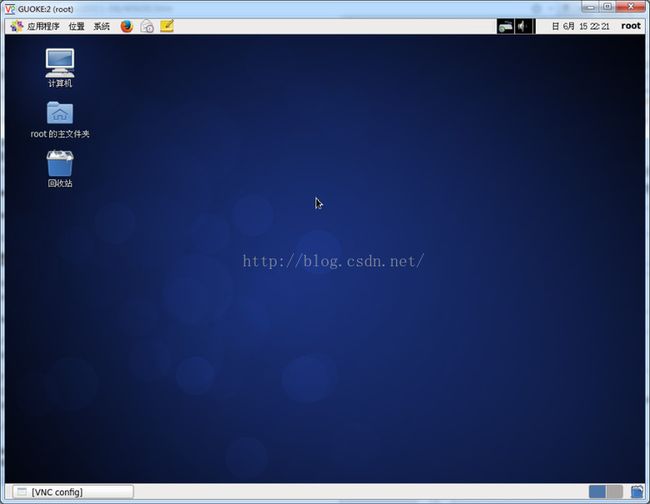
到这里显示你已经成功利用vnc连接你的centos环境了。
安装完成后在启动过程中遇到的问题:
参考:https://yq.aliyun.com/articles/5626