Android接口定义语言AIDL
Android接口定义语言AIDL
前言
这篇文章大部分是来自android开发官网和一些网上大佬的文章,这里写出来也是为了学习和记录。
正文
客户端和服务端之间的进程间通信(IPC)认可的编程接口
- 只有不同应用的客户端用IPC访问服务并在服务中处理多线程才使用AIDL。不执行跨应用的IPC可以使用Binder接口,如果想执行IPC但是不处理多线程则使用Messenger接口,总之是要先绑定服务的。
包含.aidl文件的应用,SDK工具会生成一个基于.aidl文件的Ibinder的接口,保存在项目的gen/ 目录中,服务实现IBinder接口,客户端绑定服务调用IBinder来实现IPC.
实现步骤:
- 创建.aidl文件
- 实现接口(sdk会生成接口)
- 向客户端公开接口
创建.aidl文件
支持的数据:
- java中的原语类型(int , long , char等)
- String
- CharSequence
- List(元素 必须是aldl支持的数据)
- Map(同上)
- 实现Parcelable的实体
注意:server中必须是Arraylist 或者HashMap 。非原语要指示数据走向(in、out、inout)原语默认in。要确定好你需要的方向,因为编组参数开销极大。in –>数据从客户端流向服务端,out 数据只能由服务端流向客户端,inout 则表示数据可在服务端与客户端之间双向流通。其中,数据流向是针对在客户端中的那个传入方法的对象而言的。in 为定向 tag 的话表现为服务端将会接收到一个那个对象的完整数据,但是客户端的那个对象不会因为服务端对传参的修改而发生变动;out 的话表现为服务端将会接收到那个对象的参数为空的对象,但是在服务端对接收到的空对象有任何修改之后客户端将会同步变动;inout 为定向 tag 的情况下,服务端将会接收到客户端传来对象的完整信息,并且客户端将会同步服务端对该对象的任何变动来自 https://blog.csdn.net/luoyanglizi/article/details/51958091
// IRemoteService.aidl
package com.example.android;
// Declare any non-default types here with import statements
/** Example service interface */
interface
IRemoteService
{
/** Request the process ID of this service, to do evil things with it. */
int
getPid
()
;
/** Demonstrates some basic types that you can use as parametersand return values in AIDL.*/
void
basicTypes
(
int
anInt,
long
aLong, boolean aBoolean,
float
aFloat,
double
aDouble, String aString
)
;
}
aidl文件保存在项目的src/下,生成的文件在gen/下 名字和aidl文件一样只是以.java扩展名(IRemoteService.aidl —-> IRemoteService.java)
实现接口
.java接口文件包含了Stub的子类,是父类的抽象实现
private
final
IRemoteService.Stub mBinder =
new
IRemoteService.Stub() {
public
int getPid()
{
return Process.myPid()
;
}
public
void basicTypes(int anInt, long aLong, boolean aBoolean,
float
aFloat,
double
aDouble, String aString) {
// Does nothing
}
};
注意事项:
- 一开始就要做好多线程准备。
- 默认下RPC是同步调用,如果请求时间比较长,应该在客户端的子线程中调用服务。
- 异常不会回传给调用方
公开接口
public
class
RemoteService
extends
Service
{
@Override
public
void
onCreate
()
{
super
.onCreate();
}
@Override
public
IBinder
onBind
(Intent intent)
{
// Return the interface
return
mBinder;
}
private
final
IRemoteService.Stub mBinder =
new
IRemoteService.Stub() {
public
int getPid()
{
return Process.myPid()
;
}
public
void basicTypes(int anInt, long aLong, boolean aBoolean,
float
aFloat,
double
aDouble, String aString) {
// Does nothing
}
};
}
客户端的bindServices时,onServiceConnected( )回调会返回binder实例。
客户端需要具有对interface的访问权限,所以客户端的src/目录必须包含.aidl文件副本。
IRemoteService mIRemoteService;
private
ServiceConnection mConnection =
new
ServiceConnection() {
// Called when the connection with the service is established
public
void
onServiceConnected
(ComponentName className, IBinder service)
{
// Following the example above for an AIDL interface,
// this gets an instance of the IRemoteInterface, which we can use to call on the service
mIRemoteService = IRemoteService.Stub.asInterface(service);
}
// Called when the connection with the service disconnects unexpectedly
public
void
onServiceDisconnected
(ComponentName className)
{
Log.e(TAG,
"Service has unexpectedly disconnected"
);
mIRemoteService =
null
;
}
};
通过IPC传递对象
该类必须支持Parcelable接口,因为系统可以通过他分解对象。
支持Parcelable的操作:
- 实现Parcelable接口
- 实现writeToParcel,获取对象的当前状态写入Parcel。
- 添加名为CREATOR的静态字段,这是实现Parcelable.Creator接口的对象。
- 创建一个声明可打包类的.aidl文件。
在.aidl文件中创建一个可打包的类:
这个aidl类要和Parcelable实现名字一样。
package
android.graphics;
// Declare Rect so AIDL can find it and knows that it implements
// the parcelable protocol.
parcelable Rect;
然后支持Parcelable接口:
( wirter 和 read 变量的顺序不能发生变化)
import
android.os.Parcel;
import
android.os.Parcelable;
public
final
class
Rect
implements
Parcelable
{
public
int
left;
public
int
top;
public
int
right;
public
int
bottom;
public
static
final
Parcelable.Creator CREATOR =
new
Parcelable.Creator() {
public
Rect
createFromParcel
(Parcel in)
{
return
new
Rect(in);
}
public
Rect[] newArray(
int
size) {
return
new
Rect[size];
}
};
public
Rect
()
{
}
private
Rect
(Parcel in)
{
readFromParcel(in);
}
public
void
writeToParcel
(Parcel out)
{
out.writeInt(left);
out.writeInt(top);
out.writeInt(right);
out.writeInt(bottom);
}
public
void
readFromParcel
(Parcel in)
{
left = in.readInt();
top = in.readInt();
right = in.readInt();
bottom = in.readInt();
}
}
调用IPC方法
步骤:
- 在src/加入.aidl文件
- 实现IBinder接口实例
- 实现ServiceConnection
- 调用bindService(),传入ServiceConnection实现
- 在onServiceConnected中收到IBinder实例,调用YourInterfaceName.Stub.asInterface((IBinder)service)。
- 需要始终捕获DeadObjectException 异常(连接断开异常)
- 断开连接 unbindService();
要让服务端先起来 客户端才能绑定服务 而且现在只能显示绑定服务。
intent
.setPackage
("
com
.music
.fiio
.aidldemo
");
intent
.setAction
("
com
.music
.fiio
.aidldemo
.DemoService
");
intent
.setFlags
(
Intent
.FLAG_ACTIVITY_NEW_TASK
);
bindService
(
intent
,
connection
,
BIND_AUTO_CREATE
);
AIDL例子
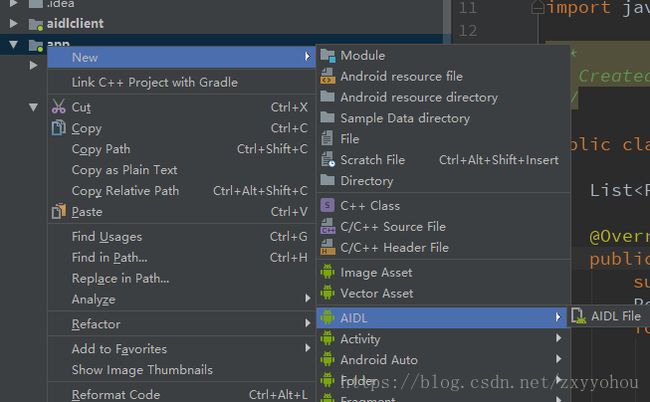
先创建.aidl文件
package com.music.fiio.aidldemo; import com.music.fiio.aidldemo.Person; // Declare any non-default types here with import statements interface IServiceAIDL { void addPerson(in Person p); // 对于非原语的数据类型要加tag ListgetPerson(); }
那么如何去得到想要去传递的自定义类
首先创建一个.aidl文件,这个文件名和你想要的实体类名保持一致。
Person.aidl文件
注意其中的 parcelable 的首字母是小写哦。
接下来就是创建实现Parcelable的实体类
public class Person implements Parcelable { private String name ; private int age ; public Person(){} protected Person(Parcel in) { readFromParcel(in); } @Override public void writeToParcel(Parcel dest, int flags) { dest.writeString(name); dest.writeInt(age); } /** * 参数是一个Parcel,用它来存储与传输数据 * @param dest */ public void readFromParcel(Parcel dest) { //注意,此处的读值顺序应当是和writeToParcel()方法中一致的 name = dest.readString(); age = dest.readInt(); } @Override public int describeContents() { return 0; } public static final CreatorCREATOR = new Creator () { @Override public Person createFromParcel(Parcel in) { return new Person(in); } @Override public Person[] newArray(int size) { return new Person[size]; } }; public String getName() { return name; } public void setName(String name) { this.name = name; } public int getAge() { return age; } public void setAge(int age) { this.age = age; } }
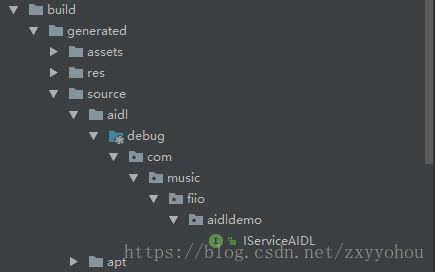
你可以手动的去clean下项目 IDE会在在build中的gen中生成一个.java的文件,其实我们操作也是这个文件。
现在让我们来创建一个服务
public class DemoService extends Service { Listlists = new ArrayList<>(); @Override public void onCreate() { super.onCreate(); Person person ; for (int i = 0 ; i < 10 ; i ++){ person = new Person(); person.setAge(i); person.setName(i+"号机器人"); lists.add(person); } Log.i("zxy--",""); } @Nullable @Override public IBinder onBind(Intent intent) { Log.i("zxy - ","onBind"); return mbinder; } private IBinder mbinder = new IServiceAIDL.Stub(){ @Override public void addPerson(Person p) throws RemoteException { synchronized (lists){ lists.add(p); } } @Override public List getPerson() throws RemoteException { synchronized (lists){ return lists ; } } }; }
记得要去AndroidManifest.xml中注册:
android:name=".DemoService"
    android:exported="true"
    >

        android:name="android.intent.category.DEFAULT"/>
        android:name="com.music.fiio.aidldemo.DemoService"/>
到这里简单的服务其实就ok了。
现在我们可以来做客户端:
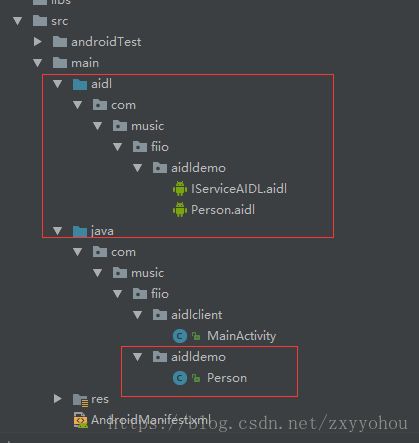
我们将服务端的包含aidl的包都复制到客户端来,当然还有实体类也要复制过来,而且要保证他们的包名和服务端是一样de。
这样其实也会在build下生成一个.java文件。
客户端代码如下:
public class MainActivity extends AppCompatActivity implements View.OnClickListener { private IServiceAIDL iServiceAIDL ; private Button button_get; private Button button_add; // 需要等Service的的app先启动起来 @Override protected void onCreate(Bundle savedInstanceState) { super.onCreate(savedInstanceState); setContentView(R.layout.activity_main); button_get = (Button)findViewById(R.id.button_get); button_get.setOnClickListener(this); button_add = (Button)findViewById(R.id.button_add); button_add.setOnClickListener(this); Intent intent = new Intent(); intent.setPackage("com.music.fiio.aidldemo"); intent.setAction("com.music.fiio.aidldemo.DemoService"); intent.setFlags(Intent.FLAG_ACTIVITY_NEW_TASK); bindService(intent,connection,BIND_AUTO_CREATE); } @Override public void onClick(View view) { switch (view.getId()){ case R.id.button_add: try { Person p = new Person(); p.setName("new 机器人"); p.setAge(22); iServiceAIDL.addPerson(p); }catch (Exception e){ e.printStackTrace(); } break; case R.id.button_get: try { List到这里简单的aidl通信完成了,当然aidl不止这么简单,后来需要大佬们自己去学习了。lists = iServiceAIDL.getPerson(); for (Person p : lists){ Log.i("zxy-","person - name : "+p.getName()+" - age : "+p.getAge()); } }catch (Exception e){ e.printStackTrace(); } break; } } ServiceConnection connection = new ServiceConnection() { @Override public void onServiceConnected(ComponentName componentName, IBinder iBinder) { iServiceAIDL = IServiceAIDL.Stub.asInterface(iBinder); } @Override public void onServiceDisconnected(ComponentName componentName) { Log.i("zxy-","onServiceDisconnected "); } }; }


