flutter 基础知识点总结
前提:从事开发已经十年了,PC开发/Android开发/后端开发,初级/中级/高级/架构师,成员/组长/开发负责人,以及各种考证和阶段目标计划…,一路走来喜怒哀乐/酸甜苦辣都体验了。
人无远虑必有近忧,千里之行始于足下,今天为近一段时间学习flutter进行小结,为预定的企业级项目做准备(要求生产环境 10万用户以上)。
1,flutter 原理(后期会计划分析源码,进而深入理解原理)
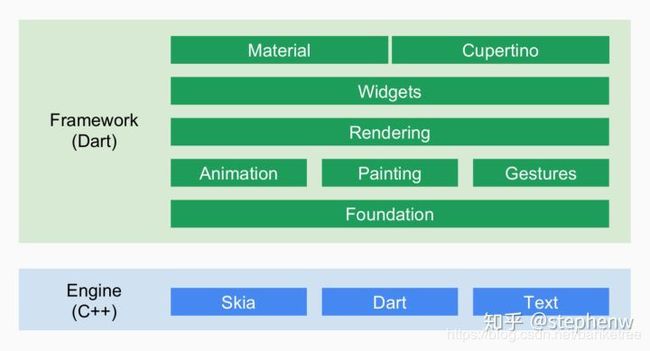
flutter 是谷歌推出的应用开发UI框架,它提供了绘图的各种Api和组件,如图:
flutter 已支持移动、Web、桌面和嵌入式设备,这意味着它正式成为了支持多平台的轻量级 UI 框架
1,相关管理
资源:flutter app安装包中会包含代码和 assets(资源)两部分。Assets是会打包到程序安装包中的,可在运行时访问。常见类型的assets包括静态数据(例如JSON文件)、配置文件、图标和图片(JPEG,WebP,GIF,动画WebP / GIF,PNG,BMP和WBMP)等。
flutter:
  assets:
    - graphics/background.png
包:Pub(https://pub.dev/ )是谷歌官方的Dart Packages仓库,flutter使用配置文件pubspec.yaml(位于项目根目录)来管理第三方依赖包。
dependencies:
  flutter:
    sdk: flutter
  cupertino_icons: ^0.1.2

dev_dependencies:
  flutter_test:
    sdk: flutter

flutter:
  uses-material-design: true
路由:所谓路由管理,就是管理页面之间如何跳转,通常也可被称为导航管理。
//导航到新路由
          Navigator.push( context,
           MaterialPageRoute(builder: (context) {
              return NewRoute();
           }));
          },

//退出
Navigator.pop(context, "我是返回值"),
2,相关组件(属性+缩略图)
Widget、Element、RenderObject
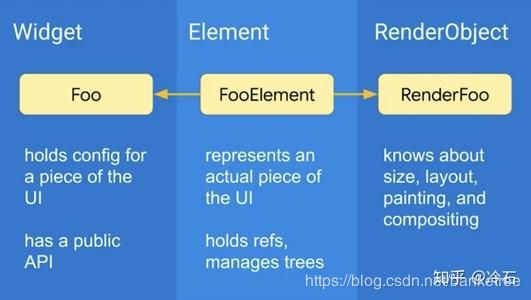
Widget实际上就是Element的配置数据,一个Widget对象可以对应多个Element对象,从创建到渲染的大体流程是:根据Widget生成Element,然后创建相应的RenderObject并关联到Element.renderObject属性上,最后再通过RenderObject来完成布局排列和绘制。如图:
StatelessWidget
abstract class StatefulWidget extends Widget {
  @override
  StatefulElement createElement() => StatefulElement(this);

  @protected
  State createState();
}

StatefulWidget对Flutter开发者来讲非常熟悉了。
createElement方法返回的是一个StatefulElement实例。方法createState()构建对应于这个StatefulWidget的State。
StatefulWidget没有生成RenderObject的方法。
所以StatefulWidget也只是个中间层,它需要对应的State实现build方法来返回子Widget。
StatefulWidget
abstract class StatelessWidget extends Widget {
  /// Initializes [key] for subclasses.
  const StatelessWidget({ Key key }) : super(key: key);

  @override
  StatelessElement createElement() => StatelessElement(this);

  @protected
  Widget build(BuildContext context);
}

StatelessWidget对Flutter开发者来讲再熟悉不过了。它的createElement方法返回的是一个StatelessElement实例。
StatelessWidget没有生成RenderObject的方法。所以StatelessWidget只是个中间层,它需要实现build方法来返回子Widget。
基础组件-〉
Text (文本)
class Text extends StatelessWidget {
  const Text(this.data, {
    Key key,
    this.style, //字体的样式设置
    this.textAlign,  //文本对齐方式(center居中,left左对齐,right右对齐,justfy两端对齐)
    this.textDirection, //文本方向(ltr从左至右,rtl从右至左)
    this.locale,  //本地语言类型
    this.softWrap, //是否自动换行(true自动换行,false单行显示,超出屏幕部分默认截断处理)
    this.overflow, //文字超出屏幕之后的处理方式(clip裁剪,fade渐隐,ellipsis省略号)
    this.textScaleFactor,
    this.maxLines, //文字显示最大行数
    this.semanticsLabel, //字体显示倍率
  }) : assert(data != null),
       textSpan = null,
       super(key: key);
    ...
}
Button 按钮系列
RaisedButton 即"漂浮"按钮,它默认带有阴影和灰色背景。按下后,阴影会变大。
FlatButton即扁平按钮,默认背景透明并不带阴影。按下后,会有背景色。
OutlineButton默认有一个边框,不带阴影且背景透明。按下后,边框颜色会变亮、同时出现背景和阴影(较弱)。
IconButton是一个可点击的Icon,不包括文字,默认没有背景,点击后会出现背景。
RaisedButton、FlatButton、OutlineButton都有一个icon 构造函数,通过它可以轻松创建带图标的按钮。
ButtonBar :按钮组
FloatingActionButton :浮动按钮


属性名称	    值类型	        属性值
onPressed	VoidCallback	必填参数,按下按钮时触发的回调,接收一个 方法,传 null 表示按钮禁用,会显示禁用相关 样式
child	    Widget	        文本控件
color	    Color	        按钮的颜色
disabledColor	Color	    按钮禁用时的颜色
disabledTextColor	Color	按钮禁用时的文本颜色
splashColor	        Color	点击按钮时水波纹的颜色
highlightColor	    Color	点击(长按)按钮后按钮的颜色
elevation	        double	阴影的范围,值越大阴影范围越大
padding		                内边距
shape		                设置按钮的形状
shape: RoundedRectangleBorder(
borderRadius: BorderRadius.circular(10)
)
shape: CircleBorder(
side: BorderSide( color: Colors.white )
)

/**
    const FloatingActionButton({
    Key key,
    this.child,//按钮显示的内容
    this.tooltip,//长按时显示的提示
    this.foregroundColor,//前景色,影响到文字颜色
    this.backgroundColor,//背景色
    this.heroTag = const _DefaultHeroTag(),//hero效果使用的tag,系统默认会给所有FAB使用同一个tag,方便做动画效果
    this.elevation = 6.0,//未点击时阴影值
    this.highlightElevation = 12.0,//点击下阴影值
    @required this.onPressed,
    this.mini = false,//FloatingActionButton有regular, mini, extended三种类型,默认为false即regular类型,true时按钮变小即mini类型,extended需要通过FloatingActionButton.extended()创建,可以定制显示内容
    this.shape = const CircleBorder(),//定义FAB的shape,设置shape时,默认的elevation将会失效,默认为CircleBorder
    this.clipBehavior = Clip.none,
    this.materialTapTargetSize,
    this.isExtended = false,//是否为”extended”类型
    })
 */
Image (图片/图标Icon)
Image:通过ImageProvider来加载图片
Image.asset:用来加载本地资源图片
Image.file:用来加载本地(File文件)图片
Image.network:用来加载网络图片
Image.memory:用来加载Uint8List资源(byte数组)图片

new Image(image: new AssetImage('images/logo.png'));

new Image(image: new NetworkImage('http://n.sinaimg.cn/sports/2_img/upload/cf0d0fdd/107/w1024h683/20181128/pKtl-hphsupx4744393.jpg'))

new Image.asset('images/logo.png')

new Image.file(new File('/storage/xxx/xxx/test.jpg'))

new Image.network('http://n.sinaimg.cn/sports/2_img/upload/cf0d0fdd/107/w1024h683/20181128/pKtl-hphsupx4744393.jpg')

new FadeInImage.assetNetwork(
  placeholder: 'images/logo.png',
  image: imageUrl,
  width: 120,
  fit: BoxFit.fitWidth,
)

new FadeInImage.memoryNetwork(
  placeholder: kTransparentImage,
  image: imageUrl,
  width: 120,
  fit: BoxFit.fitWidth,
)

new CachedNetworkImage(
  width: 120,
  fit: BoxFit.fitWidth,
  placeholder: new CircularProgressIndicator(),
  imageUrl: imageUrl,
  errorWidget: new Icon(Icons.error),
)

new Image.memory(bytes)
Switch和Checkbox (单选框/复选框)
const Switch({
  Key key,
  @required this.value,    //true:开, false:关
  @required this.onChanged,   //状态变化时的回调方法
  this.activeColor,   //打开状态下颜色
  this.activeTrackColor,   //打开状态下track颜色
  this.inactiveThumbColor,   //关闭状态thumb颜色
  this.inactiveTrackColor,   //关闭状态track颜色
  this.activeThumbImage,   //打开状态下thumb图片
  this.inactiveThumbImage,   //关闭状态下thumb图片
  this.materialTapTargetSize,   //点击区域
})

const Checkbox({
    Key key,
    @required this.value, //是否选中此复选框
    this.tristate = false, //默认false,如果为true,复选框的值可以为true、false或null。
    @required this.onChanged, //监听 当复选框的值应该更改时调用
    this.activeColor, //选中此复选框时要使用的颜色
    this.checkColor, //选中此复选框时用于复选图标的颜色
    this.materialTapTargetSize, //为目标与布局大小,默认有 padded 和 shrinkWrap 两种状态;小菜理解 padded 为谷歌设计建议尺寸 48px * 48px,shrinkWrap 为目标尺寸缩小到谷歌设计提供的最小值,但在实际效果中差别不大
  })
TextField (输入框和表单)
const TextField({
    Key key,
    this.controller,            //控制器,控制TextField文字
    this.focusNode,
    this.decoration: const InputDecoration(),      //输入器装饰
    TextInputType keyboardType: TextInputType.text, //输入的类型
    this.style,
    this.textAlign: TextAlign.start,
    this.autofocus: false,
    this.obscureText: false,  //是否隐藏输入
    this.autocorrect: true,
    this.maxLines: 1,
    this.maxLength,
    this.maxLengthEnforced: true,
    this.onChanged,            //文字改变触发
    this.onSubmitted,          //文字提交触发(键盘按键)
    this.onEditingComplete,  //当用户提交可编辑内容时调用
    this.inputFormatters,
    this.enabled,
    this.cursorWidth = 2.0,
    this.cursorRadius,
    this.cursorColor,
    this.keyboardAppearance,
  })
布局组件->
Row、Column (线性布局)
/**
 * 行布局
 *
 * Row({
    Key key,
    //mainAxisAlignment主轴上的对齐方式
    //center:将children放置在主轴的中心;
    //end:将children放置在主轴的末尾;
    //spaceAround:将主轴方向上的空白区域均分,使得children之间的空白区域相等,首尾空白区域为children之间的1/2;
    //spaceBetween:将主轴方向上的空白区域均分,使得children之间的空白区域相等,首尾没有空白区域;
    //spaceEvenly:将主轴方向上的空白区域均分,使得children之间和收尾的空白区域相等;
    //start:将children放置在主轴的起点;
    MainAxisAlignment mainAxisAlignment = MainAxisAlignment.start,
    MainAxisSize mainAxisSize = MainAxisSize.max,//控住一行的高度,max:最大化主轴方向的可用空间;min:与max相反,是最小化主轴方向的可用空间;
    CrossAxisAlignment crossAxisAlignment = CrossAxisAlignment.center,//交叉轴上的对齐方式,baseline:children在交叉轴方向,根据baseline对齐,stretch:让children填满交叉轴方向,start,center,end.
    TextDirection textDirection,//阿拉伯语系的兼容设置,一般无需处理
    VerticalDirection verticalDirection = VerticalDirection.down,//定义了children摆放顺序,down:从left到right进行布局,up:从right到left进行布局
    TextBaseline textBaseline,
    List children = const [],
    })
 */

/**
 * 列布局
 *
 * Column({
    Key key,
    //mainAxisAlignment主轴上的对齐方式
    //center:将children放置在主轴的中心;
    //end:将children放置在主轴的末尾;
    //spaceAround:将主轴方向上的空白区域均分,使得children之间的空白区域相等,首尾空白区域为children之间的1/2;
    //spaceBetween:将主轴方向上的空白区域均分,使得children之间的空白区域相等,首尾没有空白区域;
    //spaceEvenly:将主轴方向上的空白区域均分,使得children之间和收尾的空白区域相等;
    //start:将children放置在主轴的起点;
    MainAxisAlignment mainAxisAlignment = MainAxisAlignment.start,

    //控住一行的高度,max:最大化主轴方向的可用空间;min:与max相反,是最小化主轴方向的可用空间;
    MainAxisSize mainAxisSize = MainAxisSize.max,

    //交叉轴上的对齐方式,baseline:children在交叉轴方向,根据baseline对齐,stretch:让children填满交叉轴方向,start,center,end.
    CrossAxisAlignment crossAxisAlignment = CrossAxisAlignment.center,

    TextDirection textDirection,//阿拉伯语系的兼容设置,一般无需处理

    //定义了children摆放顺序,down:从top到bottom进行布局,up:从bottom到top进行布局
    VerticalDirection verticalDirection = VerticalDirection.down,
    TextBaseline textBaseline,
    List children = const [],
    })
 *
 */
Flex (弹性布局)
Flex({
  ...
  @required this.direction, //弹性布局的方向, Row默认为水平方向,Column默认为垂直方向
  List children = const [],
})
Expanded (扩充布局)
const Expanded({
  int flex = 1,
  @required Widget child,
})
Wrap、Flow (流式布局)
/**
    Wrap({
    Key key,
    this.direction = Axis.horizontal,//主轴(mainAxis)的方向,默认为水平。
    this.alignment = WrapAlignment.start,//主轴方向上的对齐方式,默认为start。
    this.spacing = 0.0,//主轴方向上的间距。
    this.runAlignment = WrapAlignment.start,//run的对齐方式。run可以理解为新的行或者列,如果是水平方向布局的话,run可以理解为新的一行。
    this.runSpacing = 0.0,//run的间距。
    this.crossAxisAlignment = WrapCrossAlignment.start,//交叉轴(crossAxis)方向上的对齐方式。
    this.textDirection,//文本方向。
    this.verticalDirection = VerticalDirection.down,//定义了children摆放顺序,默认是down,见Flex相关属性介绍。
    List children = const [],//
    })
 */


/**
 * 一般用在流式布局中,比如标签,瀑布流等
    Flow({
    Key key,
    @required this.delegate,//绘制子view
    List children = const [],
    })
 */
Stack、Positioned(层叠布局)
Stack({
  Key key,
  this.alignment = AlignmentDirectional.topStart, //指的是子Widget的对其方式,默认情况是以左上角为开始点 。
  this.textDirection,
  this.fit = StackFit.loose, //用来决定没有Positioned方式时候子Widget的大小,StackFit.loose 指的是子Widget 多大就多大,StackFit.expand使子Widget的大小和父组件一样大
  this.overflow = Overflow.clip, 指子Widget 超出Stack时候如何显示,默认值是Overflow.clip,子Widget超出Stack会被截断,Overflow.visible超出部分还会显示的
  List children = const [],
})


const Positioned({
  Key key,
  this.left,
  this.top,
  this.right,
  this.bottom,
  this.width,
  this.height,
  @required Widget child,
})


left、top 、right、 bottom分别代表离Stack左、上、右、底四边的距离。
width和height用于指定需要定位元素的宽度和高度。
注意,Positioned的width、height 和其它地方的意义稍微有点区别,
此处用于配合left、top 、right、 bottom来定位组件,
举个例子,在水平方向时,你只能指定left、right、width三个属性中的两个,
如指定left和width后,right会自动算出(left+width),
如果同时指定三个属性则会报错,垂直方向同理。
IndexedStack
IndexedStack({
    Key key,
    AlignmentGeometry alignment = AlignmentDirectional.topStart,
    TextDirection textDirection,
    StackFit sizing = StackFit.loose,
    this.index = 0,
    List children = const [],
  })

1.IndexedStack和Stack一样,都可以在一个组件上面放置另一个组件,唯一不同的是IndexedStack只能同时显示子组件中的一个组件,并通过Index属性来设置要显示的控件
2.alignment: 设置子组件在Stack中的对齐方式
3.index: 要显示的子组件的下标,对应children的List的下标
4.textDirection:设置子组件在Stack中从左往右排列,还是从右往左排列
5.sizing:调整IndexedStack组件中的没有使用Position包裹的子组件的宽高
loose: 子组件的宽高从Stack约束的最小值到最大值之间取值
expand: 子组件的宽高取Stack约束的最大值
passthrough:从父组件传递到Stack组件的约束将不加修改地传递给Stack组件中没有被Position组件包裹的子组件
SizedBox (宽高尺寸处理)
/**
 * 能强制子控件具有特定宽度、高度或两者都有,使子控件设置的宽高失效
 * const SizedBox({
 * Key key,
 * this.width,
 * this.height,
 * Widget child
 * })
 * */
ConstrainedBox (限定最大最小宽高布局)
/**
 * 限制子元素的最大最小宽高
 * ConstrainedBox({
    Key key,
    @required this.constraints,//限制条件
    Widget child
    })
 */
/**
 *const BoxConstraints({
    this.minWidth = 0.0,
    this.maxWidth = double.infinity,
    this.minHeight = 0.0,
    this.maxHeight = double.infinity
    })
 */
LimitedBox (限定最大宽高布局)
LimitedBox组件是当不受父组件约束时限制它的尺寸,什么叫不受父组件约束?就像这篇文章介绍的其他组件,它们都会对子组件约束,没有约束的父组件有ListView、Row、Column等,如果LimitedBox的父组件受到约束,此时LimitedBox将会不做任何操作,我们可以认为没有这个组件,代码如下:
Container(
  height: 100,
  width: 100,
  child: LimitedBox(
    maxHeight: 50,
    maxWidth: 100,
    child: Container(color: Colors.green,),
  ),
)
AspectRatio (调整宽高比)
/**
 * 强制子部件的宽度和高度具有给定的宽高比,可以父容器给定一个宽或者高,来换算另一个值
    const AspectRatio({
    Key key,
    @required this.aspectRatio,//宽高比
    Widget child
    })
 * */
FractionallySizedBox (百分比布局)
/**
 * 百分比布局,SizeBox直接通过width,height限制子控件;FractionallySizedBox通过百分比限制
 * const FractionallySizedBox({
    Key key,
    this.alignment = Alignment.center,
    this.widthFactor,//宽度因子,乘以宽度就是组件最后的宽
    this.heightFactor,
    Widget child,
    })
 */
Baseline
const Baseline({
    Key key,
    @required this.baseline,
    @required this.baselineType,
    Widget child,
  })

1.baseline:子组件基准线距离顶部的距离
2.baselineType
TextBaseline.alphabetic:对齐字母字符的字形底部的水平线
TextBaseline.ideographic:对齐表意文字的水平线
Offstage (是否可见)
/**
 * 控制child是否显示
 *
    当offstage为true,控件隐藏; 当offstage为false,显示;
    当Offstage不可见的时候,如果child有动画等,需要手动停掉,Offstage并不会停掉动画等操作。

    const Offstage({ Key key, this.offstage = true, Widget child })
 */
Opacity
/**     设置子控件透明度
    const Opacity({
    Key key,
    @required this.opacity,//透明度,0.0 到 1.0,0.0表示完全透明,1.0表示完全不透明
    this.alwaysIncludeSemantics = false,
    Widget child,
    })
 */
DecoratedBox(装饰盒子)
/**
 * 在子控件绘制之前或之后绘制一个装饰
    const DecoratedBox({
    Key key,
    @required this.decoration,//要绘制的装饰器
    this.position = DecorationPosition.background,//绘制在子组件上面(DecorationPosition.background)还是下面(DecorationPosition.foreground)
    Widget child
    })
 */
RotatedBox (旋转盒子)
/**
 *  旋转组件
 *   const RotatedBox({
    Key key,
    @required this.quarterTurns,//旋转的次数,每次旋转的度数只能是90度的整数倍
    Widget child,
    })
 */
Align (对齐与相对定位)
const Align({
  Key key,
  this.alignment = Alignment.center,
  this.widthFactor,
  this.heightFactor,
  Widget child,
})

alignment : 需要一个AlignmentGeometry类型的值,表示子组件在父组件中的起始位置。AlignmentGeometry 是一个抽象类,它有两个常用的子类:Alignment和 FractionalOffset,我们将在下面的示例中详细介绍。
widthFactor和heightFactor是用于确定Align 组件本身宽高的属性;它们是两个缩放因子,会分别乘以子元素的宽、高,最终的结果就是Align 组件的宽高。如果值为null,则组件的宽高将会占用尽可能多的空间。
FittedBox 缩放布局
const FittedBox({
    Key key,
    this.fit = BoxFit.contain,
    this.alignment = Alignment.center, //child对齐方式
    Widget child,
  })

fit 即child的缩放方式,比如以下缩放方式:
fill(通过扭曲源的纵横比填充目标框。)
contain(尽可能大,同时仍然将源完全包含在目标框中)
cover(尽可能小,同时仍然覆盖整个目标框)
fitWidth(确保显示了源的全部宽度,不管这是否意味着源垂直地溢出目标框)
fitHeight(确保显示源的完整高度,不管这是否意味着源水平地溢出目标框)
none(将源文件对齐到目标框内(默认情况下居中),并丢弃位于框外的源文件的任何部分。
源映像没有调整大小。
scaleDown(将源文件对齐到目标框内(默认情况下,居中),如果需要,将源文件向下缩放,以确保源文件适合框内,这与contains相同,如果它会收缩图像,则它与none相同)
容器->
Container (容器)
Container({
    Key key,
    this.alignment,//控制child的对齐方式
    this.padding, //设置内边距
    Color color, //设置背景颜色
    Decoration decoration,//绘制在child下层的装饰,不能与color同时使用
    this.foregroundDecoration,//绘制在child上层的装饰
    double width, //宽
    double height, //高
    BoxConstraints constraints,添加到child上额外的约束条件
    this.margin,//外边距
    this.transform,//设置container的变换矩阵,类型为Matrix4
    this.child, //子组件
  })

/** 装饰器,可以用来修饰其他的组件,和Android里面的shape很相似
    const BoxDecoration({
    this.color,//背景色
    this.image,//图片
    this.border,//描边
    this.borderRadius,//圆角大小
    this.boxShadow,//阴影
    this.gradient,//过度效果
    this.backgroundBlendMode,
    this.shape = BoxShape.rectangle,//形状,BoxShape.circle和borderRadius不能同时使用
    })
 */
Padding(填充)
const Padding({
  Key key,
  @required this.padding, //padding 值, EdgeInsetss 设置填充的值
  Widget child, //子组件
})


EdgeInsets
fromLTRB(double left, double top, double right, double bottom):分别指定四个方向的填充。
all(double value) : 所有方向均使用相同数值的填充。
only({left, top, right ,bottom }):可以设置具体某个方向的填充(可以同时指定多个方向)。
symmetric({ vertical, horizontal }):用于设置对称方向的填充,vertical指top和bottom,horizontal指left和right。
ConstrainedBox( 尺寸限制类容器)
/**
 * 限制子元素的最大最小宽高
 * ConstrainedBox({
    Key key,
    @required this.constraints,//限制条件
    Widget child
    })
 */
/**
 *const BoxConstraints({
    this.minWidth = 0.0,
    this.maxWidth = double.infinity,
    this.minHeight = 0.0,
    this.maxHeight = double.infinity
    })
 */
Transform(变换)
const Transform({
    Key key,
    @required this.transform,
    this.origin,
    this.alignment,
    this.transformHitTests = true,
    Widget child,
  })

1.对子组件做平移、旋转、缩放变换
2.origin: 指定子组件做平移、旋转、缩放时的中心点 origin: Offset(50, 50)
3.alignment:控制子组件在Transform中的对齐方式
4.transformHitTests:点击区域是否也做相应的变换,为true时执行相应的变换,为false不执行
5.transform:控制子组件的平移、旋转、缩放、倾斜变换
Clip(剪裁)
const ClipOval({ Key key, this.clipper, this.clipBehavior = Clip.antiAlias, Widget child }) : super(key: key, child: child);

const ClipRRect({
    Key key,
    this.borderRadius,
    this.clipper,
    this.clipBehavior = Clip.antiAlias,
    Widget child,
  }) : assert(borderRadius != null || clipper != null),
       assert(clipBehavior != null),
       super(key: key, child: child);

const ClipRect({ Key key, this.clipper, this.clipBehavior = Clip.hardEdge, Widget child }) : super(key: key, child: child);

ClipOval	子组件为正方形时剪裁为内贴圆形,为矩形时,剪裁为内贴椭圆(圆形裁剪)
ClipRRect	将子组件剪裁为圆角矩形(圆角矩形裁剪),用borderRadius控制圆角的位置大小
ClipRect	剪裁子组件到实际占用的矩形大小(溢出部分剪裁)(矩形裁剪),需要自定义clipper属性才能使用,否则没效果。自定义clipper并继承CustomClipper类,重写getClip、shouldReclip
ClipPath	路径裁剪。自定义的范围很广。采用了矢量路径path,将组件裁剪成任意形状。和ClipRect一样,需要自定义clipper并继承CustomClipper类,重写getClip、shouldReclip。这里的path用法是和android中自定义view的path是一样的。
滚动组件->
SingleChildScrollView
const SingleChildScrollView({
  Key key,
  //滚动方向,默认是垂直方向
  this.scrollDirection = Axis.vertical,
  //是否按照阅读方向相反的方向滑动
  this.reverse = false,
  //内容边距
  this.padding,
  //是否使用widget树中默认的PrimaryScrollController
  bool primary,
  //此属性接受一个ScrollPhysics类型的对象,它决定可以滚动如何响应用户操作,比如用户滑动完抬起手指后,继续执行动画,或者滑动到边界时,如何显示。
  //默认情况下,Flutter会根据具体平台分别使用不同的ScrollPhysics对象,对应不同的显示效果,如当滑动到边界时,继续拖动的话,在iOS上会出现弹性效果,
  //而在Android上会出现微光效果。如果你想在所有平台下使用同一种效果,可以显示指定一个固定的ScrollPhysics。
  //Flutter SDK包含两个ScrollPhysics的子类。1.ClampingScrollPhysics:Android下微光效果,2.BouncingScrollPhysics:iOS下弹性效果
  this.physics,
  //此属性接收一个ScrollController对象,ScrollController的主要作用是控制滚动位置和监听滚动事件。
  //默认情况下,Widget树中会有一个默认的PrimaryScrollController,如果子树中的可滚动组件没有显示的指定controller,并且primary属性值为true时,可滚动组件会使用这个默认的ScrollController。
  //这种机制带来的好处是父组件可以控制子树中可滚动的滚动行为,例:scaffold正是使用这种机制在iOS中实现了点击导航回到顶部的功能。
  this.controller,
  this.child,
})
ListView
ListView({
    Key key,
    Axis scrollDirection = Axis.vertical, //ListView 的方向,为 Axis.vertical 表示纵向,为 Axis.horizontal 表示横向。
    bool reverse = false, //是否反向滚动
    ScrollController controller, //滑动监听,值为一个 ScrollController 对象,这个属性应该可以用来做下拉刷新和上垃加载
    bool primary,//是否是与父级PrimaryScrollController关联的主滚动视图。如果primary为true,controller必须设置
    ScrollPhysics physics,
                            // 设置 ListView 如何响应用户的滑动行为,值为一个 ScrollPhysics 对象,它的实现类常用的有:
                                AlwaysScrollableScrollPhysics:总是可以滑动。
                                NeverScrollableScrollPhysics:禁止滚动。
                                BouncingScrollPhysics:内容超过一屏,上拉有回弹效果。
                                ClampingScrollPhysics:包裹内容,不会有回弹,感觉跟
                                AlwaysScrollableScrollPhysics 差不多。
    bool shrinkWrap = false, //多用于嵌套listView中 内容大小不确定 比如 垂直布局中 先后放入文字 listView (需要Expend包裹否则无法显示无穷大高度 但是需要确定listview高度 shrinkWrap使用内容适配不会有这样的影响)
    EdgeInsetsGeometry padding, //滚动视图与子项之间的内边距
    this.itemExtent, //子项范围
    bool addAutomaticKeepAlives = true,
    bool addRepaintBoundaries = true,
    bool addSemanticIndexes = true,
    double cacheExtent,
    List children = const [],
    int semanticChildCount,
  })


适用场景
已知有限个Item的情况下


ListView.builder({
    Key key,
    Axis scrollDirection = Axis.vertical,//滚动方向,纵向或者横向
    bool reverse = false,//反转
    ScrollController controller,//
    bool primary,//
    ScrollPhysics physics,
    bool shrinkWrap = false,
    EdgeInsetsGeometry padding,
    this.itemExtent,
    @required IndexedWidgetBuilder itemBuilder,
    int itemCount,   //子 Item 数量,只有使用 new ListView.builder() 和 new ListView.separated() 构造方法的时候才能指定,其中 new ListView.separated() 是必须指定。
    bool addAutomaticKeepAlives = true, //对应于 SliverChildBuilderDelegate.addAutomaticKeepAlives属性。即是否将每个子项包装在AutomaticKeepAlive中。
    bool addRepaintBoundaries = true, //对应于 SliverChildBuilderDelegate.addRepaintBoundaries属性。是否将每个子项包装在RepaintBoundary中
    bool addSemanticIndexes = true, //对应于 SliverChildBuilderDelegate.addSemanticIndexes属性。是否将每个子项包装在IndexedSemantics中。
    double cacheExtent, //视口在可见区域之前和之后有一个区域,用于缓存在用户滚动时即将变为可见的项目。
    int semanticChildCount,  //提供语义信息的孩子的数量
  })


适用场景
长列表时采用builder模式,能提高性能。不是把所有子控件都构造出来,而是在控件viewport加上头尾的cacheExtent这个范围内的子Item才会被构造。在构造时传递一个builder,按需加载是一个惯用模式,能提高加载性能。


ListView.separated({
    Key key,
    Axis scrollDirection = Axis.vertical,
    bool reverse = false,
    ScrollController controller,
    bool primary,
    ScrollPhysics physics,
    bool shrinkWrap = false,
    EdgeInsetsGeometry padding,
    @required IndexedWidgetBuilder itemBuilder,
    @required IndexedWidgetBuilder separatorBuilder,
    @required int itemCount,
    bool addAutomaticKeepAlives = true,
    bool addRepaintBoundaries = true,
    bool addSemanticIndexes = true,
    double cacheExtent,
  })

适用场景: 列表中需要分割线时,可以自定义复杂的分割线


const ListView.custom({
    Key key,
    Axis scrollDirection = Axis.vertical,
    bool reverse = false,
    ScrollController controller,
    bool primary,
    ScrollPhysics physics,
    bool shrinkWrap = false,
    EdgeInsetsGeometry padding,
    this.itemExtent,
    @required this.childrenDelegate,
    double cacheExtent,
    int semanticChildCount,
  })

适用场景:上面几种模式基本可以满足业务需求,如果你还想做一些其它设置(如列表的最大滚动范围)或获取滑动时每次布局的子Item范围,可以尝试custom模式
GridView (9宫格布局)
/**
    GridView({
    Key key,
    Axis scrollDirection = Axis.vertical,//滚动方向
    bool reverse = false,//是否反向显示数据
    ScrollController controller,
    bool primary,
    ScrollPhysics physics,//物理滚动
    bool shrinkWrap = false,
    EdgeInsetsGeometry padding,
    @required this.gridDelegate,
    bool addAutomaticKeepAlives = true,//自动保存视图缓存
    bool addRepaintBoundaries = true,//添加重绘边界
    bool addSemanticIndexes = true,
    double cacheExtent,
    List children = const [],
    int semanticChildCount,
    })
 */
/**
    const SliverGridDelegateWithFixedCrossAxisCount({
    @required this.crossAxisCount,//每行几个
    this.mainAxisSpacing = 0.0,//主轴方向间距
    this.crossAxisSpacing = 0.0,//纵轴方向间距
    this.childAspectRatio = 1.0,//主轴纵轴缩放比例
    })
 */
CustomScrollView
const CustomScrollView({
    Key key,
    Axis scrollDirection = Axis.vertical,
    bool reverse = false,
    ScrollController controller,
    bool primary,
    ScrollPhysics physics,
    bool shrinkWrap = false,
    Key center,
    double anchor = 0.0,
    double cacheExtent,
    this.slivers = const [],
    int semanticChildCount,
    DragStartBehavior dragStartBehavior = DragStartBehavior.start,
  })


// 头部可伸缩widget,屏幕向下滑动时SliverAppBar会自动收缩到一定高度。
SliverAppBar({
    Key key,
    this.leading, // 左上方图标
    this.automaticallyImplyLeading = true,
    this.title, // 标题
    this.actions, // 右侧图标组
    this.flexibleSpace, // 设置内容,背景、标题等
    this.bottom,
    this.elevation, // 阴影范围
    this.forceElevated = false, // 是否一致显示阴影,false在展开时不显示阴影
    this.backgroundColor, // 背景色
    this.brightness,
    this.iconTheme, // 图标样式
    this.actionsIconTheme, // 右上角图标样式
    this.textTheme,
    this.primary = true,
    this.centerTitle, // 标题是否居中
    this.titleSpacing = NavigationToolbar.kMiddleSpacing, // 标题距离左侧距离
    this.expandedHeight, // 展开高度
    this.floating = false, // 收缩后是否显示顶部标题栏
    this.pinned = false, // 收缩时是否固定到一定高度
    this.snap = false,
    this.shape, // 边框设置
  })
ScrollController(滚动监听及控制)
ScrollController({
double initialScrollOffset = 0.0,// 初始的偏移量
this.keepScrollOffset = true,//是否保存滚动位置
this.debugLabel,
})


animateTo(),滚动到指定位置,可以设置目标偏移量,时间和滚动曲线
jumpTo(),滚动到指定位置,瞬间移动
addListener(), 添加滚动的监听,可以获取滚动过的位置。
dispose(),在widget的dispose时调用,避免内存泄漏
功能组件->
WillPopScope (导航返回拦截)
/**
 *  导航返回拦截,避免用户误触返回按钮而导致APP退出,常用的双击退出功能
 * const WillPopScope({
    Key key,
    @required this.child,
    @required this.onWillPop,//当用户点击返回按钮时调用(包括导航返回按钮及Android物理返回按钮),返回 Future.value(false); 表示不退出;返回 Future.value(true); 表示退出.
    })
 */
InheritedWidget (数据共享)
abstract class InheritedWidget extends ProxyWidget {
  const InheritedWidget({ Key key, Widget child })
    : super(key: key, child: child);

  @override
  InheritedElement createElement() => new InheritedElement(this);

  @protected
  bool updateShouldNotify(covariant InheritedWidget oldWidget);
}

1、InheritedWidget 的实现是对象池,所有InheritedWidget对象的实例都在这个对象池里,
可以在树的任何位置都拿到InheritedWidget的单例对象,所以可以做到在树中间传递消息。
2、对象池:在InheritedWidget中是一个数组Map _inheritedWidgets;
3、InheritedWidget的作用域
InheritedWidget的作用域只能包括自己和自己的子节点 所以InheritedWidget的传递消息 只能往下传递。
4、一个封装了InheritedWidget的库
Provider (跨组件状态共享)
//定义一个保存共享数据的类
class InheritedProvider extends InheritedWidget{
  InheritedProvider({@required this.data, Widget child}): super(child: child);

  // 共享状态使用泛型
  final T data;

  bool updateShouldNotify(InheritedProvider old){
    // 返回true,则每次更新都会调用依赖其的子孙节点的didChangeDependencies
    return true;
  }
}

//数据发生变化时如何重构InheritedProvider
// 该方法用于Dart获取模板类型
Type _typeOf() => T;

class ChangeNotifierProvider extends StatefulWidget{
  ChangeNotifierProvider({
    Key key,
    this.data,
    this.child,
  });

  final Widget child;
  final T data;

  // 定义一个便捷方法,方便子树中的widget获取共享数据
//  static T of(BuildContext context){
//    final type = _typeOf>();
//    final provider = context.inheritFromWidgetOfExactType(type) as InheritedProvider;
//    return provider.data;
//  }

  // 替换上面的便捷方法,按需求是否注册依赖关系
  static T of(BuildContext context, {bool listen = true}){
    final type = _typeOf>();
    final provider = listen
        ? context.inheritFromWidgetOfExactType(type) as InheritedProvider
        : context.ancestorInheritedElementForWidgetOfExactType(type)?.widget as InheritedProvider;
    return provider.data;
  }

  _ChangeNotifierProviderState createState() => _ChangeNotifierProviderState();

}
原理:
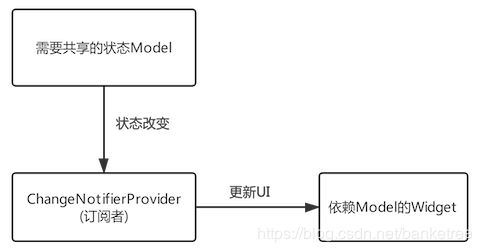
Model变化后会自动通知ChangeNotifierProvider(订阅者),ChangeNotifierProvider内部会重新构建InheritedWidget,而依赖该InheritedWidget的子孙Widget就会更新。
可以发现使用Provider,将会带来如下收益:
业务代码更关注数据了,只要更新Model,则UI会自动更新,而不用在状态改变后再去手动调用setState()来显式更新页面。
数据改变的消息传递被屏蔽了,我们无需手动去处理状态改变事件的发布和订阅了,这一切都被封装在Provider中了。这真的很棒,帮我们省掉了大量的工作!
在大型复杂应用中,尤其是需要全局共享的状态非常多时,使用Provider将会大大简化我们的代码逻辑,降低出错的概率,提高开发效率。
Theme (颜色和主题)
factory ThemeData({
    // 深色还是浅色
    Brightness brightness,
    // 主题颜色样本
    MaterialColor primarySwatch,
    // 主色,决定导航栏颜色
    Color primaryColor,
    Brightness primaryColorBrightness,
    Color primaryColorLight,
    Color primaryColorDark,
    // 次级色,决定大多数Widget的颜色,如进度条、开关等
    Color accentColor,
    Brightness accentColorBrightness,
    Color canvasColor,
    Color scaffoldBackgroundColor,
    Color bottomAppBarColor,
    // 卡片颜色
    Color cardColor,
    // 分割线颜色
    Color dividerColor,
    Color focusColor,
    Color hoverColor,
    Color highlightColor,
    Color splashColor,
    InteractiveInkFeatureFactory splashFactory,
    Color selectedRowColor,
    Color unselectedWidgetColor,
    Color disabledColor,
    // 按钮颜色
    Color buttonColor,
    // 按钮主题
    ButtonThemeData buttonTheme,
    ToggleButtonsThemeData toggleButtonsTheme,
    Color secondaryHeaderColor,
    Color textSelectionColor,
    // 输入框光标颜色
    Color cursorColor,
    Color textSelectionHandleColor,
    Color backgroundColor,
    // 对话框背景颜色
    Color dialogBackgroundColor,
    Color indicatorColor,
    Color hintColor,
    Color errorColor,
    Color toggleableActiveColor,
    // 文字字体
    String fontFamily,
    // 字体主题,包括标题、body等文字样式
    TextTheme textTheme,
    TextTheme primaryTextTheme,
    TextTheme accentTextTheme,
    InputDecorationTheme inputDecorationTheme,
    // Icon的默认样式
    IconThemeData iconTheme,
    IconThemeData primaryIconTheme,
    IconThemeData accentIconTheme,
    SliderThemeData sliderTheme,
    TabBarTheme tabBarTheme,
    TooltipThemeData tooltipTheme,
    CardTheme cardTheme,
    ChipThemeData chipTheme,
    // 指定平台,应用特定平台控件风格
    TargetPlatform platform,
    MaterialTapTargetSize materialTapTargetSize,
    bool applyElevationOverlayColor,
    PageTransitionsTheme pageTransitionsTheme,
    AppBarTheme appBarTheme,
    BottomAppBarTheme bottomAppBarTheme,
    ColorScheme colorScheme,
    DialogTheme dialogTheme,
    FloatingActionButtonThemeData floatingActionButtonTheme,
    Typography typography,
    CupertinoThemeData cupertinoOverrideTheme,
    SnackBarThemeData snackBarTheme,
    BottomSheetThemeData bottomSheetTheme,
    PopupMenuThemeData popupMenuTheme,
    MaterialBannerThemeData bannerTheme,
    DividerThemeData dividerTheme,
    ButtonBarThemeData buttonBarTheme,
  })
OverflowBox 溢出父容器显示
//允许其子组件溢出OverflowBox的父组件显示
const OverflowBox({
    Key key,
    this.alignment = Alignment.center,
    this.minWidth, //对子组件的最小宽度约束
    this.maxWidth, //对子组件的最大宽度约束
    this.minHeight, //对子组件的最小高度约束
    this.maxHeight, //对子组件的最大高度约束
    Widget child,
  })

注意:设置maxWidth或者maxHeight时,其值不能小于父组件的宽高,如果父组件有padding限制,则其值不能小于父组件的宽高减去Padding
FutureBuilder、StreamBuilder (异步UI更新)
FutureBuilder({
  // FutureBuilder依赖的Future,通常是一个异步耗时任务
  this.future,
  // 初始数据,用户设置默认数据
  this.initialData,
  // Widget构建器,该构建器会在Future执行的不同阶段被多次调用
  // 构建器签名为:Function(BuildContext context, AsyncSnapshot snapshot)
  // snapshot会包含当前异步任务的状态信息及结果信息,比如可以通过snapshot.connectionState获取异步任务的状态信息,通过snapshot.hasError判断任务时候有错误等
  @required this.builder,
})


StreamBuilder({
  Key key,
  this.initialData,
  Stream stream,
  @required this.builder,
})
对话框 Dialog
SimpleDialog
/**
 * 简单对话框,可以显示附加的提示和操作,通常配合SimpleDialogOption一起使用
    const SimpleDialog({
    Key key,
    this.title,//标题
    this.titlePadding = const EdgeInsets.fromLTRB(24.0, 24.0, 24.0, 0.0),//标题间距
    this.children,//要显示的内容
    this.contentPadding = const EdgeInsets.fromLTRB(0.0, 12.0, 0.0, 16.0),//内容间距
    this.semanticLabel,//
    this.shape,//
    })
 */
AlertDialog
/**
 * 提示对话框,显示提示内容和操作按钮
 * const AlertDialog({
    Key key,
    this.title,//标题
    this.titlePadding,//标题间距
    this.content,//要显示的内容项
    this.contentPadding = const EdgeInsets.fromLTRB(24.0, 20.0, 24.0, 24.0),//内容间距
    this.actions,//底部按钮
    this.semanticLabel,//
    this.shape,//
    })
 */
SnackBar
/**
    const SnackBar({
    Key key,
    @required this.content,//显示的内容
    this.backgroundColor,//设置背景颜色
    this.action,//可以添加事件
    this.duration = _kSnackBarDisplayDuration,
    this.animation,
    })
 */
组合布局->
RelativeLayout (相对布局)
    return Stack(
      children: [
        Container(
          width: 300,
          height: 300,
          color: Colors.red,
        ),
        Text(
          '这里是文本11',
          style: TextStyle(
              color: Colors.white
          ),
        ),
        Text('这里是文本22')
      ],
    )


      child: Container(
        width: 300,
        height: 300,
        color: Colors.red,
        child: Stack(
          children: [
            Align(
              alignment: Alignment.topCenter,
              child: Icon(Icons.account_circle,color: Colors.white,size: 40,),
            ),
          Positioned(
            top: 50,
            left: 50,
            child:Icon(Icons.print,color: Colors.white,size: 40)
          ),
           Icon(Icons.zoom_out_map,color: Colors.white,size: 40,),
          ],
        ),
      ),
    );
应用组件->
MaterialApp
MaterialApp({
  Key key,
  this.title = '', // 设备用于为用户识别应用程序的单行描述
  this.home, // 应用程序默认路由的小部件,用来定义当前应用打开的时候,所显示的界面
  this.color, // 在操作系统界面中应用程序使用的主色。
  this.theme, // 应用程序小部件使用的颜色。
  this.routes = const {}, // 应用程序的顶级路由表
  this.navigatorKey, // 在构建导航器时使用的键。
  this.initialRoute, // 如果构建了导航器,则显示的第一个路由的名称
  this.onGenerateRoute, // 应用程序导航到指定路由时使用的路由生成器回调
  this.onUnknownRoute, // 当 onGenerateRoute 无法生成路由(initialRoute除外)时调用
  this.navigatorObservers = const [], // 为该应用程序创建的导航器的观察者列表
  this.builder, // 用于在导航器上面插入小部件,但在由WidgetsApp小部件创建的其他小部件下面插入小部件,或用于完全替换导航器
  this.onGenerateTitle, // 如果非空,则调用此回调函数来生成应用程序的标题字符串,否则使用标题。
  this.locale, // 此应用程序本地化小部件的初始区域设置基于此值。
  this.localizationsDelegates, // 这个应用程序本地化小部件的委托。
  this.localeListResolutionCallback, // 这个回调负责在应用程序启动时以及用户更改设备的区域设置时选择应用程序的区域设置。
  this.localeResolutionCallback, //
  this.supportedLocales = const [Locale('en', 'US')], // 此应用程序已本地化的地区列表
  this.debugShowMaterialGrid = false, // 打开绘制基线网格材质应用程序的网格纸覆盖
  this.showPerformanceOverlay = false, // 打开性能叠加
  this.checkerboardRasterCacheImages = false, // 打开栅格缓存图像的棋盘格
  this.checkerboardOffscreenLayers = false, // 打开渲染到屏幕外位图的图层的棋盘格
  this.showSemanticsDebugger = false, // 打开显示框架报告的可访问性信息的覆盖
  this.debugShowCheckedModeBanner = true, // 在选中模式下打开一个小的“DEBUG”横幅,表示应用程序处于选中模式
})
Scaffold
  const Scaffold({
    Key key,
    this.appBar,
    this.body,
    this.floatingActionButton,
    this.floatingActionButtonLocation,
    this.floatingActionButtonAnimator,
    this.persistentFooterButtons,
    this.drawer,
    this.endDrawer,
    this.bottomNavigationBar,
    this.bottomSheet,
    this.backgroundColor,
    this.resizeToAvoidBottomPadding,
    this.resizeToAvoidBottomInset,
    this.primary = true,
    this.drawerDragStartBehavior = DragStartBehavior.start,
    this.extendBody = false,
    this.drawerScrimColor,
  })

appBar	AppBar	显示在界面顶部的一个AppBar
body	Widget	当前界面所显示的主要内容
floatingActionButton	Widget	在Material Design 中定义的一个功能
persistentFooterButtons	List	固定在下方显示的按钮
drawer	Widget	侧边栏组件
bottomNavigationBar	Widget	显示在底部的导航栏按钮
backgroundColor	Color	当前界面所显示的主要内容
body	Widget	背景色
resizeToAvoidBottomPadding	bool	控制界面内容body是否重新布局来避免底部被覆盖,比如当键盘显示时,重新布局避免被键盘盖住内容。默认值为true
AppBar
AppBar({
    Key key,
    this.leading,
    this.automaticallyImplyLeading = true,
    this.title,
    this.actions,
    this.flexibleSpace,
    this.bottom,
    this.elevation,
    this.shape,
    this.backgroundColor,
    this.brightness,
    this.iconTheme,
    this.actionsIconTheme,
    this.textTheme,
    this.primary = true,
    this.centerTitle,
    this.titleSpacing = NavigationToolbar.kMiddleSpacing,
    this.toolbarOpacity = 1.0,
    this.bottomOpacity = 1.0,
  })

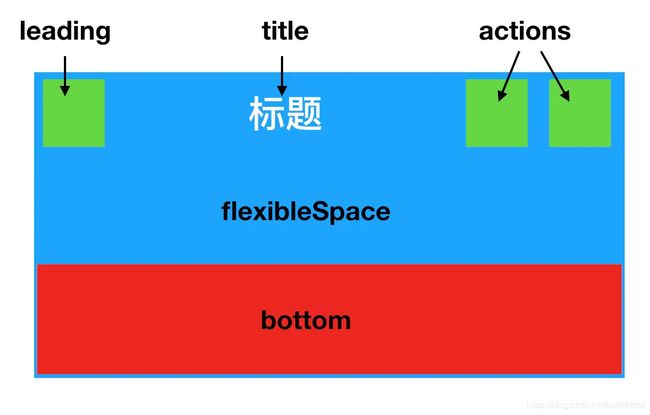
leading 左侧显示的图标 通常首页显示的为应用logo 在其他页面为返回按钮
automaticallyImplyLeading 配合leading使用
title 标题文本
actions 右侧item
flexibleSpace 显示在 AppBar 下方的控件,高度和 AppBar 高度一样,可以实现一些特殊的效果,该属性通常在 SliverAppBar 中使用
bottom 一个 AppBarBottomWidget 对象,通常是 TabBar。用来在 Toolbar 标题下面显示一个 Tab 导航栏
elevation 控件的 z 坐标顺序,默认值 4,对于可滚动的 SliverAppBar,当 SliverAppBar 和内容同级的时候,该值为 0, 当内容滚动 SliverAppBar 变为 Toolbar 的时候,修改 elevation 的值。
shape
backgroundColor AppBar背景色
brightness AppBar亮度 有黑白两种主题
iconTheme AppBar上图标的样式
actionsIconTheme AppBar上actions图标的样式
textTheme AppBar上文本样式
centerTitle 标题是否居中
titleSpacing 标题与其他控件的空隙
toolbarOpacity AppBar tool区域透明度
bottomOpacity bottom区域透明度
BottomNavigationBar
/**
    BottomNavigationBar({
    Key key,
    @required this.items,//子选项
    this.onTap,
    this.currentIndex = 0,//选中第几个
    BottomNavigationBarType type,
    this.fixedColor,//文字颜色
    this.iconSize = 24.0,//icon图片大小
    })
 */

/**
    const BottomNavigationBarItem({
    @required this.icon,//未选中图标
    this.title,//文字
    Widget activeIcon,//选中图标
    this.backgroundColor,// 测试发现type设置为shifting时,backgroundColor才有效
    })
 */
TabBar
/**
    const TabBar({
    Key key,
    @required this.tabs,//显示的标签内容,一般使用Tab对象,也可以是其他的Widget
    this.controller,//TabController对象
    this.isScrollable = false,//是否可滚动
    this.indicatorColor,//指示器颜色
    this.indicatorWeight = 2.0,//指示器高度
    this.indicatorPadding = EdgeInsets.zero,//底部指示器的Padding
    this.indicator,//指示器decoration,例如边框等
    this.indicatorSize,//指示器大小计算方式,TabBarIndicatorSize.label跟文字等宽,TabBarIndicatorSize.tab跟每个tab等宽
    this.labelColor,//选中label颜色
    this.labelStyle,//选中label的Style
    this.labelPadding,//每个label的padding值
    this.unselectedLabelColor,//未选中label颜色
    this.unselectedLabelStyle,//未选中label的Style
    }) : assert(tabs != null),
    assert(isScrollable != null),
    assert(indicator != null || (indicatorWeight != null && indicatorWeight > 0.0)),
    assert(indicator != null || (indicatorPadding != null)),
    super(key: key);
 */
Drawer
//UserAccountsDrawerHeader 可以设置用户头像、用户名、Email 等信息

/**
    const UserAccountsDrawerHeader({
    Key key,
    this.decoration,//
    this.margin = const EdgeInsets.only(bottom: 8.0),//
    this.currentAccountPicture,//用来设置当前用户的头像
    this.otherAccountsPictures,//用来设置当前用户的其他账号的头像
    @required this.accountName,//当前用户的姓名
    @required this.accountEmail,//当前用户的邮箱
    this.onDetailsPressed//当 accountName 或者 accountEmail 被点击的时候所触发的回调函数,可以用来显示其他额外的信息
    })
 */

//DrawerHeader自定义Drawer的头部信息
/**
    const DrawerHeader({
    Key key,
    this.decoration,//通常用来设置背景颜色或者背景图片
    this.margin = const EdgeInsets.only(bottom: 8.0),
    this.padding = const EdgeInsets.fromLTRB(16.0, 16.0, 16.0, 8.0),
    this.duration = const Duration(milliseconds: 250),
    this.curve = Curves.fastOutSlowIn,
    @required this.child,
    })
 */
3,动画原理
原理:利用人眼会产生视觉暂留,是布局变化,简称:物理动画或帧动画
    //图片宽高从0变到300
    animation = new Tween(begin: 0.0, end: 300.0).animate(controller)
      ..addListener(() {
        setState(()=>{});
      });
    //启动动画(正向执行)
    controller.forward();
hero动画:
A:  child: Hero(
          tag: "avatar", //唯一标记,前后两个路由页Hero的tag必须相同
          child: ClipOval(
            child: Image.asset("images/avatar.png",
              width: 50.0,
            ),
          ),
        ),

B:  child: Hero(
          tag: "avatar", //唯一标记,前后两个路由页Hero的tag必须相同
          child: Image.asset("images/avatar.png"),
      ),
集合动画:
  final Animation controller;
  Animation height;
  Animation padding;
  Animation color;

  Widget _buildAnimation(BuildContext context, Widget child) {
    return Container(
      alignment: Alignment.bottomCenter,
      padding:padding.value ,
      child: Container(
        color: color.value,
        width: 50.0,
        height: height.value,
      ),
    );
  }

  @override
  Widget build(BuildContext context) {
    return AnimatedBuilder(
      builder: _buildAnimation,
      animation: controller,
    );
  }
4,调试与异常
调试:
Dart 分析器
运行flutter analyze测试你的代码。这个工具是一个静态代码检查工具,主要用于分析代码并帮助开发者发现可能的错误,比如,Dart分析器大量使用了代码中的类型注释来帮助追踪问题,避免var、无类型的参数、无类型的列表文字等。
Dart Observatory (语句级的单步调试和分析器)
debugger()、print、debugPrint、flutter logs
异常:
Dart中可以通过try/catch/finally来捕获代码块异常
@override
void performRebuild() {
 ...
  try {
    //执行build方法
    built = build();
  } catch (e, stack) {
    // 有异常时则弹出错误提示
    built = ErrorWidget.builder(_debugReportException('building $this', e, stack));
  }
  ...
}
在发生异常时,Flutter默认的处理方式是弹一个ErrorWidget,上传异常如下:
FlutterErrorDetails _debugReportException(
  String context,
  dynamic exception,
  StackTrace stack, {
  InformationCollector informationCollector
}) {
  //构建错误详情对象
  final FlutterErrorDetails details = FlutterErrorDetails(
    exception: exception,
    stack: stack,
    library: 'widgets library',
    context: context,
    informationCollector: informationCollector,
  );
  //报告错误
  FlutterError.reportError(details);
  return details;
}Dart中有一个runZoned(...) 方法,可以给执行对象指定一个Zone,它可以区域错误捕捉。
main() {
  runZoned(() => runApp(MyApp()), zoneSpecification: new ZoneSpecification(
      print: (Zone self, ZoneDelegate parent, Zone zone, String line) {
        parent.print(zone, "Intercepted: $line");
      }),
  );
}

runZoned(() {
    runApp(MyApp());
}, onError: (Object obj, StackTrace stack) {
    var details=makeDetails(obj,stack);
    reportError(details);
});
5,包与插件(介绍插件使用,计划插件开发)
包与插件:功能集合的模块
alibaba/flutter_boost:路由
install_plugin 2.0.0#app下载更新插件
audio_recorder: any #录音、播放
flutter_sound: ^1.1.5#录音
dropdown_menu: ^1.1.0#下拉菜单
simple_permissions:#权限获取
easy_alert:#弹框
amap_location: any #高德地图
location: any #gogle位置获取
barcode_scan 0.0.8#二维码识别qr_mobile_vision: ^0.1.0 #二维码识别 这个不好用
flutter_screenutil: ^0.3.0#屏幕适配工具类
flutter_spinkit: ^2.1.0#加载等待框
lpinyin: ^1.0.6#汉字转拼音
shimmer: ^0.0.4#微光效果控件
qr_flutter: ^1.1.3#二维码生成
url_launcher: any#启动URL的Flutter插件。支持网络,电话,短信和电子邮件
datetime_picker_formfield: ^0.1.3#时间选择控件
flutter_picker: ‘^1.0.0’#选择器
common_utils: ‘^1.0.1’#工具类 时间、日期、日志等
flutter_html: ‘^0.8.2’#静态html标记呈现为Flutter小部件
fluwx: ‘^0.3.0’#微信支付、分享、登录
tobias: '^ 0.0.6#支付宝
cupertino_icons: ‘^0.1.2’#小图标控件
http: ‘^0.11.3+16’#网络请求
html: ‘^0.13.3’#html解析

image_picker: ‘^0.4.5’#图片选择(相册或拍照)
flutter_webview_plugin: any#webview展示
fluttertoast: any#toast提示框
shared_preferences: ‘^0.4.2’#shared_preferences存储
transparent_image: ‘^0.1.0’#透明图片控件
flutter_swiper : ‘^1.0.2’#轮播图
charts_flutter: ‘^0.4.0’#统计图表
path_provider: ‘^0.4.1’#获取系统文件
cached_network_image: ‘0.4.1’#加载网络图片并本地缓存
sqflite: ‘^0.11.0+1’#sqllite数据库操作
pull_to_refresh: ‘^1.1.5’#下拉刷新上拉加载更多  //flutter_easyrefresh
video_player: ‘0.6.1’#视频播放
collection: ‘1.14.11’#集合操作工具类
device_info: ‘0.2.1’#获取手机信息
flutter_svg: ‘^0.3.2’#展示svg图标控件
intl: any#国际化工具类
connectivity: ‘0.3.1’#链接网络
flutter_staggered_grid_view:#瀑布流展示控件
flutter_file_manager:#文件管理
loader_search_bar:#导航栏搜索控件
flutter_image_compress : any#图片压缩
ota_update : any#App下载更新
flutter_slidable:#item侧滑控件
vercoder_inputer: ^0.8.0#验证码输入框
flutter_app_badger: ^1.0.2#桌面提示角标
flutter_badge: 0.0.1#控件显示角标
flutter_local_notifications: #设置通知栏消息提示
dragablegridview_flutter: ^0.1.9#可拖动删除的GridView
cool_ui: “^0.1.14”#自定义键盘
例如:
网络请求
自带HttpClient
try {
                    //创建一个HttpClient
                    HttpClient httpClient = new HttpClient();
                    //打开Http连接
                    HttpClientRequest request = await httpClient.getUrl(
                        Uri.parse("https://www.baidu.com"));
                    //使用iPhone的UA
                    request.headers.add("user-agent", "Mozilla/5.0 (iPhone; CPU iPhone OS 10_3_1 like Mac OS X) AppleWebKit/603.1.30 (KHTML, like Gecko) Version/10.0 Mobile/14E304 Safari/602.1");
                    //等待连接服务器(会将请求信息发送给服务器)
                    HttpClientResponse response = await request.close();
                    //读取响应内容
                    _text = await response.transform(utf8.decoder).join();
                    //输出响应头
                    print(response.headers);

                    //关闭client后,通过该client发起的所有请求都会中止。
                    httpClient.close();

                  } catch (e) {
                    _text = "请求失败:$e";
                  } finally {
                    setState(() {
                      _loading = false;
                    });
                  }
第三方库Dio http库
    return new Container(
      alignment: Alignment.center,
      child: FutureBuilder(
          future: _dio.get("https://api.github.com/orgs/flutterchina/repos"),
          builder: (BuildContext context, AsyncSnapshot snapshot) {
            //请求完成
            if (snapshot.connectionState == ConnectionState.done) {
              Response response = snapshot.data;
              //发生错误
              if (snapshot.hasError) {
                return Text(snapshot.error.toString());
              }
              //请求成功,通过项目信息构建用于显示项目名称的ListView
              return ListView(
                children: response.data.map((e) =>
                    ListTile(title: Text(e["full_name"]))
                ).toList(),
              );
            }
            //请求未完成时弹出loading
            return CircularProgressIndicator();
          }
      ),
    );
路径插件
临时目录: 可以使用 getTemporaryDirectory() 来获取临时目录; 系统可随时清除的临时目录(缓存)。
在iOS上,这对应于NSTemporaryDirectory() 返回的值。
在Android上,这是getCacheDir())返回的值。
文档目录: 可以使用getApplicationDocumentsDirectory()来获取应用程序的文档目录,
该目录用于存储只有自己可以访问的文件。只有当应用程序被卸载时,系统才会清除该目录。
在iOS上,这对应于NSDocumentDirectory。
在Android上,这是AppData目录。
外部存储目录:可以使用getExternalStorageDirectory()来获取外部存储目录,
如SD卡;由于iOS不支持外部目录,所以在iOS下调用该方法会抛出UnsupportedError异常,
而在Android下结果是android SDK中getExternalStorageDirectory的返回值。
图片缓存以及清空
///实现Flutter框架的图像缓存的单例。
The singleton that implements the Flutter framework's image cache.

///该缓存由ImageProvider内部使用,通常不应该直接访问。
The cache is used internally by [ImageProvider](https://docs.flutter.io/flutter/painting/ImageProvider-class.html) and should generally not be accessed directly.

///图像缓存是在启动时由绘图绑定的绘图绑定创建的。createImageCache方法。
The image cache is created during startup by the  PaintingBinding's PaintingBinding.createImageCache  method.


1.获取ImageCache 缓存对象
 ImageCache get imageCache => PaintingBinding.instance.imageCache;
2.设置缓存图片的个数(根据情况自己设置,default = 1000)
  imageCache.maximumSize = 1000;
3.获取缓存图片个数
 int num = imageCache.currentSize;
4.设置缓存大小(根据情况自己设置,default = 50M)
 imageCache.maximumSizeBytes=50<<20;
5.获取图片缓存大小(单位是byte,需自行转换到 M)
int byte=imageCache.currentSizeBytes
6.清除图片缓存
 imageCache.clear();
6,国际化
实现Localizations类
//Locale资源类
class DemoLocalizations {
  DemoLocalizations(this.isZh);
  //是否为中文
  bool isZh = false;
  //为了使用方便,我们定义一个静态方法
  static DemoLocalizations of(BuildContext context) {
    return Localizations.of(context, DemoLocalizations);
  }
  //Locale相关值,title为应用标题
  String get title {
    return isZh ? "Flutter应用" : "Flutter APP";
  }
  //... 其它的值
}
实现Delegate类
//Locale代理类
class DemoLocalizationsDelegate extends LocalizationsDelegate {
  const DemoLocalizationsDelegate();

  //是否支持某个Local
  @override
  bool isSupported(Locale locale) => ['en', 'zh'].contains(locale.languageCode);

  // Flutter会调用此类加载相应的Locale资源类
  @override
  Future load(Locale locale) {
    print("$locale");
    return SynchronousFuture(
        DemoLocalizations(locale.languageCode == "zh")
    );
  }

  @override
  bool shouldReload(DemoLocalizationsDelegate old) => false;
}
添加多语言支持
localizationsDelegates: [
 // 本地化的代理类
 GlobalMaterialLocalizations.delegate,
 GlobalWidgetsLocalizations.delegate,
 // 注册我们的Delegate
 DemoLocalizationsDelegate()
],
接下来我们可以在Widget中使用Locale值:

return Scaffold(
  appBar: AppBar(
    //使用Locale title
    title: Text(DemoLocalizations.of(context).title),
  ),
  ... //省略无关代码
 )
使用插件 Intl包 可以轻松实现(忽略)
7,原理
事件(全局事件总线)
Flutter中可以使用Listener来监听原始触摸事件,按照本书对组件的分类,则Listener也是一个功能性组件。

Listener({
  Key key,
  this.onPointerDown, //手指按下回调
  this.onPointerMove, //手指移动回调
  this.onPointerUp,//手指抬起回调
  this.onPointerCancel,//触摸事件取消回调
  this.behavior = HitTestBehavior.deferToChild, //在命中测试期间如何表现
  Widget child
})


忽略PointerEvent
Listener(
  child: AbsorbPointer(
    child: Listener(
      child: Container(
        color: Colors.red,
        width: 200.0,
        height: 100.0,
      ),
      onPointerDown: (event)=>print("in"),
    ),
  ),
  onPointerDown: (event)=>print("up"),
)
手势识别 (GestureDetector)
 return Center(
      child: GestureDetector(
        child: Container(
          alignment: Alignment.center,
          color: Colors.blue,
          width: 200.0,
          height: 100.0,
          child: Text(_operation,
            style: TextStyle(color: Colors.white),
          ),
        ),
        onTap: () => updateText("Tap"),//点击
        onDoubleTap: () => updateText("DoubleTap"), //双击
        onLongPress: () => updateText("LongPress"), //长按
      ),
    );


  return Stack(
      children: [
        Positioned(
          top: _top,
          left: _left,
          child: GestureDetector(
            child: CircleAvatar(child: Text("A")),
            //手指按下时会触发此回调
            onPanDown: (DragDownDetails e) {
              //打印手指按下的位置(相对于屏幕)
              print("用户手指按下:${e.globalPosition}");
            },
            //手指滑动时会触发此回调
            onPanUpdate: (DragUpdateDetails e) {
              //用户手指滑动时,更新偏移,重新构建
              setState(() {
                _left += e.delta.dx;
                _top += e.delta.dy;
              });
            },
            onPanEnd: (DragEndDetails e){
              //打印滑动结束时在x、y轴上的速度
              print(e.velocity);
            },
          ),
        )
      ],
    );
Dismissible ( 滑动删除 )
/**
 *  滑动删除
 *
 * const Dismissible({
    @required Key key,//
    @required this.child,//
    this.background,//滑动时组件下一层显示的内容,没有设置secondaryBackground时,从右往左或者从左往右滑动都显示该内容,设置了secondaryBackground后,从左往右滑动显示该内容,从右往左滑动显示secondaryBackground的内容
    //secondaryBackground不能单独设置,只能在已经设置了background后才能设置,从右往左滑动时显示
    this.secondaryBackground,//
    this.onResize,//组件大小改变时回调
    this.onDismissed,//组件消失后回调
    this.direction = DismissDirection.horizontal,//
    this.resizeDuration = const Duration(milliseconds: 300),//组件大小改变的时长
    this.dismissThresholds = const {},//
    this.movementDuration = const Duration(milliseconds: 200),//组件消失的时长
    this.crossAxisEndOffset = 0.0,//
    })
 */
Flutter启动 ->
//启动过程分析 Flutter应用启动后要展示的第一个Widget
void runApp(Widget app) {
  WidgetsFlutterBinding.ensureInitialized()
    ..attachRootWidget(app)
    ..scheduleWarmUpFrame();
}
WidgetsFlutterBinding正是绑定widget 框架和Flutter engine的桥梁,定义如下:
class WidgetsFlutterBinding extends BindingBase with GestureBinding, ServicesBinding, SchedulerBinding, PaintingBinding, SemanticsBinding, RendererBinding, WidgetsBinding {
static WidgetsBinding ensureInitialized() {
if (WidgetsBinding.instance == null)
WidgetsFlutterBinding();
return WidgetsBinding.instance;
}
}Window正是Flutter Framework连接宿主操作系统的接口。我们看一下Window类的部分定义:
class Window {
// 当前设备的DPI,即一个逻辑像素显示多少物理像素,数字越大,显示效果就越精细保真。
// DPI是设备屏幕的固件属性,如Nexus 6的屏幕DPI为3.5
double get devicePixelRatio => _devicePixelRatio;
// Flutter UI绘制区域的大小
Size get physicalSize => _physicalSize;
// 当前系统默认的语言Locale
Locale get locale;
// 当前系统字体缩放比例。
double get textScaleFactor => _textScaleFactor;
// 当绘制区域大小改变回调
VoidCallback get onMetricsChanged => _onMetricsChanged;
// Locale发生变化回调
VoidCallback get onLocaleChanged => _onLocaleChanged;
// 系统字体缩放变化回调
VoidCallback get onTextScaleFactorChanged => _onTextScaleFactorChanged;
// 绘制前回调,一般会受显示器的垂直同步信号VSync驱动,当屏幕刷新时就会被调用
FrameCallback get onBeginFrame => _onBeginFrame;
// 绘制回调
VoidCallback get onDrawFrame => _onDrawFrame;
// 点击或指针事件回调
PointerDataPacketCallback get onPointerDataPacket => _onPointerDataPacket;
// 调度Frame,该方法执行后,onBeginFrame和onDrawFrame将紧接着会在合适时机被调用,
// 此方法会直接调用Flutter engine的Window_scheduleFrame方法
void scheduleFrame() native 'Window_scheduleFrame';
// 更新应用在GPU上的渲染,此方法会直接调用Flutter engine的Window_render方法
void render(Scene scene) native 'Window_render';
// 发送平台消息
void sendPlatformMessage(String name,
ByteData data,
PlatformMessageResponseCallback callback) ;
// 平台通道消息处理回调
PlatformMessageCallback get onPlatformMessage => _onPlatformMessage;
... //其它属性及回调
}
本小结从应用代码层分析并理解,为后期温习以及生产项目打下基础。
Flutter 开源项目 上百案例集合下载


