Shiro入门实战【附源码】
文章目录
- 1. Shiro简介
- 2. Shiro 的认证流程
- 3. 编码实战
- 3.1 创建 SpringBoot 项目,pom.xml 依赖如下:
- 3.2 application.yml 配置如下:
- 3.3 实体类创建
- 3.4 创建 mapper 接口
- 3.5 在主启动类上加 @MapperScan 注解扫描 mapper 的位置
- 3.6 创建 mapper.xml 文件,代码如下:
- 3.7 创建数据库 test,sql 语句如下:
- 3.8 创建 AuthRealm,实现 Shiro 框架的 AuthorizingRealm,代码如下:
- 3.9 创建 Shiro 的配置类:
- 3.10 创建 CredentialMatcher,做密码比较的规则验证:
- 3.11 Service 层实现:
- 3.12 Controller 层实现:
- 3.13 jsp 页面实现:
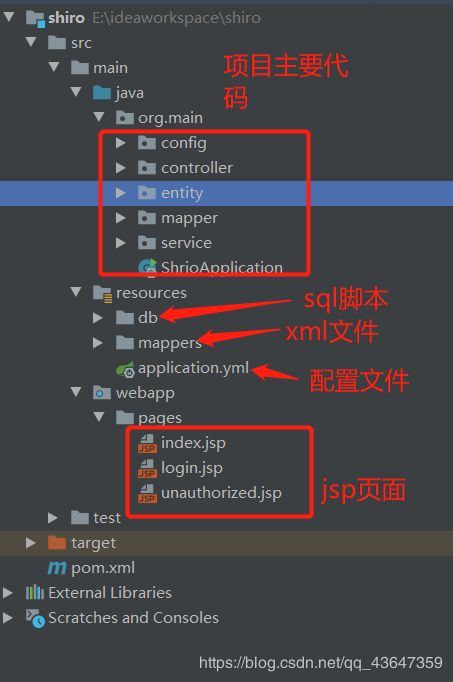
- 完整的项目结构
- 4. 项目源码地址:
1. Shiro简介
写代码前可以简单了解一下 Shiro
- Shiro 简介
- Shiro 身份验证
- Shiro 授权
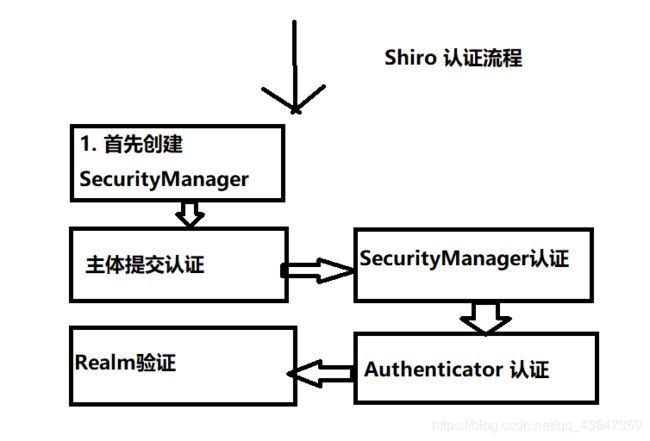
2. Shiro 的认证流程
3. 编码实战
3.1 创建 SpringBoot 项目,pom.xml 依赖如下:
<project xmlns="http://maven.apache.org/POM/4.0.0"
         xmlns:xsi="http://www.w3.org/2001/XMLSchema-instance"
         xsi:schemaLocation="http://maven.apache.org/POM/4.0.0 http://maven.apache.org/xsd/maven-4.0.0.xsd">
    <modelVersion>4.0.0modelVersion>

    <parent>
        <groupId>org.springframework.bootgroupId>
        <artifactId>spring-boot-starter-parentartifactId>
        <version>1.5.16.RELEASEversion>
        <relativePath/>
    parent>

    <groupId>org.examplegroupId>
    <artifactId>shiroartifactId>
    <version>1.0-SNAPSHOTversion>
    <packaging>warpackaging>
    <name>shironame>
    <description>Demo project for shirodescription>

    <properties>
        <java.version>1.8java.version>
    properties>

    <dependencies>
        <dependency>
            <groupId>org.projectlombokgroupId>
            <artifactId>lombokartifactId>
            <version>1.18.12version>
        dependency>
        <dependency>
            <groupId>org.mybatis.spring.bootgroupId>
            <artifactId>mybatis-spring-boot-starterartifactId>
            <version>1.3.1version>
        dependency>
        <dependency>
            <groupId>org.springframework.bootgroupId>
            <artifactId>spring-boot-starter-webartifactId>
        dependency>
        <dependency>
            <groupId>mysqlgroupId>
            <artifactId>mysql-connector-javaartifactId>
            <scope>runtimescope>
        dependency>
        <dependency>
            <groupId>org.springframework.bootgroupId>
            <artifactId>spring-boot-starter-tomcatartifactId>
            <scope>providedscope>
        dependency>
        <dependency>
            <groupId>org.apache.shirogroupId>
            <artifactId>shiro-coreartifactId>
            <version>1.3.2version>
        dependency>
        <dependency>
            <groupId>org.apache.shirogroupId>
            <artifactId>shiro-springartifactId>
            <version>1.3.2version>
        dependency>
        <dependency>
            <groupId>com.alibabagroupId>
            <artifactId>druidartifactId>
            <version>1.0.20version>
        dependency>
        <dependency>
            <groupId>org.apache.commonsgroupId>
            <artifactId>commons-lang3artifactId>
            <version>3.4version>
        dependency>
        <dependency>
            <groupId>org.springframeworkgroupId>
            <artifactId>spring-context-supportartifactId>
            <version>4.2.3.RELEASEversion>
        dependency>
        <dependency>
            <groupId>org.apache.tomcat.embedgroupId>
            <artifactId>tomcat-embed-jasperartifactId>
        dependency>
        <dependency>
            <groupId>javax.servletgroupId>
            <artifactId>javax.servlet-apiartifactId>
        dependency>
        <dependency>
            <groupId>javax.servletgroupId>
            <artifactId>jstlartifactId>
        dependency>
    dependencies>

    <build>
        <plugins>
            <plugin>
                <groupId>org.springframework.bootgroupId>
                <artifactId>spring-boot-maven-pluginartifactId>
            plugin>
        plugins>
    build>

project>
3.2 application.yml 配置如下:
# 数据库配置
spring:
  datasource:
    type: com.alibaba.druid.pool.DruidDataSource
    driver-class-name: com.mysql.jdbc.Driver
    url: jdbc:mysql://127.0.0.1:3306/test?characterEncoding=UTF-8
    username: root
    password: 123456
  # jsp 配置 前缀/后缀
  mvc:
    view:
      prefix: /pages/
      suffix: .jsp

# mybatis 配置
mybatis:
  mapper-locations: mappers/*.xml
  type-aliases-package: org.main.entity
3.3 实体类创建
创建与数据库对应的实体类,主要有 User、Role、Permission 这三个实体类,代码如下:
package org.main.entity;

import lombok.Data;

import java.io.Serializable;

/**
 * 角色权限类
 * @Author: bai
 * @DateTime: 2020/6/25 9:21
 */
@Data
public class Permission implements Serializable {
    /**
     * 权限id
     */
    private Integer pid;
    /**
     * 权限组名称
     */
    private String name;
    /**
     * 可访问的 url
     */
    private String url;
}
package org.main.entity;

import lombok.Data;

import java.io.Serializable;
import java.util.HashSet;
import java.util.Set;

/**
 * 角色类
 * @Author: bai
 * @DateTime: 2020/6/25 9:22
 */
@Data
public class Role implements Serializable {
    /**
     * 角色id
     */
    private Integer rid;
    /**
     * 角色名称
     */
    private String rname;
    /**
     * 角色权限[单角色可能具备多种权限]
     */
    private Set<Permission> permissions = new HashSet<Permission>();
    /**
     * 角色属于哪个用户[单角色可能属于多个用户],[同时有多人具备同一种角色]
     */
    private Set<User> users = new HashSet<User>();
}
package org.main.entity;

import lombok.Data;

import java.io.Serializable;
import java.util.HashSet;
import java.util.Set;

/**
 * 用户类
 * @Author: bai
 * @DateTime: 2020/6/25 9:23
 */
@Data
public class User implements Serializable {
    /**
     * 用户id
     */
    private Integer uid;
    /**
     * 用户名
     */
    private String username;
    /**
     * 密码
     */
    private String password;
    /**
     * 用户的角色[单用户可能具备多种角色]
     */
    private Set<Role> roles = new HashSet<Role>();
}
3.4 创建 mapper 接口
package org.main.mapper;

import org.apache.ibatis.annotations.Param;
import org.main.entity.User;

/**
 * @Author: bai
 * @DateTime: 2020/6/25 9:29
 */
public interface UserMapper {
    User findByUsername(@Param("username") String username);
}
3.5 在主启动类上加 @MapperScan 注解扫描 mapper 的位置
package org.main;

import org.mybatis.spring.annotation.MapperScan;
import org.springframework.boot.SpringApplication;
import org.springframework.boot.autoconfigure.SpringBootApplication;
import org.springframework.context.annotation.ComponentScan;

/**
 * @Author: bai
 * @DateTime: 2020/6/25 9:30
 */
@SpringBootApplication
@ComponentScan
@MapperScan(basePackages = {"org.main.mapper"})
public class ShrioApplication {
    public static void main(String[] args) {
        SpringApplication.run(ShrioApplication.class, args);
    }
}
3.6 创建 mapper.xml 文件,代码如下:
<mapper namespace="org.main.mapper.UserMapper">
    <resultMap id="userMap" type="org.main.entity.User">
        <id property="uid" column="uid"/>
        <result property="username" column="username"/>
        <result property="password" column="password"/>
        <collection property="roles" ofType="org.main.entity.Role">
            <id property="rid" column="rid"/>
            <result property="rname" column="rname"/>
            <collection property="permissions" ofType="org.main.entity.Permission">
                <id property="pid" column="pid"/>
                <result property="name" column="name"/>
                <result property="url" column="url"/>
            collection>
        collection>
    resultMap>

    <select id="findByUsername" resultMap="userMap">
        SELECT u.*,r.*,p.*
        FROM user u
        INNER JOIN user_role ur on ur.uid=u.uid
        INNER JOIN role r on r.rid=ur.rid
        INNER JOIN permission_role pr on pr.rid=r.rid
        INNER JOIN permission p on pr.pid=p.pid
        WHERE  u.username=#{username}
    select>
mapper>
3.7 创建数据库 test,sql 语句如下:
-- 权限表--
CREATE TABLE permission (
  pid int(11) NOT NULL AUTO_INCREMENT,
  name VARCHAR(255) NOT NULL DEFAULT '',
  url VARCHAR(255) DEFAULT '',
  PRIMARY KEY (pid)
) ENGINE =InnoDB DEFAULT CHARSET = utf8;

INSERT INTO permission VALUES ('1','add','');
INSERT INTO permission VALUES ('2','delete','');
INSERT INTO permission VALUES ('3','edit','');
INSERT INTO permission VALUES ('4','query','');

-- 用户表--
CREATE TABLE user(
uid int(11) NOT NULL AUTO_INCREMENT,
username VARCHAR(255) NOT NULL DEFAULT '',
password VARCHAR(255) NOT NULL DEFAULT '',
PRIMARY KEY (uid)
) ENGINE =InnoDB DEFAULT CHARSET=utf8;

INSERT INTO user VALUES ('1','admin','123');
INSERT INTO user VALUES ('2','demo','123');

-- 角色表--
CREATE TABLE role(
rid int(11) NOT NULL AUTO_INCREMENT,
rname VARCHAR(255) NOT NULL DEFAULT '',
PRIMARY KEY (rid)
) ENGINE =InnoDB DEFAULT CHARSET=utf8;

INSERT INTO role VALUES ('1','admin');
INSERT INTO role VALUES ('2','customer');

-- 权限角色关系表--
CREATE TABLE permission_role(
  rid int(11) NOT NULL ,
  pid int(11) NOT NULL ,
  KEY idx_rid(rid),
  KEY idx_pid(pid)
) ENGINE = InnoDB DEFAULT CHARSET = utf8;

INSERT INTO permission_role VALUES ('1','1');
INSERT INTO permission_role VALUES ('1','2');
INSERT INTO permission_role VALUES ('1','3');
INSERT INTO permission_role VALUES ('1','4');
INSERT INTO permission_role VALUES ('2','1');
INSERT INTO permission_role VALUES ('2','4');

-- 用户角色关系表--
CREATE TABLE user_role(
  uid int(11) NOT NULL ,
  rid int(11) NOT NULL ,
  KEY idx_uid(uid),
  KEY idx_rid(rid)
) ENGINE = InnoDB DEFAULT CHARSET = utf8;

INSERT INTO user_role VALUES (1,1);
INSERT INTO user_role VALUES (2,2);
3.8 创建 AuthRealm,实现 Shiro 框架的 AuthorizingRealm,代码如下:
package org.main.config;

import org.apache.shiro.authc.*;
import org.apache.shiro.authz.AuthorizationInfo;
import org.apache.shiro.authz.SimpleAuthorizationInfo;
import org.apache.shiro.realm.AuthorizingRealm;
import org.apache.shiro.subject.PrincipalCollection;
import org.main.entity.Permission;
import org.main.entity.Role;
import org.main.entity.User;
import org.main.service.UserService;
import org.springframework.beans.factory.annotation.Autowired;
import org.apache.commons.collections.CollectionUtils;

import java.util.ArrayList;
import java.util.List;
import java.util.Set;

/**
 * @Author: bai
 * @DateTime: 2020/6/25 9:41
 */
public class AuthRealm extends AuthorizingRealm {
    @Autowired
    private UserService userService;

    //授权
    @Override
    protected AuthorizationInfo doGetAuthorizationInfo(PrincipalCollection principals) {
        User user = (User) principals.fromRealm(this.getClass().getName()).iterator().next();
        List<String> permissionList = new ArrayList<String>();
        List<String> roleNameList = new ArrayList<String>();
        Set<Role> roleSet = user.getRoles();
        if (CollectionUtils.isNotEmpty(roleSet)) {
            for (Role role : roleSet) {
                roleNameList.add(role.getRname());
                Set<Permission> permissionSet = role.getPermissions();
                if (CollectionUtils.isNotEmpty(permissionSet)) {
                    for (Permission permission : permissionSet) {
                        permissionList.add(permission.getName());
                    }
                }
            }
        }
        SimpleAuthorizationInfo info = new SimpleAuthorizationInfo();
        info.addStringPermissions(permissionList);
        info.addRoles(roleNameList);
        return info;
    }

    // 认证登陆
    @Override
    protected AuthenticationInfo doGetAuthenticationInfo(AuthenticationToken authenticationToken) throws AuthenticationException {
        UsernamePasswordToken usernamePasswordToken = (UsernamePasswordToken) authenticationToken;
        String username = usernamePasswordToken.getUsername();
        User user = userService.findByUsername(username);
        return new SimpleAuthenticationInfo(user, user.getPassword(), this.getClass().getName());
    }
}
3.9 创建 Shiro 的配置类:
package org.main.config;

import org.apache.shiro.cache.MemoryConstrainedCacheManager;
import org.apache.shiro.mgt.SecurityManager;
import org.apache.shiro.spring.security.interceptor.AuthorizationAttributeSourceAdvisor;
import org.apache.shiro.spring.web.ShiroFilterFactoryBean;
import org.apache.shiro.web.mgt.DefaultWebSecurityManager;
import org.springframework.aop.framework.autoproxy.DefaultAdvisorAutoProxyCreator;
import org.springframework.beans.factory.annotation.Qualifier;
import org.springframework.context.annotation.Bean;
import org.springframework.context.annotation.Configuration;

import java.util.LinkedHashMap;

/**
 * Shiro 配置类
 *
 * @Author: bai
 * @DateTime: 2020/6/25 9:52
 */
@Configuration
public class ShiroConfiguration {
    @Bean("shiroFilter")
    public ShiroFilterFactoryBean shiroFilter(@Qualifier("securityManager") SecurityManager manager) {
        ShiroFilterFactoryBean bean = new ShiroFilterFactoryBean();
        bean.setSecurityManager(manager);

        bean.setLoginUrl("/login");
        bean.setSuccessUrl("/index");
        bean.setUnauthorizedUrl("/unauthorized");

        LinkedHashMap<String, String> filterChainDefinitionMap = new LinkedHashMap<String, String>();

        // authc 表示只有登陆后才有权限访问,anon 表示没有登陆也有权限访问
        filterChainDefinitionMap.put("/index", "authc");
        filterChainDefinitionMap.put("/login", "anon");
        filterChainDefinitionMap.put("/loginUser", "anon");

        // admin 接口指允许admin角色访问
        filterChainDefinitionMap.put("/admin", "roles[admin]");
        filterChainDefinitionMap.put("/edit", "perms[edit]");

        // 开放druid所有请求,可以访问druid监控
        filterChainDefinitionMap.put("/**", "user");

        bean.setFilterChainDefinitionMap(filterChainDefinitionMap);
        return bean;
    }

    @Bean("securityManager")
    public SecurityManager securityManager(@Qualifier("authRealm") AuthRealm authRealm) {
        DefaultWebSecurityManager manager = new DefaultWebSecurityManager();
        manager.setRealm(authRealm);
        return manager;
    }

    @Bean("authRealm")
    public AuthRealm authRealm(@Qualifier("credentialMatcher") CredentialMatcher credentialMatcher) {
        AuthRealm authRealm = new AuthRealm();
        // 使用缓存
        authRealm.setCacheManager(new MemoryConstrainedCacheManager());
        authRealm.setCredentialsMatcher(credentialMatcher);
        return authRealm;
    }

    @Bean("credentialMatcher")
    public CredentialMatcher credentialMatcher() {
        return new CredentialMatcher();
    }

    /**
     * 以下的两个方法是设置 shiro 与 spring 之间的关联
     *
     * @param securityManager
     * @return
     */
    @Bean
    public AuthorizationAttributeSourceAdvisor authorizationAttributeSourceAdvisor(@Qualifier("securityManager") SecurityManager securityManager) {
        AuthorizationAttributeSourceAdvisor advisor = new AuthorizationAttributeSourceAdvisor();
        advisor.setSecurityManager(securityManager);
        return advisor;
    }

    @Bean
    public DefaultAdvisorAutoProxyCreator defaultAdvisorAutoProxyCreator() {
        DefaultAdvisorAutoProxyCreator creator = new DefaultAdvisorAutoProxyCreator();
        creator.setProxyTargetClass(true);
        return creator;
    }
}
3.10 创建 CredentialMatcher,做密码比较的规则验证:
package org.main.config;

import org.apache.shiro.authc.AuthenticationInfo;
import org.apache.shiro.authc.AuthenticationToken;
import org.apache.shiro.authc.UsernamePasswordToken;
import org.apache.shiro.authc.credential.SimpleCredentialsMatcher;

/**
 * 密码校验规则
 *
 * @Author: bai
 * @DateTime: 2020/6/25 10:03
 */
public class CredentialMatcher extends SimpleCredentialsMatcher {
    @Override
    public boolean doCredentialsMatch(AuthenticationToken token, AuthenticationInfo info) {
        UsernamePasswordToken usernamePasswordToken = (UsernamePasswordToken) token;
        String password = new String(usernamePasswordToken.getPassword());
        String dbPassword = (String) info.getCredentials();
        return this.equals(password, dbPassword);
    }
}
3.11 Service 层实现:
package org.main.service;

import org.main.entity.User;
import org.main.mapper.UserMapper;
import org.springframework.stereotype.Service;

import javax.annotation.Resource;

/**
 * @Author: bai
 * @DateTime: 2020/6/25 9:42
 */
@Service
public class UserService {
    @Resource
    private UserMapper userMapper;

    public User findByUsername(String username) {
        return userMapper.findByUsername(username);
    }
}
3.12 Controller 层实现:
package org.main.controller;

import org.apache.shiro.SecurityUtils;
import org.apache.shiro.authc.UsernamePasswordToken;
import org.apache.shiro.subject.Subject;
import org.main.entity.User;
import org.springframework.web.bind.annotation.*;

import javax.servlet.http.HttpSession;

/**
 * @Author: bai
 * @DateTime: 2020/6/25 10:10
 */
@RestController
public class UserController {

    @GetMapping(value = "/login")
    public String login() {
        return "login";
    }

    /**
     * 两个case
     * 第一个是只有登陆后才能访问相关的接口,没有登陆是不允许访问相关的接口,例如admin接口
     * 第二个是某些接口只能被某些角色访问
     * @return
     */
    @GetMapping(value = "/admin")
    public String admin() {
        return "admin success";
    }

    @GetMapping(value = "/logout")
    public String logout() {
        Subject subject = SecurityUtils.getSubject();
        if (null != subject) {
            subject.logout();
        }
        return "login";
    }

    @GetMapping(value = "/index")
    public String index() {
        return "index";
    }

    @GetMapping(value = "/edit")
    public String edit() {
        return "edit success";
    }

    @GetMapping(value = "/unauthorized")
    public String unauthorized() {
        return "unauthorized";
    }

    @PostMapping(value = "/loginUser")
    public String loginUser(@RequestParam(value = "username") String username,
                            @RequestParam(value = "password") String password,
                            HttpSession session) {
        UsernamePasswordToken token = new UsernamePasswordToken(username, password);
        Subject subject = SecurityUtils.getSubject();
        try {
            subject.login(token);
            User user = (User) subject.getPrincipal();
            session.setAttribute("user", user);
            return "index";
        } catch (Exception e) {
            e.printStackTrace();
            return "login";
        }
    }
}
3.13 jsp 页面实现:
index.jsp
<%--
  Created by IntelliJ IDEA.
  User: bai
  Date: 2020/6/25
  Time: 10:20
  To change this template use File | Settings | File Templates.
--%>
<%@ page contentType="text/html;charset=UTF-8" language="java" %>
<html>
<head>
    <title>Hometitle>
head>
<body>
    <h1>欢迎登陆, ${user.username}h1>
body>
html>
login.jsp
<%--
  Created by IntelliJ IDEA.
  User: bai
  Date: 2020/6/25
  Time: 10:21
  To change this template use File | Settings | File Templates.
--%>
<%@ page contentType="text/html;charset=UTF-8" language="java" %>
<html>
<head>
    <title>Logintitle>
head>
<body>
    <h1>欢迎登陆h1>
    <form action="/loginUser" method="post">
        <input type="text" name="username"><br>
        <input type="password" name="password"><br>
        <input type="submit" value="提交">
    form>
body>
html>
unauthorized.jsp
<%--
  Created by IntelliJ IDEA.
  User: bai
  Date: 2020/6/25
  Time: 10:22
  To change this template use File | Settings | File Templates.
--%>
<%@ page contentType="text/html;charset=UTF-8" language="java" %>
<html>
<head>
    <title>Unauthorizedtitle>
head>
<body>
    <h1>Unauthorized!h1>
body>
html>
完整的项目结构
4. 项目源码地址:
码云仓库

