vue+element-ui入门(手把手教你怎么用element)
vue+element-ui入门,手把手教你怎么用vue+element-ui
- 1.vue安装使用
- 查看版本
- 升级或安装 cnpm
- 最新稳定版
- 全局安装 vue-cli
- 创建一个基于 webpack 模板的新项目
- 这里需要进行一些配置,默认回车即可
- 2.安装element-ui
- npm 安装
- 3.使用
- 项目目录:
- 引入 Element
- 使用elment-ui
- 运行
- 访问网页:
1.vue安装使用
参考:https://www.runoob.com/vue2/vue-install.html
NPM 方法
由于 npm 安装速度慢,本教程使用了淘宝的镜像及其命令 cnpm,安装使用介绍参照:使用淘宝 NPM 镜像。
npm 版本需要大于 3.0,如果低于此版本需要升级它:
查看版本
$ npm -v
2.3.0
#升级 npm
cnpm install npm -g
升级或安装 cnpm
npm install cnpm -g
在用 Vue.js 构建大型应用时推荐使用 NPM 安装:
最新稳定版
$ cnpm install vue
命令行工具
Vue.js 提供一个官方命令行工具,可用于快速搭建大型单页应用。
全局安装 vue-cli
$ cnpm install --global vue-cli
创建一个基于 webpack 模板的新项目
$ vue init webpack my-project
这里需要进行一些配置,默认回车即可
This will install Vue 2.x version of the template.
For Vue 1.x use: vue init webpack#1.0 my-project
? Project name my-project
? Project description A Vue.js project
? Author runoob [email protected]
? Vue build standalone
? Use ESLint to lint your code? Yes
? Pick an ESLint preset Standard
? Setup unit tests with Karma + Mocha? Yes
? Setup e2e tests with Nightwatch? Yes
vue-cli · Generated “my-project”.
To get started:
 cd my-project
 npm install
 npm run dev
Documentation can be found at https://vuejs-templates.github.io/webpack
进入项目,安装并运行:
$ cd my-project
$ cnpm install
$ cnpm run dev
DONE Compiled successfully in 4388ms
Listening at http://localhost:8080
成功执行以上命令后访问 http://localhost:8080/,输出结果如下所示:

2.安装element-ui
npm 安装
推荐使用 npm 的方式安装,它能更好地和 webpack 打包工具配合使用。
npm i element-ui -S
3.使用
参考自:https://element.eleme.cn/#/zh-CN/component/quickstart
项目目录:
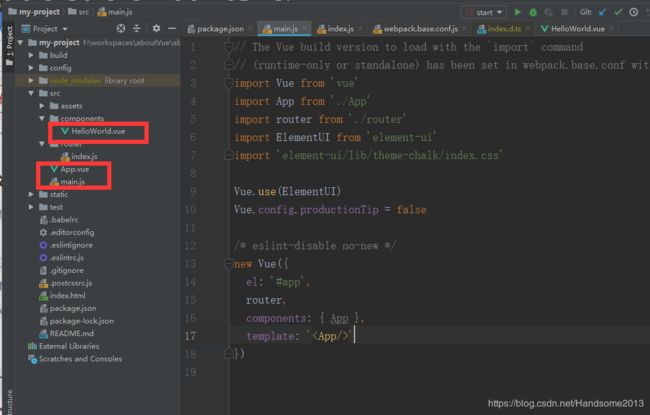
引入 Element
你可以引入整个 Element,或是根据需要仅引入部分组件。我们先介绍如何引入完整的 Element。
¶ 完整引入
在 main.js 中写入以下内容:
// The Vue build version to load with the `import` command
// (runtime-only or standalone) has been set in webpack.base.conf with an alias.
import Vue from 'vue'
import App from './App'
import router from './router'
import ElementUI from 'element-ui'
import 'element-ui/lib/theme-chalk/index.css'
Vue.use(ElementUI)
Vue.config.productionTip = false
/* eslint-disable no-new */
new Vue({
el: '#app',
router,
components: { App },
template: '以上代码便完成了 Element 的引入。需要注意的是,样式文件需要单独引入。
使用elment-ui
在HelloWorld.vue中:
注意:这里element已经在App.js中引入了,这里直接使用,还有就是template中只有一个根标签,
根标签不能并列,比如这里是
如果缺少这个,就会出错。
运行
npm run dev

访问网页:

#例子链接:https://github.com/bigFace2019/firstProgram.git