【线程】ReentrantReadWriteLock 内部共享锁与排他锁源码剖析 (十一)

我的原则:先会用再说,内部慢慢来。
学以致用,根据场景学源码

文章目录

      • 一、概念
      • 二、ReentrantReadWriteLock 整体架构
      • 三、lock.readLock().lock() (读)剖析
      • 四、lock.writeLock().lock() (写)剖析
      • 五、write 锁释放 lock.writeLock().unlock();
      • 六、read 锁释放 lock.readLock().unlock();
          • 重点讲解下:else if (ws == 0 && !compareAndSetWaitStatus(h, 0, Node.PROPAGATE))
      • 七、场景分析
        • 场景一:thread1 在 read,thread2-threadN 接着 read
        • 场景二:thread1 在 read,thread1 准备来 write
        • 场景三:thread1 在 read,thread2 准备来 write
        • 场景四:thread1 在 read,thread1 重入 read (测试read重入)
        • 场景五:thread1 在 write,thread2-N 准备来 read
        • 场景六:thread1 在 write,thread2 准备来 write
        • 场景七:thread1 在 write ,thread1 准备来 read (测试降级)
        • 场景八:thread1 在 write, thread再次 write (测试write锁重入)
        • 场景九:thread_write_01持有锁,后面1读1写3读排队(测试读写混合唤醒)
      • 八、各个场景的分析结论:
      • 九、结论
      • 十、番外篇


一、概念

  1. 共享锁(SHARED): 读操作相关的锁。我正在read,任何人都可以 read。
  2. 排他锁(EXCLUSIVE): write 操作相关的锁,我正在write,别人不能write,不能read(避免不同的人读到的信息不一样)

二、ReentrantReadWriteLock 整体架构

【线程】ReentrantReadWriteLock 内部共享锁与排他锁源码剖析 (十一)_第1张图片

package java.util.concurrent.locks;
import java.util.concurrent.TimeUnit;
import java.util.Collection;

public class ReentrantReadWriteLock
        implements ReadWriteLock, java.io.Serializable {
    private static final long serialVersionUID = -6992448646407690164L;
    /** 读锁 */
    private final ReentrantReadWriteLock.ReadLock readerLock;
    /** 写锁 */
    private final ReentrantReadWriteLock.WriteLock writerLock;
    
    final Sync sync;

    /** 默认非公平锁 **/
    public ReentrantReadWriteLock() {
        this(false);
    }

    public ReentrantReadWriteLock(boolean fair) {
        sync = fair ? new FairSync() : new NonfairSync();
        readerLock = new ReadLock(this);
        writerLock = new WriteLock(this);
    }

    public ReentrantReadWriteLock.WriteLock writeLock() { return writerLock; }
    public ReentrantReadWriteLock.ReadLock  readLock()  { return readerLock; }


    abstract static class Sync extends AbstractQueuedSynchronizer {
    	private static final long serialVersionUID = 6317671515068378041L;
    	// 高16位是 read锁,低16位是 write 锁
        static final int SHARED_SHIFT   = 16;
        // read 锁的单位, write在低16位,所以单位是1,read锁在高16位,所以单位是 1 * 2 ^ 16
        static final int SHARED_UNIT    = (1 << SHARED_SHIFT);
        // read 锁最大的数量
        static final int MAX_COUNT      = (1 << SHARED_SHIFT) - 1;
        // write 锁最大的数量
        static final int EXCLUSIVE_MASK = (1 << SHARED_SHIFT) - 1;
        // 获取当前共享锁的数量,也就是 read 锁的数量。 直接右移 16 位,剩下的就是 read 锁的数量了
        static int sharedCount(int c)    { return c >>> SHARED_SHIFT; }
        /*  
         *  
         *  获取当前独占锁的数量,也就是 write 锁的数量 ,抹掉前面16位
         *	二进制运算: n & ( 2 ^ m - 1) == n mod (2 ^ m)
         *  比如: 7  & ( 2 ^ 2 -1 ) = 7 mod (2 ^ 2) = 3 
         *  也就是取余数操作可以用与运算来解决。
         */
        static int exclusiveCount(int c) { return c & EXCLUSIVE_MASK; }

		// 计数器
        static final class HoldCounter {
        	// 某个读线程重入的次数
            int count = 0;
            // tid表示该线程的tid字段的值
            final long tid = getThreadId(Thread.currentThread());
        }

        // 本地线程计数器
        static final class ThreadLocalHoldCounter
            extends ThreadLocal<HoldCounter> {
            // 重写初始化方法,在没有进行set的情况下,获取的都是该HoldCounter值	
            public HoldCounter initialValue() {
                return new HoldCounter();
            }
        }

        private transient ThreadLocalHoldCounter readHolds;
        private transient HoldCounter cachedHoldCounter;
       
        private transient Thread firstReader = null;
        private transient int firstReaderHoldCount;

        Sync() {
            readHolds = new ThreadLocalHoldCounter();
            setState(getState()); // ensures visibility of readHolds
        }
    }

    static final class NonfairSync extends Sync {}
    static final class FairSync extends Sync {}
    public static class ReadLock implements Lock, java.io.Serializable {}
    public static class WriteLock implements Lock, java.io.Serializable {}
    ...

}
  • 读写状态的设计
    【线程】ReentrantReadWriteLock 内部共享锁与排他锁源码剖析 (十一)_第2张图片
假设当前同步状态值为S,get和set的操作如下:
(1)获取写状态:
   		 S&0x0000FFFF:将高16位全部抹去

(2)获取读状态:
  	  	S>>>16:无符号补0,右移16位

(3)写状态加1:
    	 S+1

(4)读状态加1:
  S+(1<<16)即S + 0x00010000

在代码层的判断中,如果S不等于0,那么就有两种情况:
1. write 锁被获取:S&0x0000FFFF > 0
2. read 锁被获取:S>>>16 > 0

=== 点击查看top目录 ===

  • 独占锁与共享锁方法对照表
独占锁 共享锁
tryAcquire(int arg) tryAcquireShared(int arg)
tryAcquireNanos(int arg, long nanosTimeout) tryAcquireSharedNanos(int arg, long nanosTimeout)
acquire(int arg) acquireShared(int arg)
acquireQueued(final Node node, int arg) doAcquireShared(int arg)
acquireInterruptibly(int arg) acquireSharedInterruptibly(int arg)
doAcquireInterruptibly(int arg) doAcquireSharedInterruptibly(int arg)
doAcquireNanos(int arg, long nanosTimeout) doAcquireSharedNanos(int arg, long nanosTimeout)
release(int arg) releaseShared(int arg)
tryRelease(int arg) tryReleaseShared(int arg)
- doReleaseShared()

独占锁和共享锁的方法基本一一对应,加个 shared 就是共享锁的方法

三、lock.readLock().lock() (读)剖析

  • 看下 ReadLock#lock 方法
public void ReentrantReadWriteLock.ReadLock#lock() {
    sync.acquireShared(1);
}
  • 看下 AbstractQueuedSynchronizer#acquireShared 方法
public final void AbstractQueuedSynchronizer#acquireShared(int arg) {
    if (tryAcquireShared(arg) < 0)
    	// 返回 -1 才走这里,进入队列阻塞等待
        doAcquireShared(arg);
}
  • 看下 ReentrantReadWriteLock.Sync#tryAcquireShared 方法

protected final int ReentrantReadWriteLock.Sync#tryAcquireShared(int unused) {

    Thread current = Thread.currentThread();
    // 当前状态
    int c = getState();
    
    /*
    	画个重点:
    	 1. 如果 write 锁线程数不是0 ,但是如果是当前thread持有锁的话,同样可以去获取读锁。这里成为锁降级。
    	 2. 如果 write 锁线程数不是0, 但是其他 thread 来获取锁的话,直接就返回 -1了
     */	 
    // 如果 write 的独占锁线程数不等于0,并且不是当前thread,那么就返回 -1,表示获取锁失败
    if (exclusiveCount(c) != 0 &&
        getExclusiveOwnerThread() != current)
        return -1;

    // read 锁的数量
    int r = sharedCount(c);
    /* 
     * readerShouldBlock :
     * read 锁是否需要blocking。如是非公平锁 NonfairLock ,那么不用排队直接抢。
     * 如果是公平锁 FairLock,那么就判断下是否线程中有没有sync队列,如果没有,那么不用排队,如果有,判断下是不是重入,是的话,不用排队。
     */
    if (!readerShouldBlock() &&
    	// 看下是否撑爆炸了,read 锁的数量要小于最大数 MAX_COUNT
        r < MAX_COUNT &&
        // 设置一下 read 锁的数量
        compareAndSetState(c, c + SHARED_UNIT)) {

        if (r == 0) { //  1. read 锁数量是0 
            firstReader = current; 
            firstReaderHoldCount = 1; //第一个 reader 拿到了1个 read 锁
        } else if (firstReader == current) { // 2. 第一个 reader 重入
            firstReaderHoldCount++; // read 锁数量 ++
        } else { // 3. read 锁数量不是0,而且 firstReader 不是当前 thread
            HoldCounter rh = cachedHoldCounter; // 计数器
            // 计数器为空或者计数器上的 tid不是当前thread的tid
            if (rh == null || rh.tid != getThreadId(current))
            	// 获取当前thread的计数器
                cachedHoldCounter = rh = readHolds.get();
            else if (rh.count == 0)
            	// 数量是 0的话,set进去
                readHolds.set(rh);
            rh.count++;
        }
        return 1;
    }
    return fullTryAcquireShared(current);
}

代码细节分析:

  1. exclusiveCount(c),先判断 write 锁是否是0 ,不是的话,判断是否是当前线程,也不是的话,直接返回 -1

  2. !readerShouldBlock(), 判断该线程是否需要阻塞,需要的话 ,退出走 fullTryAcquireShared。

  3. r < MAX_COUNT, 判断下锁数量是否超出容量了,是的话,退出走 fullTryAcquireShared。

  4. compareAndSetState(c, c + SHARED_UNIT),CAS 设置 read 锁数量。 不成功的话,退出走 fullTryAcquireShared。

  5. (r == 0) ,上面步骤全部成功,如果 r ==0 也就是 read 锁数量是 0,那么设置第一个读线程firstReader和firstReaderHoldCount

  6. (firstReader == current),如果 r != 0 ,并且 firstReader == current,那么意味着重入,那么就直接 ++

  7. else,设置当前thread对应的HoldCounter的值。

  8. 假如返回 -1 之后,进入 doAcquireShared , 进行Sync队列排队,看下流程 acquireShared方法

  • doAcquireShared 方法 (重点注意里面的 setHeadAndPropagate 方法)
private void AbstractQueuedSynchronizer#doAcquireShared(int arg) {
    final Node node = addWaiter(Node.SHARED); //注意此处,加入的是 共享锁,addWaiter 方法,看一下之前的文章
    boolean failed = true;
    try {
        for (;;) {
            final Node p = node.predecessor();
            if (p == head) { //唤醒,是唤醒 同步队列的第一个
                int r = tryAcquireShared(arg);
                if (r >= 0) { // -1 没拿到锁,1 拿到了锁。
                    setHeadAndPropagate(node, r); // 这个是重点!!!这个会唤醒下一个持有共享锁的线程
                    p.next = null; // help GC
                    failed = false;
                    return;
                }
            }
            if (shouldParkAfterFailedAcquire(p, node) &&
                parkAndCheckInterrupt())
                interrupted = true;
        }
    } finally {
        if (failed)
            cancelAcquire(node);
    }
}
  • setHeadAndPropagate 方法
private void AbstractQueuedSynchronizer#setHeadAndPropagate(Node node, int propagate) {
    Node h = head; // Record old head for check below
    setHead(node);
    
    if (propagate > 0 || h == null || h.waitStatus < 0 ||
        (h = head) == null || h.waitStatus < 0) {
        Node s = node.next;
        if (s == null || s.isShared())
            doReleaseShared(); // 这里是重点啊!!!共享锁直接进来这个方法
    }
}

---

final boolean AbstractQueuedSynchronizer.Node#isShared() {
    return nextWaiter == SHARED;
}

private void AbstractQueuedSynchronizer#setHead(Node node) {
    head = node;
    node.thread = null;
    node.prev = null;
}

具体的入队列addWaiter ,阻塞shouldParkAfterFailedAcquire方法,看下 【线程】ReentrantLock 源码剖析 (八)

=== 点击查看top目录 ===

四、lock.writeLock().lock() (写)剖析

  • 看下 WriteLock#lock 方法
public void ReentrantReadWriteLock.WriteLock#lock() {
    sync.acquire(1);
}
  • 看下 acquire 方法
public final void AbstractQueuedSynchronizer#acquire(int arg) {
    if (!tryAcquire(arg) && // 返回true的话,就是拿到lock了,无需往下走了
        acquireQueued(addWaiter(Node.EXCLUSIVE), arg)) // tryAcquire返回了 false,走这里进入队列
        selfInterrupt();
}
  • 看下 tryAcquire 方法

protected final boolean ReentrantReadWriteLock.Sync#tryAcquire(int acquires) {
    Thread current = Thread.currentThread();
    int c = getState(); // 获取状态 
    int w = exclusiveCount(c); // 获取 write 锁数量
    if (c != 0) {
        // 如果 write 锁数量不是 0 或者说目前不是重入
        if (w == 0 || current != getExclusiveOwnerThread())
            return false; // 获取锁失败
        // 既然走到了这里,说明: w!= 0 && current == getExclusiveOwnerThread(),那么就是write数量不是0,并且是重入操作。
        if (w + exclusiveCount(acquires) > MAX_COUNT) //查看是否超限
            throw new Error("Maximum lock count exceeded");
        // Reentrant acquire
        setState(c + acquires); // 重入,状态 +1
        return true; //成功拿到锁
    }
    /*
     * 1. writer 是否应该阻塞。 NonfairSync一直不用阻塞。 FairSync的话,就看下队列中有没有排毒跌,有的话,就阻塞
     * 2. CAS 设置 state
     */
    if (writerShouldBlock() ||
        !compareAndSetState(c, c + acquires))
        return false; // 1.阻塞 或者:2.CAS设置status不成功。返回 false
    setExclusiveOwnerThread(current);
    return true;
}

=== 点击查看top目录 ===

五、write 锁释放 lock.writeLock().unlock();

  • unlock
public void WriteLock#unlock() {
    sync.release(1);
}
  • release
public final boolean AbstractQueuedSynchronizer#release(int arg) {
    if (tryRelease(arg)) {
        Node h = head;
        if (h != null && h.waitStatus != 0)
            unparkSuccessor(h);
        return true;
    }
    return false;
}
  • tryRelease
protected final boolean ReentrantReadWriteLock.Sync#tryRelease(int releases) {
    //若锁的持有者不是当前线程,抛出异常
    if (!isHeldExclusively())
        throw new IllegalMonitorStateException();
    //写锁的新线程数,正常-1
    int nextc = getState() - releases;
    //如果独占模式重入数为0了,说明独占模式write锁被释放
    boolean free = exclusiveCount(nextc) == 0;
    if (free)
        //若write锁的新线程数为0,则将锁的持有者设置为null
        setExclusiveOwnerThread(null);
    //设置写锁的新线程数
    //不管独占模式是否被释放,更新独占重入数
    setState(nextc);
    return free;
}

=== 点击查看top目录 ===

六、read 锁释放 lock.readLock().unlock();

public void ReentrantReadWriteLock.ReadLock#unlock() {
    sync.releaseShared(1);
}
  • releaseShared 方法
public final boolean AbstractQueuedSynchronizer#releaseShared(int arg) {
    if (tryReleaseShared(arg)) {
        doReleaseShared();
        return true;
    }
    return false;
}
  • tryReleaseShared 方法
protected final boolean tryReleaseShared(int unused) {
    // 获取当前线程
    Thread current = Thread.currentThread();
    if (firstReader == current) { // 当前线程为第一个读线程
        // assert firstReaderHoldCount > 0;
        if (firstReaderHoldCount == 1) // read 线程占用的资源数为1
            firstReader = null;
        else // 减少占用的资源
            firstReaderHoldCount--;
    } else { // 当前线程不为第一个读线程
        // 获取缓存的计数器
        HoldCounter rh = cachedHoldCounter;
        if (rh == null || rh.tid != getThreadId(current)) // 计数器为空或者计数器的tid不为当前正在运行的线程的tid
            // 获取当前线程对应的计数器
            rh = readHolds.get();
        // 获取计数
        int count = rh.count;
        if (count <= 1) { // 计数小于等于1
            // 移除
            readHolds.remove();
            if (count <= 0) // 计数小于等于0,抛出异常
                throw unmatchedUnlockException();
        }
        // 减少计数
        --rh.count;
    }
    for (;;) { // 无限循环
        // 获取状态
        int c = getState();
        // 获取状态
        int nextc = c - SHARED_UNIT;
        if (compareAndSetState(c, nextc)) // 比较并进行设置
            return nextc == 0;
    }
}
  • doReleaseShared 方法
private void AbstractQueuedSynchronizer#doReleaseShared() {
    for (;;) { // 一直在自旋
        Node h = head;
        if (h != null && h != tail) {
            int ws = h.waitStatus;
            if (ws == Node.SIGNAL) {
                if (!compareAndSetWaitStatus(h, Node.SIGNAL, 0))
                    continue;            // loop to recheck cases
                unparkSuccessor(h);
            }
            else if (ws == 0 &&
                     !compareAndSetWaitStatus(h, 0, Node.PROPAGATE))
                continue;                // loop on failed CAS
        }
        if (h == head)                   // loop if head changed
            break;
    }
}
重点讲解下:else if (ws == 0 && !compareAndSetWaitStatus(h, 0, Node.PROPAGATE))
  • 分析一下,如何同时满足上面2个条件,紧接着走 continue ?

  • 情形:在释放共享锁的一瞬间,有Node加入进来获取共享锁了

  • 情形一:

看上图开始讲解:

具体的入队列addWaiter ,阻塞shouldParkAfterFailedAcquire方法,看下 【线程】ReentrantLock 源码剖析 (八)

基础: doAcquireSharedInterruptibly 内有 addWaiter 方法,addWaiter 内有 enq 方法

流程分析:

0. 在最开始的时候,就是盘古开天辟地的时候,AbstractQueuedSynchronizer#addWaiter会进入内部的enq方法,也就是图内左。好,现在有这个线程调用到了 doReleaseShared 方法。(高并非条件下,最极端的情况下,会出现我下面要讲解的情况)
1. doAcquireSharedInterruptibly 准备进入 addWaiter
2. 看左上图,一开始head是null,现在开始设置 head : compareAndSetHead(new Node()) 已经完成
3. 看右图,这时候 (h!= null && h !=tail) ,满足,进去
4. 看左上图,这时候开始设置 tail = head,一定比3先,否则3进不去
5. 看右图,ws这个时候 == 0 条件满足。准备进入 && 后面的compareAndSetWaitStatus
6. 看左下图 ,shouldParkAfterFailedAcquire 方法把 head 的waitStatus设置成了 -1,返回 false。暂时先不管后续for
7. 看右图,compareAndSetWaitStatus(h, 0, Node.PROPAGATE))  这里waitStatus已经从0被改成 -1,所以CAS设置失败。
8. 上面条件满足,走continue9. 重新进入 for ,这时候 ws == Node.SIGNAL ,唤醒线程。
  • 情形二:假如,把上面的 67 步骤调换一下,会是什么场景?
6.看右图,compareAndSetWaitStatus(h, 0, Node.PROPAGATE))  CAS设置成功。
7.看左下图 ,shouldParkAfterFailedAcquire 方法把 head 的waitStatus设置成了 -1,返回 false。暂时先不管后续for
8.看右图, h == head,break 跳出,跳出这个 doReleaseShared 方法
9.看左下图 ,步骤7 继续走 shouldParkAfterFailedAcquire 返回 false。然后继续for循环,重新进入 setHeadAndPropagate 方法。
10. 重新进入 doReleaseShared 方法。这时候 ws == Node.SIGNAL ,唤醒线程。

=== 点击查看top目录 ===

七、场景分析

  1. 场景一:thread1 在 read,thread2-threadN 接着 read
  2. 场景二:thread1 在 read,thread1 准备来 write
  3. 场景三:thread1 在 read,thread2 准备来 write
  4. 场景四:thread1 在 read,thread1 重入 read (测试read重入)
  5. 场景五:thread1 在 write,thread2-N 准备来 read
  6. 场景六:thread1 在 write,thread2 准备来 write
  7. 场景七:thread1 在 write ,thread1 准备来 read (测试降级)
  8. 场景八:thread1 在 write, thread再次 write (测试write锁重入)
  9. 场景九:thread_write_01持有锁,后面1读1写3读排队(测试读写混合唤醒)

场景一:thread1 在 read,thread2-threadN 接着 read

代码:

public class _14_01_TestReadWriteLock {
    public static void main(String[] args) throws Exception {
        ReentrantReadWriteLock lock = new ReentrantReadWriteLock();
        for (int i = 0; i < 5; i++) {
            new Thread(() -> {
                System.out.println(Thread.currentThread().getName() + " wait to lock ...");
                lock.readLock().lock();
                System.out.println(Thread.currentThread().getName() + " get the lock ... ===");
                System.out.println("点击任意键唤醒线程 ...");
                Scanner sc = new Scanner(System.in);
                sc.nextLine();
                try {
                    Thread.sleep(1000);
                } catch (Exception e) {
                    e.printStackTrace();
                } finally {
                    System.out.println(Thread.currentThread().getName() + " ready to unlock ...");
                    lock.readLock().unlock();
                }
            }, "Read_" + i).start();
        }
    }
}

输出:

Read_0 wait to lock ...
Read_1 wait to lock ...
Read_1 get the lock ... ===
点击任意键唤醒线程 ...
Read_0 get the lock ... ===
点击任意键唤醒线程 ...
Read_2 wait to lock ...
Read_2 get the lock ... ===
点击任意键唤醒线程 ...
Read_3 wait to lock ...
Read_3 get the lock ... ===
点击任意键唤醒线程 ...
Read_4 wait to lock ...
Read_4 get the lock ... ===
点击任意键唤醒线程 ...


Read_3 ready to unlock ...
Read_2 ready to unlock ...
Read_1 ready to unlock ...
Read_0 ready to unlock ...
Read_4 ready to unlock ...

结论:

在第一个thread并未释放锁的时候,其他thread不阻塞,直接获取锁,往下跑。
  • readLock共享锁解析
    【线程】ReentrantReadWriteLock 内部共享锁与排他锁源码剖析 (十一)_第3张图片
    如图,全部线程都跑到这个地方,直接 return 1,那么看下方法 acquireShared 直接就结束了,中途没有阻塞,直接拿到锁。

=== 点击查看top目录 ===

场景二:thread1 在 read,thread1 准备来 write

看下代码:

public class _14_02_TestReadWriteLock {
	public static void main(String[] args) throws Exception{
		new Thread(() -> {
			ReadWriteLock lock = new ReentrantReadWriteLock();
			System.out.println(Thread.currentThread().getName() + " wait to read lock  ...");
			lock.readLock().lock();
			System.out.println(Thread.currentThread().getName() + " get the read lock ... ===");


			System.out.println(Thread.currentThread().getName() + " wait to lock write ...");
			lock.writeLock().lock();
			System.out.println(Thread.currentThread().getName() + " get the lock write ...");

			System.out.println(Thread.currentThread().getName() + " ready to unlock read ...");
			lock.readLock().unlock();

			System.out.println(Thread.currentThread().getName() + " ready to unlock write ...");
			lock.writeLock().unlock();
		}).start();
	}
}

输出:

Thread-0 wait to read lock  ...
Thread-0 get the read lock ... ===
Thread-0 wait to lock write ...
... 阻塞当中 ...

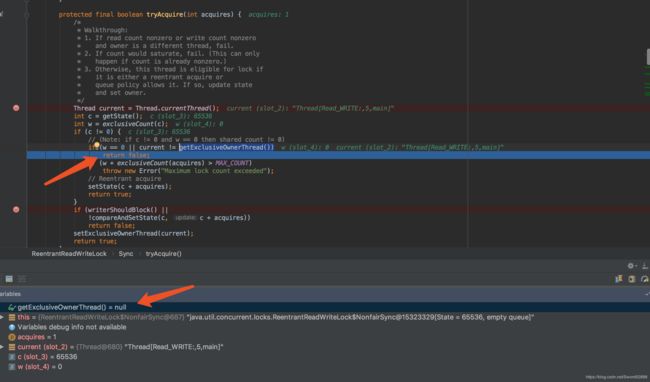
上面代码,read锁已经获得,但是write锁阻塞,read锁无法释放,上面死锁了。

  • write独占锁解析
    【线程】ReentrantReadWriteLock 内部共享锁与排他锁源码剖析 (十一)_第4张图片

注意上方的 c = getState() = 65536 ,刚刚好是 2的 16次方,因为read锁是在 高16位,所以 read 锁数量是1的话,那么就是 65536,真正的数量右移 16位。

【线程】ReentrantReadWriteLock 内部共享锁与排他锁源码剖析 (十一)_第5张图片

【线程】ReentrantReadWriteLock 内部共享锁与排他锁源码剖析 (十一)_第6张图片
=== 点击查看top目录 ===

场景三:thread1 在 read,thread2 准备来 write

同理,堵塞,等待 thread1 释放read 锁,释放后,可以获得锁

  • write独占锁解析
    【线程】ReentrantReadWriteLock 内部共享锁与排他锁源码剖析 (十一)_第7张图片
    代码
// 场景三:thread1 在 read,thread2 准备来 write
public class _14_03_TestReadWriteLock {
	public static void main(String[] args) throws Exception{
		ReadWriteLock lock = new ReentrantReadWriteLock();
		new Thread(() -> {
			System.out.println(Thread.currentThread().getName() + " wait to read lock  ...");
			lock.readLock().lock();
			System.out.println(Thread.currentThread().getName() + " get the read lock ... ===");

			System.out.println("点击任意键唤醒线程 ...");
			Scanner sc = new Scanner(System.in);
			sc.nextLine();
			System.out.println(Thread.currentThread().getName() + " ready to unlock read ...");
			lock.readLock().unlock();

		}).start();

		Thread.sleep(2000);

		for (int i = 0; i < 5; i++) {
			new Thread(() -> {
				System.out.println(Thread.currentThread().getName() + " wait to lock write ...");
				lock.writeLock().lock();
				System.out.println(Thread.currentThread().getName() + " get the lock write ...");

				System.out.println(Thread.currentThread().getName() + " ready to unlock write ...");
				lock.writeLock().unlock();
			}).start();
		}
	}
}

输出:

Thread-0 wait to read lock  ...
Thread-0 get the read lock ... ===
点击任意键唤醒线程 ...
Thread-1 wait to lock write ...
Thread-2 wait to lock write ...
Thread-3 wait to lock write ...
Thread-4 wait to lock write ...
Thread-5 wait to lock write ...

Thread-0 ready to unlock read ...
Thread-1 get the lock write ...
Thread-1 ready to unlock write ...
Thread-2 get the lock write ...
Thread-2 ready to unlock write ...
Thread-3 get the lock write ...
Thread-3 ready to unlock write ...
Thread-4 get the lock write ...
Thread-4 ready to unlock write ...
Thread-5 get the lock write ...
Thread-5 ready to unlock write ...

=== 点击查看top目录 ===

场景四:thread1 在 read,thread1 重入 read (测试read重入)

代码:

// 场景四:thread1 在 read,thread1 重入 read
public class _14_07_TestReadWriteLock {
    public static void main(String[] args) throws Exception {
        new Thread(() -> {
            ReadWriteLock lock = new ReentrantReadWriteLock();

            System.out.println(Thread.currentThread().getName() + " wait to read lock ...");
            lock.readLock().lock();
            System.out.println(Thread.currentThread().getName() + " get the read lock ... ===");

            lock.readLock().lock();
            System.out.println(Thread.currentThread().getName() + " get the read lock2 ... ===");

            lock.readLock().lock();
            System.out.println(Thread.currentThread().getName() + " get the read lock3 ... ===");


            System.out.println(Thread.currentThread().getName() + " ready to read unlock ...");
            lock.readLock().unlock();

            System.out.println(Thread.currentThread().getName() + " ready to read unlock2 ...");
            lock.readLock().unlock();

            System.out.println(Thread.currentThread().getName() + " ready to read unlock3 ...");
            lock.readLock().unlock();
        }).start();
    }
}

输出:

Thread-0 wait to read lock ...
Thread-0 get the read lock ... ===
Thread-0 get the read lock2 ... ===
Thread-0 get the read lock3 ... ===
Thread-0 ready to read unlock ...
Thread-0 ready to read unlock2 ...
Thread-0 ready to read unlock3 ...
  • read共享锁解析
    【线程】ReentrantReadWriteLock 内部共享锁与排他锁源码剖析 (十一)_第8张图片
    === 点击查看top目录 ===

场景五:thread1 在 write,thread2-N 准备来 read

代码:

public class _14_05_TestReadWriteLock {
	public static void main(String[] args) throws Exception{
		ReadWriteLock lock = new ReentrantReadWriteLock();
		new Thread(() -> {
			System.out.println(Thread.currentThread().getName() + " wait to write lock  ...");
			lock.writeLock().lock();
			System.out.println(Thread.currentThread().getName() + " get the write lock ... ===");

			System.out.println("点击任意键唤醒线程 ...");
			Scanner sc = new Scanner(System.in);
			sc.nextLine();
			System.out.println(Thread.currentThread().getName() + " ready to unlock write ...");
			lock.writeLock().unlock();

		}).start();

		Thread.sleep(5000);

		for (int i = 0; i < 5; i++) {
			new Thread(() -> {
				System.out.println(Thread.currentThread().getName() + " wait to read lock  ... ");
				lock.readLock().lock();
				System.out.println(Thread.currentThread().getName() + " get the read lock ... ===");
				System.out.println(Thread.currentThread().getName() + " ready to read unlock  ...");
				lock.readLock().unlock();
			}).start();
		}
	}
}

输出:

Thread-0 wait to write lock  ...
Thread-0 get the write lock ... ===
点击任意键唤醒线程 ...
Thread-1 wait to read lock  ... 
Thread-2 wait to read lock  ... 
Thread-3 wait to read lock  ... 
Thread-4 wait to read lock  ... 
Thread-5 wait to read lock  ... 

Thread-0 ready to unlock write ...
Thread-1 get the read lock ... ===
Thread-1 ready to read unlock  ...
Thread-2 get the read lock ... ===
Thread-2 ready to read unlock  ...
Thread-3 get the read lock ... ===
Thread-3 ready to read unlock  ...
Thread-5 get the read lock ... ===
Thread-5 ready to read unlock  ...
Thread-4 get the read lock ... ===
Thread-4 ready to read unlock  ...

read共享锁解析

【线程】ReentrantReadWriteLock 内部共享锁与排他锁源码剖析 (十一)_第9张图片

=== 点击查看top目录 ===

场景六:thread1 在 write,thread2 准备来 write

代码

public class _14_06_TestReadWriteLock {
	public static void main(String[] args) throws Exception{
		ReadWriteLock lock = new ReentrantReadWriteLock();
		new Thread(() -> {
			System.out.println(Thread.currentThread().getName() + " wait to write lock  ...");
			lock.writeLock().lock();
			System.out.println(Thread.currentThread().getName() + " get the write lock ... ===");

			System.out.println("点击任意键唤醒线程 ...");
			Scanner sc = new Scanner(System.in);
			sc.nextLine();
			System.out.println(Thread.currentThread().getName() + " ready to unlock write ...");
			lock.writeLock().unlock();
		}).start();

		Thread.sleep(5000);

		new Thread(() -> {
			System.out.println(Thread.currentThread().getName() + " wait to write lock  ... ");
			lock.writeLock().lock();
			System.out.println(Thread.currentThread().getName() + " get the write lock ... ===");
			System.out.println(Thread.currentThread().getName() + " ready to write unlock  ...");
			lock.writeLock().unlock();
		}).start();
	}
}

输出:

Thread-0 wait to write lock  ...
Thread-0 get the write lock ... ===
点击任意键唤醒线程 ...
Thread-1 wait to write lock  ... 

Thread-0 ready to unlock write ...
Thread-1 get the write lock ... ===
Thread-1 ready to write unlock  ...
  • write独占锁解析
    【线程】ReentrantReadWriteLock 内部共享锁与排他锁源码剖析 (十一)_第10张图片
    这个地方会在 acquireQueued(addWaiter(Node.EXCLUSIVE), arg) 方法进行排队,acquireQueued + addWaiter 的底层,看一下: 上一章节:【线程】ReentrantLock 源码剖析 (八)

sync 队列如下图,先排队,等待被notify
【线程】ReentrantReadWriteLock 内部共享锁与排他锁源码剖析 (十一)_第11张图片

=== 点击查看top目录 ===

场景七:thread1 在 write ,thread1 准备来 read (测试降级)

代码:

public class _14_07_TestReadWriteLock {
	public static void main(String[] args) throws Exception{
		new Thread(() -> {
			ReadWriteLock lock = new ReentrantReadWriteLock();

			System.out.println(Thread.currentThread().getName() + " wait to write lock ...");
			lock.writeLock().lock();
			System.out.println(Thread.currentThread().getName() + " get the write lock ... ===");

			System.out.println(Thread.currentThread().getName() + " wait to read lock ...");
			lock.readLock().lock();
			System.out.println(Thread.currentThread().getName() + " get the read lock  ... ===");

			System.out.println(Thread.currentThread().getName() + " ready to unlock read...");
			lock.readLock().unlock();

			System.out.println(Thread.currentThread().getName() + " ready to unlock write ...");
			lock.writeLock().unlock();
		}).start();
	}
}

输出:

Thread-0 wait to write lock ...
Thread-0 get the write lock ... ===
Thread-0 wait to read lock ...
Thread-0 get the read lock  ... ===
Thread-0 ready to unlock read...
Thread-0 ready to unlock write ...

看下图: 在 write锁被持有,并且getExclusiveOwnerThread() == current的情况下,顺利拿到 read 锁。

  • read共享锁解析
    【线程】ReentrantReadWriteLock 内部共享锁与排他锁源码剖析 (十一)_第12张图片

=== 点击查看top目录 ===

场景八:thread1 在 write, thread再次 write (测试write锁重入)

代码

// 场景八:thread1 在 write, thread再次 write (测试write锁重入)
public class _14_08_TestReadWriteLock {
    public static void main(String[] args) throws Exception {
        new Thread(() -> {
            ReadWriteLock lock = new ReentrantReadWriteLock();

            System.out.println(Thread.currentThread().getName() + " wait to write lock ...");
            lock.writeLock().lock();
            System.out.println(Thread.currentThread().getName() + " get the write lock ... ===");

            lock.writeLock().lock();
            System.out.println(Thread.currentThread().getName() + " get the write lock2 ... ===");

            lock.writeLock().lock();
            System.out.println(Thread.currentThread().getName() + " get the write lock3 ... ===");

            System.out.println(Thread.currentThread().getName() + " ready to write unlock ...");
            lock.writeLock().unlock();

            System.out.println(Thread.currentThread().getName() + " ready to write unlock2 ...");
            lock.writeLock().unlock();

            System.out.println(Thread.currentThread().getName() + " ready to write unlock3 ...");
            lock.writeLock().unlock();
        }).start();
    }
}

输出:

Thread-0 wait to write lock ...
Thread-0 get the write lock ... ===
Thread-0 get the write lock2 ... ===
Thread-0 get the write lock3 ... ===
Thread-0 ready to write unlock ...
Thread-0 ready to write unlock2 ...
Thread-0 ready to write unlock3 ...
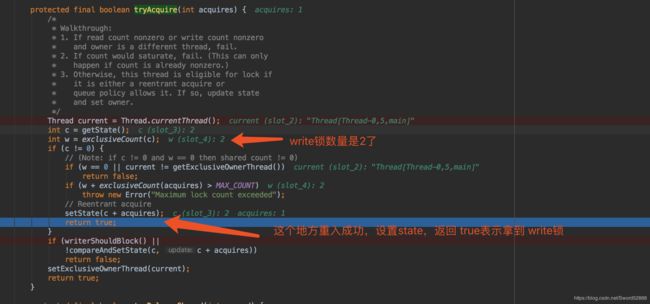
  • write独占锁解析
    【线程】ReentrantReadWriteLock 内部共享锁与排他锁源码剖析 (十一)_第13张图片
    === 点击查看top目录 ===

场景九:thread_write_01持有锁,后面1读1写3读排队(测试读写混合唤醒)

// 场景九:thread_write_01持有锁,后面1读1写3读排队(测试读写混合唤醒)
public class _14_09_TestReadWriteLock {
    public static void main(String[] args) throws Exception {

        ReentrantReadWriteLock lock = new ReentrantReadWriteLock();

        // 1. 上一个 write 锁
        new Thread(() -> {
            System.out.println(Thread.currentThread().getName() + " wait to write lock ...");
            lock.writeLock().lock();

            Scanner sc = new Scanner(System.in);
            System.out.println("点击任意键唤醒线程 ...");
            sc.nextLine();

            System.out.println(Thread.currentThread().getName() + " ready to write unlock ...");
            lock.writeLock().unlock();

        },"write_01").start();


        // 确保上面代码先执行
        Thread.sleep(1000);

        // 2. 上一个 read 锁
        new Thread(() -> {
                System.out.println(Thread.currentThread().getName() + " wait to write lock ...");
                lock.readLock().lock();

                System.out.println(Thread.currentThread().getName() + " ready to write unlock ...");
                lock.readLock().unlock();

        },"read").start();

        // 确保上面代码先执行
        Thread.sleep(1000);

        // 3. 上一个 write 锁
        new Thread(() -> {
            System.out.println(Thread.currentThread().getName() + " wait to write lock ...");
            lock.writeLock().lock();

            System.out.println(Thread.currentThread().getName() + " ready to write unlock ...");
            lock.writeLock().unlock();

        },"write_02").start();

        // 确保上面代码先执行
        Thread.sleep(1000);

        // 4. 上3个 read 锁
        for (int i = 0; i < 3; i++) {
            new Thread(() -> {
                System.out.println(Thread.currentThread().getName() + " wait to write lock ...");
                lock.readLock().lock();

                System.out.println(Thread.currentThread().getName() + " ready to write unlock ...");
                lock.readLock().unlock();

            },"read_0" + i).start();
        }
    }
}

输出:

write_01 wait to write lock ...
点击任意键唤醒线程 ...
read wait to write lock ...
write_02 wait to write lock ...
read_00 wait to write lock ...
read_01 wait to write lock ...
read_02 wait to write lock ...

write_01 ready to write unlock ...
read ready to write unlock ...
write_02 ready to write unlock ...
read_01 ready to write unlock ...
read_02 ready to write unlock ...
read_00 ready to write unlock ...

同步 Sync 队列如下图:
【线程】ReentrantReadWriteLock 内部共享锁与排他锁源码剖析 (十一)_第14张图片
【线程】ReentrantReadWriteLock 内部共享锁与排他锁源码剖析 (十一)_第15张图片
这个场景的重点在于,read锁被唤醒的过程中,依次唤醒后面的读锁。主要是看被唤醒后的操作doAcquireShared 方法 被唤醒后走 setHeadAndPropagate 方法

八、各个场景的分析结论:

  1. thread1 拿到read锁的时候,thread2想read可以。(共享锁可以共享)
  2. thread1 拿到read锁的时候,thread1想write不行。(锁无法升级)
  3. thread1 拿到read锁的时候,thread2想write不行。
  4. thread1 拿到read锁的时候,thread1想再次read可以。 (重入ok)
  5. thread1 拿到write锁的时候,thread2想read不行。(独占锁不允许共享)
  6. thread1 拿到write锁的时候,thread2 想 write不行。(独占锁不允许共享)
  7. thread1 拿到write锁的时候,thread1想read可以。(锁降级了)
  8. thread1 拿到write锁的时候,thread1想write可以。 (重入ok)

所以:

  1. 一个线程要想同时持有写锁和读锁,必须先获取写锁再获取读锁;
  2. 写锁可以“降级”为读锁;读锁不能“升级”为写锁。

=== 点击查看top目录 ===

九、结论

而readwrite锁有以下三个重要的特性:

(1)公平选择性:支持非公平(默认)和公平的锁获取方式,吞吐量还是非公平优于公平。

(2)重进入:读锁和写锁都支持线程重进入。

(3)锁降级:遵循获取写锁、获取读锁再释放写锁的次序,写锁能够降级成为读锁

=== 点击查看top目录 ===

十、番外篇

下一章节:【线程】线程八锁与Synchronzied内部原理(十二)
上一章节:【线程】ReentrantLock 内部公平锁与非公平锁实现 (十)

你可能感兴趣的:(java,线程)