Mask RCNN目标检测源码运行笔记(Demo模式)
1. 论文基本信息
- 论文标题:Mask R-CNN
- 论文作者:Kaiming He(Facebook AI Research (FAIR))等人
- 论文出处:ICCV 2017
- 在线阅读:https://arxiv.org/pdf/1703.06870.pdf
- 源码链接:https://github.com/facebookresearch/maskrcnn-benchmark
2. 运行环境
- NVIDIA GTX 1070
- Ubuntu 18.04 x64
- gcc/g++ 7.4.0
- CUDA 10.0 (cuda_10.0.130_410.48_linux.run)
- Anaconda 3
- Python 3.7
- PyTorch 1.3.0 for CUDA 10.0
只需要预先安装好gcc/g++ 7.4.0、CUDA 10.0和Anaconda即可,其他依赖包(包括PyTorch)会在下一节会的详细环境搭建步骤进行安装。
3. 准备
S1. 运行如下命令安装matplotlib后端:
sudo apt-get install tcl-dev tk-dev python-tk python3-tk
S2. 在自己的工作区目录中,运行如下命令下载源码包,也可以手工复制链接在浏览器下载:
git clone https://github.com/facebookresearch/maskrcnn-benchmark.git
S3. cd到maskrcnn-benchmark目录中,然后运行如下命令创建虚拟环境并激活:
conda create --name maskrcnn_benchmark python=3.7
conda activate maskrcnn_benchmark
S4. 继续保持在maskrcnn-benchmark目录和刚刚激活的虚拟环境中,然后运行如下命令编写简易安装脚本:
gedit install.sh
在打开的gedit空白编辑界面中,粘贴如下文本:
# this installs the right pip and dependencies for the fresh python
conda install ipython pip

# maskrcnn_benchmark and coco api dependencies
pip install ninja yacs cython matplotlib tqdm opencv-python requests

# follow PyTorch installation in https://pytorch.org/get-started/locally/
# we give the instructions for CUDA 10.0
conda install -c pytorch pytorch-nightly torchvision cudatoolkit=10.0

export INSTALL_DIR=$PWD

# install pycocotools
cd $INSTALL_DIR
git clone https://github.com/cocodataset/cocoapi.git
cd cocoapi/PythonAPI
python setup.py build_ext install

# install cityscapesScripts
cd $INSTALL_DIR
git clone https://github.com/mcordts/cityscapesScripts.git
cd cityscapesScripts/
python setup.py build_ext install

# install apex
cd $INSTALL_DIR
git clone https://github.com/NVIDIA/apex.git
cd apex
python setup.py install --cuda_ext --cpp_ext

# install PyTorch Detection
cd $INSTALL_DIR
git clone https://github.com/facebookresearch/maskrcnn-benchmark.git
cd maskrcnn-benchmark

# the following will install the lib with
# symbolic links, so that you can modify
# the files if you want and won't need to
# re-build it
python setup.py build develop


unset INSTALL_DIR

# or if you are on macOS
# MACOSX_DEPLOYMENT_TARGET=10.9 CC=clang CXX=clang++ python setup.py build develop
粘贴完成后,保存并关闭gedit,回到终端。
S5. 在终端中运行:
chmod 777 install.sh
./install.sh
在执行install.sh的过程中,中间会询问是否继续,输入y即可继续安装。
注 1: 若install过程中出现网络问题导致中断,可以重新执行./install.sh。
注 2: 若install过程中提示形如socket.timeout: The read operation timed out的错误,多半是网络不好导致某个文件没有下载下来,这时直接copy链接手工下载安装相应的包即可。
4. Demo
S1. 在终端中cd到源码内部的demo目录。
S2. 运行如下命令新建一个示例源码:
gedit demo2.py
在文本编辑器中粘贴如下内容:
import matplotlib
matplotlib.use('TkAgg')

import matplotlib.pyplot as plt
import matplotlib.pylab as pylab

import requests
from io import BytesIO
from PIL import Image
import numpy as np

# this makes our figures bigger
pylab.rcParams['figure.figsize'] = 20, 12

from maskrcnn_benchmark.config import cfg
from predictor import COCODemo

config_file = "../configs/caffe2/e2e_mask_rcnn_R_50_FPN_1x_caffe2.yaml"

# update the config options with the config file
cfg.merge_from_file(config_file)
# manual override some options
# cpu or cuda
cfg.merge_from_list(["MODEL.DEVICE", "cuda"])

coco_demo = COCODemo(
    cfg,
    min_image_size=800,
    confidence_threshold=0.7,
)

def load(url):
    """
    Given an url of an image, downloads the image and
    returns a PIL image
    """
    response = requests.get(url)
    pil_image = Image.open(BytesIO(response.content)).convert("RGB")
    # convert to BGR format
    image = np.array(pil_image)[:, :, [2, 1, 0]]
    return image

def imshow(img):
    plt.imshow(img[:, :, [2, 1, 0]])
    plt.axis("off")

# from http://cocodataset.org/#explore?id=345434
image = load("https://farm3.staticflickr.com/2469/3915380994_2e611b1779_z.jpg")
image2 = image[:, :, [2, 1, 0]]
plt.imshow(image2)
plt.show()

# compute predictions
predictions = coco_demo.run_on_opencv_image(image)
imshow(predictions)
plt.show()
S3. 粘贴完毕,关闭gedit,回到终端。
S4. 在终端中运行:
python demo2.py
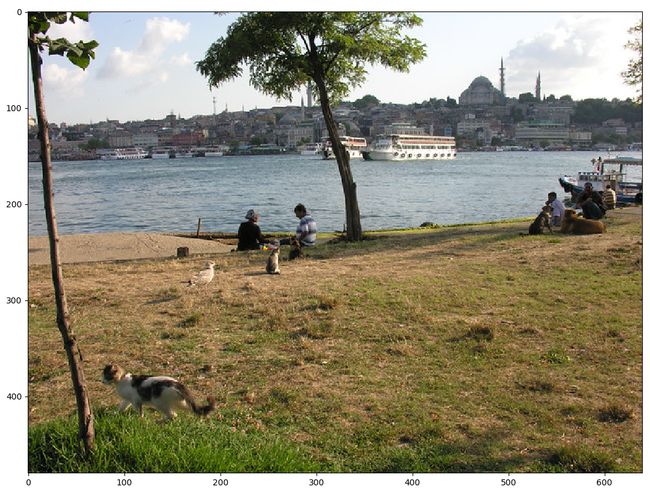
运行时,源码会先后显示原图和检测/分割后的图,只有关闭了第一个窗口,程序才会继续运行,如下图所示:

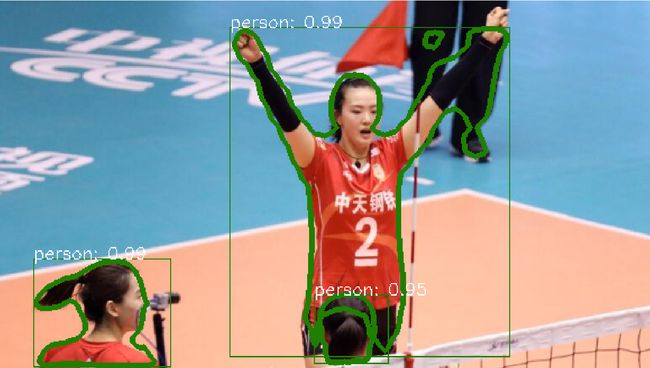
注: 如果上述图像的url难以访问,网速缓慢,也可以自己换一个图片链接,比如:https://inews.gtimg.com/newsapp_ls/0/10947814918_580328/0,运行的效果如下图所示:
参考资料:
https://github.com/facebookresearch/maskrcnn-benchmark/blob/master/INSTALL.md