CC3200——管脚的细节
虽然这一章非常基础,但是对于后面的操作至关重要,为后面打好基础。
首先每个管脚都有三个名称,在不同的配置函数中使用的不同的名称。
1、CC3200一共有64个引脚,名称依次为PIN_01、PIN_02 ..... PIN_64;
2、在这64个引脚中,有27个可以当做普通GPIO口使用,官方说法是多达27个独立可编程的复用GPIO引脚。因为CC3200的每个引脚都有很多功能可以选择,所以这27个引脚中,只有部分引脚的GPIO功能是该引脚的默认功能,其他只有在启动复用功能时才能作为GPIO使用,默认不是GPIO,具体复用功能几需要查阅《数据手册》中的表格。这些具有GPIO功能的引脚又有一套名字,分别为GPIO0,GPIO1,.....,GPIO31,但是这套名字在函数中貌似用不到,到现在我还没有发现,只是起到计算后面那个名字的作用。
3、CC3200将32个(其实能用的只有27个,其他几个是保留功能,不能使用)GPIO引脚又分为四组,GPIOA0,GPIOA1 ,GPIOA2, GPIOA3,库文件中是下面这样定义每个组的基地址的:
#define GPIOA0_BASE             0x40004000
#define GPIOA1_BASE             0x40005000
#define GPIOA2_BASE             0x40006000
#define GPIOA3_BASE             0x40007000
#define GPIOA4_BASE             0x40024000
至于为什么库文件中又定义了GPIOA4_BASE,我还不清楚,可能为了兼容其他的芯片吧。
每组中分别包含8个GPIO:
所以对于GPIOA0组,包含32个GPIO中的GPIO0-GPIO7;
所以对于GPIOA1组,包含32个GPIO中的GPIO8-GPIO15;
所以对于GPIOA2组,包含32个GPIO中的GPIO16-GPIO23;
所以对于GPIOA3组,包含32个GPIO中的GPIO24-GPIO31;
每组中的GPIO引脚的名字都为GPIO_PIN_0到GPIO_PIN_7,这个名字在函数中经常用到,用到时要和他所在的组一起出现。需要注意的是,3200中的GPIO操作是按位操作的,因此GPIO_PIN_0到GPIO_PIN_7是像下面这样定义的。
#define GPIO_PIN_0              0x00000001  // GPIO pin 0
#define GPIO_PIN_1              0x00000002  // GPIO pin 1
#define GPIO_PIN_2              0x00000004  // GPIO pin 2
#define GPIO_PIN_3              0x00000008  // GPIO pin 3
#define GPIO_PIN_4              0x00000010  // GPIO pin 4
#define GPIO_PIN_5              0x00000020  // GPIO pin 5
#define GPIO_PIN_6              0x00000040  // GPIO pin 6
#define GPIO_PIN_7              0x00000080  // GPIO pin 7
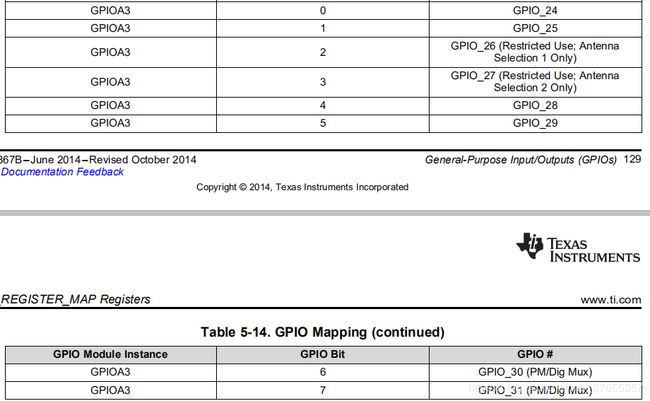
在CC3200..manual手册中有这样一个表,方便查询:
4、example:流水灯的GPIO的操作
(1)查看板子原理图,找到LED所接入的引脚
(2)比如,LED5对应GPIO11,在数据手册中找到GPIO11所对应的64位命名下的引脚编号
因此,GPIO11是PIN2引脚在模式0下的功能。
(3)在manual手册中找到GPIO11所在的分组,以及它在该分组中的名字
![]()
所以它在GPIOA1组,名字为GPIO_PIN_3
(4)调用库函数实现GPIO的配置
使能时钟:
MAP_PRCMPeripheralClkEnable(PRCM_GPIOA1, PRCM_RUN_MODE_CLK);
配置引脚的功能选择以及模式选择
MAP_PinTypeGPIO(PIN_64, PIN_MODE_0, false);
配置GPIO的输入输出方向
MAP_GPIODirModeSet(GPIOA1_BASE, GPIO_PIN_1, GPIO_DIR_MODE_OUT);
之后就可以对该GPIO进行写或者读操作了。
如果配置为了输出方向,那么可以利用GPIOPinWrite()来进行端口的置位和复位操作,函数原型为:
但是要注意,置位复位是按照bit进行的操作的,8位二进制数中的0bit代表GPIO_PIN_0,1bit代表GPIO_PIN_1...
因此,要想置位GPIO_PIN_5,上面函数的ucVal需要传入00100000=0X20,其实只要bit5为1即可,其他位不影响。
比如需要点亮LED5,通过上面的分析可以知道它在GPIOA1组,名字为GPIO_PIN_3,因此置位它需要这样:
GPIOPinWrite(GPIOA1_BASE,GPIO_PIN_3,0X20);
5、利用库函数快速实现
上面的一大堆计算和分析实在麻烦,但是官方SDK给了很好的函数方便实现。在gpio_if.c中下面是最有用的两个。
(1)计算给定GPIO的分组和组内名称
//****************************************************************************
//
//! Get the port and pin of a given GPIO
//!
//! \param ucPin is the pin to be set-up as a GPIO (0:39)
//! \param puiGPIOPort is the pointer to store GPIO port address  return value
//! \param pucGPIOPin is the pointer to store GPIO pin return  value
//!
//! This function
//!    1. Return the GPIO port address and pin for a given  external pin number
//!
//! \return None.
//
//****************************************************************************
void
GPIO_IF_GetPortNPin(unsigned char ucPin,
                    unsigned int *puiGPIOPort,
                    unsigned char *pucGPIOPin)
{
    //
    // Get the GPIO pin from the external Pin number
    //
    *pucGPIOPin = 1 << (ucPin % 8);
    //
    // Get the GPIO port from the external Pin number
    //
    *puiGPIOPort = (ucPin / 8);
    *puiGPIOPort = ulReg[*puiGPIOPort];
}
(2)指定引脚的置位复位:
//****************************************************************************
//
//! Set a value to the specified GPIO pin
//!
//! \param ucPin is the GPIO pin to be set (0:39)
//! \param uiGPIOPort is the GPIO port address
//! \param ucGPIOPin is the GPIO pin of the specified port
//! \param ucGPIOValue is the value to be set
//!
//! This function
//!    1. Sets a value to the specified GPIO pin
//!
//! \return None.
//
//****************************************************************************
void
GPIO_IF_Set(unsigned char ucPin,
             unsigned int uiGPIOPort,
             unsigned char ucGPIOPin,
             unsigned char ucGPIOValue)
{
    //
    // Set the corresponding bit in the bitmask
    //
    ucGPIOValue = ucGPIOValue << (ucPin % 8);
    //
    // Invoke the API to set the value
    //
    GPIOPinWrite(uiGPIOPort,ucGPIOPin,ucGPIOValue);
}


