Django开发个人网站——个人信息管理和头像上传操作
用户信息修改与头像上传
知识要点:管理个人信息,头像上传与裁剪
上期文章:密码修改与操作
B站视频:Django开发个人网站
个人信息编辑
我们在进行任何操作时,只要涉及到数据部分,都需要设计数据库,现在让我们先看一看我们的设计的个人信息数据模型。
class UserProfile(models.Model):
    user = models.OneToOneField(User, on_delete=models.CASCADE)
    birth = models.CharField(max_length=100, blank= True, default="konw")
    phone = models.CharField(max_length=100, blank=True)
    school = models.CharField(max_length=100, blank=True)
    company = models.CharField(max_length=100, blank=True)
    profession = models.CharField(max_length=100, blank=True)
    address = models.CharField(max_length=100, blank=True)
    about = models.TextField(blank=True)
    photo = models.ImageField(blank=True)

    def __str__(self):
        return 'user:{}'.format(self.user.username)
我们对个人信息添加了一些内容,这些内容包括 school,company,profession,address,about,photo,当然别忘了在表单中添加它们。
class UserProfileForm(forms.ModelForm):
    class Meta:
        model = UserProfile
        fields = ('user', 'birth', 'phone', 'school', 'company', 'profession', 'address', 'about','photo')
下面就是对数据的操作处理部分了,编辑views.py:
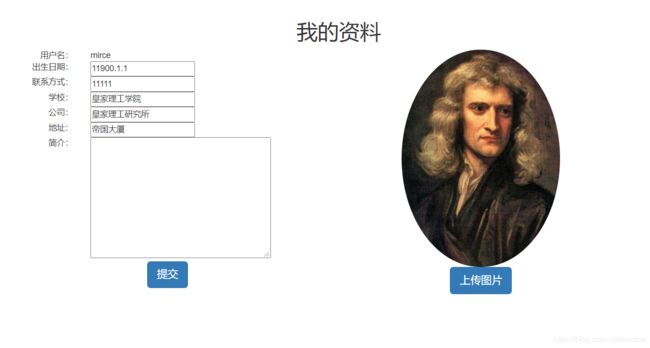
首先是个人信息的展示部分,编写infor_show函数:
@login_required(login_url='/account/login/')
def infor_show(request):
    userinfo = UserProfile.objects.get(user=request.user)
    return render(request,"account/infor_show.html",{'userinfo':userinfo})
这个函数很简单,就是将从数据库中去得到个人信息数据返回给前端。
根据views.py,我们需要编写一个infor_show.html页面:
{% extends "base.html" %}
{% load static %}
{% block title %}我的信息{% endblock %}
{% block content %}

    我的资料


            用户名:


            {{ userinfo.user.username }}


                出生日期:


                {{ userinfo.birth }}


                联系方式:


                {{ userinfo.phone }}


                学校:


                {{ userinfo.school }}


                公司:


                {{ userinfo.company }}


                地址:


                {{ userinfo.address }}


                简介:


                {{ userinfo.about }}


        MY PICTURE


{% endblock %}
这个页面就是展示用户的个人信息,其中 MY PICTURE
下一步就是要编写用户修改信息的部分了,在views.py中增加info_edit函数:
@login_required(login_url='/account/login/')
def infor_edit(request):
    if request.method == "POST":
        userprofile = UserProfileForm(request.POST)
        user_info = UserProfile.objects.get(user=request.user)
        if userprofile.is_valid():
            return HttpResponse('输入数据错误,请重试')
        else:
            cd = userprofile.cleaned_data
            user_info.birth = cd['birth']
            user_info.phone = cd['phone']
            user_info.school = cd['school']
            user_info.company = cd['company']
            user_info.profession = cd['profession']
            user_info.address = cd['address']
            user_info.save()
            return HttpResponseRedirect(reverse('account:info_show'))


    else:
        user_info = UserProfile.objects.get(user=request.user)
        userprofile = UserProfileForm(initial={
                                            'birth': user_info.birth,
                                            'phone': user_info.phone,
                                            'school': user_info.school,
                                            'company': user_info.company,
                                            'profession': user_info.profession,
                                            'about': user_info.about,
                                            'address': user_info.address}
        )
        return render(request,'account/info_edit.html', {'user_info': userprofile})
这与以前写的将用户填写的数据保存到数据库并没有任何不同,这里不再详细介绍,来看下面这段代码:
user_info = UserProfile.objects.get(user=request.user) #1
userprofile = UserProfileForm(initial={					#2
    'birth': user_info.birth,
    'phone': user_info.phone,
    'school': user_info.school,
    'company': user_info.company,
    'profession': user_info.profession,
    'about': user_info.about,
    'address': user_info.address}
                             )
我们首先从UserProfile中取出数据,代码userprofile = UserProfileForm(initial={})是在表单实例化时赋予默认值,表单参数inital就是表单实例化时初始化,由于用户已经在数据库中保存了信息,所以我们在表单实例化时先从数据库中取出相应的数据在表单中展示出来,便于用户看到以前数据。
下一步就是编写模板页面了,新建info_edit.html:
{% extends 'base.html' %}
{% load static %}
{% block title %}编辑信息{% endblock %}
{% block content %}
{% load static %}
 {% endblock %}
至此,个人信息修改部分已经编写完成了。
图像处理
头像处理部分涉及到对图片的操作,处理起来较为麻烦,使用插件可以帮助我们简化开发过程。
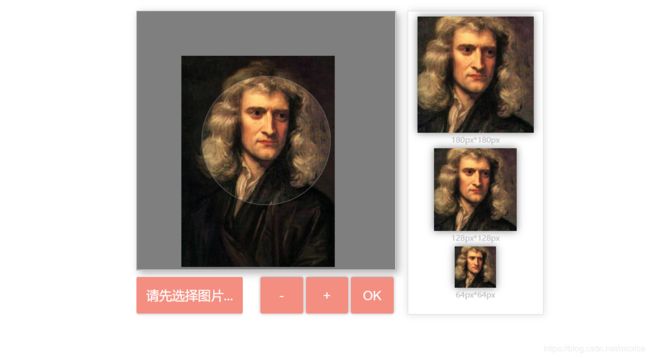
这里借助ImgCrop,在网络上下载ImgCrop包,我们将包里的style.css这个文件更名为imagecrop.css并放到我们项目里的静态资源中,将jquery-1.11.1.min.js和cropbox-min.js也放入到静态资源中。
编写我们的头像上传页面。新建imgcrop.html模板,将我们下载包里的index.html中的部分代码复制到这个模板中。
{% comment %}头像裁剪页面{% endcomment %}
{% load static %}
<link rel="stylesheet" href="{% static 'css/imagecrop.css' %}">
<div class="container">
<div class="imageBox">
<div class="thumBox">div>
<div class="spinner" style="display: none">div>
div>
<div class="action">
<div class="new-contentarea tc">
<a href="javascript:void(0)" class="upload-img">
<label for="upload-file">请选择图片label>
a>
div>
<input type="button" id="btnCrop" class="Btnsty_peyton" value="OK">
<input type="button" id="btnZoomIn" class="Btnsty_peyton" value="+">
<input type="button" id="btnZoomOut" class="Btnsty_peyton" value="-">
div>
<div class="cropped">div>
div>
<script type="text/javascript" src="{% static 'js/jquery-1.11.1.min.js' %}">script>
<script type="text/javascript" src="{% static 'js/cropbpx-min.js' %}">script>
<script type="text/javascript" src="{% static 'js/csrf.js' %}">script>
<script type="text/javascript">
var options ={
thumbBox: '.thumbBox',
spinner: '.spinner',
imgSrc: ''
};
var cropper = $('.imageBox').cropbox(options);
var img = '';
$('#upload-file').on('change',function(){
var reader = new FileReader();
reader.onload = function(e){
options.imgSrc = e.target.result;
cropper = $('.imageBox').cropbox(options);
};
reader.readAsDataURL(this.files[0]);
});
$('#btnCrop').on('click',function(){
$.ajax({
url:'{% url "account:my_image" %}',
type:"POST",
data:{"img":img},
success:function(e){
if(e=='1'){
parent.location.reload();
}
else{
layer.alert("图片上传失败");
}
},
});
});
function getImg(){
img = cropper.getDataURL();
$('.cropped').html('');
$('.cropped').append(' +img+'" align="absmiddle" style="width:180px;margin-top:4px; border-radius:180px; box-shadow:0px 0px 12px #7E7E7E;">
180px*180px
');
$('.cropped').append(' +img+'" align="absmiddle" style="width:128px;margin-top:4px; border-radius:128px; box-shadow:0px 0px 12px #7E7E7E;">
128px*128px
');
$('.cropped').append(' +img+'" align="absmiddle" style="width:180px;margin-top:4px; border-radius:64px; box-shadow:0px 0px 12px #7E7E7E;">
64px*64px
');
}
$(".imageBox").on("mouseup",function(){
getImg();
});
$("#btnZoomIn").on("mouseup",function(){
cropper.zoomIn();
});
$("#btnZoomOut").on("mouseup",function(){
cropper.zoomOut();
});
script>
这段代码是插件原来带有的,我们在直接复制时注意修改css和js静态资源路径,此外,我们在确定按钮上绑定了一个ajax请求事件。
在数据库中存储图片需要在数据模型中设置一下字段:
编辑models.py和forms.py::
……
# models.py
photo = models.ImageField(blank=True)

# forms.py
……
fields = ('user', 'birth', 'phone', 'school', 'company', 'profession', 'address', 'about','photo')
修改完成后别忘了迁移数据库
在imgcrop.html页面中,可以看到使用ajax向后端传送了图片数据,在后端需要对这些数据做出响应,编写views.py:
@login_required(login_url="/account/image")
def my_image(request):
    if request.method=="POST":
        img = request.POST['img']
        userProfile = UserProfile.objects.get(user=request.user.id)
        userProfile.photo = img
        userProfile.save()
        return HttpResponse('1')
    else:
        return render(request,'account/imagecrop.html')
这个视图函数就是将传送过来的图片保存至数据库,保存成功后会返回一个“1”,ajax根据返回的数据做出相应的操作。
配置urls.py:
……
path('my-image/', views.my_image, name="my_image"),
在浏览器中输入**local host:8000/accout/my-image/**即可访问到头像上传页面。
在个人信息的页面中需要添加头像。
将infor_show.html中的 MY PICTURE
{% load static %}


