用vue-cli3搭建ui库(仿elementUI)
文章目录
- 用vue-cli3初始化项目
- 修改项目结构
- 先写个测试demo
- 1. packages下新建文件夹test,结构如下:
- 2. examples进行测试
- 3. examples展示markdown文件
- 4. 像elementui 一样的 可操作展示
用vue-cli3初始化项目

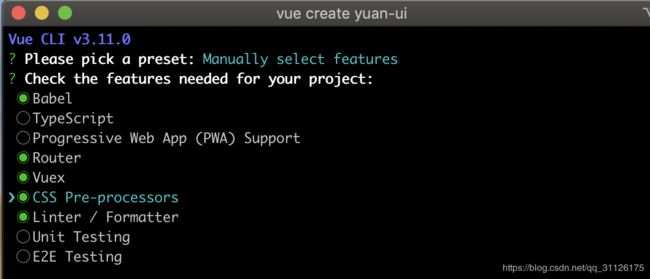
css 选了sass
lint 选了ESLint + Prettier
vscode 可下载eslint插件,配置保存自动格式化代码
个人配置如下(首选项–>设置)
{
    "eslint.autoFixOnSave": true,
    "eslint.options": {
        "extensions": [
            ".js",
            ".vue"
        ]
    },
    "eslint.validate": [
        "javascript",
        {
            "language": "vue",
            "autoFix": true
        },
        "html",
        "vue"
    ],
}
修改项目结构
- 把 src 目录名字改成
examples,这是用于展示组件示例的 - 在根目录下新建一个
packages文件夹,这是用来放组件的 - 在根目录下新建一个 vue.config.js 文件
const path = require('path')
module.exports = {
  // 修改 pages 入口
  pages: {
    index: {
      entry: 'examples/main.js', // 入口
      template: 'public/index.html', // 模板
      filename: 'index.html' // 输出文件
    }
  },
  // 扩展 webpack 配置
  chainWebpack: config => {
    // @ 默认指向 src 目录,这里要改成 examples
    // 另外也可以新增一个 ~ 指向 packages
    config.resolve.alias
      .set('@', path.resolve('examples'))
      .set('~', path.resolve('packages'))

    // 把 packages 和 examples 加入编译,因为新增的文件默认是不被 webpack 处理的
    config.module
      .rule('js')
      .include.add(/packages/).end()
      .include.add(/examples/).end()
      .use('babel')
      .loader('babel-loader')
      .tap(options => {
        // 修改它的选项...
        return options
      })
  }
}
先写个测试demo
1. packages下新建文件夹test,结构如下:
packages
  └── test
     ├── index.js
     └── src
         └── test.vue
test.vue 组件内容
<template>
<div>
<button @click="add">{{ num }}button>
div>
template>
<script>
export default {
name: "YuanTest", // 这个名字很重要,它就是未来的标签名test/index.js 暴露组件 针对单个组件的安装,因为 Vue.use() 会默认调用 install 方法安装.
// 为组件提供 install 方法,供组件对外按需引入
import YuanTest from "./src/test";
YuanTest.install = Vue => {
  Vue.component(YuanTest.name, YuanTest);
};
export default YuanTest;
全局安装 ,在packages的根目录下,创建index,js,用于循环安装所有组件
import YuanTest from "./test";
// 所有组件列表
const components = [YuanTest];
// 定义 install 方法,接收 Vue 作为参数
const install = function(Vue) {
  // 判断是否安装,安装过就不继续往下执行
  if (install.installed) return;
  install.installed = true;
  // 遍历注册所有组件
  components.map(component => Vue.component(component.name, component));
  // 下面这个写法也可以
  // components.map(component => Vue.use(component))
};

// 检测到 Vue 才执行,毕竟我们是基于 Vue 的
if (typeof window !== "undefined" && window.Vue) {
  install(window.Vue);
}

export default {
  install,
  // 所有组件,必须具有 install,才能使用 Vue.use()
  ...components
};
2. examples进行测试
examples/main.js 添加以下内容
//导入组件
import YuanUI from "../packages/index";
//注册组件
Vue.use(YuanUI);
examples/views/Home.vue 调用组件
<template>
  <div>
    <yuan-test>yuan-test>
  div>
template>

<script>
export default {};
script>

<style>style>
3. examples展示markdown文件
element-ui的示例文件都是markdown的.
- 安装 vue-markdown-loader
npm i vue-markdown-loader -D
npm i  vue-loader vue-template-compiler -D
或者
yarn add vue-markdown-loader vue-loader vue-template-compiler -D
高亮样式
npm i highlight.js -D 或者 yarn add highlight.js
- vue.config.js 添加
module.exports = {
  ...
  chainWebpack: config => {
    ...
    config.module.rule('md')
      .test(/\.md/)
      .use('vue-loader')
      .loader('vue-loader')
      .end()
      .use('vue-markdown-loader')
      .loader('vue-markdown-loader/lib/markdown-compiler')
      .options({
        raw: true
      })
  }
}
- 测试使用 在home.vue中,写如下代码,并在同级新建
test.md文件,写入## test文本
<template>
  <div>
    <test>test>
  div>
template>

<script>
import test from "./test.md";
import "highlight.js/styles/github.css";
export default {
  components: {
    test
  }
};
script>
<style>style>
现在基本能用了,我们调整下展示页面的布局
examples
├── App.vue
├── assets
│   └── logo.png
├── components   页面布局的组件
├── docs         文档
│   └── test.md
├── main.js
├── router.js
├── store.js
└── store.js
为方便展示,将页面布局样式全放在了app.vue中,可根据个人需要,自行拆分成组件放在components,并在app.vue中引用.
App.vue
<template>
  <div id="app">

    <div class="header">div>
    <div class="main">

      <div class="sidebar">
        <router-link to="test">testrouter-link>
      div>
      <div class="view">
        <router-view>router-view>
      div>
    div>

    <div class="footer">div>
  div>
template>

<script>
export default {};
script>

<style lang="scss">
html,
body {
  margin: 0;
}
.header,
.footer {
  height: 60px;
  background-color: antiquewhite;
}
.main {
  min-height: calc(100vh - 120px);
  display: flex;
}
.sidebar {
  width: 200px;
}
.view {
  flex: 1;
}
style>
router.js
import Vue from "vue";
import Router from "vue-router";

Vue.use(Router);

export default new Router({
  mode: "history",
  base: process.env.BASE_URL,
  routes: [
    {
      path: "/",
      name: "test",
      component: () => import("@/docs/test.md")
      //component: r => require.ensure([], () => r(require(`@/docs/test.md`)))
    }
  ]
});
4. 像elementui 一样的 可操作展示
markdown-it 渲染 markdown 基本语法
markdown-it-anchor 为各级标题添加锚点
markdown-it-container 用于创建自定义的块级容器
vue-markdown-loader 核心loader
transliteration 中文转拼音
highlight.js 代码块高亮实现
vue.config.js
const path = require("path");
const md = require("markdown-it")(); // 引入markdown-it
const slugify = require("transliteration").slugify; // 引入transliteration中的slugify方法
module.exports = {
// 修改 pages 入口
pages: {
index: {
entry: "examples/main.js", // 入口
template: "public/index.html", // 模板
filename: "index.html" // 输出文件
}
},
parallel: false, //解决打包时含script标签,报错问题 https://github.com/QingWei-Li/vue-markdown-loader/issues/61
// 扩展 webpack 配置
chainWebpack: config => {
// @ 默认指向 src 目录,这里要改成 examples
// 另外也可以新增一个 ~ 指向 packages
config.resolve.alias
.set("@", path.resolve("examples"))
.set("~", path.resolve("packages"));
// 把 packages 和 examples 加入编译,因为新增的文件默认是不被 webpack 处理的
config.module
.rule("js")
.include.add(/packages/)
.end()
.include.add(/examples/)
.end()
.use("babel")
.loader("babel-loader")
.tap(options => {
// 修改它的选项...
return options;
});
//markdown
config.module
.rule("md")
.test(/\.md/)
.use("vue-loader")
.loader("vue-loader")
.end()
.use("vue-markdown-loader")
.loader("vue-markdown-loader/lib/markdown-compiler")
// .loader(path.resolve(__dirname, "./md-loader/index.js"));//element-ui的md处理在md-loader中,这里没有使用.处理方式在下面
.options({
raw: true,
preventExtract: true, //这个加载器将自动从html令牌内容中提取脚本和样式标签
// 定义处理规则
preprocess: (MarkdownIt, source) => {
// 对于markdown中的table,
MarkdownIt.renderer.rules.table_open = function() {
return '';
};
// 对于代码块去除v - pre, 添加高亮样式;
const defaultRender = md.renderer.rules.fence;
MarkdownIt.renderer.rules.fence = (
tokens,
idx,
options,
env,
self
) => {
const token = tokens[idx];
// 判断该 fence 是否在 :::demo 内
const prevToken = tokens[idx - 1];
const isInDemoContainer =
prevToken &&
prevToken.nesting === 1 &&
prevToken.info.trim().match(/^demo\s*(.*)$/);
if (token.info === "html" && isInDemoContainer) {
return `
${md.utils.escapeHtml(
token.content
)}`;
}
return defaultRender(tokens, idx, options, env, self);
};
return source;
},
use: [
// 标题锚点
[
require("markdown-it-anchor"),
{
level: 2, // 添加超链接锚点的最小标题级别, 如: #标题 不会添加锚点
slugify: slugify, // 自定义slugify, 我们使用的是将中文转为汉语拼音,最终生成为标题id属性
permalink: true, // 开启标题锚点功能
permalinkBefore: true // 在标题前创建锚点
}
],
// :::demo ****
//
// :::
//匹配:::后面的内容 nesting == 1,说明:::demo 后面有内容
//m为数组,m[1]表示 ****
[
require("markdown-it-container"),
"demo",
{
validate: function(params) {
return params.trim().match(/^demo\s*(.*)$/);
},
render: function(tokens, idx) {
const m = tokens[idx].info.trim().match(/^demo\s*(.*)$/);
if (tokens[idx].nesting === 1) {
//
const description = m && m.length > 1 ? m[1] : ""; // 获取正则捕获组中的描述内容,即::: demo xxx中的xxx
const content =
tokens[idx + 1].type === "fence"
? tokens[idx + 1].content
: "";
return `
${content}
${description ? `<div>${md.render(description)}` : ""}
`;
}
return "";
}
}
],
[require("markdown-it-container"), "tip"],
[require("markdown-it-container"), "warning"]
]
});
}
};
demoblock.vue代码省略,地址查看
高亮 main.js
import Vue from "vue";
import App from "./App.vue";
import router from "./router";
import store from "./store";
import hljs from "highlight.js";
//导入组件
import YuanUI from "../packages/index";
import DemoBlock from "./components/DemoBlock.vue";
import "~/theme-chalk/src/index.scss"; //组件样式
import "./assets/styles/common.scss"; //公共样式
import "./demo-styles/index.scss"; //文档 展示样式
Vue.component("DemoBlock", DemoBlock);
router.afterEach(route => {
Vue.nextTick(() => {
const blocks = document.querySelectorAll("pre code:not(.hljs)");
Array.prototype.forEach.call(blocks, hljs.highlightBlock);
});
});
//注册组件
Vue.use(YuanUI);
new Vue({
router,
store,
render: h => h(App)
}).$mount("#app");
test.md
## tip
:::tip
需要注意的是,覆盖字体路径变量是必需的,将其赋值为 Element 中 icon 图标所在的相对路径即可。
:::
## warning
:::warning
Input 为受控组件,它**总会显示 Vue 绑定值**。
通常情况下,应当处理 `input` 事件,并更新组件的绑定值(或使用`v-model`)。否则,输入框内显示的值将不会改变。
不支持 `v-model` 修饰符。
:::
## demo
:::demo
```html
你可能感兴趣的:(vue,Element)
