上篇我们了解了window的创建过程和添加视图的流程,但是顶级视图DecorView是怎么被加载的呢?其实这个过程非常简单,分析下setContentView的过程,一切就明了了。
一、关系介绍
public class PhoneWindow extends Window implements MenuBuilder.Callback {
      ...
      //窗口顶层
    View private DecorView mDecor;
    //所有自定义View的根View, id="@android:id/content"
    private ViewGroup mContentParent;
     ...
}
先交代下PhoneWindow 与DecorView 以及mContentParent的关系:mDecor是窗口顶层视图,mContentParent是mDecor上content framelayout的父容器,用来装xml解析出来的view树。
二、setContent流程
2.1.setContentView
// Activity.java
public void setContentView(@LayoutRes int layoutResID) {
        getWindow().setContentView(layoutResID);
        initWindowDecorActionBar();
 }
然而setContentView是window的一个抽象方法,真正实现类是PhoneWindow. 这个方法有3个重载:
@Override
public void setContentView(int layoutResID) {
   ...
        mLayoutInflater.inflate(layoutResID, mContentParent);
   ...
}

@Override
public void setContentView(View view) {
    setContentView(view, new ViewGroup.LayoutParams(MATCH_PARENT, MATCH_PARENT));
}

@Override
public void setContentView(View view, ViewGroup.LayoutParams params) {
    ...
        mContentParent.addView(view, params);
    ...
}
看上去是3个,其实是2个,这两个重载的区别的,一个是解析xml视图,一个是直接传入视图。那么我们就看相对复杂点的xml解析的。
//PhoneWindow


    @Override
    public void setContentView(int layoutResID) {
        if (mContentParent == null) {

//1.初始化
        //创建DecorView对象和mContentParent对象 ,并将mContentParent关联到DecorView上
            installDecor();
        } else if (!hasFeature(FEATURE_CONTENT_TRANSITIONS)) {
            mContentParent.removeAllViews();//Activity转场动画相关
        }

//2.填充Layout
        if (hasFeature(FEATURE_CONTENT_TRANSITIONS)) {
            final Scene newScene = Scene.getSceneForLayout(mContentParent, layoutResID,
                    getContext());
            transitionTo(newScene);//Activity转场动画相关
        } else {
        //将Activity设置的布局文件,加载到mContentParent中
            mLayoutInflater.inflate(layoutResID, mContentParent);
        }

        //让DecorView的内容区域延伸到systemUi下方,防止在扩展时被覆盖,达到全屏、沉浸等不同体验效果。
        mContentParent.requestApplyInsets();

//3. 通知Activity布局改变
        final Callback cb = getCallback();
        if (cb != null && !isDestroyed()) {

        //触发Activity的onContentChanged方法
            cb.onContentChanged();
        }
        mContentParentExplicitlySet = true;
    }
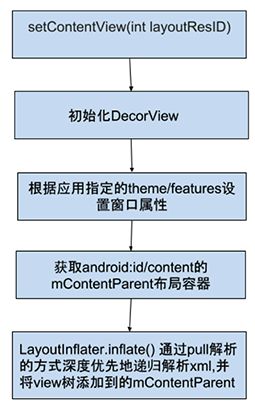
(1) 初始化 : Activity第一次调用setContentView,则会调用installDecor()方法创建DecorView对象和mContentParent对象。FEATURE_CONTENT_TRANSITIONS表示是否使用转场动画。如果内容已经加载过,并且不需要动画,则会调用removeAllViews移除内容以便重新填充Layout。
(2) 填充Layout : 初始化完毕,如果设置了FEATURE_CONTENT_TRANSITIONS,就会创建Scene完成转场动画。否则使用布局填充器将布局文件填充至mContentParent。到此为止,Activity的布局文件已经添加到DecorView里面了,所以可以理解Activity的setContentView方法的由来,因为布局文件是添加到DecorView的mContentParent中,所以方法名为setContentView无可厚非。
那么核心方法就两个:installDecor() 和 mLayoutInflater.inflate(layoutResID, mContentParent),下面来一一介绍。
2.2 installDecor
//PhoneWindow
private void installDecor() {
    mForceDecorInstall = false;
    if (mDecor == null) {
        mDecor = generateDecor(-1);// 创建 DecorView
       mDecor.setDescendantFocusability(ViewGroup.FOCUS_AFTER_DESCENDANTS);
        mDecor.setIsRootNamespace(true);
        if (!mInvalidatePanelMenuPosted && mInvalidatePanelMenuFeatures != 0) {
            mDecor.postOnAnimation(mInvalidatePanelMenuRunnable);
        }
    } else {
        mDecor.setWindow(this);
    }
    if (mContentParent == null) {
         //根据窗口的风格修饰,选择对应的修饰布局文件,并且将id为content的FrameLayout赋值给mContentParent
        mContentParent = generateLayout(mDecor);
       …  //初始化一堆属性值
    }
}
generateDecor(-1)很简单,就是new DecorView
重点关注下 mContentParent = generateLayout(mDecor);
protected ViewGroup generateLayout(DecorView decor) {
   //1,为Activity配置相应属性,即android:theme=“”,PhoneWindow对象调用getWindowStyle()方法获取值。
   TypedArray a = getWindowStyle();
    ...
   //2,获取窗口Features, 设置相应的修饰布局文件,这些xml文件位于frameworks/base/core/res/res/layout下
   int layoutResource;
   int features = getLocalFeatures();//指定requestFeature()指定窗口修饰符,PhoneWindow对象调用getLocalFeature()方法获取值;
    ...
    mDecor.startChanging();
    //3, 将上面选定的布局文件inflate为View树,添加到decorView中
   mDecor.onResourcesLoaded(mLayoutInflater, layoutResource);
    //4,将窗口修饰布局文件中id="@android:id/content"的View赋值给mContentParent, 后续自定义的view/layout都将是其子View
   ViewGroup contentParent = (ViewGroup)findViewById(ID_ANDROID_CONTENT);
    ...
    mDecor.finishChanging();
   return contentParent;
}
installDecor() 做了这么几件事:
1) 创建一个DecorView的对象mDecor,该mDecor对象将作为整个应用窗口的根视图。
2) 配置不同窗口修饰属性(style theme等)。
3) 将DecorView布局中id为content的FrameLayou的Viewt赋值给mContentParent
至此,DecorView 的 contentView 大容器已经设置完成, 但是里面并没有内容,原因是用户自定义的xml文件还没有解析加载到contentView上。
2.3 LayoutInflater.inflate(layoutResID, mContentParent)解析加载视图
获取LayoutInflater实例两种方式:
LayoutInflater lif = LayoutInflater.from(Context context);

LayoutInflater lif = (LayoutInflater) context.getSystemService(Context.LAYOUT_INFLATER_SERVICE);
from只不过是对下面方式的一种封装而已。来看看inflate方法,然后你会发现无论哪个inflate的重载方法最后都调运了inflate(XmlPullParser parser, ViewGroup root, boolean attachToRoot)方法,那么分析下这个方法就好了:
//LayoutInflater
public View inflate(XmlPullParser parser, @Nullable ViewGroup root, boolean attachToRoot) {
synchronized (mConstructorArgs) {
Trace.traceBegin(Trace.TRACE_TAG_VIEW, "inflate");
final Context inflaterContext = mContext;
final AttributeSet attrs = Xml.asAttributeSet(parser);
Context lastContext = (Context) mConstructorArgs[0];
mConstructorArgs[0] = inflaterContext;
//定义返回值,初始化为传入的形参root
View result = root;
try {
//寻找根结点,开始xml pull解析过程
int type;
while ((type = parser.next()) != XmlPullParser.START_TAG &&
type != XmlPullParser.END_DOCUMENT) {
// Empty
}
if (type != XmlPullParser.START_TAG) {
throw new InflateException(parser.getPositionDescription()
+ ": No start tag found!");
}
final String name = parser.getName();
if (DEBUG) {
System.out.println("**************************");
System.out.println("Creating root view: "
+ name);
System.out.println("**************************");
}
if (TAG_MERGE.equals(name)) {
if (root == null || !attachToRoot) {
throw new InflateException("典型的pull解析的方式,深度优先地递归解析xml,一层层添加到root view上,最终返回root view.解析的部分大致包含两点:1.解析出View对象,2.解析View对应的Params,并设置给View。
而我们看到LayoutInflater.inflate(layoutResID, mContentParent),传进去的是mContentParent,也就是最终root view就是mContentParent。xml布局解析完毕,且add到了mContentParent上。
至此DecorView视图组建完成。
稍微总结一下流程:
2.3、DecorView的添加
当启动Activity调运完ActivityThread的main方法之后,接着调用ActivityThread类performLaunchActivity来创建要启动的Activity组件,在创建Activity组件的过程中,还会为该Activity组件创建窗口对象和视图对象;接着Activity组件创建完成之后,通过调用ActivityThread类的handleResumeActivity将它激活。
我们从ActivityThread的handleLaunchActivity()方法开始
private void handleLaunchActivity(ActivityClientRecord r, Intent customIntent, String reason) {
...
Activity a = performLaunchActivity(r, customIntent);
...
}
``
performLaunchActivity中:

通过Instrumentation.newActivity的方法创建Activity, 在之后activity执行attach方法会初始化PhoneWindow.

另外在
``
final void handleResumeActivity(IBinder token,
        boolean clearHide, boolean isForward, boolean reallyResume, int seq, String reason) {
…
if (r.window == null && !a.mFinished && willBeVisible) {
    r.window = r.activity.getWindow();
    View decor = r.window.getDecorView();
    decor.setVisibility(View.INVISIBLE);
    ViewManager wm = a.getWindowManager();
    WindowManager.LayoutParams l = r.window.getAttributes();
   ...
    if (a.mVisibleFromClient && !a.mWindowAdded) {
        a.mWindowAdded = true;
        wm.addView(decor, l);
    }
}
…
     if (r.activity.mVisibleFromClient) {
         r.activity.makeVisible();
     }
...
}
再看下Activity的makeVisible方法:
void makeVisible() {
    if (!mWindowAdded) {
        ViewManager wm = getWindowManager();
        wm.addView(mDecor, getWindow().getAttributes());
        mWindowAdded = true;
    }
    mDecor.setVisibility(View.VISIBLE); //显示DecorView
}
首先我们都看到了
  ViewManager wm = a.getWindowManager();
   wm.addView(decor, l);
添加了decorView, 追下下实现类:WindowManagerImpl ,看看addView方法:
@Override
public void addView(@NonNull View view, @NonNull ViewGroup.LayoutParams params) {
    applyDefaultToken(params);
    mGlobal.addView(view, params, mContext.getDisplay(), mParentWindow);
}
这个mGlobal 即:WindowManagerGlobal, 那就看他的addView方法:
public void addView(View view, ViewGroup.LayoutParams params,
        Display display, Window parentWindow) {
   ...
    ViewRootImpl root;
    View panelParentView = null;
   ...
        root = new ViewRootImpl(view.getContext(), display);
        view.setLayoutParams(wparams);
        mViews.add(view);
        mRoots.add(root);
        mParams.add(wparams);
    }
    // do this last because it fires off messages to start doing things
    try {
        root.setView(view, wparams, panelParentView);
    } catch (RuntimeException e) {
       ...
    }
}
创建ViewRootImpl, 并将DecorView添加到ViewRootImpl上,那么添加的动作是setView 看下:
public void setView(View view, WindowManager.LayoutParams attrs, View panelParentView) {
    synchronized (this) {
         if (mView == null) {
             mView = view;
            //发起绘制流程
            requestLayout();
             …
            //设置ViewRootImpl为DecorView的父控件
           view.assignParent(this);
            ...
        }
     }
 }
好了到这大概已经清楚了整个布局加载流程,其实非常简单,就是创建DecorView,并把xml的View树解析出来,加到DecorView上,形成完整的View组件的过程。下一节接着讲从ViewRootImpl开始的绘制流程。
参考:
https://blog.csdn.net/yanbober/article/details/45970721
https://blog.csdn.net/zhangcanyan/article/details/52973127
https://www.jianshu.com/p/16e978f9d421
