Android Palette 提取图片的主色调
博主声明:
转载请在开头附加本文链接及作者信息,并标记为转载。本文由博主 威威喵 原创,请多支持与指教。
本文首发于此 博主:威威喵 | 博客主页:https://blog.csdn.net/smile_running
在 Android 应用开发中,经常会有这样的一种需求,就是状态栏的颜色要随着图片的切换,进行动态的设置颜色,而且此颜色要与图片相互融合,自然颜色不能太夸张,状态栏颜色与图片的主色调区别不能太大。
介于这种情况,Android SDK 给我们提供了这样的一个类:Palette 类,此类在 com.android.support 包下,我们要使用时,只需引入该包即可。引入方法如下:
implementation 'com.android.support:palette-v7:28.+'
这样的话,我们就可以使用 Palette 来获取图片中的主色调了。它的获取有两种方式,分别是同步和异步方式,代码如下:
    // 同步方式获取
    Palette p = Palette.from(bitmap).generate();

    // 异步方式获取
    Palette.from(bitmap).generate(new PaletteAsyncListener() {
        public void onGenerated (Palette palette){
        }
    });
由于我们获取的颜色一般都需要设置到控件来,所以采用的基本都是异步的方式来获取主色调,其获取方式如下:
    // 异步方式获取
    Palette.from(bitmap).generate(new PaletteAsyncListener() {
        public void onGenerated (Palette palette){
            if (palette != null) {
                Palette.Swatch vibrant = palette.getVibrantSwatch();//有活力的
                Palette.Swatch vibrantDark = palette.getDarkVibrantSwatch();//有活力的暗色
                Palette.Swatch vibrantLight = palette.getLightVibrantSwatch();//有活力的亮色

                Palette.Swatch muted = palette.getMutedSwatch();//柔和的
                Palette.Swatch mutedDark = palette.getDarkMutedSwatch();//柔和的暗色
                Palette.Swatch mutedLight = palette.getLightMutedSwatch();//柔和的亮色
            }
        }
    });
其获取的是一个 Swatch 颜色板,分两种主色调:有活力的与柔和的色调。当获取到 Swatch 时,并且当它不为 null,我们就可以获取到真正需要的值了,如下代码:
                Palette.Swatch vibrant = palette.getVibrantSwatch();//有活力的
                vibrant.getPopulation(): //样本中的像素数量
                vibrant.getRgb(): //颜色的RBG值
                vibrant.getHsl(): //颜色的HSL值
                vibrant.getBodyTextColor(): //主体文字的颜色值
                vibrant.getTitleTextColor(): //标题文字的颜色值
好了,Palette 的用法还是比较简单了,常用的就是这样了。接下来,我们来看一个获取图片主色调的案例吧。
我准备的是我的博客头像,就是这只小猫咪,然后从这张图片中获取其主色调。首先呢,Palette 传入的是一个 bitmap 对象,而我们的图片一般都是用 ImageView 显示的,所以可以这样来获取 bitmap,代码如下:
    private Bitmap getBitmap(ImageView imageView) {
        return ((BitmapDrawable) imageView.getDrawable()).getBitmap();
    }
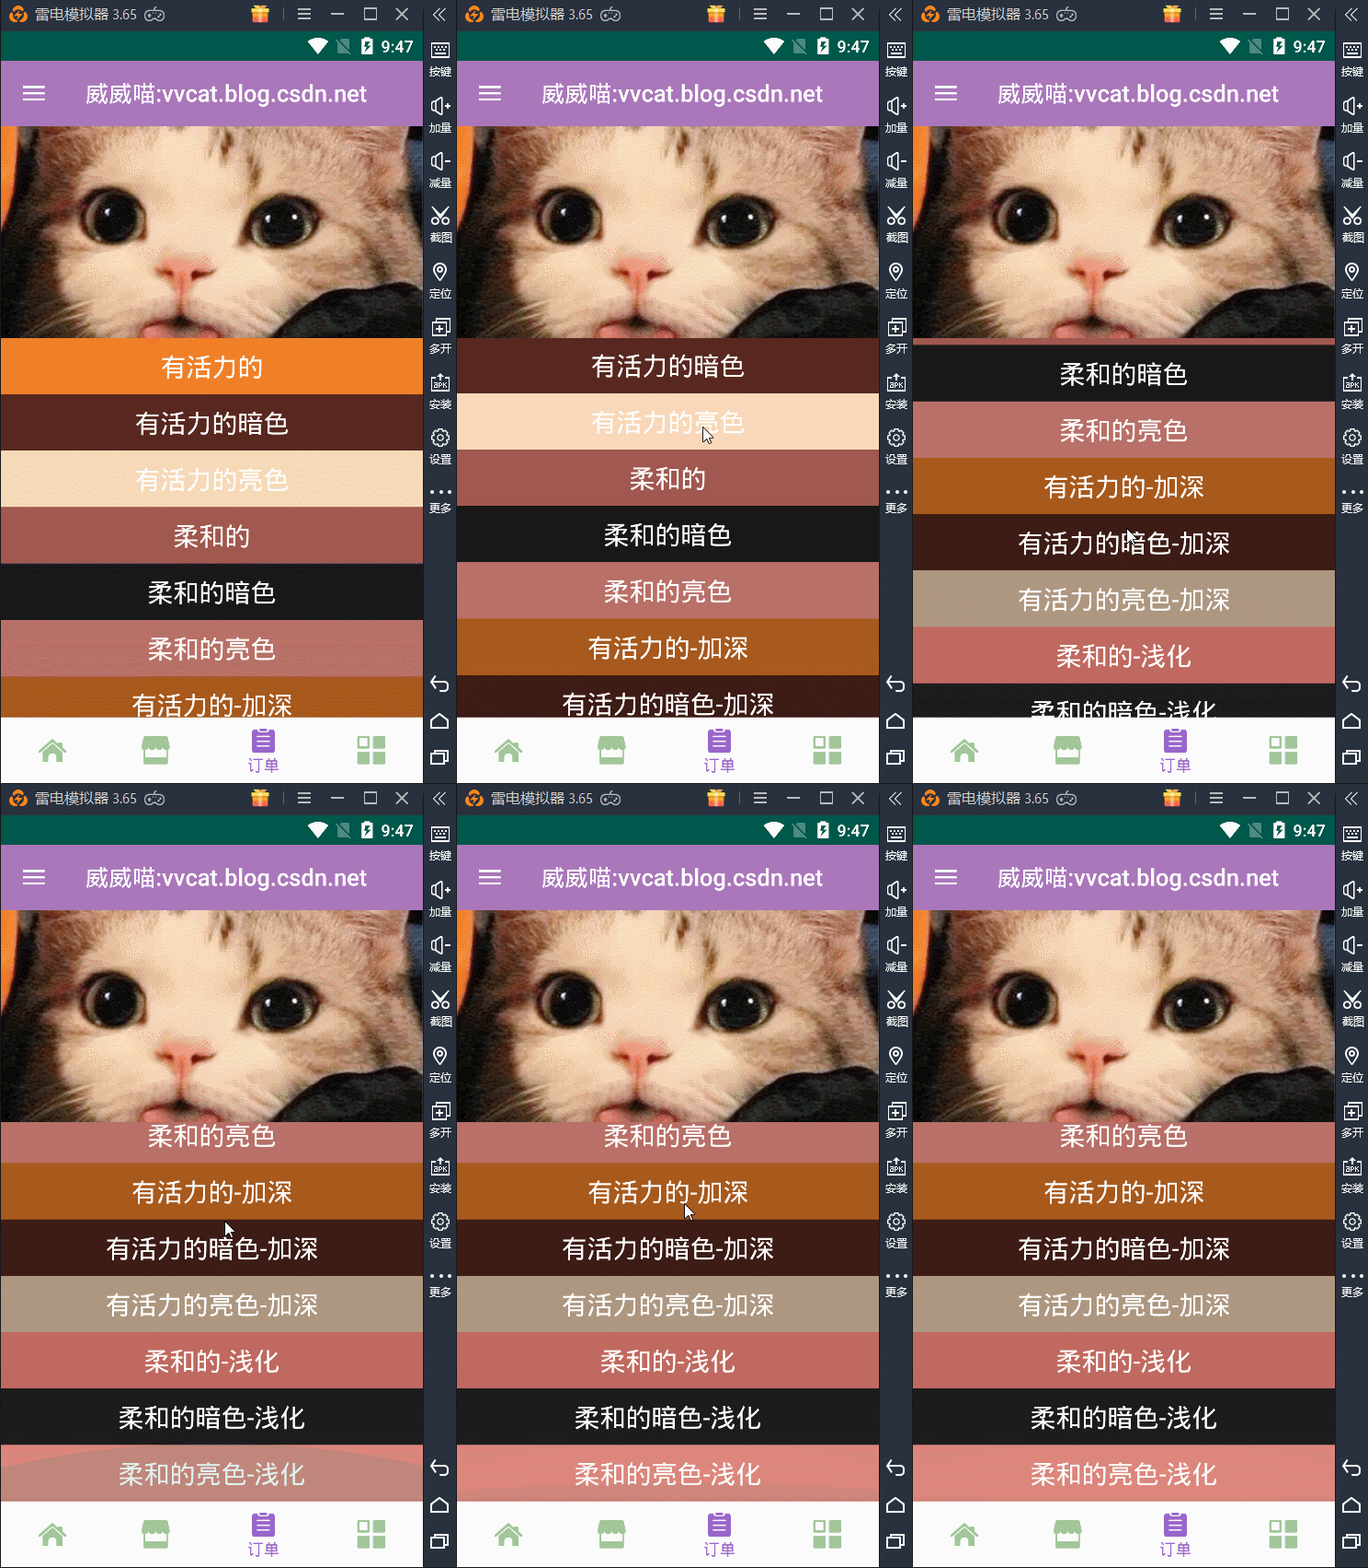
来看看案例的显示效果吧

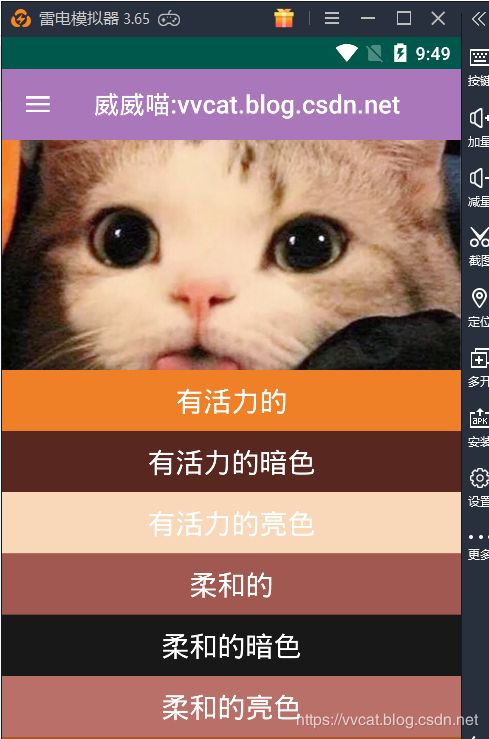
接着来看看分别从图片中获取的颜色效果图

这个是从图片中获取的原始色调,当然了,如果感觉颜色有点偏的话,我们可以相对的更改颜色,可以选择加深颜色或者浅化颜色,达到与图片相近的效果。下面是加深颜色与浅化颜色的算法代码,获取颜色的 rgb 值,做一个简单的加、减法计算,然后重新生成新的 rgb 颜色即可,代码如下:
    /**
     * 颜色加深算法
     */
    private int setColorBurn(int rgb, float val) {
        int r = (rgb >> 16) & 0xff;
        int g = (rgb >> 8) & 0xff;
        int b = rgb & 0xff;
        r = (int) Math.floor(r * (1f - val));
        g = (int) Math.floor(g * (1f - val));
        b = (int) Math.floor(b * (1f - val));
        return Color.rgb(r, g, b);
    }

    /**
     * 颜色浅化算法
     */
    private int setColorShallow(int rgb, float val) {
        int r = (rgb >> 16) & 0xff;
        int g = (rgb >> 8) & 0xff;
        int b = rgb & 0xff;
        r = (int) Math.floor(r * (1f + val));
        g = (int) Math.floor(g * (1f + val));
        b = (int) Math.floor(b * (1f + val));
        return Color.rgb(r, g, b);
    }
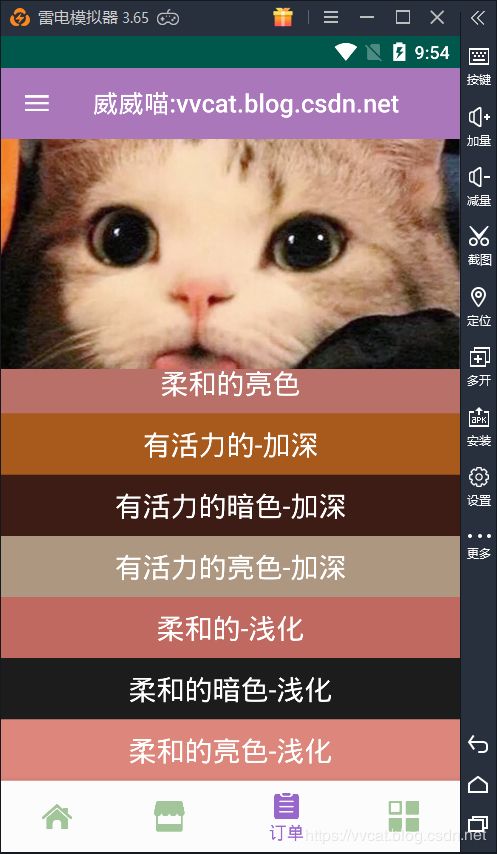
我们来看看加深颜色与浅化颜色后的效果图吧,与上图对比一下。

好了,下面是本案例的完整代码:
package nd.no.xww.bottomnavigationlayout;

import android.graphics.Bitmap;
import android.graphics.Color;
import android.graphics.drawable.BitmapDrawable;
import android.os.Bundle;
import android.support.annotation.NonNull;
import android.support.annotation.Nullable;
import android.support.v4.app.Fragment;
import android.support.v7.graphics.Palette;
import android.view.LayoutInflater;
import android.view.View;
import android.view.ViewGroup;
import android.widget.ImageView;
import android.widget.TextView;

/**
 * @author xww
 * @desciption : Palette 提取图片主色调
 * @date 2019/7/22
 * @time 23:40
 * 博主:威威喵,ID:smile_Running
 * 博客地址:
 * https://blog.csdn.net/smile_Running
 *  or
 * https://vvcat.blog.csdn.net/
 */
public class ThreeFragment extends Fragment {

    private ImageView ivGirl;

    private TextView tvVibrant;
    private TextView tvVibrantDark;
    private TextView tvVibrantLight;
    private TextView tvMuted;
    private TextView tvMutedDark;
    private TextView tvMutedLight;
    // 颜色加深处理
    private TextView tvVibrantBurn;
    private TextView tvVibrantDarkBurn;
    private TextView tvVibrantLightBurn;
    //颜色浅化处理
    private TextView tvMutedShallow;
    private TextView tvMutedDarkShallow;
    private TextView tvMutedLightShallow;


    @Nullable
    @Override
    public View onCreateView(@NonNull LayoutInflater inflater, @Nullable ViewGroup container, @Nullable Bundle savedInstanceState) {
        View view = inflater.inflate(R.layout.fragment_three, container, false);
        return view;
    }

    @Override
    public void onViewCreated(@NonNull View view, @Nullable Bundle savedInstanceState) {
        super.onViewCreated(view, savedInstanceState);
        ivGirl = view.findViewById(R.id.img_girl);
        tvVibrant = view.findViewById(R.id.tv_palette_vibrant);
        tvVibrantDark = view.findViewById(R.id.tv_palette_vibrant_dark);
        tvVibrantLight = view.findViewById(R.id.tv_palette_vibrant_light);
        tvMuted = view.findViewById(R.id.tv_palette_muted);
        tvMutedDark = view.findViewById(R.id.tv_palette_muted_dark);
        tvMutedLight = view.findViewById(R.id.tv_palette_muted_light);
        tvVibrantBurn = view.findViewById(R.id.tv_palette_vibrant_burn);
        tvVibrantDarkBurn = view.findViewById(R.id.tv_palette_vibrant_dark_burn);
        tvVibrantLightBurn = view.findViewById(R.id.tv_palette_vibrant_light_burn);
        tvMutedShallow = view.findViewById(R.id.tv_palette_muted_shallow);
        tvMutedDarkShallow = view.findViewById(R.id.tv_palette_muted_dark_shallow);
        tvMutedLightShallow = view.findViewById(R.id.tv_palette_muted_light_shallow);
    }

    @Override
    public void onResume() {
        super.onResume();
        getPalette(getBitmap(ivGirl));
    }

    private void getPalette(Bitmap bitmap) {
        if (bitmap != null) {
            Palette.from(bitmap).generate(new Palette.PaletteAsyncListener() {
                @Override
                public void onGenerated(@Nullable Palette palette) {
                    if (palette != null) {
                        Palette.Swatch vibrant = palette.getVibrantSwatch();//有活力的
                        tvVibrant.setText("有活力的");
                        tvVibrantBurn.setText("有活力的-加深");
                        if (vibrant != null) {
                            tvVibrant.setBackgroundColor(vibrant.getRgb());
                            tvVibrantBurn.setBackgroundColor(setColorBurn(vibrant.getRgb(), 0.3f));
                        }

                        Palette.Swatch vibrantDark = palette.getDarkVibrantSwatch();//有活力的暗色
                        tvVibrantDark.setText("有活力的暗色");
                        tvVibrantDarkBurn.setText("有活力的暗色-加深");
                        if (vibrantDark != null) {
                            tvVibrantDark.setBackgroundColor(vibrantDark.getRgb());
                            tvVibrantDarkBurn.setBackgroundColor(setColorBurn(vibrantDark.getRgb(), 0.3f));
                        }

                        Palette.Swatch vibrantLight = palette.getLightVibrantSwatch();//有活力的亮色
                        tvVibrantLight.setText("有活力的亮色");
                        tvVibrantLightBurn.setText("有活力的亮色-加深");
                        if (vibrantLight != null) {
                            tvVibrantLight.setBackgroundColor(vibrantLight.getRgb());
                            tvVibrantLightBurn.setBackgroundColor(setColorBurn(vibrantLight.getRgb(), 0.3f));
                        }

                        Palette.Swatch muted = palette.getMutedSwatch();//柔和的
                        tvMuted.setText("柔和的");
                        tvMutedShallow.setText("柔和的-浅化");
                        if (muted != null) {
                            tvMuted.setBackgroundColor(muted.getRgb());
                            tvMutedShallow.setBackgroundColor(setColorShallow(muted.getRgb(), 0.3f));
                        }

                        Palette.Swatch mutedDark = palette.getDarkMutedSwatch();//柔和的暗色
                        tvMutedDark.setText("柔和的暗色");
                        tvMutedDarkShallow.setText("柔和的暗色-浅化");
                        if (mutedDark != null) {
                            tvMutedDark.setBackgroundColor(mutedDark.getRgb());
                            tvMutedDarkShallow.setBackgroundColor(setColorShallow(mutedDark.getRgb(), 0.3f));
                        }

                        Palette.Swatch mutedLight = palette.getLightMutedSwatch();//柔和的亮色
                        tvMutedLight.setText("柔和的亮色");
                        tvMutedLightShallow.setText("柔和的亮色-浅化");
                        if (mutedLight != null) {
                            tvMutedLight.setBackgroundColor(mutedLight.getRgb());
                            tvMutedLightShallow.setBackgroundColor(setColorShallow(mutedLight.getRgb(), 0.2f));
                        }
                    }
                }
            });
        }
    }

    private Bitmap getBitmap(ImageView imageView) {
        return ((BitmapDrawable) imageView.getDrawable()).getBitmap();
    }

    /**
     * 颜色加深算法
     */
    private int setColorBurn(int rgb, float val) {
        int r = (rgb >> 16) & 0xff;
        int g = (rgb >> 8) & 0xff;
        int b = rgb & 0xff;
        r = (int) Math.floor(r * (1f - val));
        g = (int) Math.floor(g * (1f - val));
        b = (int) Math.floor(b * (1f - val));
        return Color.rgb(r, g, b);
    }

    /**
     * 颜色浅化算法
     */
    private int setColorShallow(int rgb, float val) {
        int r = (rgb >> 16) & 0xff;
        int g = (rgb >> 8) & 0xff;
        int b = rgb & 0xff;
        r = (int) Math.floor(r * (1f + val));
        g = (int) Math.floor(g * (1f + val));
        b = (int) Math.floor(b * (1f + val));
        return Color.rgb(r, g, b);
    }
}
还有其他一些 xml 布局文件代码,也非常简单,代码如下:
<RelativeLayout xmlns:android="http://schemas.android.com/apk/res/android"
    android:layout_width="match_parent"
    android:layout_height="match_parent">

    <ImageView
        android:id="@+id/img_girl"
        android:layout_width="match_parent"
        android:layout_height="180dp"
        android:scaleType="centerCrop"
        android:src="@drawable/wwcat" />

    <android.support.v4.widget.NestedScrollView
        android:layout_width="match_parent"
        android:layout_height="wrap_content"
        android:layout_below="@+id/img_girl">

        <LinearLayout
            android:layout_width="match_parent"
            android:layout_height="match_parent"
            android:orientation="vertical">

            <TextView
                android:id="@+id/tv_palette_vibrant"
                android:layout_width="match_parent"
                android:layout_height="48dp"
                android:gravity="center"
                android:textColor="#ffffff"
                android:textSize="22sp" />

            <TextView
                android:id="@+id/tv_palette_vibrant_dark"
                android:layout_width="match_parent"
                android:layout_height="48dp"
                android:gravity="center"
                android:textColor="#ffffff"
                android:textSize="22sp" />

            <TextView
                android:id="@+id/tv_palette_vibrant_light"
                android:layout_width="match_parent"
                android:layout_height="48dp"
                android:gravity="center"
                android:textColor="#ffffff"
                android:textSize="22sp" />

            <TextView
                android:id="@+id/tv_palette_muted"
                android:layout_width="match_parent"
                android:layout_height="48dp"
                android:gravity="center"
                android:textColor="#ffffff"
                android:textSize="22sp" />

            <TextView
                android:id="@+id/tv_palette_muted_dark"
                android:layout_width="match_parent"
                android:layout_height="48dp"
                android:gravity="center"
                android:textColor="#ffffff"
                android:textSize="22sp" />

            <TextView
                android:id="@+id/tv_palette_muted_light"
                android:layout_width="match_parent"
                android:layout_height="48dp"
                android:gravity="center"
                android:textColor="#ffffff"
                android:textSize="22sp" />


            <TextView
                android:id="@+id/tv_palette_vibrant_burn"
                android:layout_width="match_parent"
                android:layout_height="48dp"
                android:gravity="center"
                android:textColor="#ffffff"
                android:textSize="22sp" />

            <TextView
                android:id="@+id/tv_palette_vibrant_dark_burn"
                android:layout_width="match_parent"
                android:layout_height="48dp"
                android:gravity="center"
                android:textColor="#ffffff"
                android:textSize="22sp" />

            <TextView
                android:id="@+id/tv_palette_vibrant_light_burn"
                android:layout_width="match_parent"
                android:layout_height="48dp"
                android:gravity="center"
                android:textColor="#ffffff"
                android:textSize="22sp" />


            <TextView
                android:id="@+id/tv_palette_muted_shallow"
                android:layout_width="match_parent"
                android:layout_height="48dp"
                android:gravity="center"
                android:textColor="#ffffff"
                android:textSize="22sp" />

            <TextView
                android:id="@+id/tv_palette_muted_dark_shallow"
                android:layout_width="match_parent"
                android:layout_height="48dp"
                android:gravity="center"
                android:textColor="#ffffff"
                android:textSize="22sp" />

            <TextView
                android:id="@+id/tv_palette_muted_light_shallow"
                android:layout_width="match_parent"
                android:layout_height="48dp"
                android:gravity="center"
                android:textColor="#ffffff"
                android:textSize="22sp" />
        LinearLayout>
    android.support.v4.widget.NestedScrollView>

RelativeLayout>
对了,还有一种是肯定会遇到图片获取主色调的 rgb 值为 null 的情况,所以要进行空判断,当为 rgb 值为空时,我们设定一个默认的颜色即可解决这个问题。