Spark基础全解析
SPARK全解析
标签(空格分隔): Spark
- SPARK全解析
- Spark是什么?
- Spark 源码编译
- Spark本地模式安装配置及Spark Shell基本使用
- Spark集群
- Spark Application开发、运行及监控(IDEA)
- Spark 日志监控(HistoryServer)配置
- Spark RDD
- Spark共享变量
- Spark 内核
- Spark 依赖
- Spark Shuffle
- Spark Application添加jar包的三种方法
- Spark SQL
- Spark SQL的发展历程
- DataFrame
- SparkSQL案例
- Spark 集成
- SPARK中聚合函数
- SPARK中定义UDF、UDAF
- Spark Streaming
- Spark Streaming工作原理
- DStream
- Spark Streaming编程模型
- Spark Streaming 读取HDFS数据
- Spark Streaming的集成
- Spark Streaming常用API解析
- Spark Streaming的窗口函数
- 喜欢我的文章请关注微信公众号DTSpider
Spark是什么?
Spark是Apache的一个顶级项目,是一个快速、通用的大规模数据处理引擎。以下是它的几个特点 :
- Speed
存储在内存中的数据,Spark比Hadoop的MapReduce快100多倍,存储在磁盘中的数据要快10多倍。 - Easy of Use
开发Spark应用程序可以使用Java、Scala、Python、R等编程语言 - Generality
Spark提供了SparkSQL、Streaming、MLlib、GraphX,功能强大。一站式解决需求。 - Runs Everywhere
Spark可以运行在Hadoop的Yarn上、Mesos上、以及它自身的standalone上,处理的文件系统包括HDFS、Cassandra、HBase、S3.
以上部分摘自官网: http://spark.apache.org/
Spark 源码编译
本文以 spark1.6.1版本为例
- (1)下载源码包

- (2)准备环境
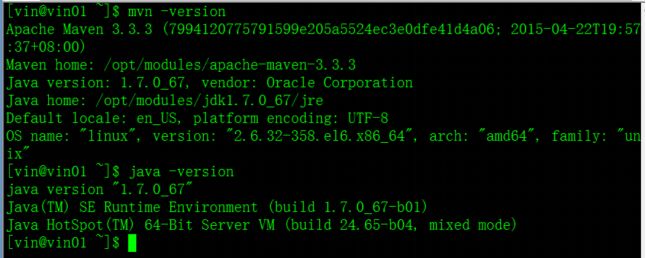
Spark1.6.1版本编译需要Maven 3.3.3 or newer and Java 7+ 环境
- (3)编译
–1 解压spark源码
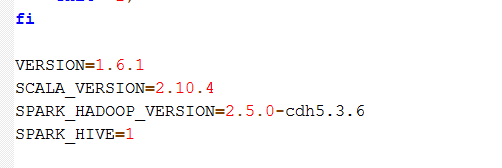
–2 在执行编译前修改$SPARK_HOME下的make-distribution.sh文件如下
–3 编译apache hadoop,需要配置镜像文件
路径:/opt/modules/apache-maven-3.3.3/conf/settings.xml
配置内容:

如果是cdh版本hadoop,则必须去掉该镜像
–配置域名解析服务器
# vi /etc/resolv.conf
内容:
nameserver 8.8.8.8
 nameserver 8.8.4.4
–4 执行编译(根据所使用的Hadoop版本进行编译)
- (2)准备环境
—-针对APACH HADOOP
./make-distribution.sh --tgz -Phadoop-2.4 -Dhadoop.version=2.5.0 -Phive -Phive-thriftserver -Pyarn
—- 针对CDH HADOOP
./make-distribution.sh --tgz -Phadoop-2.4 -Dhadoop.version=2.5.0-cdh5.3.6 -Phive -Phive-thriftserver -Pyarn

Spark本地模式安装配置及Spark Shell基本使用
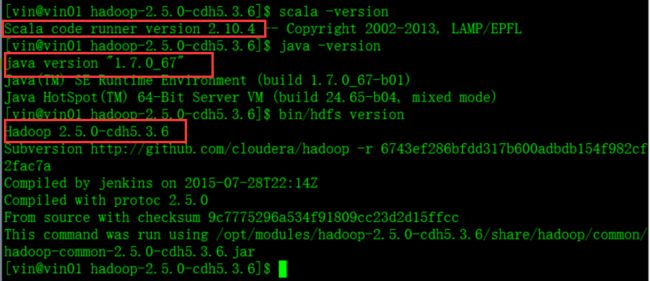
1、Spark安装环境准备:
- JAVA
- HDFS(HDFS是否脱离了安全模式)
- SCALA
2、Spark安装
通过notepad++配置$SPARK_HOME目录下conf下的配置文件
①日志配置
更改log4j.properties.template文件名为log4j.properties
②配置spark-env.sh

配置完成
3、测试Spark Shell命令行
使用Spark RDD进行简单测试:
启动spark交互式命令行:bin/spark-shell 并编程测试wordcount
- HDFS上的数据源
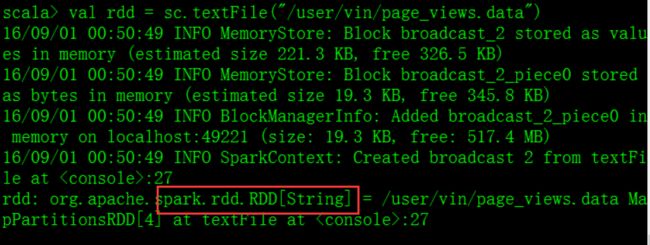
- 定义rdd读取数据源
- 使用rdd.map(line => line.split(“ ”)) 可以将文件按空格进行分割,分割之后会变成数组
- 再在其后面加上.collect之后查看输出
这里需使用flatMap代替map对该数组进行一个压平的操作,即: rdd.flatMap(line => line.split(” “)).collect,输出的为压平后的一个个单词

再使用map操作将其变为元组对,即:rdd.flatMap(line => line.split(” “)).map(word => (word,1)).collect
输出结果:

进行到这一步,再使用reduceByKey()就可完成wordcount了,reduceByKey中的ByKey使数组中的元组对按key进行排序,reduce进行相加。
即:
rdd.flatMap(line => line.split(" ")).map(word => (word,1)).reduceByKey((a,b) => (a + b))

上一步即完成了对数据的处理,再对其赋值之后保存,即可完成wordcount
赋值:
val wordcountRDD = rdd.flatMap(line => line.split(" ")).map(word => (word,1)).reduceByKey((a,b) => (a + b))

保存:
wordcountRDD.saveAsTextFile("/user/vin/wordcount/output")

Spark集群
Spark Cluster 可以运行在Yarn上,由Yarn进行资源管理和任务调度,还可以运行在其自带的资源管理调度框架Standalone上,分为主节点Master(类似于yarn的resourcemanager)和从节点Work(类似于yarn的nodemanager),不同的是一台机器上可以运行多个Work。
Spark架构原理图:
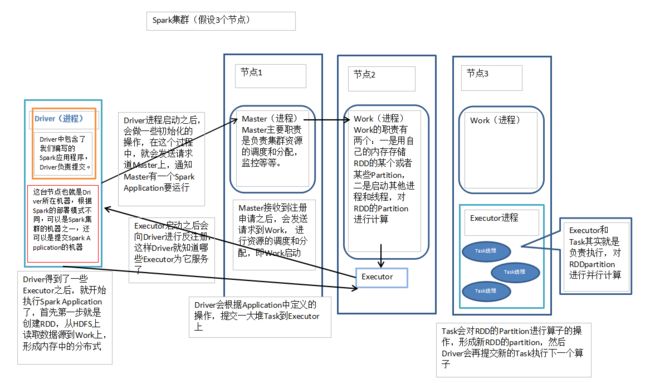
说明:Job:包含了由Spark Action催生的多个Tasks,是一个并行计算
Stage:一个Job分为了多个彼此依赖的Stage,每个Stage又包含了一系列的Task,类似于MapReduce的Map阶段和reduce阶段。
- Spark集群安装部署
- 配置$SPARK_HOME目录下conf下的配置文件
1 配置spark-env.sh
参考官网:http://spark.apache.org/docs/1.6.1/spark-standalone.html#installing-spark-standalone-to-a-cluster
2 配置slaves
配置运行Work的主机名
3 启动
在sbin目录里使用
start-master.sh //启动所有的从节点,使用此命令时,运行此命令的机器,必须要配置与其他机器的SSH无密钥登录,否则启动的时候会出现一些问题
start-slaves.sh

4 Spark的的web监控端口为8080,URL为7070,Job监控4040,都是自动增长

5 测试Spark集群
spark-shell是spark的一个application,将其运行在spark standalone上,通过输入: bin/spark-shell –help 查看其运行方法

启动: bin/spark-shell –master spark://vin01:7077

Spark Application开发、运行及监控(IDEA)
- 在IDEA中创建scala Project,并添加spark依赖包
步骤:File -> Project Structure -> Libraries -> +号 -> java -> 选择编译好的spark目录下的lib依赖包
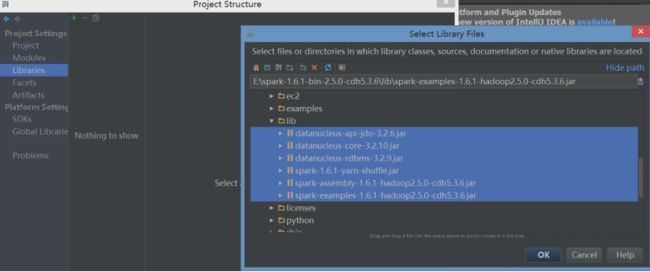
- 导入依赖包之后即可进行程序开发,新建包、在包中创建Scala class之SparkApp
- 编程
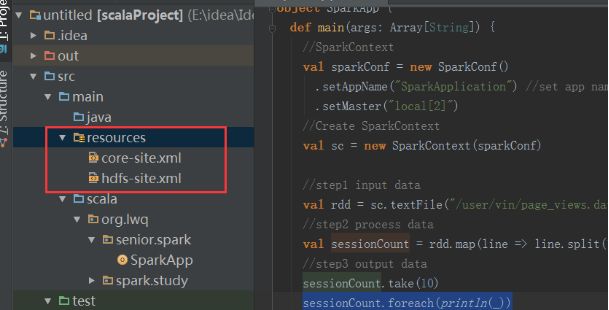
配置resurces(在新建scala Project时,创建resources)
由于程序中需要读hdfs上的数据文件,所以需要将hadoop的配置文件hdfs-site.xml 与core-site.xml 文件拷贝到scala project的resources中
打包在Spark shell上提交运行(bin/spark-submit …)
步骤:1 打包
File -> project structure -> Artifacts -> + -> jar

2 选择类
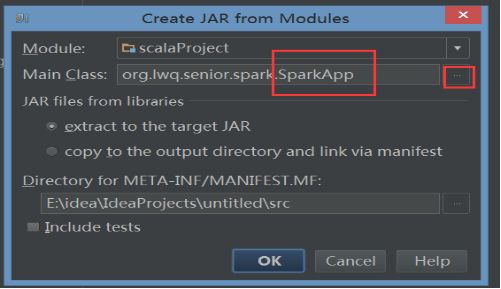
3 去除依赖包(因为集群上本身有)
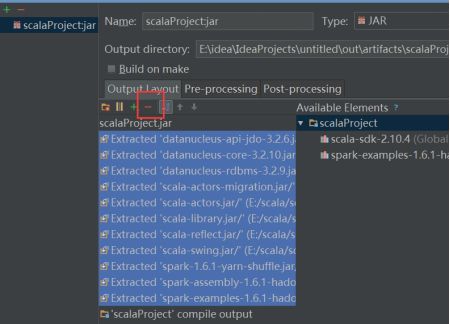
4 上述步骤设置了打哪个包,还需要build进行打包

5 将jar包上传至linux下并赋予执行权限:此处为方便上传到Spark主目录下

6 提交任务

7 先测试本地

8 测试集群:此时需要将代码中的master注释掉再重新打包,重新打包直接用rebuild即可

9 启动spark Standalone
查看8080端口是否有资源
提交任务
bin/spark-sumit --master spark://vin01:7077 scalaProject.jar

10 监控

Spark 日志监控(HistoryServer)配置
Spark HistoryServer配置分为两个部分:
第一、设置SparkApplicaiton在运行时,需要记录日志信息
配置:配置$SPARK_HOME目录下conf下spark-defaults.conf文件

第二、启动HistoryServer,通过界面查看
配置Spark主目录下conf下spark-env.sh文件
SPARK_HISTORY_OPTS="-Dspark.history.fs.logDirectory=hdfs://vin01/user/vin/sparkEventLogs"
配置完成启动服务

它端口号是18080
Spark RDD
RDD是什么
官方解释:
RDD是Spark的基本抽象,是一个弹性分布式数据集,代表着不可变的,分区(partition)的集合,能够进行并行计算。也即是说:- 它是一系列的分片、比如说128M一片,类似于Hadoop的split;
- 在每个分片上都有一个函数去执行/迭代/计算它
- 它也是一系列的依赖,比如RDD1转换为RDD2,RDD2转换为RDD3,那么RDD2依赖于RDD1,RDD3依赖于RDD2。
- 对于一个Key-Value形式的RDD,可以指定一个partitioner,告诉它如何分片,常用的有hash、range
- 可选择指定分区最佳计算位置
创建RDD的两种方式
- RDD的三大Operations
- Transformation
从原有的一个RDD进行操作创建一个新的RDD,通常是一个lazy过程,例如map(func) 、filter(func),直到有Action算子执行的时候 - Action
返回给驱动program一个值,或者将计算出来的结果集导出到存储系统中,例如count() reduce(func) - Persist
将数据存储在内存中,或者存储在硬盘中
例如: cache() persist() unpersist()
合理使用persist()和cache()持久化操作能大大提高spark性能,但是其调用是有原则的,必须在transformation或者textFile后面直接调用persist()或cache(),如果先创建的RDD,然后再起一行调用这两个方法,则会报错
- Transformation
- RDD的常用Transformation
– map(func) :返回一个新的分布式数据集,由每个原元素经过func函数转换后组成
spark shell本地测试:
    val numbers = Array(1, 2, 3, 4, 5)
    val numberRDD = sc.parallelize(numbers, 1)
    val multipleNumberRDD = numberRDD.map ( num => num * 2 )
    multipleNumberRDD.foreach ( num => println(num) )
– filter(func) : 返回一个新的数据集,由经过func函数后返回值为true的原元素组成
    val numbers = Array(1, 2, 3, 4, 5, 6, 7, 8, 9, 10)
    val numberRDD = sc.parallelize(numbers, 1)
    val evenNumberRDD = numberRDD.filter { num => num % 2 == 0 }
    evenNumberRDD.foreach { num => println(num) }
– flatMap(func) : 类似于map,但是每一个输入元素,会被映射为0到多个输出元素(因此,func函数的返回值是一个Seq,而不是单一元素)
    val lineArray = Array("hello you", "hello me", "hello world")
    val lines = sc.parallelize(lineArray, 1)
    val words = lines.flatMap { line => line.split(" ") }
    words.foreach { word => println(word) }
– union(otherDataset) : 返回一个新的数据集,由原数据集和参数联合而成
– groupByKey([numTasks]) :在一个由(K,V)对组成的数据集上调用,返回一个(K,Seq[V])对的数据集。注意:默认情况下,使用8个并行任务进行分组,你可以传入numTask可选参数,根据数据量设置不同数目的Task
    val scoreList = Array(Tuple2("class1", 80), Tuple2("class2", 75),Tuple2("class1", 90), Tuple2("class2", 60))
    val scores = sc.parallelize(scoreList, 1)
    val groupedScores = scores.groupByKey()
     groupedScores.foreach(score => {
      println(score._1);
      score._2.foreach { singleScore => println(singleScore) };
      println("=============================")  })

– reduceByKey(func, [numTasks]) : 在一个(K,V)对的数据集上使用,返回一个(K,V)对的数据集,key相同的值,都被使用指定的reduce函数聚合到一起。和groupbykey类似,任务的个数是可以通过第二个可选参数来配置的。在实际开发中,能使reduceByKey实现的就不用groupByKey
val scoreList = Array(Tuple2("class1", 80), Tuple2("class2", 75),Tuple2("class1", 90), Tuple2("class2", 60))
    val scores = sc.parallelize(scoreList, 1)
    val totalScores = scores.reduceByKey(_ + _)
totalScores.foreach(classScore => println(classScore._1 + ": " + classScore._2)) 
– join(otherDataset, [numTasks]) :在类型为(K,V)和(K,W)类型的数据集上调用,返回一个(K,(V,W))对,每个key中的所有元素都在一起的数据集
    val studentList = Array(
        Tuple2(1, "leo"),
        Tuple2(2, "jack"),
        Tuple2(3, "tom"));
   val scoreList = Array(
        Tuple2(1, 100),
        Tuple2(2, 90),
        Tuple2(3, 60));
    val students = sc.parallelize(studentList);
    val scores = sc.parallelize(scoreList);
    val studentScores = students.join(scores)
    studentScores.foreach(studentScore => {
      println("student id: " + studentScore._1);
      println("student name: " + studentScore._2._1)
      println("student socre: " + studentScore._2._2)
      println("=======================================")
}) ![]()
– groupWith(otherDataset, [numTasks]) : 在类型为(K,V)和(K,W)类型的数据集上调用,返回一个数据集,组成元素为(K, Seq[V], Seq[W]) Tuples。这个操作在其它框架,称为CoGroup
– cartesian(otherDataset) : 笛卡尔积。但在数据集T和U上调用时,返回一个(T,U)对的数据集,所有元素交互进行笛卡尔积。
– repartition():重新分区,当数据处理到最后剩下很少的数据集时,可以使用repartition()进行重新分区
常用Action
– reduce(func) : 通过函数func聚集数据集中的所有元素。Func函数接受2个参数,返回一个值。这个函数必须是关联性的,确保可以被正确的并发执行
    val numberArray = Array(1, 2, 3, 4, 5, 6, 7, 8, 9, 10)
    val numbers = sc.parallelize(numberArray, 1)
    val sum = numbers.reduce(_ + _)
    println(sum)
–collect() : 在Driver的程序中,以数组的形式,返回数据集的所有元素。这通常会在使用filter或者其它操作后,返回一个足够小的数据子集再使用。
   val numberArray = Array(1, 2, 3, 4, 5, 6, 7, 8, 9, 10)
    val numbers = sc.parallelize(numberArray, 1)
    val doubleNumbers = numbers.map { num => num * 2 }
    val doubleNumberArray = doubleNumbers.collect()
    for(num <- doubleNumberArray) {
      println(num)
    }
–count() : 返回数据集的元素个数
    val numberArray = Array(1, 2, 3, 4, 5, 6, 7, 8, 9, 10)
    val numbers = sc.parallelize(numberArray, 1)
    val count = numbers.count()
    println(count)
–take(n) : 返回一个数组,由数据集的前n个元素组成。注意,这个操作目前并非在多个节点上,并行执行,而是Driver程序所在机器,单机计算所有的元素(Gateway的内存压力会增大,需要谨慎使用)
    val numberArray = Array(1, 2, 3, 4, 5, 6, 7, 8, 9, 10)
    val numbers = sc.parallelize(numberArray, 1)
    val top3Numbers = numbers.take(3)
    for(num <- top3Numbers) {
      println(num)
    }
–first() : 返回数据集的第一个元素(类似于take(1))
–saveAsTextFile(path) : 将数据集的元素,以textfile的形式,保存到本地文件系统,hdfs或者任何其它hadoop支持的文件系统。Spark将会调用每个元素的toString方法,并将它转换为文件中的一行文本
–saveAsSequenceFile(path) : 将数据集的元素,以sequencefile的格式,保存到指定的目录下,本地系统,hdfs或者任何其它hadoop支持的文件系统。RDD的元素必须由key-value对组成,并都实现了Hadoop的Writable接口,或隐式可以转换为Writable(Spark包括了基本类型的转换,例如Int,Double,String等等)
–foreach(func) : 在数据集的每一个元素上,运行函数func。这通常用于更新一个累加器变量,或者和外部存储系统做交互
Spark共享变量
- 共享变量概念
共享变量是Spark一个非常重要的特性,在默认情况下,如果一个算子的函数中使用到了某个外部的变量,那么这个变量的值会被拷贝到每个task中,此时每个task只能操作自己的那份变量副本。如果多个task想要共享某个变量,这种方式是做不到的。
Spark为此提供了两种共享变量,一种是Broadcast Variable(广播变量),一种是Accumulator(累加变量)。广播变量会将使用到的变量,仅仅为每个节点拷贝一份,更大的用处是优化性能,减少网络传输以及内存的消耗。累加变量则可以然多个task共同操作一份变量,主要可以进行累加。
- 共享变量示例
Spark提供的Broadcast Variable是只读的,可以通过调用SparkContext的broadcast()方法来针对某个变量创建广播变量。每个节点可以使用广播变量的value()方法来获取值。
   val factor = 3
   val factorBroadcast = sc.broadcast(factor)

   val arr =Array(1,2,3,4,5)
   val rdd = sc.parallelize(arr)
   val mutiRdd = rdd.map(num => num*factorBroadcast.value())
   mutiRdd.foreach(num => println(num))
Spark提供的Accumulator,主要用于多个节点对一个变量进行共享的操作,task只能对Accumulator进行累加操作,不能读取它的值,只有Driver程序可以读取。
    val sumAccumulator = sc.accumulator(0)

    val arr = Array(1,2,3,4,5)
    val rdd = sc.parallelize(arr)
    rdd.foreach(num => sumAccumulator +=num)
    println(sumAccumulator.value)
Spark 内核
Spark 依赖
Spark依赖分为宽依赖和窄依赖:
- 窄依赖
- 子RDD的每个分区依赖于常数个(即与数据规模无关)
- 输入输出一对一的算子,且结果RDD的分区结构不变,主要是map、flatMap
- 输入输出一对一,但结果RDD的分区结构发生了变化,如 union、coalesce
从输入中选择部分元素的算子,如filter、distinct、subtract、sample
宽依赖
子RDD的每个分区依赖于所有父RDD分区
- 对单个RDD基于key进行重组和reduce,如 groupByKey、reduceByKey‘
- 对两个RDD基于key进行join和重组,如join
区分宽依赖和窄依赖是根据父RDD的每个分区数据给多少个子RDD的每个分区数据:
1 -> 1 :窄依赖
1 -> N :宽依赖,有宽依赖的地方必有shuffle

Spark Shuffle
- Shuffle过程的解析
在Spark RDD的计算处理的过程中,每个宽依赖都伴随着Shuffle。
首先看Shuffle过程

依图所示:
假设有一个节点,上面运行了3个shuffleMapTask,每个shuffleMapTask,都会为每个ReduceTask创建一份bucket缓存以及对应的ShuffleBlockFile磁盘文件,shuffleMapTask的输出,会作为MapStatus,发送到DAGScheduler的MapOutputTrackerMaster中,每个MapStatus包含了每个ReduceTask要拉取的数据的大小。
假设有另外一个节点,上面也运行了4个ReduceTask,现在等着去获取ShuffleMapTask的输出数据,来完成程序定义的算子,而ReduceTask会用BlockStoreShuffleFetcher去MapOutputTrackerMaster获取自己要拉取的文件的信息,然后底层通过BlockManager将数据拉取过来。每个ReduceTask拉取过来的数据,其实就会组成一个内部的RDD,叫shuffleRDD,优先放入内存,其次如果内存不够,那么写入磁盘,最后每个ReduceTask针对数据进行聚合,最后生成MapPartitionRDD,就是执行reduceByKey等操作希望获得的RDD。
Spark Application添加jar包的三种方法
- –jars
在bin/spark-submit 后面直接以–jars方式将jar包添加,须写绝对路径
示例:
${SPARK_HOME}/bin/spark-submit --master /opt/jars/sparkexternale/xx1.jar, /opt/jars/sparkexternale/xx2.jar - –driver-class-path
示例:
bin/spark-shell \
--master local[3] \
--driver-class-path /opt/modules/spark-1.6.1-bin-2.5.0-cdh5.3.6/exlibs/mysql-connector-java-5.1.27-bin.jar:/opt/modules/spark-1.6.1-bin-2.5.0-cdh5.3.6/exlibs/hbase-client-0.98.6-cdh5.3.6.jar:/opt/modules/spark-1.6.1-bin-2.5.0-cdh5.3.6/exlibs/hbase-common-0.98.6-cdh5.3.6.jar:/opt/modules/spark-1.6.1-bin-2.5.0-cdh5.3.6/exlibs/hbase-protocol-0.98.6-cdh5.3.6.jar:/opt/modules/spark-1.6.1-bin-2.5.0-cdh5.3.6/exlibs/hbase-server-0.98.6-cdh5.3.6.jar:/opt/modules/spark-1.6.1-bin-2.5.0-cdh5.3.6/exlibs/htrace-core-2.04.jar:/opt/modules/spark-1.6.1-bin-2.5.0-cdh5.3.6/exlibs/protobuf-java-2.5.0.jar:/opt/modules/spark-1.6.1-bin-2.5.0-cdh5.3.6/exlibs/guava-12.0.1.jar:/opt/modules/spark-1.6.1-bin-2.5.0-cdh5.3.6/exlibs/hive-hbase-handler-0.13.1-cdh5.3.6.jar
- SPARK_CLASSPATH
配置此环境变量:通常在企业中,提交Application使用脚本的方式,比如spark-app-submit.sh脚本,通常一个App设置一个脚本,即设置一个SPARK CLASSPATH
//spark-app-submit.sh:
#!/bin/sh
## SPARK_HOME
SPARK_HOME=/opt/cdh5.3.6/spark-1.6.1-bin-2.5.0-cdh5.3.6
## SPARK CLASSPATH
SPARK_CLASSPATH=$SPARK_CLASSPATH:/opt/jars/sparkexternale/xx.jar:/opt/jars/sparkexternale/yy.jar

${SPARK_HOME}/bin/spark-submit --master spark://vin01:7077 --deploy-mode cluster /opt/tools/scalaProject.jar
Spark SQL
Spark SQL的发展历程
Spark 作为一个优秀的大数据计算框架,必然少不了支持SQL的框架,基于Hive的性能以及它与Spark的兼容,Shark项目由此诞生,Shark即Hive on Spark,它通过HQL解析,将HQL翻译成Spark上的RDD操作,然后通过Hive的metadata获取数据库里的表信息,实际的HDFS上的数据和文件会有Spark获取并放到Spark上计算。
在Hive中,处理SQl的过程如下:
SQL –> 语法解析–>逻辑计划(优化)–>物理计划–>MapReduce
而Shark的诞生,是将某个Hive版本源码拿过来进行修改“物理计划”的部分,将其转化为Spark而不是MapReduce,这有很大的弊端,比如依赖于Hive。
Shark的SQL处理过程如下:
SQL –> 语法解析–>逻辑计划(优化)–>物理计划–>Spark
在1.0之后SparkSQL诞生,它涵盖了Shark的所有特性,SparkSQL不再使用Hive的解析引擎,即不再与Hive共用语法解析和逻辑计划,它有了自己的解析引擎Catalyst。
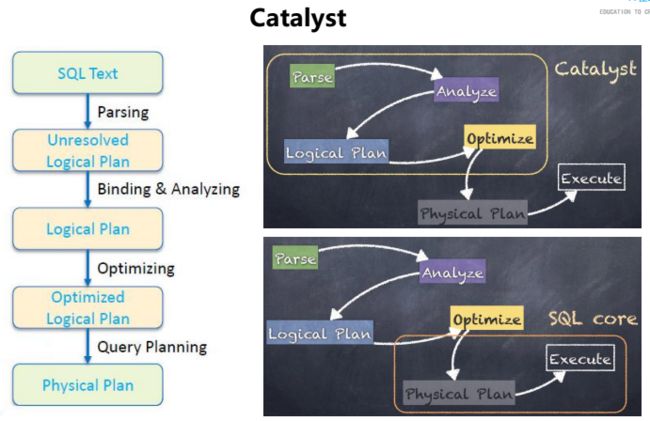
spark SQL的三大愿景就是:① Write less code ② Read less data ③ Let the optimizer do the hard work
DataFrame
在Spark中,DataFrame是一种以RDD为基础的分布式数据集,类似于传统数据库中的二位表格,它与RDD的主要区别在于,前者带有schema元信息,即DataFrame所表示的二位数据集的每一列都带有名称和类型。使得SparkSQL得以洞察更多的结构信息,从而对其背后的额数据源以及作为用于DataFrame之上的变换进行了针对性的优化,最终达到大幅提升运行时效率的目标,反观RDD,由于无从得知所存数据元素的具体内部结构,Spark Core只能在stage层面进行简单通用的流水线优化
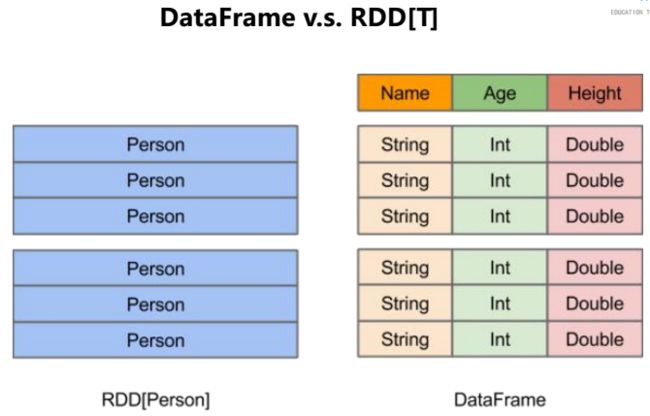
- DataFrame VS RDD 及DataFrame的创建
在Spark安装目录下有示例数据,将其上传到HDFS上。

创建RDD,首选创建一个类来封装rdd

再创建rdd读取该数据文件,并处理之后传递给People类,这样就得到了一个存储类的rdd

得到的结果是:

从结果可以看出,创建出来的RDD只知道它存储的是一个类,具体类的参数名称的信息都不清楚。
而如果创建DataFrame呢
使用json格式数据创建DataFrame,(DataFrame中的read方法可以直接读取json格式的数据

创建DataFrame的入口是sqlContext或者HiveContext

得到的结果是:

从创建的DataFrame可以得到数据的字段名,数据类型等。
DataFrame的创建
- 通过内置方法读取外部数据源,数据源可以是以下格式:
json hive jdbc parquet/orc text - 通过scala的CASE CLASS转换
首先创建一个case class,名为Employee,并且定义id和name两个参数
case class Employee(id: Int, name: String)
我们可以通过很多方式来初始化Employee类,比如从关系型数据库中获取数据以此来定义Employee类。但是在本文为了简单起见,我将直接定义一个Employee类的List,如下:
val listOfEmployees = List(Employee(1, "iteblog"), Employee(2, "Jason"), Employee(3, "Abhi"))
我们将listOfEmployees列表传递给SQLContext类的createDataFrame 函数,这样我们就可以创建出DataFrame了!然后我们可以调用DataFrame的printuSchema函数,打印出该DataFrame的模式,我们可以看出这个DataFrame主要有两列:name和id,这正是我们定义Employee的两个参数,并且类型都一致。
- 通过内置方法读取外部数据源,数据源可以是以下格式:
val empFrame = sqlContext.createDataFrame(listOfEmployees)
empFrame.printSchema
|-- id: integer (nullable = false)
|-- name: string (nullable = true)
然后可以使用Spark支持的SQL功能来查询相关的数据。在使用这个功能之前,我们必须先对DataFrame注册成一张临时表,我们可以使用registerTempTable函数实现,如下:
empFrame.registerTempTable("employeeTable")
注册为临时表就可以使用SQL语句来进行查询等操作了
val sortedByNameEmployees = sqlContext.sql("select * from employeeTable order by name desc")
sortedByNameEmployees.show()
+-----+-------+
|empId|   name|
+-----+-------+
|    1|iteblog|
|    2|  Jason|
|    3|   Abhi|
+-----+-------+
转换原理:createDataFrame函数可以接收一切继承scala.Product类的集合对象
查看Spark的DataFrame源码中createDataFrame函数
def createDataFrame[A <: Product : TypeTag](rdd: RDD[A]): DataFrame
而case class类就是继承了Product。我们所熟悉的TupleN类型也是继承了scala.Product类的,所以我们也可以通过TupleN来创建DataFrame
- 通过RDD进行转换
方式一:
The first method uses reflection to infer the schema of an RDD that contains specific types of objects.
这一种方式是通过自动推断,将RDD反射为DataFrame,但是这个Rdd必须是case class的类型。而且必须使用import sqlContext.implicits._来引包。
演示:
定义一个case class 类People
case class People(name: String, age: Int)
创建一个People类的RDD
val rdd = sc.textFile("/user/vin/people.txt").map(line => line.split(",")).map(x => People(x(0), x(1).trim.toInt))

转换:
val people_df = rdd.toDF()

在IDEA编程中需要使用import sqlContext.implicits._,否则jar包出错。
方式二:
The second method for creating DataFrames is through a programmatic interface that allows you to construct a schema and then apply it to an existing RDD.
a DataFrame can be created programmatically with three steps:
第一步:将RDD(可以是任何类型)转换为RDD[Row]
需要引包:import org.apache.spark.sql._
演示:
val rdd = sc.textFile("/user/vin/people.txt")
 import org.apache.spark.sql._
 val rowRdd = rdd.map(line => line.split(", ")).map(x => Row(x(0), x(1).toInt))

第二步:
创建schema
引包:import org.apache.spark.sql.types._
val schema = StructType(StructField("name",StringType,true) :: StructField("age",IntegerType,true) :: Nil)

第三步:Apply the schema to the RDD of Rows
val people_df = sqlContext.createDataFrame(rowRdd, schema)

这种方式类似scala 的case class类创建DataFrame
SparkSQL案例
需求:将Hive中的emp表与mysql中的dept表进行连接查询
一、启动spark-shell
export SPARK_CLASSPATH=$SPARK_CLASSPATH:/opt/modules/hive-0.13.1-cdh5.3.6/lib/mysql-connector-java-5.1
 bin/spark-shell local[2]
二、引包并建立JDBC连接
val url = "jdbc:mysql://vin01:3306/test?user=root&password=123456"
 import java.util.Properties
 val props = new Properties()

三、创建DataFrame
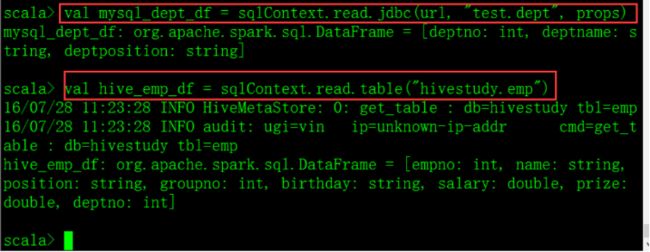
四、jion
val join_df = hive_emp_df.join(mysql_dept_df, "deptno")

五、 将jion出来的值注册为临时表,方便查询
join_df.registerTempTable("join_emp_dept")
查询:
sqlContext.sql("select empno, ename, deptno, deptname, sal from join_emp_dept order by empno").show

Spark 集成
一、Spark与Hive的集成
Spark SQL通过sqlContext读取Hive中的数据,由于Spark需要读取Hive表中的元数据,所以需要将Hive conf下的hive-site.xml文件传递到Spark conf下,做软链接:

还需要指定mysql连接jar包:
![]()
测试语句:

Spark还提供直接使用SQL的命令行:


二、Spark与Hbase集成
读取hbase上的数据
在pom文件中添加maven依赖
版本:
依赖:
<dependency>
            <groupId>org.apache.hbasegroupId>
            <artifactId>hbase-serverartifactId>
            <version>${hbase.version}version>
        dependency>
        <dependency>
            <groupId>org.apache.hbasegroupId>
            <artifactId>hbase-clientartifactId>
            <version>${hbase.version}version>
        dependency>
因为需要读取hbase的配置文件,所以需要将hbase-site.xml文件拷贝到resource中

我们知道hbase的数据存储在hdfs上,spark读取hbase的数据与mapreduce读取hbase的数据方法是一样的,首先我们在spark core中sparkContext.scala类中找到两个读取hadoop文件的api
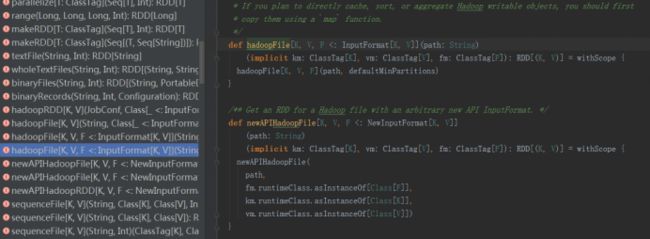
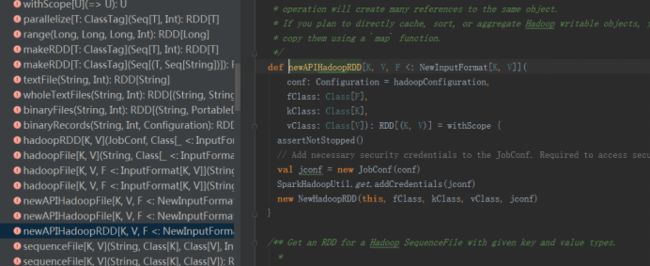
上面两个类就是读取hadoop文件的函数,这里使用新API进行解析
源码解析:
在newAPIHadoopRDD中,有四个参数conf 、fClass 、kClass 和 vClass,还有一个返回值RDD,
其中conf为设置配置文件,fClass是读取HDFS文件所使用的格式,在这里是TableInputFormat,vClass和KClass的具体含义与mapreduce和hbase的集成中一样。
完整代码:
package org.bigdata.spark.app.hbase

import org.apache.hadoop.hbase.HBaseConfiguration
import org.apache.hadoop.hbase.client.Result
import org.apache.hadoop.hbase.io.ImmutableBytesWritable
import org.apache.hadoop.hbase.mapreduce.TableInputFormat
import org.apache.spark.{SparkContext , SparkConf}
/**
 * Created by hp-pc on 2016/8/10.
 */
object SparkReadHbase {
  def main(args: Array[String]) {
    //step 0: SparkContext
    val sparkConf =new SparkConf()
      .setAppName("SparkReadHbase  Application")
      .setMaster("local[2]")
    //create SparkContext
    val sc = new SparkContext(sparkConf)
    /**
     *def newAPIHadoopRDD[K, V, F <: NewInputFormat[K, V]](
      conf: Configuration = hadoopConfiguration,
      fClass: Class[F],* @param fClass Class of the InputFormat
      kClass: Class[K],* @param kClass Class of the keys
      vClass: Class[V]): RDD[(K, V)] = withScope {
    assertNotStopped()        * @param vClass Class of the values
     */
//创建一个rdd读取hbase ,读取hbase需要定义hbase配置,结合hbase与mapreduce集成时hbase配置定义方法,再设置读取哪张表
    val conf = HBaseConfiguration.create()
    conf.set(TableInputFormat.INPUT_TABLE,"user")
    val hbaseRdd = sc.newAPIHadoopRDD(
      conf,
      classOf[TableInputFormat],
      classOf[ImmutableBytesWritable],
      classOf[Result]

    )
    println(hbaseRdd.count()+"=============================================")
    sc.stop()
  }
}
这里只是统计hbase有多少行,如果需要输出hbase具体数据,就需要使用具体api,代码如下:
import org.apache.hadoop.hbase.{CellUtil, HBaseConfiguration}
import org.apache.hadoop.hbase.client.Result
import org.apache.hadoop.hbase.io.ImmutableBytesWritable
import org.apache.hadoop.hbase.mapreduce.TableInputFormat
import org.apache.hadoop.hbase.util.Bytes
import org.apache.spark.{SparkContext, SparkConf}

object SparkReadHBase {

  def main(args: Array[String]) {
    // step 0: SparkContext
    val sparkConf = new SparkConf()
      .setAppName("SparkReadHBase Applicaiton") // name
      .setMaster("local[2]") // --master local[2] | spark://xx:7077 | yarn

    // Create SparkContext
    val sc = new SparkContext(sparkConf)

    /**
     *
    conf: Configuration  hadoopConfiguration,
      fClass: Class[F],
      kClass: Class[K],
      vClass: Class[V]

      RDD[(K, V)]
     */
    val conf = HBaseConfiguration.create()
    //   /** Job parameter that specifies the input table. */
    // val INPUT_TABLE: String = "hbase.mapreduce.inputtable"
    conf.set(TableInputFormat.INPUT_TABLE, "stu")

    // RDD[(ImmutableBytesWritable, Result)]
    val hbaseRdd = sc.newAPIHadoopRDD(
      conf,
      classOf[TableInputFormat],
      classOf[ImmutableBytesWritable],
      classOf[Result]
    )
    // 上面必须填写,具体含义,与我们讲解的MapReduc与HBase集成是一样的

    println(hbaseRdd.count() + "============================")

    hbaseRdd.map(tuple => {
      val rowkey = Bytes.toString(tuple._1.get())
      val result = tuple._2

      var rowStr = rowkey + ", "

      for(cell <- result.rawCells()){
        rowStr += Bytes.toString(CellUtil.cloneFamily(cell)) + ":" +
          Bytes.toString(CellUtil.cloneQualifier(cell)) + "->" +
          Bytes.toString(CellUtil.cloneValue(cell)) + "----"
      }
      // return
      rowStr
    }).foreach(println)

    sc.stop()

  }

}
测试:
在命令行测试,需要导入包,前两种方法都不行,使用SPARK_CLASSPATH,代码如下:
export SPARK_CLASSPATH=/opt/modules/spark-1.6.1-bin-2.5.0-cdh5.3.6/exlibs/mysql-connector-java-5.1.27-bin.jar:/opt/modules/spark-1.6.1-bin-2.5.0-cdh5.3.6/exlibs/hbase-client-0.98.6-cdh5.3.6.jar:/opt/modules/spark-1.6.1-bin-2.5.0-cdh5.3.6/exlibs/hbase-common-0.98.6-cdh5.3.6.jar:/opt/modules/spark-1.6.1-bin-2.5.0-cdh5.3.6/exlibs/hbase-protocol-0.98.6-cdh5.3.6.jar:/opt/modules/spark-1.6.1-bin-2.5.0-cdh5.3.6/exlibs/hbase-server-0.98.6-cdh5.3.6.jar:/opt/modules/spark-1.6.1-bin-2.5.0-cdh5.3.6/exlibs/htrace-core-2.04.jar:/opt/modules/spark-1.6.1-bin-2.5.0-cdh5.3.6/exlibs/protobuf-java-2.5.0.jar:/opt/modules/spark-1.6.1-bin-2.5.0-cdh5.3.6/exlibs/guava-12.0.1.jar:/opt/modules/spark-1.6.1-bin-2.5.0-cdh5.3.6/exlibs/hive-hbase-handler-0.13.1-cdh5.3.6.jar在命令行中粘贴代码:
使用paste
![]()
将读取hbase的代码以粘贴模式输入:

输出:

打印hbase信息的代码:

输出:

SPARK中聚合函数
在DataFrame类中,有如下五组函数
* @groupname basic
Basic DataFrame functions
* @groupname dfops
Language Integrated Queries
* @groupname rdd
RDD Operations
* @groupname output
Output Operations
* @groupname action
Actions
agg()支持SQL 语言and DSL(Domain)语言,有如下需求:在hbase中存储有emp表,使用agg函数进行统计:
首先创建dataframe:
val emp_df = sqlContext.sql(“select * from tmp”)
或者:val emp_df = sqlContext.read.table(“emp”)
统计工资的平均值和comm的最大值的几种写法
(1)emp_df.agg("sal" -> "avg", "comm" -> "max").show
(2)emp_df.agg(Map("sal" -> "avg", "comm" -> "max")).show
(3)emp_df.agg(max($"comm"), avg($"sal")).show //DSL写法
按照分组进行统计,即统计各个部门的comm最大值和sal平均值
emp_df.groupBy($"deptno").agg(max($"comm"), avg($"sal")).show
SPARK中定义UDF、UDAF
UDF:在实际开发中,通常在创建sqlContext后,注册UDF、 UDAF,语法:
sqlContext.udf.register(
 “”, //函数名称
 .... //函数体
 )
需求:针对hbase中的emp表,如果comm(奖金)是null的话,返回0.0,编写udf:
sqlContext.udf.register(
      "trans_comm",
      (comm: Double) => {
        if(comm == null){
          0.0
        }else{
          comm
        }
      }
)
注册完成后可以在sql中使用该udf
UDAF:定义UDAF:UDAF是用户自定义聚合函数,它的特点是多对一,即输入多个值,输出一个值。定义UDAF需要继承UserDefinedAggregateFunction 这个基类,然后重写它的抽象方法。
解析:
import org.apache.spark.sql.Row
import org.apache.spark.sql.expressions.{MutableAggregationBuffer, UserDefinedAggregateFunction}
import org.apache.spark.sql.types.{StructType, DataType}

/**
 * Created by hp-pc on 2016/8/17.
 */
object AvgUDAF  extends UserDefinedAggregateFunction{
  override def inputSchema: StructType = ???

  override def update(buffer: MutableAggregationBuffer, input: Row): Unit = ???

  override def bufferSchema: StructType = ???

  override def merge(buffer1: MutableAggregationBuffer, buffer2: Row): Unit = ???

  override def initialize(buffer: MutableAggregationBuffer): Unit = ???

  override def deterministic: Boolean = ???

  override def evaluate(buffer: Row): Any = ???

  override def dataType: DataType = ???
** 其中inputSchema是传递给聚合函数的参数的类型,在sparkSql中都是DataFrame,而DataFrame都是StructType,在这里还要封装,使用StructField,具体实现(以工资sal字段为例、Double类型):
  override def inputSchema: StructType = StructType(
  StructField("sal", DoubleType, true) :: Nil
)
true代表是否为空,Nil表示空List, :: 符号表示将前面的数组和Nil合并为一个List 。因为StructType里存放的是数组,所以这里把它转换为List,这一段代码就是指定输入字段的类型。
**其中的dataType是指定输出数据的类型,以工资为例的话就是DoubleType类型,具体代码如下:
override def dataType: DataType = DoubleType
**其中的bufferSchema就是依据需求定义的缓冲字段的类型和名称,以求平均工资为例,缓冲的是工资总和和个数两个字段,这里工资总和是Double类型,个数是Int类型,具体代码如下
   /**
 * 依据需求定义缓冲数据字段的名称和类型
 */
override def bufferSchema: StructType = StructType(
  StructField("sal_total", DoubleType, true) ::
    StructField("sal_count", IntegerType, true) :: Nil
    )
**其中的evaluate函数就是将结果计算并返回,它的Any最后就是DataType ,代码实现如下:
override def evaluate(buffer: Row): Any = {
  val salTotal = buffer.getDouble(0)
  val salCount = buffer.getInt(1)

  // return
  salTotal / salCount
}
**其中的deterministic是确定唯一性,将其值设为true即可
override def deterministic: Boolean = true
**其中的initialize是初始化定义的字段,这里将Double初始化值为0.0,Int值初始化为0,分别为第一个数据和第二个数据,代码实现如下:
/**
 * 对缓冲数据的字段值进行初始化
 * @param buffer
 */
override def initialize(buffer: MutableAggregationBuffer): Unit = {
  buffer.update(0, 0.0)
  buffer.update(1, 0)
}
**其中的update函数是更新缓存数据的值,从这个函数的参数可以看出它是从bufferSchema函数中获取值,使用buffer.getDouble(0)来获取bufferSchema中的List中第一个值,及sal_total的值,使用buffer.getInt(1)来获取List中的第二个值,及sal_count的值,代码实现如下:
// 获取缓冲数据
 val salTotal1 = buffer1.getDouble(0)
 val salCount1 = buffer1.getInt(1)
上面只是获取缓冲数据,还需要获取新传递的数据,传递的数据葱花inputSchema函数中获取。这些数据需要更新到缓冲中,代码实现如下:
// 获取传递进来的数据
 val inputSal = input.getDouble(0)
接收到数据之后,将会更新到缓冲数据,最后计算的其实是更新完的缓冲的数据,在这个例子中的更新方法是将sal_total进行累加,将sal_count进行加一计数。代码实现如下:
// 更新缓冲数据
  buffer.update(0, salTotal + inputSal)
  buffer.update(1, salCount + 1)
}
**其中merge函数是在合并分区的时候用到的,我们读取的数据实在HDFS文件系统上,必然会被分为很多块,每个块都有自己的缓冲,有自己的task,当将这些缓冲合并在一起返回最终结果时就会用到merge,合并之后的缓冲会存储在buffer1中。代码实现如下:
/**
 * 从字面看,是合并
 * Merges two aggregation buffers
 *  and stores the updated buffer values back to `buffer1`.
 *  *  This is called when we merge two partially aggregated data together.
 *  * @param buffer1
 * @param buffer2
 */
override def merge(buffer1: MutableAggregationBuffer, buffer2: Row): Unit = {
  // 获取缓冲数据
  val salTotal1 = buffer1.getDouble(0)
  val salCount1 = buffer1.getInt(1)

  // 获取缓冲数据
  val salTotal2 = buffer2.getDouble(0)
  val salCount2 = buffer2.getInt(1)

  // 更新缓冲数据
  buffer1.update(0, salTotal1 + salTotal2)
  buffer1.update(1, salCount1 + salCount2)
}
将上述代码合并之后即是一个求平均工资的UDAF,同样,在使用的时候也要对其进行注册。
注册方法:将上述代码在spark中使用paste模式进行粘贴执行,再执行下面方法进行注册,即可使用。
    sqlContext.udf.register(
      "avg_sal",
      AvgSalUDAF
    )
Spark Streaming
Streaming,是一种数据传送技术,它把客户机收到的数据变成一个稳定连续的流,源源不断的送出,使用户听到的声音或者看到的图像十分平稳,而且用户在整个文件传送完之前就可以开始在屏幕上浏览文件。
三种流处理技术:
- Apache Storm
- Spark Streaming
- Apache Samza
上述三种实时计算系统都是开源的分布式系统,具有低延时、可扩展和容错性诸多优点,他们的共同特色在于:允许在运行数据流代码时,将任务分配到一系列具有容错能力的计算机上并行运行。
Spark Streaming工作原理
Spark Streaming是一个可扩展,高吞吐、具有容错率的流式计算框架,它从数据源(soket、flume 、kafka)得到数据,并将流式数据分成很多RDD,根据时间间隔以批次(batch)为单位进行处理,能实现实时统计,累加,和一段时间内的指标的统计。
当运行Spark Streaming 框架时,Application会执行StreamingContext,并且在底层运行的是SparkContext,然后Driver在每个Executor上一直运行一个Receiver来接受数据

Receiver通过input stream接收数据并将数据分成块(blocks),之后存储在Executor的内存中,blocks会在其他的Executor上进行备份
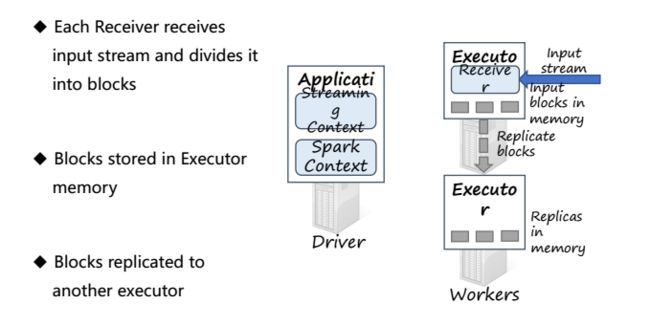
Executor将存储的blocks回馈给StreamingContext,当经过一定时间后,StreamingContext将在这一段时间内的blocks,也称为批次(batch)当作RDD来进行处理,并通过SparkContext运行Spark jobs,Spark jobs通过运行tasks在每个Executor上处理存储在内存中的blocks

这个循环每隔一个批次执行一次
DStream
DStream(Discretized Stream)是Spark Streaming的一个基本抽象,它表示一个连续的数据流,可以是从数据源接受的输入数据流,也可以是通过转换输入数据流而生成的新的待处理的数据流,实际上,DStream代表的是一系列连续的RDDs,每个DStream的RDD都包含了一个批次的数据,对DStream的操作就是对它的一系列RDD进行操作,它有两种方式创建,一是接收数据源的流数据创建,二是通过转换,每一个时间间隔会生成一个RDD。

Spark Streaming编程模型
首先导入包:
import org.apache.spark._
import org.apache.spark.streaming._
import org.apache.spark.streaming.StreamingContext._
创建StreamingContext:(这里local2表示启动了两个线程,必须两个以上
val conf = new SparkConf().setMaster("local[2]").setAppName("NetworkWordCount")
val ssc = new StreamingContext(conf, Seconds(1))  //设置批次时间,测试可以用5秒
//在Spark-shell中可以通过传递sc方式创建StreamingContext:
val ssc = new StreamingContext(sc, Seconds(1))- 第一步:接收数据
ssc创建好之后就可以读取数据源了,根据StreamingContext源码可以看到读取数据源的方法:

这里举例使用套接字作为数据源,即使用socketTextStream方法
查看其注释:
/**
 - Create a input stream from TCP source hostname:port. Data is received using
 - a TCP socket and the receive bytes is interpreted as UTF8 encoded `\n` delimited lines.
 - @param hostname      Hostname to connect to for receiving data
 - @param port          Port to connect to for receiving data
 - @param storageLevel  Storage level to use for storing the received objects
 -                      (default: StorageLevel.MEMORY_AND_DISK_SER_2)
 */
def socketTextStream(
    hostname: String,
    port: Int,
    storageLevel: StorageLevel = StorageLevel.MEMORY_AND_DISK_SER_2
  ): ReceiverInputDStream[String] = withNamedScope("socket text stream") {
  socketStream[String](hostname, port, SocketReceiver.bytesToLines, storageLevel)
}
从上面的源码中可以看出该方法有三个参数,最后一个有默认值,那么以最简单的方式创建一个Dstream:
val socketDStream= scc.socketTextStream(“vin01”,9999)
这里的socketDStream是一行一行的数据
- 第二步:基于DStream进行处理数据
// 将行数据分隔成单词
val words = socketDStream.flatMap(_.split(" "))
// 计算这一批次的词频,先将单词转换成元组,再reduce
val pairs = words.map(word => (word, 1))
 val wordCounts = pairs.reduceByKey(_ + _)
第三步:输出
wordCounts.print()
最后启动该应用即可:
ssc.start() // Start the computation
ssc.awaitTermination() // Wait for the computation to terminate
运行测试:

输出:

Spark Streaming 读取HDFS数据
读取HDFS上的数据,需要用到Spark Streaming类中的一个方法:
即:
/**
 * Create a input stream that monitors a Hadoop-compatible filesystem
 * for new files and reads them as text files (using key as LongWritable, value
 * as Text and input format as TextInputFormat). Files must be written to the
 * monitored directory by "moving" them from another location within the same
 * file system. File names starting with . are ignored.
 * @param directory HDFS directory to monitor for new file
 */
def textFileStream(directory: String): DStream[String] = withNamedScope("text file stream") {
  fileStream[LongWritable, Text, TextInputFormat](directory).map(_._2.toString)
}
同样,使用wordcount模板,更改的是创建DStream的方式
import org.apache.spark._
import org.apache.spark.streaming._
import org.apache.spark.streaming.StreamingContext._

val ssc = new StreamingContext(sc, Seconds(5))

val socketDStream = ssc.textFileStream("/user/vin/sparkstreaming/hdfsfiles")

val words = socketDStream.flatMap(_.split(" "))
val pairs = words.map(word => (word, 1))
val wordCounts = pairs.reduceByKey(_ + _)

wordCounts.print()

ssc.start()
ssc.awaitTermination()
将数据文件上传到HDFS上:

执行结果:

*通常,在开发测试中,通常把代码写入脚本中,然后再spark-shell中执行该脚本:
步骤:创建.scala文件,将代码拷贝至该文件中,在spark-shell中使用 :load +绝对路径执行*

Spark Streaming的集成
- 与Flume进行集成
spark与提供了与Flume集成时的通用类:flumeUtils,但是必须依赖flume的某些jar包,所以在开发时,maven工程中要添加依赖:
(参考官网),如果在命令行测试,则需要添加classpath,这里在spark主目录下创建exlibs来存放jar包。
flumeUtils.scala源码
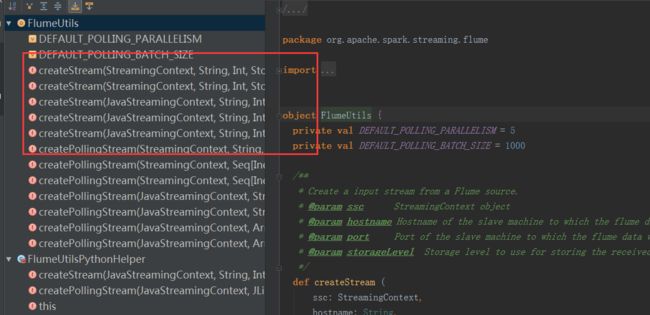
启动spark-shell时,多个包之间用逗号隔开。
bin/spark-shell \
--master local[3] \
--jars exlibs/mysql-connector-java-5.1.27-bin.jar,\
exlibs/spark-streaming-flume_2.10-1.6.1.jar,\
exlibs/flume-avro-source-1.5.0-cdh5.3.6.jar,\
exlibs/flume-ng-sdk-1.5.0-cdh5.3.6.jar
集成测试:在启动spark-shell前,首先配置flume,设置接收源,这里测试基于push的测试,
配置flume:创建flume-push-spark.properties文件,$FLUME_HOME/conf下,
通过notepad++进行配置
主要是配置sinks

注:spark-push.txt文件已经存在
flume配置完成后,编写与flume集成的第一个测试程序wordcount:flume.scala(存储在spark主目录下)
import org.apache.spark._
import org.apache.spark.streaming._
import org.apache.spark.streaming.StreamingContext._
import org.apache.spark.streaming.flume._

val ssc = new StreamingContext(sc, Seconds(5))

// Step 1:Recevier Data From Where
// Flume: FlumeUtils, Kafka: KafkaUtils
val flumeDStream = FlumeUtils.createStream(ssc, "vin01", 9988).map(event => new String(event.event.getBody.array()))

// Step 2: Process Data Base DStream
// DStream[Long]
val words = flumeDStream.flatMap(_.split(" "))

// Count each word in each batch
val pairs = words.map(word => (word, 1))
val wordCounts = pairs.reduceByKey(_ + _)

// Step 3: Output Result
// Print the first ten elements of each RDD generated in this DStream to the console
wordCounts.print()

ssc.start()             // Start the computation
ssc.awaitTermination()  // Wait for the computation to terminate

sc.stop
启动Spark shell:

spark-shell application应用提交:
:load /opt/modules/spark-1.6.1-bin-2.5.0-cdh5.3.6/flume.scala
启动flume来监控spark-shell.txt文件:
启动命令:(添加上将结果显示在控制台上的参数console)
bin/flume-ng agent --conf conf/ --name a1 --conf-file conf/flume-push-spark.properties -Dflume.root.logger=DEBUG,console在flume启动前需要先在spark-shell中启动Flume的wordcount程序,否则运行报错:(先有接收的才能推给它)

测试:使用echo命令往spark-push.txt 里面追加数据

测试结果:

- Spark Streaming与kafka的集成(基于直接取direct)
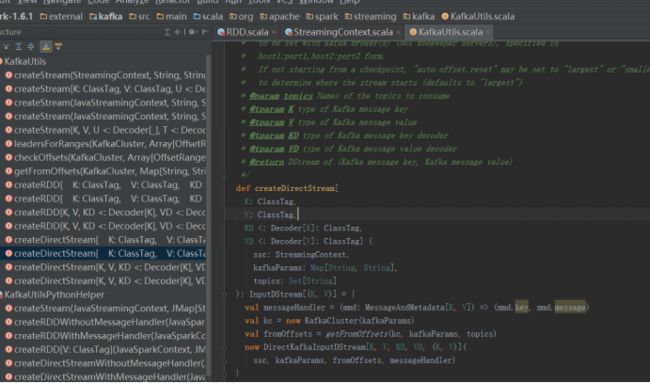
SparkStreaming与kafka集成,基于Direct方式,没有Recevier,数据存储在kafka中,kafka中有Topic,Topic中有分区,所以当spark job运行时,会调用kafka消费者api,找到某个topic,从zookeeper上获取偏移量offset,从而创建rdd,然后再进行rdd数据处理,处理完后更新zookeeper上的偏移量,下一个job运行时同样的流程,只不过传递的参数不一样
参考源码,创建最简单的DStream:
集成使用:
若使用idea编程,需在pom文件中添加依赖包
(参考官网)
编程:(此程序使用了不仅进行wordcount,还对其进行了累加)
import kafka.serializer.StringDecoder
import org.apache.spark.streaming._
import org.apache.spark.streaming.kafka.KafkaUtils
import org.apache.spark.{SparkConf, SparkContext}

    val ssc = new StreamingContext(sc, Seconds(5))

    // set checkpoint
    ssc.checkpoint("sparkstreaming/kafka/")

    // Step 1: Recevier Data From Where
    val kafkaParams = Map("metadata.broker.list" -> "vin01:9092")
    val topics = Set("sparkPullTopic")

    // InputDStream[(K, V)]
    val socketDStream = KafkaUtils.createDirectStream[
      String, String,StringDecoder, StringDecoder](
      ssc,
      kafkaParams, // Map[String, String]
      topics  // Set[String]
    ).map(_._2)

    // Step 2: Process Data Base DStream
    // Split each line into words
    val words = socketDStream.flatMap(_.split(" "))

    // Count each word in each batch
    val pairs = words.map(word => (word, 1))
    /**
     * updateFunc: (Seq[V], Option[S]) => Option[S]
     *
     * DStream[(Key, Value)]
     * Seq[V]
     *    V: 代表的是 DStream中Value的类型,针对WordCount程序来说,V是Int
     * Option[S]
     *    Option\Some\None
     *    S: 代表的是状态State,存储的是以前分析的结果,针对WordCount程序来说,S是Count,Int
     *      S可以是任意类型,依据实际需求而定
     *
     */
    val wordCounts = pairs.updateStateByKey(
      (values: Seq[Int], state: Option[Int]) => {
        //获取当前的要计算的值
        val currentCount = values.sum
        // 获取以前状态中的值
        val previousCount = state.getOrElse(0)

        // update state and return
        Some(currentCount + previousCount)
      }
    )

    // Step 3: Output Result
    // Print the first ten elements of each RDD generated in this DStream to the console
    wordCounts.print()

    ssc.start()             // Start the computation
    ssc.awaitTermination()  // Wait for the computation to terminate

    sc.stop
kafka配置:
创建topic:
查看当前有哪些topic:
bin/kafka-topics.sh --list --zookeeper vin01:2181
创建sparkPull topic:(一个副本、一个分区)
bin/kafka-topics.sh --create --zookeeper vin01:2181 --replication-factor 1 --partitions 1 --topic sparkPull

打开producer:
bin/kafka-console-producer.sh --broker-list vin01:9092 --topic sparkPull

打开consumer以便于监控:
bin/kafka-console-consumer.sh --zookeeper vin01:2181 --topic sparkPull --from-beginning
![]()
启动spark-shell:
kafka依赖于几个包,在启动时必须指定(参考spark添加jar包的三种方式):
bin/spark-shell  \
--master local[3]  \
--jars exlibs/mysql-connector-java-5.1.27-bin.jar, \
exlibs/spark-streaming-kafka_2.10-1.6.1.jar, \
exlibs/kafka_2.10-0.8.2.1.jar, \
exlibs/kafka-clients-0.8.2.1.jar, \
exlibs/zkclient-0.3.jar, \
exlibs/metrics-core-2.2.0.jar
此时jar包就导入了

运行之前的kafka.scala应用程序:
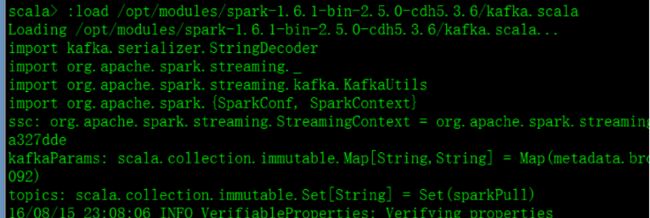
:load /opt/modules/spark-1.6.1-bin-2.5.0-cdh5.3.6/kafka.scala
运行成功
测试:在produce界面输入单词
第一次输入第一行回车
第二次输入第二行回车

在consumer界面看到输出:

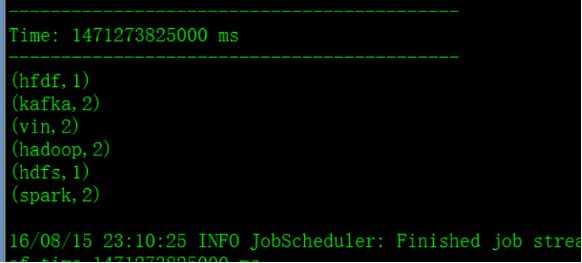
查看统计结果:
第一次输出:

第二次输出:(实现了累加)
Spark Streaming常用API解析
- UpdateStateByKey
UpdateStateByKey通常用作更新记录使用,能将Spark Streaming之前处理的数据记录起来,进而实现累加功能
updateStateBykey方法存在于PairDStreamFunctions.scala中,可以从DStream.scala中的 object DStream中的toPairDStreamFunctions方法中链接到PairDStreamFunctions.scala中。


解析updateStateByKey:
/**
 * Return a new "state" DStream where the state for each key is updated by applying
 * the given function on the previous state of the key and the new values of each key.
 * Hash partitioning is used to generate the RDDs with Spark's default number of partitions.
 * @param updateFunc State update function. If `this` function returns None, then
 *                   corresponding state key-value pair will be eliminated.
 * @tparam S State type
 */
def updateStateByKey[S: ClassTag](
    updateFunc: (Seq[V], Option[S]) => Option[S]
  ): DStream[(K, S)] = ssc.withScope {
  updateStateByKey(updateFunc, defaultPartitioner())
}
其中:
updateFunc: (Seq[V], Option[S]) => Option[S]
代表一个匿名函数,Options[S]是该函数粉返回类型,
Seq[V]表示泛型,因为DStream是[(key , value)]格式的,Seq[V]中V代表的是DStream中value的类型,针对wordcount程序来说,V为整型Int,Seq[V]表示一个集合,存储了value的类型。
Option[S]代表一个状态,Option有两个子类:Some、None,
这里的S代表的代表的是一个状态,存储的是以前分析的结果,由于不同的应用分析结果不同,针对wordcount程序来说,分析结果是Count,其类型也是Int。但在不同的应用中,S可以是任意的类型,依据实际需求而定。
根据分析可以得出如下代码:
……
val WordCounts = Pairs.updataStateByKey((values:Seq[Int], state:Option[Int]) => {
 //获取当前要计算的值
 val currentCount = values.sum
 //获取以前状态中的值
 val previousCount = state.getOrElse(0)
 //更新状态,返回
 Some(currentCount + prevousCount)
 })
完整代码:
import org.apache.spark.streaming._
import org.apache.spark.{SparkConf, SparkContext}

object UpdateStateWordCount {
  def main(args: Array[String]) {
    // step 0: SparkContext
    val sparkConf = new SparkConf()
      .setAppName("LogAnalyzer Applicaiton") // name
      .setMaster("local[2]") // --master local[2] | spark://xx:7077 | yarn

    // Create SparkContext
    val sc = new SparkContext(sparkConf)

    val ssc = new StreamingContext(sc, Seconds(5))

    // set checkpoint
    ssc.checkpoint("sparkstreaming/socketwc/")

    // Step 1: Recevier Data From Where
    val socketDStream = ssc.socketTextStream("hadoop-senior01.ibeifeng.com", 9999)


    // transformFunc: RDD[T] => RDD[U]
    // 仅仅针对DStream中的RDD来操作,在实际开发中,RDD的操作更加方便
    /**
     * WordCount
     *    . ? @ # $ !
     *    如果单词是上述标点符号,统计毫无意义,可以进行过滤
     */
    val filterRdd = sc.parallelize(List(".", "?", "@", "#", "!")).map((_, true))
    socketDStream.transform(rdd => {
      val tupleRdd = rdd.map((_, 1))
      // join,filter
      tupleRdd.leftOuterJoin(filterRdd)
    })

    // Step 2: Process Data Base DStream
    // Split each line into words
    val words = socketDStream.flatMap(_.split(" "))

    // Count each word in each batch
    val pairs = words.map(word => (word, 1))
    /**
     * updateFunc: (Seq[V], Option[S]) => Option[S]
     *
     * DStream[(Key, Value)]
     * Seq[V]
     *    V: 代表的是 DStream中Value的类型,针对WordCount程序来说,V是Int
     * Option[S]
     *    Option\Some\None
     *    S: 代表的是状态State,存储的是以前分析的结果,针对WordCount程序来说,S是Count,Int
     *      S可以是任意类型,依据实际需求而定
     *
     *  回顾一下:
     *    reduceByKey()
     *    =
     *    reduce(Key, Values)
     *
     */
    val wordCounts = pairs.updateStateByKey(
      (values: Seq[Int], state: Option[Int]) => {
        //获取当前的要计算的值
        val currentCount = values.sum
        // 获取以前状态中的值
        val previousCount = state.getOrElse(0)

        // update state and return
        Some(currentCount + previousCount)
      }
    )

    val wcDStream = pairs.updateStateByKey(
      (values: Seq[Int], state: Option[Int]) => Some(values.sum + state.getOrElse(0)))

    // Step 3: Output Result
    // Print the first ten elements of each RDD generated in this DStream to the console
    wordCounts.print()

    ssc.start()             // Start the computation
    ssc.awaitTermination()  // Wait for the computation to terminate

    sc.stop
  }

}
测试:
打开nc 9999端口,运行程序:
两次在端口输入:

第一次输出:

第二次输出:
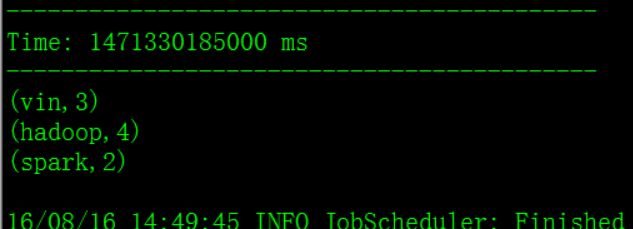
实现了累加统计,测试成功
注:在代码中,使用了transform方法,对其进行解析:
- DStream的transform方法
transform方法在DStream中,其源码为:
/**
 * Return a new DStream in which each RDD is generated by applying a function
 * on each RDD of 'this' DStream.
 */
def transform[U: ClassTag](transformFunc: RDD[T] => RDD[U]): DStream[U] = ssc.withScope {
  // because the DStream is reachable from the outer object here, and because
  // DStreams can't be serialized with closures, we can't proactively check
  // it for serializability and so we pass the optional false to SparkContext.clean
  val cleanedF = context.sparkContext.clean(transformFunc, false)
  transform((r: RDD[T], t: Time) => cleanedF(r))
}
可以看出,它将DStream中的RDD进行单独单独操作,最终返回的还是DStream,所以如果进行wordcount过滤的话,将需要过滤的符号存储在RDD中,对RDD 进行join操作。匹配过滤掉这些字符。
具体代码:
 /**
     * WordCount
     *    . ? @ # $ !
     *    如果单词是上述标点符号,统计毫无意义,可以进行过滤
     */
    val filterRdd = sc.parallelize(List(".", "?", "@", "#", "!")).map((_, true))
    socketDStream.transform(rdd => {
      val tupleRdd = rdd.map((_, 1))
      // join,filter
      tupleRdd.leftOuterJoin(filterRdd).filter(tuple => {
val x1 = tuple_1
val x2 =tuple_2 //(i, option[boolean])
if (!x2._2.isEmpty){
 true
}else
{false
}

})
    })
解释:
filterRdd存储了这些符号,进行RDD之间的join需要将其映射成元组对,所以对其进行映射,
在transform中,对RDD进行操作,首先将其映射为tupleRdd(元组对),以此tupleRdd为准与filterRdd进行join。join完成之后还是元组对,所以对该元组对进行操作,首先判断tupleRdd中的值是否是这些符号之中的一个,join之后是两个元组对进行join,所以x2在这里也是一个元组对,它的类型是( 1 , option(boolean)),如果是这个符号,那么返回的是(1,true),否则返回的是空(1,none),所以x2._2如果是空,则为这些符号,需要过滤掉。其中filter(func) : 返回一个新的数据集,由经过func函数后返回值为true的原元素组成。
join(otherDataset, [numTasks]) :在类型为(K,V)和(K,W)类型的数据集上调用,返回一个(K,(V,W))对,每个key中的所有元素都在一起的数据集
- DStream的foreachRDD方法
DStream中还有一个方法foreachRDD,它与transform一样是对RDD进行操作,但是它没有返回值,比如遇到需求将分析出来的结果存储在mysql中:
// foreachFunc: (RDD[T], Time) => Unit
dstream.foreachRDD(rdd => {
  // 将分析的数据存储到JDBC中,MySQL数据中
  val connection = createJDBCConnection()  // executed at the driver
  rdd.foreach { record =>
    connection.putStateResult(record) // executed at the worker
  }
})
Spark Streaming的窗口函数
spark streaming提供了窗口操作,允许在某个大小的窗口中进行操作,常用于统计某个时间段内指标:
比如需求:对词频的统计,要求每次统计的数据是最近10s的数据
分析windows源码:

分析reduceByKeyAndWindow:
/**
 * Return a new DStream by applying `reduceByKey` over a sliding window. This is similar to
 * `DStream.reduceByKey()` but applies it over a sliding window. Hash partitioning is used to
 * generate the RDDs with Spark's default number of partitions.
 * @param reduceFunc associative reduce function
 * @param windowDuration width of the window; must be a multiple of this DStream's
 *                       batching interval
 * @param slideDuration  sliding interval of the window (i.e., the interval after which
 *                       the new DStream will generate RDDs); must be a multiple of this
 *                       DStream's batching interval
 */
def reduceByKeyAndWindow(
    reduceFunc: (V, V) => V,
    windowDuration: Duration,
    slideDuration: Duration
  ): DStream[(K, V)] = ssc.withScope {
  reduceByKeyAndWindow(reduceFunc, windowDuration, slideDuration, defaultPartitioner())
}
在源码中,可以看到需要传递三个参数,reduceFunc:RDD的操作,windowDuration:窗口的大小,即每次处理几个批次的数据,必须是接收数据时间间隔的整数倍(即 Seconds(5)的整数倍),slideDuration表示窗口的时间间隔,即每隔多少秒窗口执行一次。
在wordcount程序中只需修改:
val wordCounts = pairs.reduceByKey(_ + _)  这一行代码,修改为:
val wordCounts = pairs.reduceByKeyAndWindow((x:Int,y:Int)=x+y,Seconds(10),Second(4))
Second(10)表示每次处理2 X5秒的数据,在这里是统计两个批次的数据,Second(4)表示每隔4s执行一次窗口。


