CoolWeatherplus项目
文章目录
- 功能概述
- 实现效果
- 原版的效果图
- 本项目的效果图:
- 功能一
- 实现方法
- 遇到的坑:
- 1.Cannot resolve symbol ‘AppCompatActivity’。
- 2.设置activity为弹窗形式时的bug。
- 3.ADM的data不能打开
- 4.GitHub上传
- 总结
- 功能二
- 实现方法
- 遇到的坑
- 1.AndroidStduio中导入的图片文件必须是以字母开头。
- 2.之前的读取的数据有问题,
- 功能三
- 3.1 更改为真实数据
- 实现方法
- 遇到的坑
- 1.GsonFormat插件点击ok后没有反应。
- 2.使用JsonDeserializer
- 3.Gson没办法直接解析这个类
- 总结
- 3.2 增加生活建议
- 效果图
- 实现方法
- 遇到的坑
- 1.使用AndroidStudio自带的图标
- 2.忘记给layout删除和增加
- 3.目前为止最大的坑,图标是蓝色的,而我们的整体颜色是白色的
- 4.setting 图标是黑色的
- 总结
- 3.3 优化now.xml文件
- 效果图
- 遇到的坑
- 1.android:gravity与android:layout_gravity
- 2.设置ImageView居中
- 3.RelativeLayout中的子View靠右显示
- 功能四
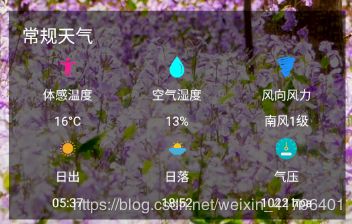
- 4.1 增加常规天气
- 效果图
- 实现方法
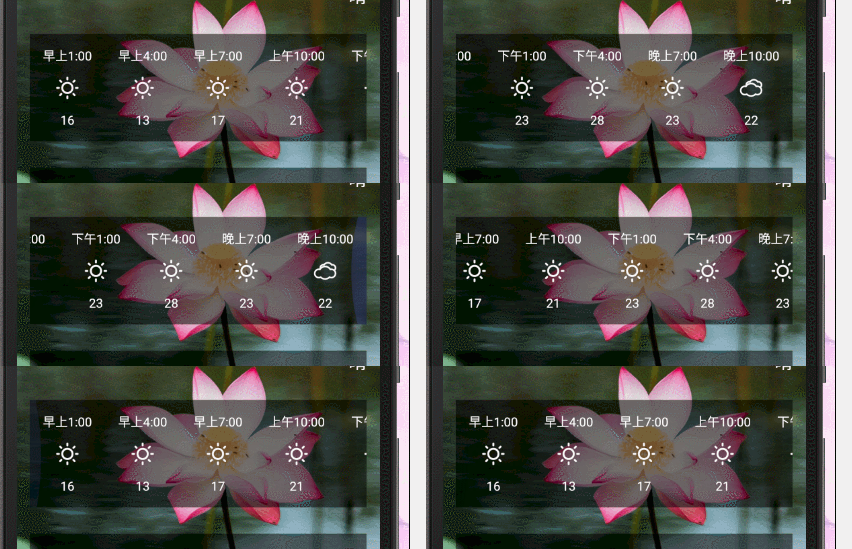
- 4.2 隔小时天气功能
- 效果图
- 实现方法
- 遇到的坑
- 1.刷新界面后,RecylcerView不从头显示,而是从上一次的显示。
- 总结
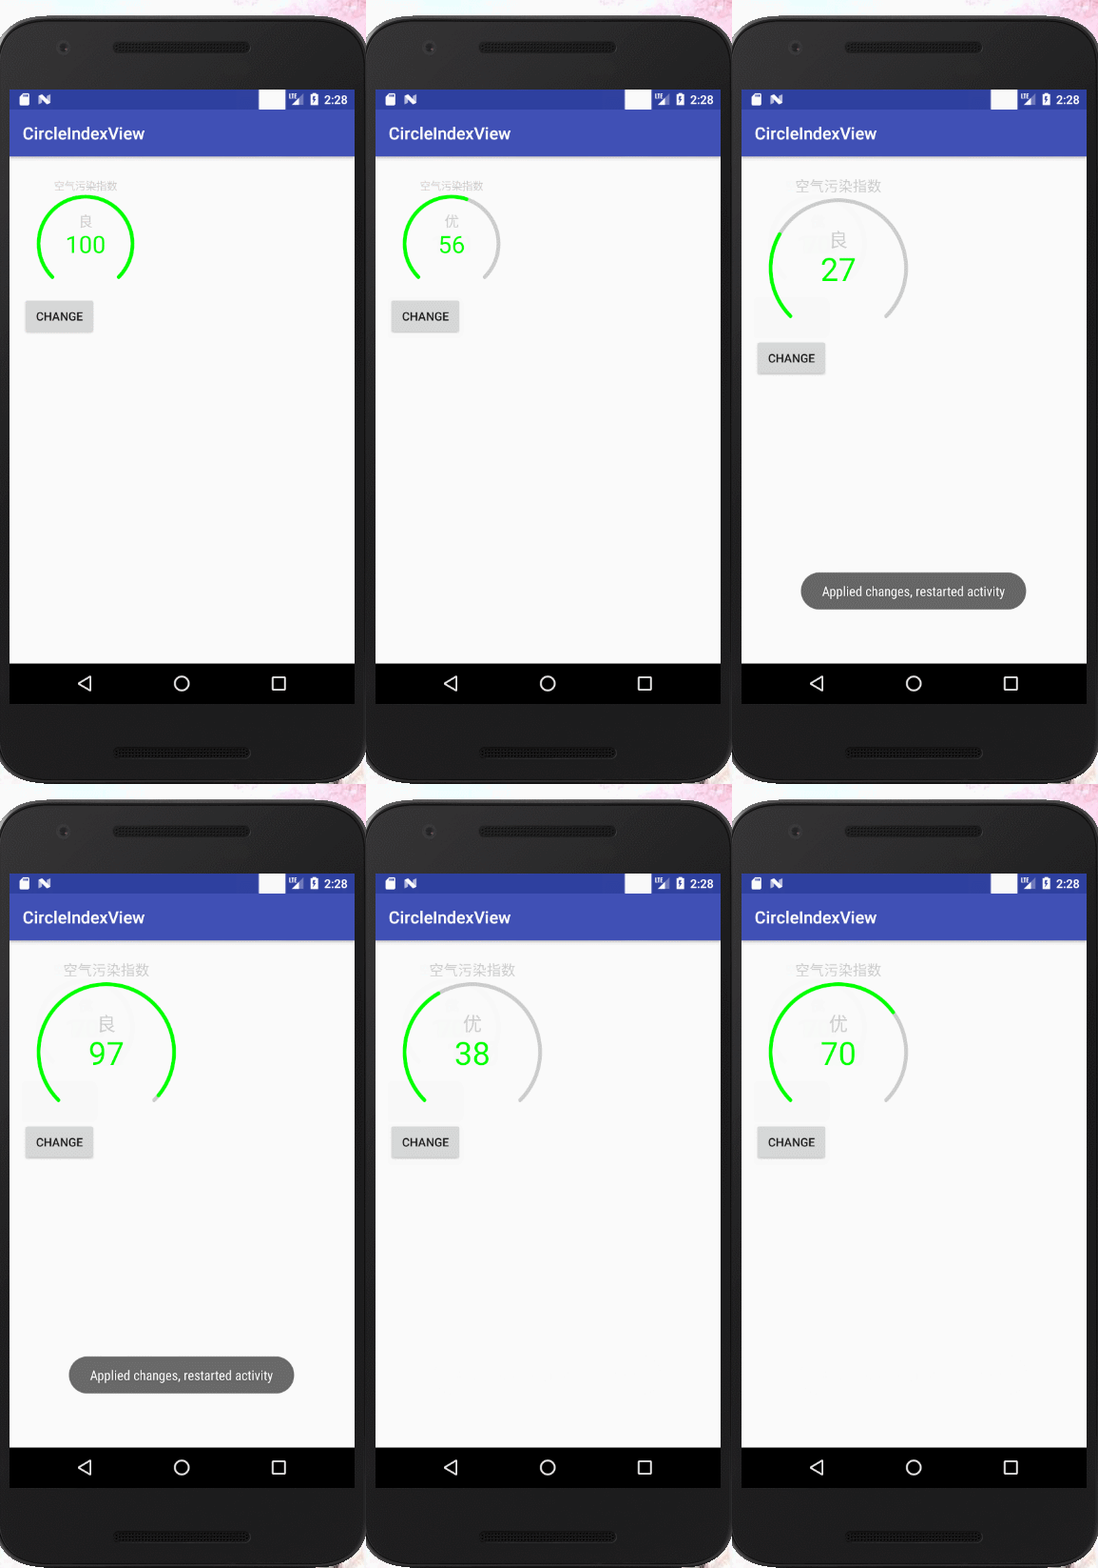
- 4.3 空气质量功能
- 效果图
- 实现方法
- 遇到的坑
- 1.自定义View中值无法更改
- 2.drawText的baseline问题
- 3.更改原版view的字体,使原版字体根据圈的大小而自适应
- 4.普通用户和认证开发者仅可访问全国地级市及地级市所辖的国控站点数据,且不支持通过经纬度获取数据(可使用城市名称、ID、IP)
- 总结
- 1.TypedValue.applyDimension()方法的作用
- 2.RectF的四个参数分别是左上右下。
- 3.动画总结
- airnow.xml与airnow_item.xml
- 功能五
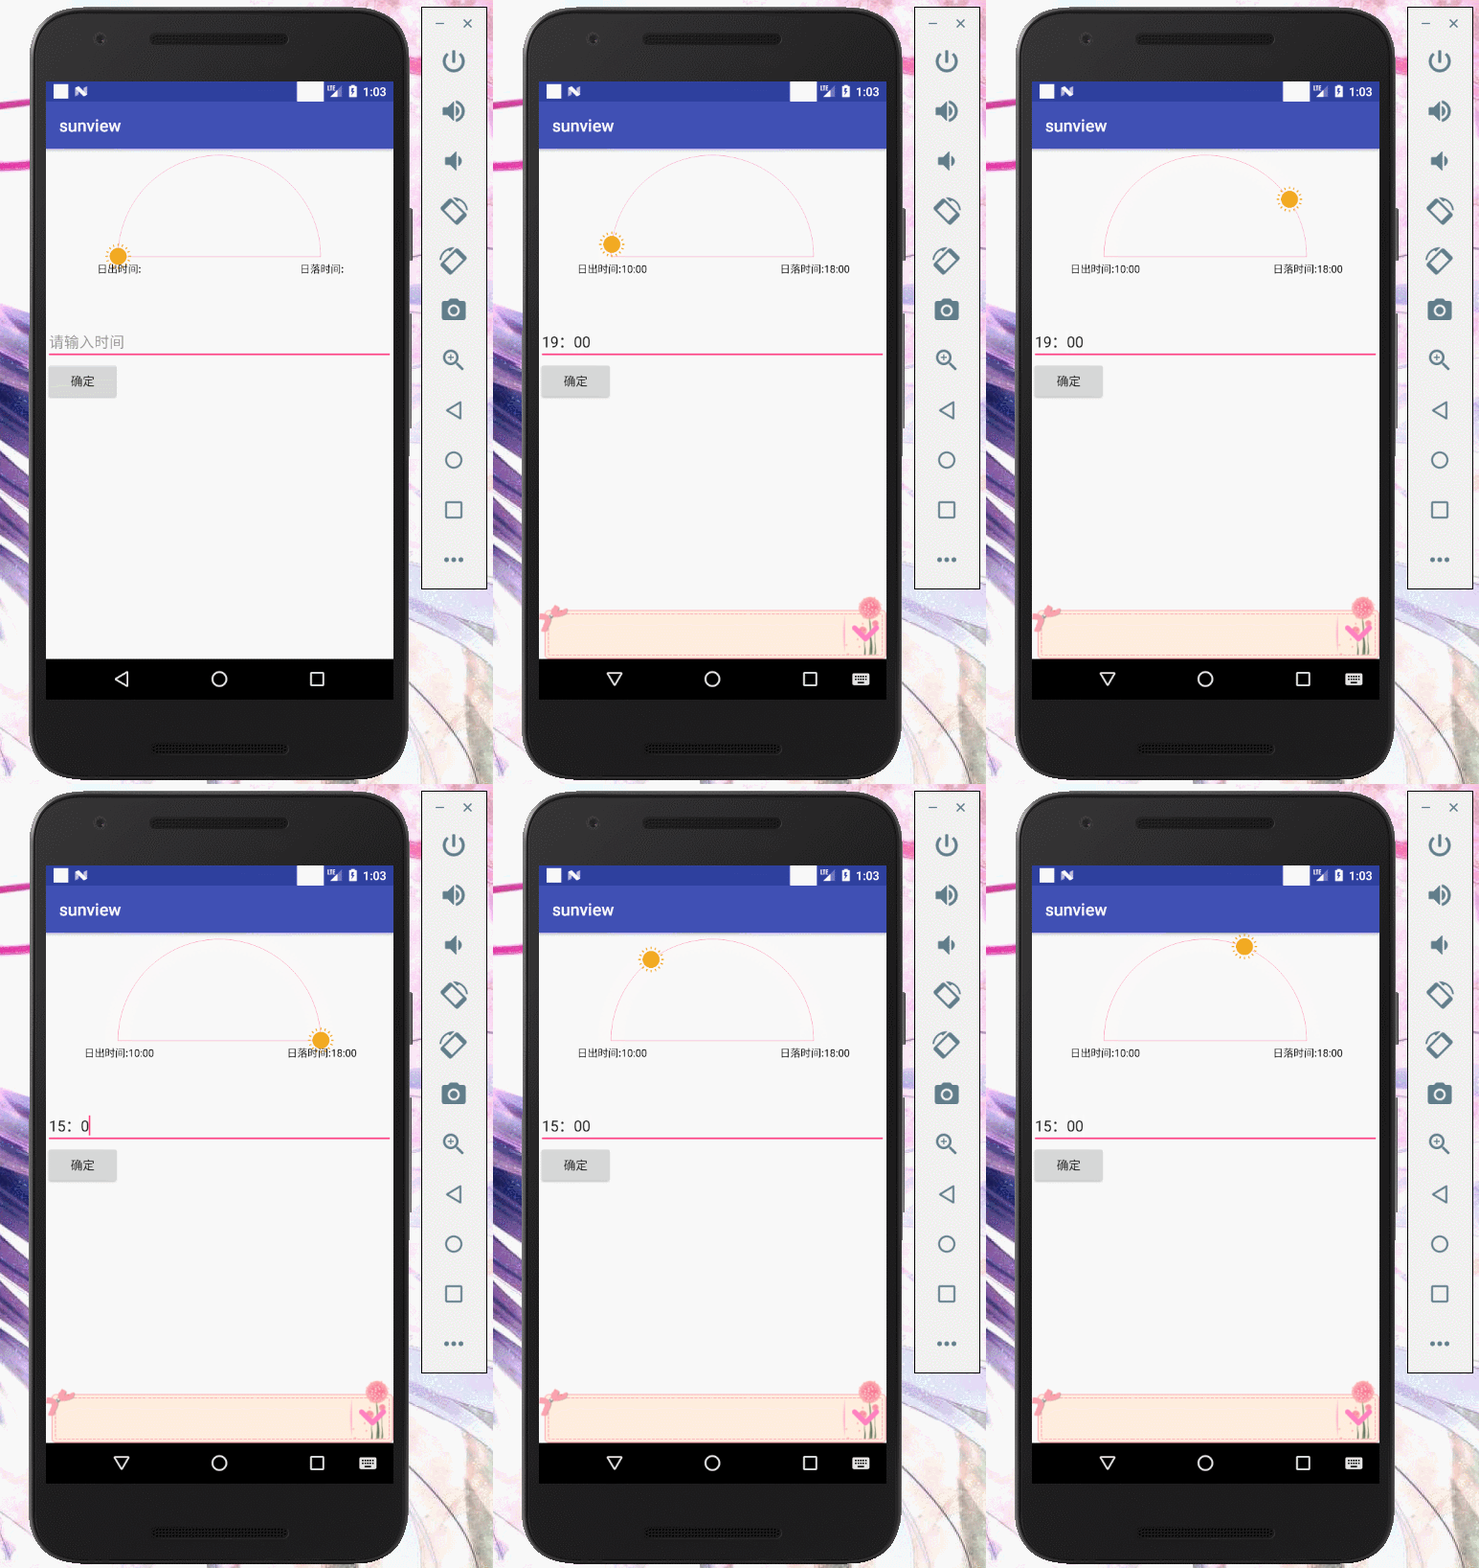
- 5.1 日出日落动态效果
- 效果图
- 实现方法
- 总结
- 1. 图片缩小的方法
- 2.获取文字长度的方法
- 3.动画效果实现方法
- 总结
- 0.综述
- 1.layout文件与引用的库
- 2.复用Fragment并通过LitePal来存储省/市/县数据
- 3.通过OkHttp获取数据通过Gson解析数据最终显示
- 4.前台服务
- 自定义View+动画
- 定位功能
- 前期准备
- 具体使用:
功能概述
数据来源:和风天气。
所涉及技术包括:OkHttp+Gson+LitePal+自定义View+RecyclerView
其中实现以下了功能
1.用户自定义是否更新数据和后台更新数据时间;
2.优化软件界面,根据不同天气使用不同图标;
3.将最初的虚拟天气数据更改为真实天气数据,拓展生活建议功能,优化当前天气(now.xml)布局;
4.添加常规天气,隔小时天气,空气质量功能,
5.尝试添加各种自定义View
6.添加通知栏,通知天气。
7.增加定位功能
项目地址: Github地址
实现效果
原版的效果图
本项目的效果图:
功能一
用户自定义是否更新数据和后台更新数据时间。
实现方法
设置一个button,点击它跳转到另一个活动,这个活动以弹窗形式出现,将获取的数据存入SharedPreferences,在服务中通过SharedPreferences去获取这个数据,并设置时间。
遇到的坑:
1.Cannot resolve symbol ‘AppCompatActivity’。
程序运行都ok,但就是会出现这个问题,很多都是红色的线。
解决方法:File->Invalidate Caches/Restart。
2.设置activity为弹窗形式时的bug。
application 中,theme是以什么开头的,我们的activity中的theme也要是以什么开头,具体看下述代码。
<application
        android:theme="@style/AppTheme">
        <!-- 因为之前设置了theme是@style所以这里不能用@android:style/Theme.Dialog-->
        <activity android:name=".SettingActivity"
            android:label="自动更新的时间"
            android:theme="@style/Theme.AppCompat.Dialog"
            >
        </activity>
    </application>
3.ADM的data不能打开
解决方法参考我的另一篇博客,戳这个连接。
4.GitHub上传
GitHub上传个人库。新手经常会遇到一个问题就是我们需要将远程版本库中的文件拷到上一个文件夹里,不过.git文件是隐藏的,我们没办法直接复制粘贴。这时可以使用这个命令。不过使用这个方法会把这个文件夹拷贝到coolweather文件夹的外面。
cp -af coolweatherplus ../
总结
1.在服务中使用Sp和在活动中使用Sp方法相同。
2.跳转到的活动命名为SettingActivity,当我们点击按钮确定后,我让他跳转回WeatherActivity,跳转回去后,WeatherActivity属于重新创建,所以会执行onCreate(),在这个方法中,我们会调用显示天气的方法showWeatherInfo(),在这个方法中就开启了服务。我最初是在SettingActivity中又开启了一次服务,这是不需要的。
3.SharedPreferences的写入和读取,碎片就突出一个getContext()就行了。
读取数据,服务与活动
SharedPreferences prefs=PreferenceManager.getDefaultSharedPreferences(this);
        String times=prefs.getString("times",null);
碎片
SharedPreferences prefs= PreferenceManager.getDefaultSharedPreferences(getContext());
                        String test=prefs.getString("times",null);
写入数据:
在碎片中写入:
 SharedPreferences.Editor editor=PreferenceManager.
                                //不能使用getDefaultSharedPreferences(WeatherActivity.this)
                                getDefaultSharedPreferences(getContext())
                                .edit();

                        editor.putString("weather_id",weatherid);
                        editor.apply();
在活动或服务中写入:
SharedPreferences.Editor editor=PreferenceManager.
                                    getDefaultSharedPreferences(AutoUpdateService.this)
                                    .edit();
                            editor.putString("weather",responseText);
                            editor.apply();
SharedPreferences.Editor editor = PreferenceManager.
                                    getDefaultSharedPreferences(WeatherActivity.this).edit();
                            editor.putString("weather", responseText);
                            editor.apply();
4.要多从ADM中取出我们创建的SharedPerference来看。如果遇到不让你导出,重新选择一下设备即可。导出文件如下。
<?xml version="1.0" encoding="ISO-8859-1"?>
<map>
<string name="bing_pic">http://cn.bing.com/th?id=OHR.BistiBadlands_ZH-CN5428677883_1920x1080.jpg&rf=NorthMale_1920x1081920x1080.jpg</string>
<string name="times">4/20</string>
<string name="weather_id">CN101030100</string>
<string name="weather">{"HeWeather":[{"basic":{"cid":"CN101030100","location":"天津","parent_city":"天津","admin_area":"天津","cnty":"中国","lat":"36.05804062","lon":"103.82355499","tz":"+8.00","city":"天津","id":"CN101030100","update":{"loc":"2019-04-03 21:20","utc":"2019-04-03 13:20"}},"update":{"loc":"2019-04-03 21:20","utc":"2019-04-03 13:20"},"status":"ok","now":{"cloud":"91","cond_code":"100","cond_txt":"晴","fl":"11","hum":"12","pcpn":"0.0","pres":"1015","tmp":"14","vis":"16","wind_deg":"46","wind_dir":"东北风","wind_sc":"2","wind_spd":"7","cond":{"code":"100","txt":"晴"}},"daily_forecast":[{"date":"2019-04-04","cond":{"txt_d":"晴"},"tmp":{"max":"18","min":"3"}},{"date":"2019-04-05","cond":{"txt_d":"晴"},"tmp":{"max":"16","min":"4"}},{"date":"2019-04-06","cond":{"txt_d":"晴"},"tmp":{"max":"20","min":"5"}},{"date":"2019-04-07","cond":{"txt_d":"阴"},"tmp":{"max":"19","min":"6"}},{"date":"2019-04-08","cond":{"txt_d":"阴"},"tmp":{"max":"17","min":"4"}},{"date":"2019-04-09","cond":{"txt_d":"小雨"},"tmp":{"max":"13","min":"3"}}],"aqi":{"city":{"aqi":"60","pm25":"22","qlty":"良"}},"suggestion":{"comf":{"type":"comf","brf":"舒适","txt":"白天不太热也不太冷,风力不大,相信您在这样的天气条件下,应会感到比较清爽和舒适。"},"sport":{"type":"sport","brf":"较适宜","txt":"天气较好,户外运动请注意防晒。推荐您进行室内运动。"},"cw":{"type":"cw","brf":"较适宜","txt":"较适宜洗车,未来一天无雨,风力较小,擦洗一新的汽车至少能保持一天。"}},"msg":"所有天气数据均为模拟数据,仅用作学习目的使用,请勿当作真实的天气预报软件来使用。"}]}</string>
</map>
效果图:
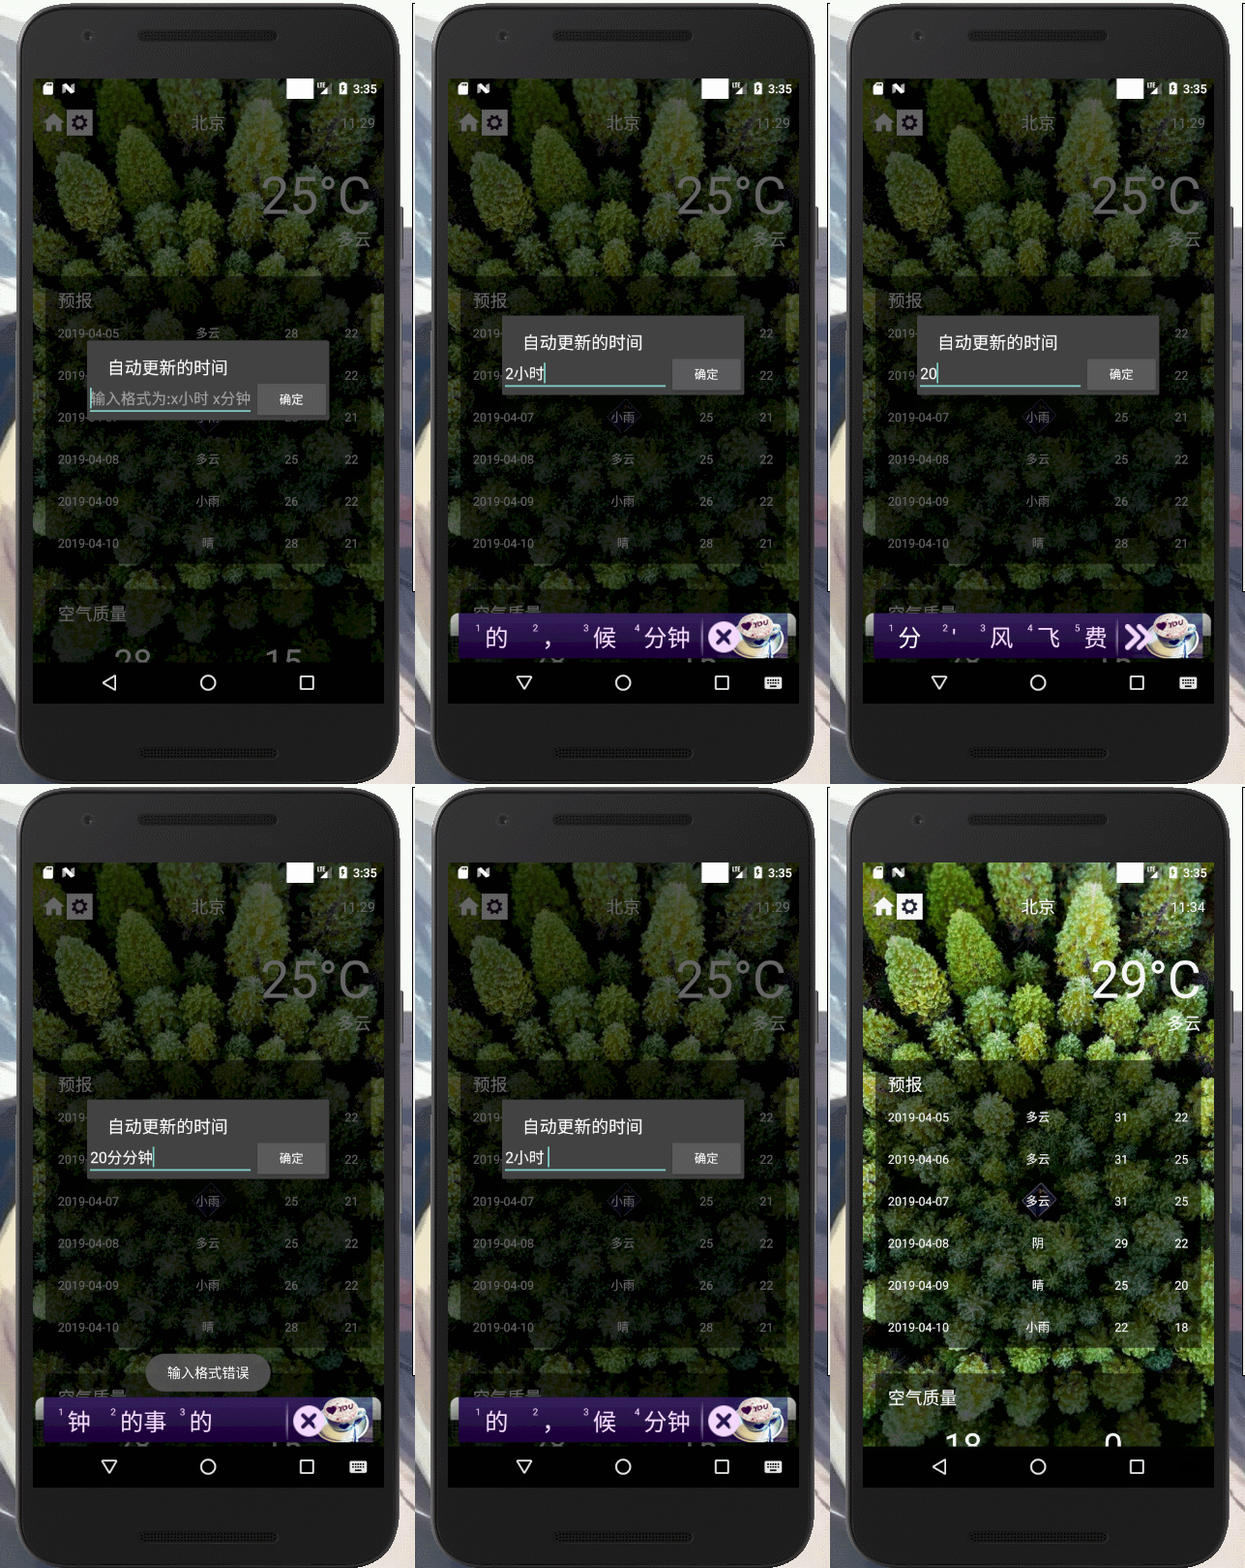
点击左上角的设置按钮,出现这个弹窗,要求输入格式为“xx小时 xx分钟”,不是这种格式会提示输入错误,输入正确后,我在service中lod.d设置的时间,可以成功看到,说明设置成功。
功能二
根据天气更改壁纸的话,我没有找到太多的壁纸图片,所以改成了将预报中的天气(文字)更改为和风天气给的天气图标。图标下载地址
实现方法
实现方法很简单了,就是将原本的这个textview改成imageview,然后在Activity中动态更改即可。这里我采用Hashmap来存储对应关系(String,Integer)。String是天气的名字,Integer就是对应图片的id。
遇到的坑
1.AndroidStduio中导入的图片文件必须是以字母开头。
解决方法:好吧一个一个去更改,点击图片,shift+F6快捷键可以更改名字。
2.之前的读取的数据有问题,
仅供学习,并不是真实的天气数据,API文档地址,打算更改成真实数据,顺便继续练手gson库。
效果图:
功能三
3.1 更改为真实数据
实现方法
使用gson去解析和风天气新的api。使用这个API去解析。常规天气数据集合。gson的操作可以详见我的另一篇博客:gson详解包括大量实例。
遇到的坑
1.GsonFormat插件点击ok后没有反应。
解决方法:应该是数据有错误,比如我复制如下数据。就一直无法显示,我必须只复制{}中的,不可以复制"now”。
"now": {
                "cond_code": "101",
                "cond_txt": "多云",
                "fl": "16",
                "hum": "73",
                "pcpn": "0",
                "pres": "1017",
                "tmp": "14",
                "vis": "1",
                "wind_deg": "11",
                "wind_dir": "北风",
                "wind_sc": "微风",
                "wind_spd": "6"
            },
2.使用JsonDeserializer
我们使用这个类会很方便的去处理一些的json复杂数据,但是千万别忘了下面代码做的事情,我们不用我们创建的gsonBuilder来创建Gson对象的话,无法把我们的deserializer写进去。
//Gson gson=new Gson();
Gson gson=gsonBuilder.create();
3.Gson没办法直接解析这个类
api返回的json数据。
{
HeWeather6: [
{
basic: {
cid: "CN101010100",
location: "北京",
parent_city: "北京",
admin_area: "北京",
cnty: "中国",
lat: "39.90498734",
lon: "116.4052887",
tz: "+8.00"
},
update: {
loc: "2019-04-10 19:55",
utc: "2019-04-10 11:55"
},
status: "ok",
now: {
cloud: "91",
cond_code: "101",
cond_txt: "多云",
fl: "12",
hum: "22",
pcpn: "0.0",
pres: "1014",
tmp: "15",
vis: "21",
wind_deg: "200",
wind_dir: "西南风",
wind_sc: "2",
wind_spd: "10"
}
}
]
}
我通过GsonFormat直接生成了javaBean,粘贴到GsonFormat的数据是从basic上面的尖括号开始复制,直到对应的尖括号。(也就是HeWeather6这个array的第1个对象)。之后为了解析进这个对象,我重写写了一个JsonDeserializer。进到这个对象中,再去分别解析basic,now,status,update四个对象。
public class NowWeatherDeserializer implements JsonDeserializer<NowWeather>{
    @Override
    public NowWeather deserialize(final JsonElement jsonElement, final Type typeOfT,
                               final JsonDeserializationContext context)throws JsonParseException {
        final JsonObject jsonObject = jsonElement.getAsJsonObject();

       final JsonArray jsonArray=jsonObject.get("HeWeather6").getAsJsonArray();
       // NowWeather nowWeather =context.deserialize(jsonArray.get(0),NowWeather.class);

        final JsonObject jsonObject1=jsonArray.get(0).getAsJsonObject();
        NowWeather.BasicBean basic=context.deserialize(jsonObject1.get("basic"), NowWeather.BasicBean.class);
        NowWeather.UpdateBean update=context.deserialize(jsonObject1.get("update"),NowWeather.UpdateBean.class);
        String status=context.deserialize(jsonObject1.get("status"),String.class);
        NowWeather.NowBean now=context.deserialize(jsonObject1.get("now"),NowWeather.NowBean.class);
        NowWeather nowWeather=new NowWeather();
        nowWeather.setBasic(basic);
        nowWeather.setNow(now);
        nowWeather.setStatus(status);
        nowWeather.setUpdate(update);

        return nowWeather;
    }
}
这些都好说,我想直接解析到Heweather6这个数组的第1个对象,然后直接去解析NowWeather对象,发现失败了。记录一下。
总结
1.需要更改的有:WeatherActivity,AutoUpdateService。简单来说就是请求了天气数据的地方,都需要去更改,不过ChooseAreaFragment不需要更改。
2.由于我这里没有空气质量的数据,所以需要去其他API地址访问数据。
3.2 增加生活建议
效果图
实现方法
1.生活建议的数据很相似,我们在解析的时候也是使用LIst解析。原始方法是在suggestion.xml中放了三个textview,我使用了一个LinearLayout,LinearLayout中的布局为suggestion_item.xml,这样能节省大量代码,多次使用suggestion_item.xml。
2.我们使用的图标是androidstudio自带的图标。
3.左右使用Relativelayout,左侧嵌套一个ImageView,右侧嵌套两个TextView。
遇到的坑
1.使用AndroidStudio自带的图标
Android Studio自带的图标以及一些免费的切图素材网页。
2.忘记给layout删除和增加
忘记删除导致只要一刷新,我的生活建议就增多。忘记增加会不显示这些数据。
//view每一次增加都要使用这个语句将其添加进layout
suggestionLayout.addView(view);
//每一次都要删除之前的东西。
 forecastLayout.removeAllViews();
        suggestionLayout.removeAllViews();
3.目前为止最大的坑,图标是蓝色的,而我们的整体颜色是白色的
如下图所示。

解决办法:不是将imageView设置背景色,而是这行代码,这样就变成了白色。
android:tint="#fff"
4.setting 图标是黑色的
解决方法:使用AndroidStudio自带库的图标。
总结
1.使用两个RelactiveLayout,可以将视图平均分成两个。
android:layout_width="0dp"
        android:layout_height="match_parent"
        android:layout_weight="1"
2.想让两个TextView纵向显示,可以套上一个LinearLayout。
<LinearLayout
            android:layout_width="match_parent"
            android:layout_height="wrap_content"
            android:orientation="vertical"
            >
    <TextView
        android:id="@+id/suggestion_main_idea"
        android:layout_width="match_parent"
        android:layout_height="wrap_content"
        android:layout_gravity="center"
        android:textColor="#fff"
        />
        <TextView
            android:id="@+id/suggestion_txt"
            android:layout_width="match_parent"
            android:layout_height="wrap_content"
            android:layout_gravity="center"
            android:textColor="#fff"
            />
        </LinearLayout>
3.ImageView没有layout_gravity,要使用其他方法替代才能实现居中效果,这样就居中了。
android:layout_centerInParent="true"
4.centerCrop
centerCrop的目标是将ImageView填充满,故按比例缩放原图,使得可以将ImageView填充满,同时将多余的宽或者高剪裁掉。(这是说那张必应的图片)
 <ImageView
        android:id="@+id/bing_pic_img"
        android:layout_width="match_parent"
        android:layout_height="match_parent"
        android:scaleType="centerCrop"
        />
5.AndroidStudio的图标很好用。
6.android:tint="#fff",这个语句很好用,可以改图片的颜色。
7.设置上下两个TextView的间隔,使用layout_marginTop,别使用layout_margin。在控件外部的layout去设置整体的layout_margin.
3.3 优化now.xml文件
效果图
原先的效果是这样的,显示的是当前的时间,可是看不到今天的最高温度和最低温度。

现在的效果图

遇到的坑
1.android:gravity与android:layout_gravity
参考自android:layout_gravity和android:gravity的区别。
android:gravity:
这个是针对控件里的元素来说的,用来控制元素在该控件里的显示位置。例如,在一个Button按钮控件中设置如下两个属性,
android:gravity="left"和android:text=“提交”,这时Button上的文字“提交”将会位于Button的左部。
android:layout_gravity:
这个是针对控件本身而言,用来控制该控件在包含该控件的父控件中的位置。同样,当我们在Button按钮控件中设置android:layout_gravity="left"属性时,表示该Button按钮将位于界面的左部。
2.设置ImageView居中
//android:layout_graivity="center"
//在父控件的正中间
android:layout_centerInParent="true"
//在垂直方向上居中
android:layout_centerVertical="true"
3.RelativeLayout中的子View靠右显示
上下为不同API版本中使用的方法,为了兼容性,最好两行都写进去。
android:layout_alignParentEnd="true"
android:layout_alignParentRight="true"
虽然将LinearLayout靠右显示了,但我们还需要让TextView居中,根据之前写到的,使用layout_gravity=center,来让其在父控件中居中显示。
<RelativeLayout
        android:layout_width="0dp"
        android:layout_height="match_parent"
        android:layout_weight="1"

        >
    <LinearLayout
        android:layout_width="wrap_content"
        android:layout_height="wrap_content"
        android:orientation="vertical"

        android:layout_alignParentEnd="true"
        android:layout_alignParentRight="true"
        >
        <TextView
            android:id="@+id/today_max_degree"
            android:layout_width="wrap_content"
            android:layout_height="wrap_content"
            android:textColor="#fff"
            android:textSize="15sp"
            android:layout_gravity="center"
            />
        <TextView
            android:id="@+id/degree_text"
            android:layout_width="wrap_content"
            android:layout_height="wrap_content"
            android:textColor="#fff"
            android:textSize="40sp"
            android:layout_marginTop="5dp"
            android:layout_gravity="center"
            />
        <TextView
            android:id="@+id/today_min_degree"
            android:layout_width="wrap_content"
            android:layout_height="wrap_content"
            android:textColor="#fff"
            android:textSize="15sp"
            android:layout_marginTop="5dp"
            android:layout_gravity="center"
            />

    </LinearLayout>
    </RelativeLayout>
功能四
4.1 增加常规天气
效果图
实现方法
xml文件的整体思想是这样的:一个LinearLayout中首先套一个Textview和两个LinearLayout(包含上面三个和下面三个),图中只放了一个。在这个LinearLayout中放一个水平的LinearLayout去装三个RelativeLayout(分别是三个属性)这个三个RelativeLayout要1:1:1的摆放。每个RelativeLayout中放一个LinearLayout去装图标,属性名,属性值。
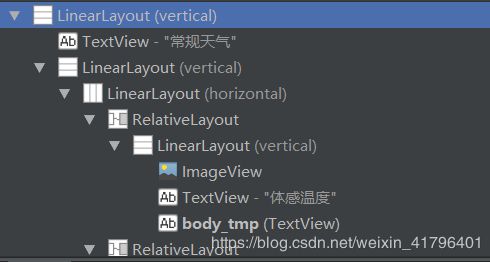
这样的操作呢,就是xml中比较复杂重复使用了很多重复的东西,先尝试下效果,到时候打算多使用几个xml文件,节省下代码量,好处就是在活动中非常方便。
4.2 隔小时天气功能
效果图
实现方法
使用RecyclerView来实现整体功能,具体详见我的另一篇文章,完全以这个功能作为实战,来讲解RecyclerView。RecyclerView的基本操作与实战。
遇到的坑
1.刷新界面后,RecylcerView不从头显示,而是从上一次的显示。
比如说当前时间为9:00,RecylerView第一个子项是10:00,我们之前查看到了下午1:00,那么我们刷新界面后,隔小时天气还是显示在1:00这里,而不是从第一个子项开始。
解决方法:
recyclerview不像listview有selecton方法,对应的就是这个方法。参考自StackOverflow上的回答。
//滚动到最初,每次都从第一个子项显示
        hourRecyclerView.scrollToPosition(0);
总结
1.返回来的date数据不好,需要我们处理下,原始数据为这个形式:2016-08-08 21:58,要处理为晚上21:00。
int hourtime=Integer.valueOf(hourly.getTime().split(" ")[1].split(":")[0]);
            //0代表早上(1:00-7:00),1代表上午(8:00-12:00),
            // 2代表下午(13:00-17:00),3代表晚上(18:00-24:00)。
            String time;

            if (hourtime>=18)
                time="晚上";
            else if(hourtime>=13)
                time="下午";
            else if (hourtime>=8)
                time="上午";
            else
                time="早上";
            //超过12就减去12
            hourtime=hourtime>12?hourtime-12:hourtime;
            String hourString=time+hourtime+":00";
            String hourtmp=hourly.getTmp();
            newhour.setHourly_time(hourString);
4.3 空气质量功能
效果图
实现方法
- 打算实现界面的如下图。 可以看出是一个自定义View+一个LinearLayout,这里主要参考自这篇博文。想了解自定义View的基本操作,可以阅读我的自定义View最详细的资料整理与总结。
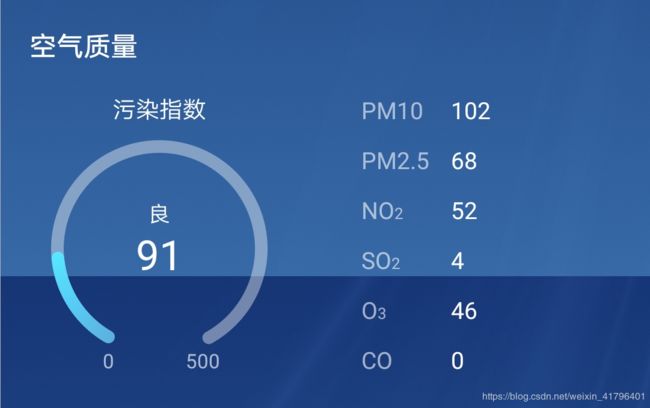
该自定义View其实就是一个顶部Text,两个中间Text,和两个圆圈,第二个圆圈的角度值根据空气质量的值转换,最后实现动画效果。
这里只放updateIndex这个函数。这个函数实现了动画效果。
/**
     *
     * @param value 空气质量数值
     * @param middleText 空气质量(良)
     */
    public void updateIndex(int value,String middleText){

        setMiddleText(middleText);
        invalidate();
        //当前角度
        float inSweepAngle = sweepAngle * value / 500;
        //角度由0f到当前角度变化
        ValueAnimator angleAnim = ValueAnimator.ofFloat(0f, inSweepAngle);
        //动画持续时间
        angleAnim.setDuration(getDuration());
        //数值由0到value变化
        ValueAnimator valueAnim = ValueAnimator.ofInt(0,value);
        valueAnim.setDuration(getDuration());
        //注册监听器
        angleAnim.addUpdateListener(new ValueAnimator.AnimatorUpdateListener()
        {
            @Override
            //当angleAnim变化回调/
            public void onAnimationUpdate(ValueAnimator valueAnimator)
            {
                float currentValue = (float) valueAnimator.getAnimatedValue();
                //将当前的角度值赋给inSweepAngle
                setInSweepAngle(currentValue);
                //通知view改变,调用这个函数后,会返回到onDraw();
                invalidate();
            }
        });
        valueAnim.addUpdateListener(new ValueAnimator.AnimatorUpdateListener()
        {
            @Override
            public void onAnimationUpdate(ValueAnimator valueAnimator)
            {
                int currentValue = (int) valueAnimator.getAnimatedValue();
                setIndexValue(currentValue);
                invalidate();
            }
        });
        //让两个动画同时进行。
        AnimatorSet animatorSet = new AnimatorSet();
        animatorSet.setInterpolator(new DecelerateInterpolator());
        animatorSet.setStartDelay(150);
        animatorSet.playTogether(angleAnim, valueAnim);
        animatorSet.start();

    }
- 同时需要重新定义AirNow类和AirNowDeserializer类来实现api数据的读取。数据地址,由于权限只能收集城市的空气质量,需要更改一下db包中的County类,需要在其中存储所属city的name。
- 新定义一个airnow.xml,和一个airnow_item.xml。
- 新建attrs.xml存放属性,该自定义View的代码为CircleIndexView.class。
<?xml version="1.0" encoding="utf-8"?>
<resources>
    <declare-styleable name="circleindexview">
        <attr name="middleText" format="string"/>
        <attr name="middleTextSize" format="dimension"/>
        <attr name="middleTextColor" format="color"/>
        <attr name="topText" format="string"/>
        <attr name="topTextSize" format="dimension"/>
        <attr name="topTextColor" format="color"/>
        <attr name="numberTextSize" format="dimension"/>
        <attr name="numberColor" format="color"/>
        <attr name="outCircleColor" format="color"/>
        <attr name="inCircleColor" format="color"/>
        <attr name="duration" format="integer"/>
    </declare-styleable>
</resources>
遇到的坑
1.自定义View中值无法更改
我写了一个updateIndex方法,但是我在代码中设置,无法更改。
解决方法:添加invalidate()来更新view。
invalidate();
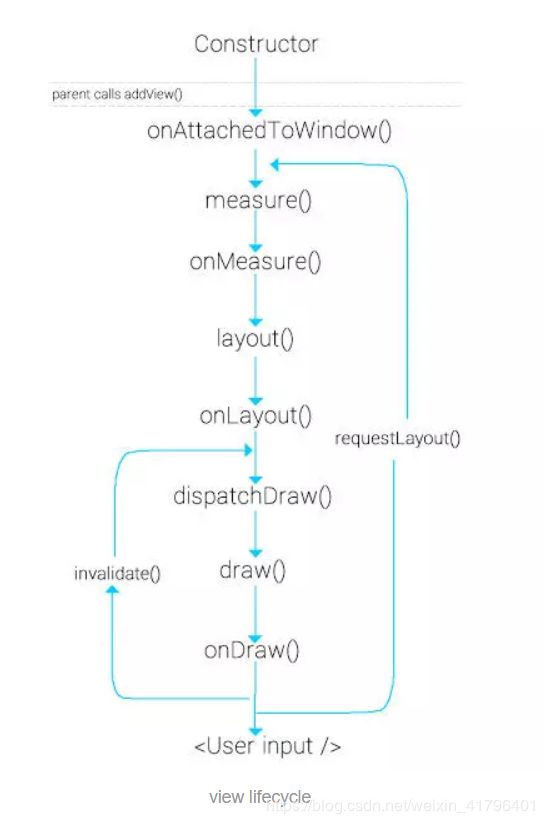
这是View的生命周期。可以看出有两个方法可以重写绘制这个view。
- invalidate()用来简单重绘View。例如更新其文本,色彩或触摸交互性。View将只调用onDraw()方法再次更新其状态。
- requestLayout()方法,你可以看到其将会从`onMeasure()开始更新View。这意味着你的View更新后,它改变它的大小,你需要再次测量它,并依赖于新的大小来重新绘制。
2.drawText的baseline问题
我们居中的位置就是getCircleHeight()/2。居中的位置是哪里,就在前面写哪里,后面就是固定的。
fontMetrics=middleTextPaint.getFontMetrics();
baseline=(getCircleHeight()-fontMetrics.bottom-fontMetrics.top)/2
具体原因:
以我之前的写的博客为例子。
接下来要用画笔Paint使用drawText()函数来绘制文字,代码如下:
	paint.setTextSize(textsize);//设置画笔的大小
 	Paint.FontMetrics fontMetrics=paint.getFontMetrics();
	float baseline = (rectF.bottom + rectF.top -fontMetrics.bottom - fontMetrics.top) / 2;
	canvas.drawText(text,(endX-startX)/2+startX-textwidth/2,baseline,paint);
这里要说的比较多,首先是Paint.FontMetrics,它可以理解为一个字体度量。通过getFontMetrics()方法获取,其包含几个字符属性参数(top,ascent,descent,bottom)。这几个属性参数都是距离baseline的距离。
值得一提的是,我阅读源码时,有这样一段话,大概意思是值向下增加,值向上减少。其实就是说,ascent与top的值是负的,descent与bottom的值是正的。ascent和descent是一个字体的建议距离(最高,最低)。

这里即将讲到第一个坑,很多新手在使用drawText的时候会遇到问题。首先,我们看下这个方法参数的含义:canvas.drawText(text, x, y, paint),第一个参数是我们需要绘制的文本,第四个参数是我们的画笔,这两个不用多说,主要是第二和第三个参数的含义,这两个参数在不同的情况下的值还是不一样的,x是这个字符串的左边在屏幕的位置,如果设置了paint.setTextAlign(Paint.Align.CENTER);那就是字符串的中心;y是指定这个字符串baseline在屏幕上的位置。大家记住了,不要混淆,y不是这个字符中心在屏幕上的位置,而是baseline在屏幕上的位置。
那么baseline的位置要如何设定呢,首先要获取你要居中的位置,比如上述的(rectF.bottom+rectF.top)/2,也就是150,要文字中间在150的位置。即以150画一条横线,文字上下的距离相等。那么就要获取top与buttom的差了,获取差之后除二,让baseline与150的距离为差/2。那么top距离150的距离=top-差/2,bottom距离150的距离为descent+差/2。这样二者就相等了,需要注意的就是正负要考虑。最后可以看到,成功将文字居中与圆角方框中间。
3.更改原版view的字体,使原版字体根据圈的大小而自适应
解决方法: 重写View的onDraw()
我认为,应该根据不同的width和height而调整我们的各个字体长度。所以我以200dp时找的最好size来作为例子,然后不同dp时,就用这个size*dp/200。
int dp200 = (int) TypedValue.applyDimension(TypedValue.COMPLEX_UNIT_DIP, 200, getResources().getDisplayMetrics());
 float xishu=(float) result/dp200;
        setMiddleTextSize(60*xishu);
        setTopTextSize(45*xishu);
        setNumberTextSize(100*xishu);
注意下面这个要更改,要让出我们topText的位置。相应的baseline位置也要下移。
 mRectF =new RectF(mCenter-mRadius,mCenter-mRadius+getTopTextSize(),
                mCenter+mRadius,mCenter+mRadius+getTopTextSize());
          baseline=(getCircleHeight()-fontMetrics.bottom-fontMetrics.top)/2+getTopTextSize();
4.普通用户和认证开发者仅可访问全国地级市及地级市所辖的国控站点数据,且不支持通过经纬度获取数据(可使用城市名称、ID、IP)
由于天气API和空气质量API不相同,所以从两个API去采数据。发现采数据时总是会有问题,误以为是多线程的问题,添加了synchronized关键字仍然出现问题,发现采北京的数据可以采到,而海淀的数据就采不到,其实是没有权限去调用海淀数据。调了两天,竟然是这个原因,下次一定好好看开发文档。
解决方法:
如果访问正常市级城市时,返回如下数据。
{
HeWeather6: [
{
basic: {
cid: "CN101010100",
location: "北京",
parent_city: "北京",
admin_area: "北京",
cnty: "中国",
lat: "39.90498734",
lon: "116.4052887",
tz: "+8.00"
},
update: {
loc: "2019-04-21 20:55",
utc: "2019-04-21 12:55"
},
status: "ok",
air_now_city: {
aqi: "134",
qlty: "轻度污染",
main: "PM10",
pm25: "48",
pm10: "218",
no2: "37",
so2: "5",
co: "0.8",
o3: "85",
pub_time: "2019-04-21 21:00"
},
air_now_station: [
{}]
}
]
}
如果访问县级城市时,会遇到这种情况。
{
HeWeather6: [
{
status: "permission denied"
}
]
}
首先更改AirNowDeserializer,不能什么情况都去获取air_now_city的数据。
String status=context.deserialize(jsonObject1.get("status"),String.class);
        AirNow airNow = new AirNow();
        if ("ok".equals(status)) {
            final JsonObject jsonObject2 = jsonObject1.get("air_now_city").getAsJsonObject();
            String aqi = context.deserialize(jsonObject2.get("aqi"), String.class);
            String qlty = context.deserialize(jsonObject2.get("qlty"), String.class);
            String cid = context.deserialize(jsonObject1.get("basic").getAsJsonObject().get("cid"), String.class);


            airNow.setAqi(aqi);
            airNow.setQuality(qlty);
            airNow.setCid(cid);
        }
        airNow.setStatus(status);
        return airNow;
之后在网络请求的onResponse中加上对status的判断,不满足就去else了,不会直接崩掉。
 if (airnow != null&&"ok".equals(airnow.getStatus()) ) {
 }
 else
 {
 }
之后更改db中的County类,添加cityName变量。
在queryFromServer的onResponse()函数进行更改,
 else if("county".equals(type)){           result=Utility.handleCountyResponse(responseText,selectedCity.getId(),selectedCity.getCityName());
                }
在handleCountyResponse中,使用setCityName()。
最后当选中的是县级城市时,
else if(currentLevel==LEVEL_COUNTY){
                    //选中了县级城市
                    ...
                    String cityname=countyList.get(position).getCityName();

                    if (getActivity()instanceof MainActivity) {
                        ...
                    }
                    //如果是在显示县级城市的天气界面(weather Activtity),则不需要再跳转了,
                    //关闭滑动菜单,可以下拉刷新,请求新天气的信息。
                    else if (getActivity()instanceof WeatherActivity){
                        ...
                        activity.requestAir(cityname);

                    }
总结
1.TypedValue.applyDimension()方法的作用
numberTextSize = ta.getDimension(R.styleable.circleindexview_numberTextSize,
                TypedValue.applyDimension(TypedValue.COMPLEX_UNIT_SP, 20, context.getResources().getDisplayMetrics()));
这个方法的作用是 把Android系统中的非标准度量尺寸转变为标准度量尺寸 (Android系统中的标准尺寸是px, 即像素)。
Android中有dp, in, mm, pt, sp(非标准)和px(标准)。
其源码如下:根据unit的不同值实现不同的转换。
/**
     * Converts an unpacked complex data value holding a dimension to its final floating
     * point value. The two parameters unit and value
     * are as in {@link #TYPE_DIMENSION}.
     *
     * @param unit The unit to convert from.
     * @param value The value to apply the unit to.
     * @param metrics Current display metrics to use in the conversion --
     *                supplies display density and scaling information.
     *
     * @return The complex floating point value multiplied by the appropriate
     * metrics depending on its unit.
     */
    public static float applyDimension(int unit, float value,
                                       DisplayMetrics metrics)
    {
        switch (unit) {
        case COMPLEX_UNIT_PX:
            return value;
        case COMPLEX_UNIT_DIP:
            return value * metrics.density;
        case COMPLEX_UNIT_SP:
            return value * metrics.scaledDensity;
        case COMPLEX_UNIT_PT:
            return value * metrics.xdpi * (1.0f/72);
        case COMPLEX_UNIT_IN:
            return value * metrics.xdpi;
        case COMPLEX_UNIT_MM:
            return value * metrics.xdpi * (1.0f/25.4f);
        }
        return 0;
    }
2.RectF的四个参数分别是左上右下。
3.动画总结
ValueAnimator是ObjectAnimator的父类,它继承自Animator。ValueAnimaotor同样提供了ofInt、ofFloat、ofObject等静态方法,传入的参数是动画过程的开始值、中间值、结束值来构造动画对象。可以将ValueAnimator看着一个值变化器,即在给定的时间内将一个目标值从给定的开始值变化到给定的结束值。在使用ValueAnimator时通常需要添加一个动画更新的监听器,在监听器中能够获取到执行过程中的每一个动画值。所以我们在这个监听器中,去set值,然后invalidate去重新绘制View。
具体不同代码的不同操作见注释。Android属性动画完全解析 ValueAnimator。
    float inSweepAngle = sweepAngle * value / 100;
    	//从0-inSweepAngele
        ValueAnimator angleAnim = ValueAnimator.ofFloat(0f, inSweepAngle);
        //把值从0,到value/3,再到value*2/3,最后到value
      alueAnimator valueAnim = ValueAnimator.ofInt(0,value/3, value*2/3,value);
         	//设置动画持续的时间(执行动画的时间)
         	angleAnim.setDuration(2000);
         	//设置开始
    		angleAnim.start();
        angleAnim.addUpdateListener(new ValueAnimator.AnimatorUpdateListener()
        {
            @Override
            public void onAnimationUpdate(ValueAnimator valueAnimator)
            {
                float currentValue = (float) valueAnimator.getAnimatedValue();
                setInSweepAngle(currentValue);
                invalidate();
            }
        });
        valueAnim.addUpdateListener(new ValueAnimator.AnimatorUpdateListener()
        {
            @Override
            public void onAnimationUpdate(ValueAnimator valueAnimator)
            {
                int currentValue = (int) valueAnimator.getAnimatedValue();
                setIndexValue(currentValue);
                invalidate();
            }
        });
除了给这个ValueAnimator注册UpdateListener,还可以注册Lisetener。
可以看到,我们需要实现接口中的四个方法,onAnimationStart()方法会在动画开始的时候调用,onAnimationRepeat()方法会在动画重复执行的时候调用,onAnimationEnd()方法会在动画结束的时候调用,onAnimationCancel()方法会在动画被取消的时候调用
angleAnim.addListener(new Animator.AnimatorListener() {
                                  @Override
                                  public void onAnimationStart(Animator animation) {

                                  }

                                  @Override
                                  public void onAnimationEnd(Animator animation) {

                                  }

                                  @Override
                                  public void onAnimationCancel(Animator animation) {

                                  }

                                  @Override
                                  public void onAnimationRepeat(Animator animation) {

                                  }
                              }
        );
但我们必须实现这四个方法才可以,可以使用Android提供了一个适配器类,叫作AnimatorListenerAdapter,使用这个类就可以解决掉实现接口繁琐的问题了,如下所示:
anim.addListener(new AnimatorListenerAdapter() {
});
这里我们向addListener()方法中传入这个适配器对象,由于AnimatorListenerAdapter中已经将每个接口都实现好了,所以这里不用实现任何一个方法也不会报错。那么如果我想监听动画结束这个事件,就只需要单独重写这一个方法就可以了,如下所示:
anim.addListener(new AnimatorListenerAdapter() {
    @Override
    public void onAnimationEnd(Animator animation) {
    }
});
使用AnimatorSet来让两个ValueAnimator一起动。
Android 动画之AnimatorSet。
AnimatorSet animatorSet = new AnimatorSet();
        animatorSet.setInterpolator(new DecelerateInterpolator());
        animatorSet.setStartDelay(150);
        animatorSet.playTogether(angleAnim, valueAnim);
        animatorSet.start();
airnow.xml与airnow_item.xml
airnow.xml
<?xml version="1.0" encoding="utf-8"?>
<LinearLayout xmlns:android="http://schemas.android.com/apk/res/android"
    xmlns:app="http://schemas.android.com/apk/res-auto"
    android:orientation="vertical"
    android:layout_width="match_parent"
    android:layout_height="wrap_content"
    android:layout_margin="15dp"
    android:background="#8000"
    >

    <TextView
        android:layout_width="wrap_content"
        android:layout_height="wrap_content"
        android:layout_marginLeft="15dp"
        android:layout_marginTop="15dp"
        android:text="空气质量"
        android:textColor="#fff"
        android:textSize="20sp"
        />
    <LinearLayout
        android:layout_width="match_parent"
        android:layout_height="wrap_content"
        android:orientation="horizontal"
        >


    <RelativeLayout
    android:layout_width="0dp"
    android:layout_height="match_parent"
    android:layout_weight="1"

        >
   <com.example.aaa.coolweather.CircleIndexView
       android:id="@+id/circleindexview"
       android:layout_width="200dp"
       android:layout_height="200dp"
       app:topText="污染指数"
       />
    </RelativeLayout>

        <RelativeLayout
            android:layout_width="0dp"
            android:layout_height="match_parent"
            android:layout_weight="1"
            >
        <LinearLayout
            android:id="@+id/aqi_gas_layout"
            android:layout_width="match_parent"
            android:layout_height="match_parent"
            android:orientation="vertical"
            >
        </LinearLayout>
        </RelativeLayout>
    </LinearLayout>
</LinearLayout>
ainow_item.xml
<?xml version="1.0" encoding="utf-8"?>
<LinearLayout xmlns:android="http://schemas.android.com/apk/res/android"
    android:layout_width="match_parent"
    android:layout_height="wrap_content"
    android:orientation="horizontal"
    android:layout_margin="5dp"
    >
    <RelativeLayout
        android:layout_width="0dp"
        android:layout_height="wrap_content"
        android:layout_weight="1"
        >
        <TextView
            android:id="@+id/airname"
            android:layout_width="wrap_content"
            android:layout_height="wrap_content"
            android:textColor="#fff"
            android:textSize="15sp"
            />
    </RelativeLayout>
    <RelativeLayout
        android:layout_width="0dp"
        android:layout_height="wrap_content"
        android:layout_weight="1"
        >
        <TextView
            android:id="@+id/airresult"
            android:layout_width="wrap_content"
            android:layout_height="wrap_content"
            android:textColor="#fff"
            android:textSize="15sp"
            />
    </RelativeLayout>
</LinearLayout>
在活动中复用。
 aqiGasLayout.removeAllViews();
        String []airName=new String[]{"Pm2.5","Pm10","Co","So2","No3","O3"};
        String[]airResult=new String[]{airNow.getPm25(),airNow.getPm10(),airNow.getCo(),
                airNow.getSo2(),airNow.getNo2(),airNow.getO3()};
        for(int i=0;i<6;i++)
        {
            View view = LayoutInflater.from(this).inflate(R.layout.airnow_item,
                    forecastLayout, false);
            TextView airname=(TextView)view.findViewById(R.id.airname);
            TextView airresult=(TextView)view.findViewById(R.id.airresult);
            airname.setText(airName[i]);
            airresult.setText(airResult[i]);
            aqiGasLayout.addView(view);
        }
功能五
5.1 日出日落动态效果
效果图
实现方法
参考自自定义View之实现日出日落太阳动效。
绘制一个封闭的半圆,在半圆的左下角与右下角绘制日出时间与日落时间。根据日出日落时间可以计算出总时间。用当前时间-日出时间,可以计算出现在太阳应走过的时间。用应走过的时间/总时间就可以得到当前时间对应的角度。太阳对应的x坐标位置与y坐标位置如下。
positionX=mWidth/2-(float)(mRadius*Math.cos((mCurrentAngle)*Math.PI/180))-mSunIcon.getWidth()/2;
positionY=marginTop+mRadius-(float)(mRadius*Math.sin((mCurrentAngle)*Math.PI/180))-mSunIcon.getHeight()/2;
更改的有以下几点:
- 由于原始图片是白色底的,所以我将太阳图片更改了,这里涉及图片的缩放;
- 更改获取文字长度的方法;
- 更改太阳的位置,太阳之前没有完全在线上。
- 当时间大于日落时间时,让太阳停在日落时间处。
总结
1. 图片缩小的方法
我的图片是2000*2000要缩小一些。
解决方法:
 /***
     * 图片的缩放方法
     *
     * @param bgimage
     *            :源图片资源
     * @param newWidth
     *            :缩放后宽度
     * @param newHeight
     *            :缩放后高度
     * @return
     */
    public static Bitmap zoomImage(Bitmap bgimage, double newWidth,
                                   double newHeight) {
        // 获取这个图片的宽和高
        float width = bgimage.getWidth();
        float height = bgimage.getHeight();
        // 创建操作图片用的matrix对象
        Matrix matrix = new Matrix();
        // 计算宽高缩放率
        float scaleWidth = ((float) newWidth) / width;
        float scaleHeight = ((float) newHeight) / height;
        // 缩放图片动作
        matrix.postScale(scaleWidth, scaleHeight);
        Bitmap bitmap = Bitmap.createBitmap(bgimage, 0, 0, (int) width,
                (int) height, matrix, true);
        return bitmap;
    }
2.获取文字长度的方法
有两种方法。第一种方法。
 /**
     * 计算文字宽度方法
     *
     */
    public static int newgetTextWidth(Paint paint, String str){
        Rect bounds = new Rect();
        paint.getTextBounds(str, 0, str.length(), bounds);
        int height = bounds.height();
        int width = bounds.width();
        return width;
    }
第二种方法,这种方法与链接中方法结果相同。
float width = paint.measureText(string);
3.动画效果实现方法
 /**
     * 设置动画
     * @param startAngle
     * @param currentAngle
     * @param duration
     */
    private void setAnimation(float startAngle,float currentAngle,int duration){
        ValueAnimator sunAnimator= ValueAnimator.ofFloat(startAngle,currentAngle);
        sunAnimator.setDuration(duration);
        sunAnimator.setTarget(currentAngle);
        sunAnimator.addUpdateListener(new ValueAnimator.AnimatorUpdateListener() {
            @Override
            public void onAnimationUpdate(ValueAnimator animation) {
                mCurrentAngle=(float)animation.getAnimatedValue();
                invalidateView();
            }
        });
        //千万别忘了这个
        sunAnimator.start();
    }
    private void invalidateView(){
        //绘制太阳的x坐标与y坐标
        //记得要减去太阳图标的大小。(让太阳始终在半圆上)
        positionX=mWidth/2-(float)(mRadius*Math.cos((mCurrentAngle)*Math.PI/180))-mSunIcon.getWidth()/2;
        positionY=marginTop+mRadius-(float)(mRadius*Math.sin((mCurrentAngle)*Math.PI/180))-mSunIcon.getHeight()/2;
        invalidate();
    }
总结
0.综述
通过和风天气提供的数据接口,编写了一个天气APP。其中包括根据定位选择城市,城市当前天气,隔小时天气,未来天气预报、日出日落、空气质量,生活建议,前台服务等功能。网络请求是通过OkHttp+Gson完成的。Fragment中的数据是通过LitePal来存储。
1.layout文件与引用的库
所引用的库包括:RecyclerView、Gson、OkHttp、LitePal。
Layout主要包括两个:activity_main.xml与activity_weather.xml。
activity_main.xml中包含一个Fragment(静态使用),用于用户进入APP选择需要查询的地区。
activity_weather.xml则包含了展示界面的内容,在最外层FrameLayout中首先嵌套了一个DrawerLayout。DrawerLayout是滑动菜单,其第一个子控件是屏幕中的内容,第二个子控件则是菜单中的内容。菜单中的内容我们放置一个Fragment(静态使用),用于用户可以通过滑动菜单来更改城市。
同时我们为了提示用户可以滑动菜单,我们要设置一个NavButton,并在其点击事件中调用代码:drawerLayout.openDrawer(GravityCompat.START);
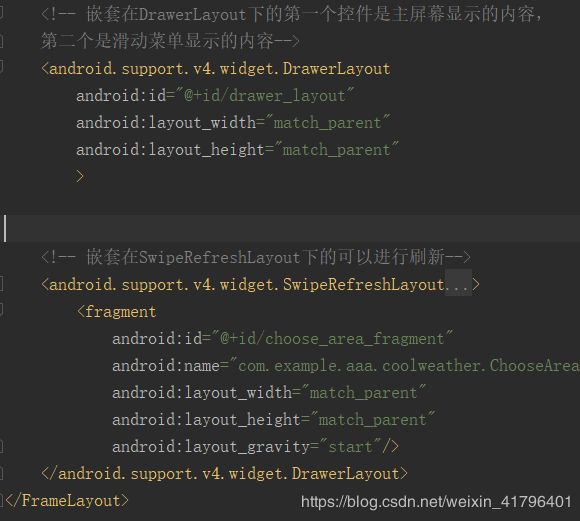
而屏幕中的内容就是用来展示天气,首先外层嵌套了一个SwipeRefreshLayout,使用该layout可以实现刷新功能。我们只要为SwipeRefreshLayout注册下拉刷新的对应事件即可。创建一个匿名内部类OnRefreshListener,并重写onRefresh()方法。最后在需要停止刷新的地方,调用swipeRefresh.setRefreshing(false);即可 。
//下拉刷新控件的对应事件。
        swipeRefresh.setOnRefreshListener(new SwipeRefreshLayout.
                OnRefreshListener() {
            @Override
            public void onRefresh() {
                requestWeather(weatherId);
               requestAir(airId);
            }
        });
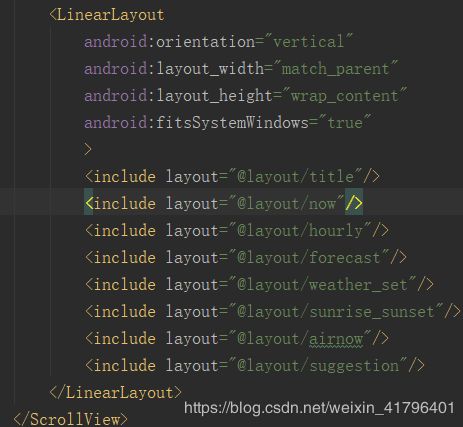
在SwipeRefreshLayout中包含多个layout文件,它们的外层有一个LinearLayout。为了让该Linearlayout可以滑动,在LinearLayout外嵌套了一层ScrollView。
2.复用Fragment并通过LitePal来存储省/市/县数据
数据包括省>市->县,因此我们可以创建三个类分别对应。

三个类都需要继承自DataSuport类,除了常规字段外,只有County中才有WeatherId,因为我们显示的都是县/城市级别的天气。City中保存ProvinceId,代表其所属省,Country中保存CityId,代表所属的城市。
public class City extends DataSupport{
...
}
接下来要创建assets文件夹,并新建litepal.xml。命名数据库名字为cool_weather,版本号为1,将实体类添加至
<litepal>
    <dbname value= "cool_weather"/>
    <version value="1"/>
    <list>
        <mapping class="com.example.aaa.coolweather.db.Province"/>
        <mapping class="com.example.aaa.coolweather.db.City"/>
        <mapping class="com.example.aaa.coolweather.db.County"/>
        </list>
</litepal>
最后在AndroidManifest中配置。
android:name="org.litepal.LitePalApplication"
我们需要首先从API接口读取省、市、县的数据,并放置在我们创建的实体类中,下面的代码是存储县的数据。创建County对象后,通过set设置属性并通过save保存。
 public static boolean handleCountyResponse(String response,int cityid,String cityName){
        if(!TextUtils.isEmpty(response)){
            try {
                JSONArray allcounties=new JSONArray(response);
                for(int i=0;i<allcounties.length();i++)
                {
                    JSONObject object=allcounties.getJSONObject(i);
                    County county=new County();
                    county.setConutyName(object.getString("name"));
                    county.setWeatherId(object.getString("weather_id"));
                    county.setCityId(cityid);
                    county.setCityName(cityName);
                    county.save();
                }
                return true;
            }
            catch (JSONException je){
                je.printStackTrace();
            }
        }
        return false;
    }
接下来说一下我们的Fragment,该Fragment主要组成是一个RelativeLayout和一个ListView,RelativeLayot是为了放置后退按钮与当前所处级别的父级别(中国,xx省,XX市)。而ListView则是为了存放当前国家/省/市所包含的所有省/市/县。
Fragment中主要有几个对象十分重要,currentLevel,用于标识当前所处的级别;provinceList,cityList,countyList,分别用来存储各个级别中内容的list。
Fragment需要重写两个函数,分别是onCreateView与onActivityCreated。在onCreateView中加载控件。而在onActivityCreated要设置listView子项的点击事件setOnItemClickListener与后退Button的设置按钮。
在onItemClick中我们通过currentLevel来判断当前处于的阶段,一共包括两个情况:
(1)如果当前阶段为Province或City,首先赋值当前选择的省和城市,并调用queryCities()或queryCounties()去查找并显示当前所选省中的全部城市或市中的所有县。
 if(currentLevel==LEVEL_PROVINCE){
                    //选中的是省级。
                    selectedProvince=provinceList.get(position);
                    //读取显示城市函数
                    queryCities();
                }
                else if(currentLevel==LEVEL_CITY)
                {
                    //选中的是市级
                    selectedCity=cityList.get(position);
                    //读取显示县级函数
                    queryCounties();
                }
query函数中会首先判断LitePal中是否存储,没有存储的话会去服务器查找(这也是为什么使用LitePal的原因,不需要重复去服务器get数据,直接存储下来即可)。为listView赋值的同时,也要设置currentLevel。
public void queryCities(){
cityList=DataSupport.where("provinceid=?",String.valueOf(selectedProvince.getId())).find(City.class);
if(cityList.size()>0){
            dataList.clear();
            for(City city:cityList){
                dataList.add(city.getCityName());
            }
            adapter.notifyDataSetChanged();
            //从第一位开始显示
            listView.setSelection(0);
            currentLevel=LEVEL_CITY;
        }
        else {
            //
            int provinceCode=selectedProvince.getProvinceCode();
             String address="http://guolin.tech/api/china/"+provinceCode;

            //使用服务器查询
            queryFromServer(address,"city");
        }
}
(2)如果当前阶段为currentLevel==LEVEL_COUNTY,也就是我们选择的是县级城市;这里要注意因为这个Fragment复用了。它同时在MainActivity与WeatherActivity中,所以我们要判断当前的Fragment在哪个Activity。
- 如果已经在WeatherActivity,就不需要跳转了,关闭滑动菜单,开始下拉刷新,去服务端请求新天气的信息。
- 如果在MainActivity中就需要跳转到WeatherActivity,Intent中需要携带的就是当前的weatherid。
- 我理解也是因为要通过getActivity判断当前所处的Activity,所以这些代码是在onActivityCreated(),该方法只有当Fragment绑定的Activity调用了onCreate之后才会调用。
if (getActivity()instanceof MainActivity) {
                        Intent intent = new Intent(getActivity(), WeatherActivity.class);
                        //跳转的过程将数据存入intent
                        intent.putExtra("weather_id", weatherid);
                        intent.putExtra("airnow_id", weatherid);
                        startActivity(intent);
                        //销毁活动
                        getActivity().finish();
                    }
                    //如果是在显示县级城市的天气界面(weather Activtity),则不需要再跳转了,
                    //关闭滑动菜单,可以下拉刷新,请求新天气的信息。
                    else if (getActivity()instanceof WeatherActivity){
                        WeatherActivity activity=(WeatherActivity)getActivity();
                        activity.drawerLayout.closeDrawers();
                        activity.swipeRefresh.setRefreshing(true);
                        activity.requestWeather(weatherid);
                        //空气质量得权限最高只能到城市,
                        // 所以即使到县级我们也直接传入城市的id。
                        activity.requestAir(cityname);

                    }
而后退button的点击事件就比较简单,根据currentLevel去调用其父级别的query函数。
在两个点击事件写完之后,还要调用queryProvinces();,因为默认是要显示全国的所有省份。
3.通过OkHttp获取数据通过Gson解析数据最终显示
首先定义了一个HttpUtil类,在其中包含了一个sendOkHttpRequest(String address,okhttp3.Callback callback),当我们想要发起网络请求时,需要传入url地址与创建的匿名类Callback对象。
public class HttpUtil {
    public static void sendOkHttpRequest(String address,okhttp3.Callback callback){
        OkHttpClient client=new OkHttpClient();
        Request request=new Request.Builder().url(address).build();
        client.newCall(request).enqueue(callback);
    }
}
当我们选择了县级城市后,会跳转至WeatherActivity中,会在onCreate通过SharedPreferences中是否缓存来判断直接显示天气,还是需要去服务器读取。
 private SharedPreferences prefs;
prefs = PreferenceManager.getDefaultSharedPreferences(this);
 String weatherString = prefs.getString("weather", null);
如果需要去服务器读取,就会调用requestWeather方法,
我们在requestWeather中发起网络请求,需要调用sendOkHttpRequest方法;
(1)在onFaiure方法中,首先切换会主线程,弹出Toast,并让刷新事件结束,隐藏刷新进度条。
(2)在onResponse方法中,首先通过Gson解析获得的json数据。将当前Weatherid对应的Weather数据存储至SharedPreferences,目的是当我们之后在发起网络请求前会先判断SP中是否已经存储。之后会调用showWeahterInfo来更新UI,最后停止刷新。
代码如下:
public  void requestWeather(final String weatherId) {
String weatherUrl = "https://free-api.heweather.net/s6/weather?location=" + weatherId +
                "&key=a15bff1949104f8ba6d4553c611ac2f7";
HttpUtil.sendOkHttpRequest(weatherUrl, new Callback() {
            @Override
            public void onFailure(Call call, IOException e) {
                e.printStackTrace();
                runOnUiThread(new Runnable() {
                    @Override
                    public void run() {
                        Toast.makeText(WeatherActivity.this, "获取天气信息失败",
                                Toast.LENGTH_SHORT).show();
                        //刷新事件结束,隐藏刷新进度条
                        swipeRefresh.setRefreshing(false);
                    }
                });
            }

            @Override
            public  void onResponse(Call call, Response response) throws IOException {

                final String responseText = response.body().string();
                //获取weather类
                final CommonWeather commonweather = Utility.handleCommonWeatherResponse(responseText);
                runOnUiThread(new Runnable() {
                    @Override
                    public void run() {
                        //状态码
                        if (commonweather != null && "ok".equals(commonweather.getStatus())) {
                            //回去看一下SharedPrefernces
                            SharedPreferences.Editor editor = PreferenceManager.
                                    getDefaultSharedPreferences(WeatherActivity.this).edit();
                            //必须传这个,存储至sp
                            editor.putString("weather", responseText);
                            editor.apply();
                            //展示天气
                            showWeahterInfo(commonweather);
                        } else {
                            Toast.makeText(WeatherActivity.this, "获取天气信息失败",
                                    Toast.LENGTH_SHORT).show();
                        }
                        //刷新事件结束,隐藏刷新进度条
                        weatherflag=true;
                        if (weatherflag&&airflag)
                        swipeRefresh.setRefreshing(false);

                    }
                });
            }
        });
}
4.前台服务
前台服务就是指在通知栏可以有一个图标,下拉时,会显示具体内容。当点击时,还会跳转到程序中。我们的前台服务是为了让用户很方便的看当前城市的天气。当用户点击通知栏时,可以跳转到当前城市的具体天气界面。我们需要借助PendingIntent,PedingIntent和普通Intent的区别在于:Intent倾向于立即执行某个操作,而PendingIntent更加倾向于在某个合适的时机去执行某个操作。
首先创建Intent对象,之后通过getActivity来创建PendingIntent 对象以便让它知道要跳转的Activity。传入四个参数分别是Context,第二个和第四个一般传入0,第三个参数是一个Intent对象。
之后创建NotificationBuilder,并在Builder中setContentIntent来设置意图,最后通过startForeground来开启前台服务。
 Intent intent=new Intent(this, WeatherActivity.class);
        PendingIntent pi=PendingIntent.getActivity(this,0,intent,0);
        builder =new NotificationCompat.Builder(this);
        builder.setContentIntent(pi);
        builder.setXXXX
        startForeground(1,builder.build());
如果只是这样的话,那么通知栏中显示的天气始终是开启服务后那一瞬间的天气了,我们需要让天气定期更改。
我们在Service中的onStartCommand使用 AlarmManager定时服务。我们使用PendingIntent的getService来获取一个可以执行服务的intent,当时间到了之后,就会通过PendingIntent跳转至所对应的Service,并调用该Service的onStartCommand方法。
补充:首先通过getSystemService(ALARM_SERVICE)来获取一个AlarmManager的实例,之后通过set函数设置工作类型,定时的时长,以及结束后要执行的操作。
传入的三个参数的含义:第一个参数表示AlarmManager的工作类型,包括RealTime、RealTime_WAKEUP(前两个代表让定时任务的触发从系统开机开始算起,wakeup代表是否唤醒CPU)、RTC、RTC_wakeup(后两个表示让定时任务的触发从1970年1月1日0时起)。

第二个参数表示定时任务触发的时间,如果之前的模式是realTime模式就传入系统开机至今的时间+定时任务的时间,如果是RTC模式,那就传入从19701月1日0时至今的时间+定时任务的时间即可。
第三个参数代表PendingIntent。
  public int onStartCommand(Intent intent,int flags,int startId){
        //首先肯定要获取当前天气的信息。
        getCommonWeather();
        SharedPreferences sp=PreferenceManager.getDefaultSharedPreferences(this);
        String weatherstring=sp.getString("weather",null);
        if(weatherstring!=null){
            CommonWeather commonWeather=Utility.handleCommonWeatherResponse(weatherstring);
            setNotification(commonWeather);
        }
        //耗时5分钟
        AlarmManager manager=(AlarmManager)getSystemService(ALARM_SERVICE);
        int times= 5*60*1000;
        long triggerAtTime= SystemClock.elapsedRealtime()+times;
        Intent i=new Intent(this,NotificationService.class);
        PendingIntent pendingIntent=PendingIntent.getService(this,0,i,0);
        //set的参数要对应,这里用了ELAPSED_REALTIME_WAKEUP代表从开机后计时
        //那么第二个参数也要对应:定时时间加上elapsedRealtime()。
        manager.set(AlarmManager.ELAPSED_REALTIME_WAKEUP,triggerAtTime,pendingIntent);
        return super.onStartCommand(intent,flags,startId);

    }
自定义View+动画
定位功能
前期准备
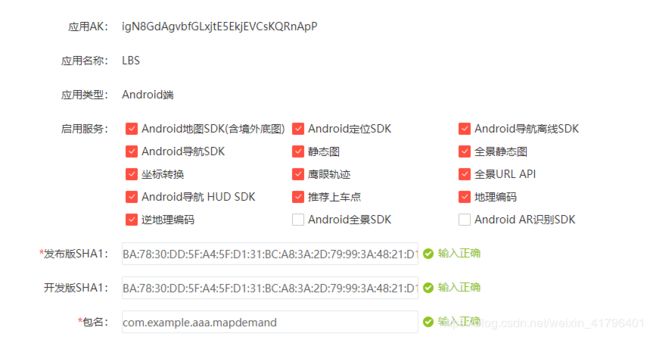
1.使用百度地图的Android定位SDK,首先注册获取自己的key,并下载所需要的sdk。
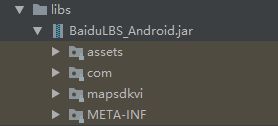
2.定制自己的SDK后,解压出来的结果如下,这是libs文件夹。

3.复制jar包,将libs中的jar包(压缩包)拷贝到libs文件夹下。
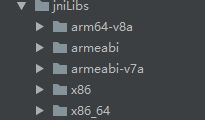
3.复制so文件
新建jniLibs文件夹,并将libs中的五个文件夹拷贝到jniLibs文件夹中。
4.在AndroidManifest注册
创建一个metadata标签,存放我们的key。
<meta-data
            android:name="com.baidu.lbsapi.API_KEY"
            android:value="igN8GdAgvbfGLxjtE5EkjEVCsKQRnApP" />
5.定位服务
使用定位SDK,需在AndroidManifest.xml文件中Application标签中声明service组件,每个App拥有自己单独的定位service,代码如下:
 <service
            android:name="com.baidu.location.f"
            android:enabled="true"
            android:process=":remote" />
开启权限:
<!-- 这个权限用于进行网络定位-->
<uses-permission android:name="android.permission.ACCESS_COARSE_LOCATION"></uses-permission>
<!-- 这个权限用于访问GPS定位-->
<uses-permission android:name="android.permission.ACCESS_FINE_LOCATION"></uses-permission>
<!-- 用于访问wifi网络信息,wifi信息会用于进行网络定位-->
<uses-permission android:name="android.permission.ACCESS_WIFI_STATE"></uses-permission>
<!-- 获取运营商信息,用于支持提供运营商信息相关的接口-->
<uses-permission android:name="android.permission.ACCESS_NETWORK_STATE"></uses-permission>
<!-- 这个权限用于获取wifi的获取权限,wifi信息会用来进行网络定位-->
<uses-permission android:name="android.permission.CHANGE_WIFI_STATE"></uses-permission>
<!-- 写入扩展存储,向扩展卡写入数据,用于写入离线定位数据-->
<uses-permission android:name="android.permission.WRITE_EXTERNAL_STORAGE"></uses-permission>
<!-- 访问网络,网络定位需要上网-->
<uses-permission android:name="android.permission.INTERNET"></uses-permission>
具体使用:
(1)动态获取权限,如果用户没有开启权限则不能开启定位服务。
(2)创建LocationClient对象,LocationClientOption对象,向Option对象添加定位服务的参数设置(开启GPS定位、高精度定位、固定时间重新定位等等),最后将Option对象设置到LocationClient对象中。
(3)为LocationClient注册LocationListener;LocationListener是继承了抽象类BDAbstractLocationListener的子类,并实现onReceiveLocation方法,在其中可以获取经度纬度、城市等信息;
(4)当不使用了需要在onDestory中调用LocationClient对象的stop方法,停止定位。
1.用户开启运行时权限。
android.permission.ACCESS_FINE_LOCATION用于访问GPS定位,同时用户必须手动开启。Manifest.permission.READ_PHONE_STATE,读取手机状态;Manifest.permission.WRITE_EXTERNAL_STORAGE,写入扩展存储,用于写入离线定位数据;
//动态获取权限
        if (ContextCompat.checkSelfPermission(MainActivity.this, Manifest.permission.ACCESS_FINE_LOCATION) != PackageManager.PERMISSION_GRANTED) {
            permissionList.add(Manifest.permission.ACCESS_FINE_LOCATION);
        }
        if (ContextCompat.checkSelfPermission(MainActivity.this, Manifest.permission.READ_PHONE_STATE) != PackageManager.PERMISSION_GRANTED) {
            permissionList.add(Manifest.permission.READ_PHONE_STATE);
        }
        if (ContextCompat.checkSelfPermission(MainActivity.this, Manifest.permission.WRITE_EXTERNAL_STORAGE) != PackageManager.PERMISSION_GRANTED) {
            permissionList.add(Manifest.permission.WRITE_EXTERNAL_STORAGE);
        }
        if (!permissionList.isEmpty()) {
            String [] permissions = permissionList.toArray(new String[permissionList.size()]);
            ActivityCompat.requestPermissions(MainActivity.this, permissions, 1);
        } else {
            requestLocation();
        }
2.初始化LocationClient对象,同样是外观模式,我们需要通过该对象来实现定位功能,在requestLocation中继续调用initLocation。
(1)首先创建LocationClientOption对象,该对象用于设置一些参数,比如间隔多少时间重新定位一次,比如开启GPS定位,定位精度,是否开启POI等等等。这里使用的是高精度的GPS定位,但GPS定位需要用户手动开启。
(2)之后创建LocationClent,需要传入Context对象。之后通过setLocOption将Option放入LocationClient。
(3)之后要为LocationClient注册一个位置监听器LocationListener,当获取到定位信息后进行回调。
(4)最后通过start方法开启位置服务。
private void initLocation(){

        LocationClientOption option=new LocationClientOption();
        mlocationClient=new LocationClient(getApplicationContext());
        //更新间隔为5秒钟
        option.setScanSpan(5000);
        option.setLocationMode(LocationClientOption.LocationMode.Hight_Accuracy);
        //可选,是否需要地址信息,默认为不需要,即参数为false
        //如果开发者需要获得当前点的地址信息,此处必须为true
        option.setIsNeedAddress(true);
        option.setOpenGps(true); // 打开gps
        mlocationClient.setLocOption(option);
        //注册位置监听器
        mlocationClient.registerLocationListener(new MyLocationListener());
        mlocationClient.start();
    }
MyLocationListener类,需要重写其onReceiveLocation方法,并根据BDlocation来获取经度纬度、或者城市名字。之后可以通过Intent,携带当前跳转WeatherActivity,让WeatherActivity去显示当前所在县/城市的天气。
//不能实现BDLocationListener接口,而是要继承自BDAbstractLocationListener
    //定位回调
    public class MyLocationListener extends BDAbstractLocationListener {
        @Override
        public void onReceiveLocation(BDLocation location){
            if (location==null||mapView==null)
                return;
            navigateTo(location);
            /*这些是测试,获取经纬度已经当前定位位置的其他信息
            //获得经纬度位置等信息
            double latitude = location.getLatitude();    //获取纬度信息
            double longitude = location.getLongitude();    //获取经度信息
            String county=location.getCountry();
            String province=location.getProvince();
            String city=location.getCity();
            String district=location.getDistrict();
            String street=location.getStreet();
            float radius = location.getRadius();    //获取定位精度,默认值为0.0f


            */
        }
    }
3.在onDestory关闭LoactionClient。
protected void onDestroy(){
        mlocationClient.stop();
        super.onDestroy();
    }
