本文档分为四个部分
1、安装要求
2、服务器优化配置
3、安装lnmp环境
4、安装zabbix-server及zabbix-agent
第一部分:安装要求
Zabbix4.0官方文档表示:如果刚接触 Zabbix,128Mb的物理内存和 256Mb的可用磁盘空间可能是一个很好的起点。 然而,所需的内存和磁盘空间显然取决于被监控的主机数量和配置参数。 如果您计划调整参数以保留较长的历史数据,那么您应该考虑至少有几Gb磁盘空间,以便有足够的磁盘空间将历史数据存储在数据库中。
建议初次安装使用2C4G的服务器
以下是官方给出的数据服务器配置信息
| 规模 | 平台 | CPU/内存 | 数据库 | 受监控的主机数量 |
|---|---|---|---|---|
| 小型 | CentOS | Virtual Appliance | MySQL InnoDB | 100 |
| 中型 | CentOS | 2 CPU cores/2GB | MySQL InnoDB | 500 |
| 大型 | RedHat Enterprise Linux | 4 CPU cores/8GB | RAID10 MySQL InnoDB 或 PostgreSQL | >1000 |
| 极大型 | RedHat Enterprise Linux | 8 CPU cores/16GB | Fast RAID10 MySQL InnoDB 或 PostgreSQL | >10000 |
##本次安装使用的是2C4G 40G的云主机,
##本次安装需要的安装包,可以去官方网站下载,也可以在我的网盘提取 https://pan.baidu.com/s/1Fr5isbMT3j76tt1g2PRHjA
提取码g2xu
第二部分,服务器优化(操作用户:root)
1、设置主机名
hostnamectl set-hostname tianyiyun
2、安装常用包
yum -y install lrzsz openssl openssl-devel gcc-c++
3、调整系统内核参数
cp /etc/sysctl.conf /etc/sysctl.conf.bak
vi /etc/sysctl.conf
net.ipv4.ip_forward = 1
net.ipv4.conf.default.rp_filter = 1
net.ipv4.conf.default.accept_source_route = 0
kernel.sysrq = 0
kernel.core_uses_pid = 1
net.ipv4.tcp_syncookies = 1
kernel.msgmnb = 65536
kernel.msgmax = 65536
kernel.shmmax = 68719476736
kernel.shmall = 4294967296
net.ipv4.tcp_max_tw_buckets = 65536
net.ipv4.tcp_sack = 1
net.ipv4.tcp_window_scaling = 1
net.ipv4.tcp_rmem = 4096        87380   4194304
net.ipv4.tcp_wmem = 4096        16384   4194304
net.ipv4.tcp_max_orphans = 3276800
net.ipv4.tcp_max_syn_backlog = 819200
net.ipv4.tcp_timestamps = 0
net.ipv4.tcp_synack_retries = 1
net.ipv4.tcp_syn_retries = 1
net.ipv4.tcp_tw_recycle = 1
net.ipv4.tcp_tw_reuse = 1
net.ipv4.tcp_mem = 94500000 915000000 927000000
net.ipv4.tcp_fin_timeout = 1
net.ipv4.tcp_keepalive_time = 30
net.ipv4.tcp_sack = 0
net.ipv4.ip_local_port_range = 1024    65000
net.ipv4.conf.default.rp_filter = 0
net.core.optmem_max = 65535
net.ipv4.tcp_keepalive_probes = 5
net.ipv4.tcp_keepalive_intvl = 15
net.ipv4.tcp_retries2 = 5
net.ipv4.tcp_orphan_retries = 3
net.ipv4.tcp_reordering = 5
net.ipv4.tcp_retrans_collapse = 0
net.core.wmem_default = 8388608
net.core.rmem_default = 8388608
net.core.rmem_max = 16777216
net.core.wmem_max = 16777216
net.core.netdev_max_backlog = 262144
net.core.somaxconn = 262144
fs.file-max = 2000000
sysctl -p
4、创建nginx系统用户
groupadd -r nginx
useradd -r -g nginx -s /sbin/nologin nginx
5、设置打开文件数限制
vi /etc/security/limits.conf
* soft nofile 65535
* hard nofile 65535
* soft noproc 65535
* hard noproc 65535
6、重启使之前设置生效
reboot
官方文档表示:Zabbix 前端是 PHP 编写的,所以必须运行在支持 PHP 的 Web 服务器上。而zabbix需要数据库的支持,官方建议的数据库管理系统有MySQL、Oracle、SQLite等。
所以我们首先需要安装nginx web服务以及php中间件;而数据库当然使用开源的MySQL
第三部分:安装lnmp环境提供zabbix ui管理界面和数据库
安装nginx
1、下载nginx安装包,同时你也需要下载zlib-1.2.8.tar.gz,pcre-8.39.tar.gz
[安装包nginx-1.16.1.tar.gz pcre-8.39.tar.gz zlib-1.2.8.tar.gz上传到/opt]
cd /opt/
wget http://nginx.org/download/nginx-1.16.1.tar.gz
2、解压3个源码包
tar zxf zlib-1.2.8.tar.gz
tar zxf pcre-8.39.tar.gz
tar zxf nginx-1.16.1.tar.gz
3、编译安装nginx
cd nginx-1.16.1/
./configure --prefix=/opt/nginx --with-http_dav_module --with-http_stub_status_module --with-http_addition_module --with-http_sub_module --with-http_flv_module --with-http_mp4_module --with-http_ssl_module --with-http_gzip_static_module --with-pcre=/opt/pcre-8.39 --with-zlib=/opt/zlib-1.2.8 --user=nginx --group=nginx
make
make install
/opt/nginx/sbin/nginx -t
(可以使用nginx -t用于测试是否完成安装)
4、修改nginx配置文件
(这次nginx配置文件没有进行优化,直接拿nginx自带的修改了以下)
cp /opt/nginx/conf/nginx.conf /opt/nginx/conf/nginx.conf.bak
vi /opt/nginx/conf/nginx.conf
user nginx;
worker_processes 2;
worker_cpu_affinity 01 10;
error_log logs/error.log;
#error_log logs/error.log notice;
#error_log logs/error.log info;pid logs/nginx.pid;
events {
	use epoll;
	worker_connections 65535;
	multi_accept on;
}
http {
	include mime.types;
	default_type application/octet-stream;
	#log_format main '$remote_addr - $remote_user [$time_local] "$request" '
	# '$status $body_bytes_sent "$http_referer" '
	# '"$http_user_agent" "$http_x_forwarded_for"';
	#access_log logs/access.log main;
	sendfile on;
	tcp_nopush on;
	keepalive_timeout 65;
	tcp_nodelay on;
	client_header_buffer_size 4k;
	open_file_cache max=102400 inactive=20s;
	open_file_cache_valid 30s;
	open_file_cache_min_uses 1;
	client_header_timeout 15;
	client_body_timeout 15;
	reset_timedout_connection on;
	send_timeout 15;
	server_tokens off;
	client_max_body_size 10m;
	fastcgi_connect_timeout 600;
	fastcgi_send_timeout 600;
	fastcgi_read_timeout 600;
	fastcgi_buffer_size 64k;
	fastcgi_buffers 4 64k;
	fastcgi_busy_buffers_size 128k;
	fastcgi_temp_file_write_size 128k;
	fastcgi_temp_path /opt/nginx/nginx_tmp;
	fastcgi_intercept_errors on;
	fastcgi_cache_path /opt/nginx/fastcgi_cache levels=1:2 keys_zone=cache_fastcgi:128m inactive=1d max_size=10g;
	gzip on;
	gzip_min_length 2k;
	gzip_buffers 4 32k;
	gzip_http_version 1.1;
	gzip_comp_level 6;
	gzip_types text/plain text/css text/javascript application/json application/javascript application/x-javascript application/xml;
	gzip_vary on;
	gzip_proxied any;

	server {
		listen 8008;
		server_name localhost;
		charset utf-8;
		location / {
			root html;
			index index.php index.html index.htm;
		}
		location ~* \.(ico|jpe?g|gif|png|bmp|swf|flv)$ {
			root html;
			expires 30d;
			access_log off;
		}
		location ~* \.(js|css)$ {
			root html;
			expires 7d;
			log_not_found off;
			access_log off;
		}
		location = /(favicon.ico|roboots.txt) {
			root html;
			access_log off;
		log_not_found off;
		}
		location /status {
			stub_status on;
		}
		location ~ .*\.(php|php5)?$ {
			root html;
			fastcgi_pass 127.0.0.1:9000;
			fastcgi_index index.php;
			fastcgi_cache cache_fastcgi;
			fastcgi_cache_valid 200 302 1h;
			fastcgi_cache_valid 301 1d;
			fastcgi_cache_valid any 1m;
			fastcgi_cache_min_uses 1;
			fastcgi_cache_use_stale error timeout invalid_header http_500;
			fastcgi_cache_key http://$host$request_uri;
			fastcgi_split_path_info ^(.+\.php)(.*)$;
      			fastcgi_param PATH_INFO $fastcgi_path_info;
      			fastcgi_param SCRIPT_FILENAME $document_root$fastcgi_script_name;
			include fastcgi_params;
		}
		#error_page 404 /404.html;
		# redirect server error pages to the static page /50x.html
		#
		error_page 500 502 503 504 /50x.html;
		location = /50x.html {
			root html;
		}
	}
}
5、启动nginx
/opt/nginx/sbin/nginx
安装php
1、[安装包php-7.3.16.tar.gz上传至/opt]
安装php所需
yum -y install libxml2 libxml2-devel openssl openssl-devel curl-devel libjpeg-devel libpng-devel freetype-devel libmcrypt-devel libzip-devel pcre-devel
2、编译安装php
cd /opt
tar -zxf php-7.3.16.tar.gz
cd /opt/php-7.3.16
./configure --prefix=/opt/php --with-config-file-path=/opt/php/etc --with-config-file-scan-dir=/opt/php/etc/php.d --enable-mysqlnd --with-mysqli --with-pdo-mysql --enable-fpm --with-fpm-user=nginx --with-fpm-group=nginx --with-gd --with-iconv --with-zlib --enable-xml --enable-shmop --enable-sysvsem --enable-inline-optimization --enable-mbregex --enable-mbstring --enable-ftp --with-openssl --enable-pcntl --enable-sockets --with-xmlrpc --enable-soap --without-pear --with-gettext --enable-session --with-curl --with-jpeg-dir --with-freetype-dir --enable-opcache --enable-bcmath
make test
make
make install
3、准备php配置文件以及启动文件
cp /opt/php-7.3.16/php.ini-production /opt/php/etc/php.ini
cp /opt/php-7.3.16/sapi/fpm/init.d.php-fpm /etc/init.d/php-fpm
cp /opt/php/etc/php-fpm.conf.default /opt/php/etc/php-fpm.conf
cp /opt/php/etc/php-fpm.d/www.conf.default /opt/php/etc/php-fpm.d/www.conf
chmod +x /etc/init.d/php-fpm
chkconfig --add php-fpm
chkconfig php-fpm on
(查看状态)
chkconfig --list php-fpm
sed -i 's#;pid = run/php-fpm.pid#pid = run/php-fpm.pid#g' /opt/php/etc/php-fpm.conf
sed -i 's/listen = 127.0.0.1:9000/listen = 0.0.0.0:9000/g' /opt/php/etc/php-fpm.conf
sed -i 's/pm.max_children = 5/pm.max_children = 300/g' /opt/php/etc/php-fpm.conf
sed -i 's/pm.start_servers = 2/pm.start_servers = 10/g' /opt/php/etc/php-fpm.conf
sed -i 's/pm.min_spare_servers = 1/pm.min_spare_servers = 10/g' /opt/php/etc/php-fpm.conf
sed -i 's/pm.max_spare_servers = 3/pm.max_spare_servers = 50/g' /opt/php/etc/php-fpm.conf
4、启动php-fpm
service php-fpm start
netstat -anpt | grep 9000
(查看状态)
安装MySQL
1、上传mysql安装包,创建mysql用户
[上传安装包mysql-5.7.29-el7-x86_64.tar.gz到/opt]
groupadd -r mysql
useradd -r -g mysql -s /bin/false -M mysql
2、安装
cd /opt
tar zxf mysql-5.7.29-el7-x86_64.tar.gz
将mysql绿色软件包改个名字
mv mysql-5.7.29-el7-x86_64 mysql
卸载自带的mariadb
rpm -e --nodeps mariadb-libs
创建一个mysql数据目录
mkdir /opt/mysql/data
chown -R mysql:mysql /opt/mysql/
修改mysql配置文件
vi /etc/my.cnf
[client]
socket=/opt/mysql/data/mysql.sock
[mysqld]
basedir=/opt/mysql
datadir=/opt/mysql/data
port=3306
pid-file=/opt/mysql/data/mysql.pid
server_id=1
socket=/opt/mysql/data/mysql.sock
log-error=/opt/mysql/data/mysql.err
安装numactl
yum -y install numactl
优化一下mysql二进制文件执行路径
ln -s /opt/mysql/bin/* /usr/local/bin
初始化
mysqld --initialize --user=mysql --basedir=/opt/mysql --datadir=/opt/mysql/data
取密码
cat /opt/mysql/data/mysql.err | grep localhost | awk -F"localhost: " {'print $2'}
cp /opt/mysql/support-files/mysql.server /etc/init.d/mysqld
chkconfig --add mysqld
chkconfig mysqld on
systemctl daemon-reload
systemctl start mysqld
修改密码
mysqladmin -uroot -p password '123456'
在弹出的输入框输出刚刚用cat等命令截取的密码
第四部分:安装zabbix-server以及在本地安装zabbix-agent
[上传zabbix-4.0.19.tar.gz到/opt下]
1、安装所需包
yum -y install net-snmp-devel libevent-devel
##官方文档给出的安装zabbix-server的configure命令是这样的
./configure --enable-server --enable-agent --with-mysql --enable-ipv6 --with-net-snmp --with-libcurl --with-libxml2
本文档参照官方文档按照 ./configure --enable-server --enable-agent --with-net-snmp --with-mysql=/opt/mysql/bin/mysql_config --with-libcurl --with-libxml2 的配置来安装
这样我们在安装之前还要安装以上依赖包
2、编译安装zabbix
cd /opt
tar zxf zabbix-4.0.19.tar.gz
cd zabbix-4.0.19/
./configure --enable-server --enable-agent --with-mysql=/opt/mysql/bin/mysql_config --with-net-snmp --with-libcurl --with-libxml2
make install
##如果需要其他的其他功能,可以参照./configure --help并结合官方文档安装https://www.zabbix.com/documentation/4.0/zh/manual/installation/install
3、初始化zabbix数据库
##这里要说一下创建数据库时要设置数据库的字符集为utf8,排序规则为utf8-bin,我可被坑惨了!
##这里贴上zabbix_server.log中的报错:
Zabbix supports only "utf8_bin" collation. Database "zabbix" has default collation "utf8_general_ci"
character set name or collation name that is not supported by Zabbix found in 384 column(s) of database "zabbix"
only character set "utf8" and collation "utf8_bin" should be used in database
翻译:Zabbix只支持“utf8”排序规则。zabbix数据库具有默认排序规则“utf8”general ci
在数据库“Zabbix”的384列中找到Zabbix不支持的字符集名称或排序规则名称数据库中
只能使用字符集“utf8”和排序规则“utf8\u bin”
创建zabbix数据库,并授权
mysql -uroot -p
mysql> create database zabbix character set utf8 COLLATE utf8_bin;
Query OK, 1 row affected (0.01 sec)
mysql> grant all privileges on zabbix.* to zabbix@localhost identified by 'zabbix';
Query OK, 0 rows affected, 1 warning (0.00 sec)
使用zabbix数据库用户导入zabbix初始化数据
cd /opt/zabbix-4.0.19/database/mysql/
mysql -uzabbix -pzabbix -hlocalhost zabbix < schema.sql
mysql -uzabbix -pzabbix -hlocalhost zabbix < images.sql
mysql -uzabbix -pzabbix -hlocalhost zabbix < data.sql
4、编辑配置文件
创建一个目录用户保存zabbix日志和pid
mkdir -p /opt/zabbix/logs
chown -R zabbix:zabbix /opt/zabbix
vi /usr/local/etc/zabbix_server.conf
LogFile=/opt/zabbix/logs/zabbix_server.log
PidFile=/opt/zabbix/logs/zabbix_server.pid
DBHost=localhost
DBName=zabbix
DBUser=zabbix
DBPassword=123456
DBSocket=/opt/mysql/data/mysql.sock
DBPort=3306
Timeout=4
LogSlowQueries=3000
##以上配置是过滤掉空行和#开头行的配置,可根据上面配置找到对应的逐条更改
5、编辑/etc/ld.so.conf
vi /etc/ld.so.conf
include ld.so.conf.d/*.conf
/opt/mysql/lib
/usr/local/lib
ldconfig
##此文件记录了编译时使用的动态库的路径,也就是加载so库的路径。默认情况下,编译器只会使用/lib和/usr/lib这两个目录下的库文件。
对于此种情况有2种解决办法:
(1)在用源码安装时,用--prefix指定安装路径为/usr/lib。
(2) 直接将源码安装的软件的lib路径加入到文件/etc/ld.so.conf文件的中,也就是上面的操作
4、启动zabbix-server
zabbix_server
netstat -anpt | grep 10051
ps -elf | grep zabbix
##通过以上两个命令可以看到是否成功启动,如果没有成功可以查询zabbix_server.log
cat /opt/zabbix/logs/zabbix_server.log
5、安装zabbix-ui(图形)管理界面
cp -rf /opt/zabbix-4.0.19/frontends/php/* /opt/nginx/html
6、访问zabbix-ui界面
http://121.204.**.**:8008/
##安全需要我ip就不给大家看了
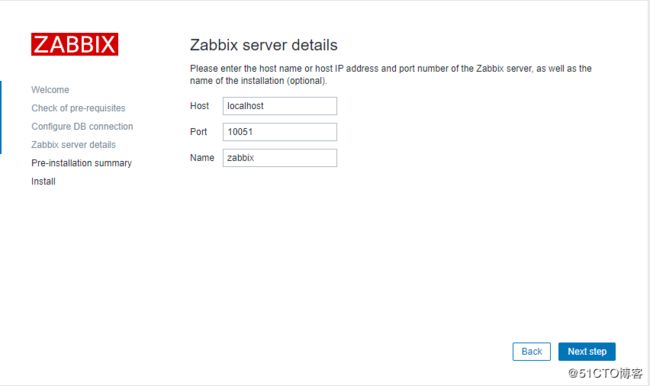
接下来就是zabbix的配置了
根据提示,下载配置文件zabbix.conf.php并拷贝到指定目录
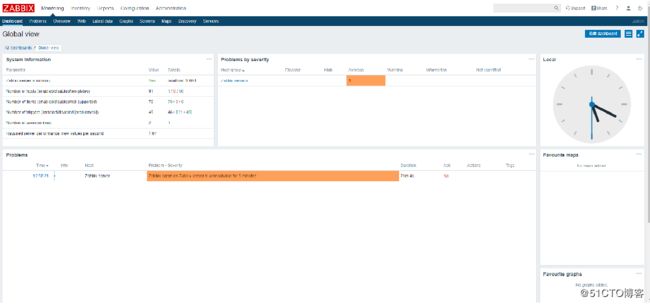
最终页面
本文为作者纯手工码字原创,转载请注明出处。有关于该文档的问题可加q:1445696451沟通


