Java 并发编程 常见面试总结
目录
一. Socket流阻塞
二. wait和notify
三. 线程实现的两种方式
四. synchronized同步代码块示例
五. ReentrantLock的方法示例
六. Lock和synchronized的一些区别和选择考虑的因素
七. Java并发包中的线程池种类及其特性介绍
八. 线程池&Future
九. BlockingQueue
十. volatile
十一. 并发编程总结
十二. 扩展.JMS->ActiveMQ
十三. 扩展.Java的反射实现API
十四. 扩展.动态代理的工作机制
一. Socket流阻塞
传统方式下,client和server之间是通过socket连接的,当client连接上server的时候,会创建一个线程,server是不知道client什么时候发消息的,所以一直等待,而且线程一直保持连接,这叫同步阻塞IO,是非常消耗性能的,慢速连接攻击大概是这个意思吧,长期占用着资源,却发送很少消息,这种对资源的不释放,最终结果就是server端不堪重负,最终挂掉。
为了解决上面的问题,就需要异步非阻塞IO,简称NIO。
demo:
标准io socket:
服务端使用多线程处理的结构示意图:
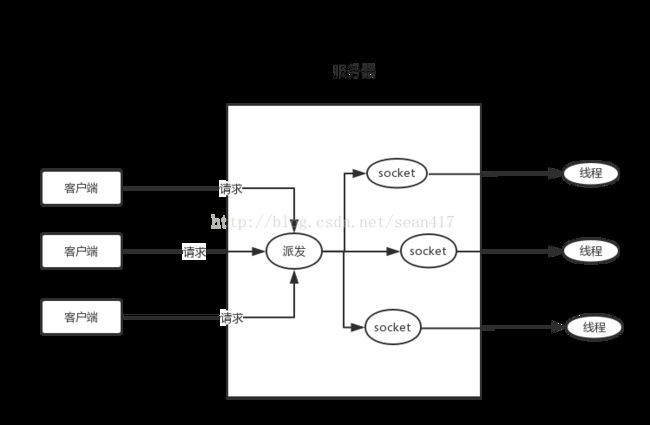
服务器端代码:
主线程负责不断地请求echoServer.accept(),如果没有客户端请求主线程会阻塞,当有客户端请求服务器端时,主线程会用线程池新创建一个线程执行。也就是说一个线程负责一个客户端socket,当一个客户端socket因为网络延迟时,服务器端负责这个客户端的线程就会等待,浪费资源。
import java.io.BufferedReader;
import java.io.IOException;
import java.io.InputStreamReader;
import java.io.PrintWriter;
import java.net.ServerSocket;
import java.net.Socket;
import java.nio.Buffer;
import java.util.concurrent.ExecutorService;
import java.util.concurrent.Executors;
/**
* 常规的socket服务端,服务器端采用一个线程接受一个客户端来处理。
* Created by chenyang on 2017/3/26.
*/
public class MultiThreadEchoServer {
private static ExecutorService tp= Executors.newCachedThreadPool();
static class HandleMsg implements Runnable{
Socket clientSocket;
public HandleMsg(Socket clientSocket) {
this.clientSocket = clientSocket;
}
@Override
public void run() {
BufferedReader is=null;
PrintWriter os=null;
try {
is=new BufferedReader(new InputStreamReader(clientSocket.getInputStream()));
os=new PrintWriter(clientSocket.getOutputStream(),true);
//从InputStream当中读取客户端所发送的数据
String inputLine=null;
long b=System.currentTimeMillis();
while ((inputLine=is.readLine())!=null){
os.println(inputLine);
}
long e=System.currentTimeMillis();
System.out.println("spend:"+(e-b)+"ms");
}catch (IOException e){
e.printStackTrace();
}finally {
try {
if(is!=null) is.close();
if(os!=null) os.close();
clientSocket.close();
}catch (IOException ex){
ex.printStackTrace();
}
}
}
}
public static void main(String[] args) {
ServerSocket echoServer=null;
Socket clientSocket=null;
try {
echoServer=new ServerSocket(8000);
}catch (IOException e){
System.out.println(e);
}
while (true){
try {
clientSocket =echoServer.accept();//阻塞
System.out.println(clientSocket.getRemoteSocketAddress()+" connect!"+System.currentTimeMillis());
//子线程负责执行与client socket 交互的操作。
tp.execute(new HandleMsg(clientSocket));
}catch (IOException e){
System.out.println(e);
}
}
}
}
客户端代码:
主线程创建10个子线程去请求server:这是个模拟网络拥堵时的客户端socket,每打一个字符就会停1秒。这样服务端的线程也要等待,这样服务器端的资源浪费的就很多。
import java.io.BufferedReader;
import java.io.IOException;
import java.io.InputStreamReader;
import java.io.PrintWriter;
import java.net.InetSocketAddress;
import java.net.Socket;
import java.net.UnknownHostException;
import java.util.concurrent.ExecutorService;
import java.util.concurrent.Executors;
import java.util.concurrent.locks.LockSupport;
/**
* 传统IO下,模拟10个网络不好的客户端同时访问server.
* Created by chenyang on 2017/4/8.
*/
public class HeavyThreadEchoClient {
static ExecutorService es= Executors.newCachedThreadPool();
static Long sleep_time=1000*1000*1000L;
public static class EchoClient implements Runnable{
@Override
public void run() {
Socket client=null;
PrintWriter writer=null;
BufferedReader reader=null;
try {
client=new Socket();
client.connect(new InetSocketAddress("localhost",8000));
writer=new PrintWriter(client.getOutputStream(),true);
writer.print("h");
LockSupport.parkNanos(sleep_time);
writer.print("e");
LockSupport.parkNanos(sleep_time);
writer.print("l");
LockSupport.parkNanos(sleep_time);
writer.print("l");
LockSupport.parkNanos(sleep_time);
writer.print("o");
LockSupport.parkNanos(sleep_time);
writer.print("!");
LockSupport.parkNanos(sleep_time);
writer.println();
writer.flush();
reader=new BufferedReader(new InputStreamReader(client.getInputStream()));
System.out.println("from server:"+reader.readLine());
}catch (UnknownHostException ex){
ex.printStackTrace();
}catch (IOException e){
e.printStackTrace();
} finally {
if(writer!=null){
writer.close();
}
if(reader!=null){
try {
reader.close();
}catch (IOException ex){
ex.printStackTrace();
}
}
if(client!=null){
try {
client.close();
}catch (IOException ex){
ex.printStackTrace();
}
}
}
}
}
public static void main(String[] args) {
EchoClient ec=new EchoClient();
for(int i=0;i<10;i++){
es.execute(ec);
}
}
}
当服务器端和客户端代码执行后的结果:
spend:6023ms
spend:6023ms
spend:6024ms
spend:6024ms
spend:6025ms
spend:6025ms
spend:6026ms
spend:6027ms
spend:6027ms
spend:6028ms
都有6秒的延迟,这都是网络io等待时间造成的。
nio socket:
通过事件通知的机制,当数据准备好了才会通知服务器端线程进行读写,避免了网络io等待。
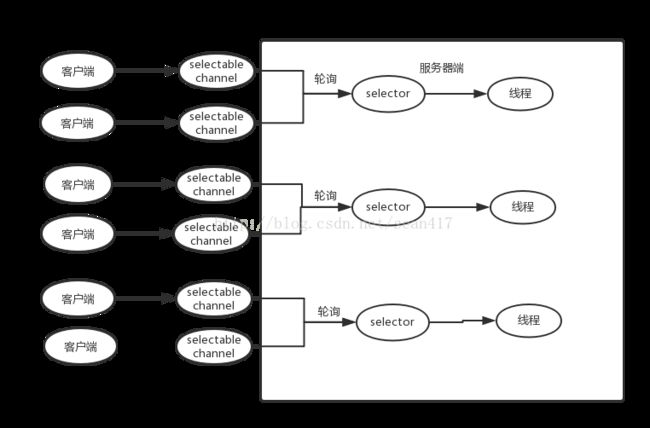
服务端多线程的结构示意图:
一个线程控制一个selector,一个selector可以轮询多个客户端的channel,这样服务器端线程不用等待网络io,只会处理准备好的数据。
服务器端代码:
import java.io.IOException;
import java.net.InetAddress;
import java.net.InetSocketAddress;
import java.net.Socket;
import java.nio.ByteBuffer;
import java.nio.channels.SelectionKey;
import java.nio.channels.Selector;
import java.nio.channels.ServerSocketChannel;
import java.nio.channels.SocketChannel;
import java.nio.channels.spi.SelectorProvider;
import java.util.*;
import java.util.concurrent.ExecutorService;
import java.util.concurrent.Executors;
/**
* Created by chenyang on 2017/4/8.
*/
public class MultiThreadNIOEchoServer {
public static Map
class EchoClient{
private LinkedList
EchoClient(){
outq=new LinkedList
}
//return the output queue
public LinkedList
return outq;
}
//enqueue a ByteBuffer on the output queue.
public void enqueue(ByteBuffer bb){
outq.addFirst(bb);
}
}
class HandleMsg implements Runnable{
SelectionKey sk;
ByteBuffer bb;
public HandleMsg(SelectionKey sk, ByteBuffer bb) {
this.sk = sk;
this.bb = bb;
}
@Override
public void run() {
EchoClient echoClient=(EchoClient)sk.attachment();
echoClient.enqueue(bb);
//we've enqueued data to be written to the client,we must
//not set interest in OP_WRITE
sk.interestOps(SelectionKey.OP_READ|SelectionKey.OP_WRITE);
selector.wakeup();
}
}
private Selector selector;
private ExecutorService tp= Executors.newCachedThreadPool();
/*
accept a new client and set it up for reading
*/
private void doAccept(SelectionKey sk){
ServerSocketChannel server=(ServerSocketChannel)sk.channel();
SocketChannel clientChannel;
try {
//获取客户端的channel
clientChannel = server.accept();
clientChannel.configureBlocking(false);
//register the channel for reading
SelectionKey clientKey=clientChannel.register(selector,SelectionKey.OP_READ);
//Allocate an EchoClient instance and attach it to this selection key.
EchoClient echoClient=new EchoClient();
clientKey.attach(echoClient);
InetAddress clientAddress=clientChannel.socket().getInetAddress();
System.out.println("Accepted connetion from "+clientAddress.getHostAddress()+".");
}catch (Exception e){
System.out.println("Failed to accept new client");
e.printStackTrace();
}
}
private void doRead(SelectionKey sk){
SocketChannel channel=(SocketChannel)sk.channel();
ByteBuffer bb=ByteBuffer.allocate(8192);
int len;
try {
len=channel.read(bb);
if(len<0){
disconnect(sk);
return;
}
}catch (Exception e){
System.out.println("Fail to read from client");
e.printStackTrace();
disconnect(sk);
return;
}
bb.flip();
tp.execute(new HandleMsg(sk,bb));
}
private void doWrite(SelectionKey sk){
SocketChannel channel=(SocketChannel)sk.channel();
EchoClient echoClient=(EchoClient)sk.attachment();
LinkedList
ByteBuffer bb=outq.getLast();
try {
int len=channel.write(bb);
if(len==-1){
disconnect(sk);
return;
}
if(bb.remaining()==0){
outq.removeLast();
}
}catch (Exception e){
e.printStackTrace();
System.out.println("fail to write to client");
disconnect(sk);
}
if(outq.size()==0){
sk.interestOps(SelectionKey.OP_READ);
}
}
private void disconnect(SelectionKey sk){
SocketChannel sc=(SocketChannel)sk.channel();
try {
sc.finishConnect();
}catch (IOException e){
}
}
private void startServer() throws Exception{
//声明一个selector
selector= SelectorProvider.provider().openSelector();
//声明一个server socket channel,而且是非阻塞的。
ServerSocketChannel ssc=ServerSocketChannel.open();
ssc.configureBlocking(false);
// InetSocketAddress isa=new InetSocketAddress(InetAddress.getLocalHost(),8000);
//声明服务器端的端口
InetSocketAddress isa=new InetSocketAddress(8000);
//服务器端的socket channel绑定在这个端口。
ssc.socket().bind(isa);
//把一个socketchannel注册到一个selector上,同时选择监听的事件,SelectionKey.OP_ACCEPT表示对selector如果
//监听到注册在它上面的server socket channel准备去接受一个连接,或 有个错误挂起,selector将把OP_ACCEPT加到
//key ready set 并把key加到selected-key set.
SelectionKey acceptKey=ssc.register(selector,SelectionKey.OP_ACCEPT);
for(;;){
selector.select();
Set readyKeys=selector.selectedKeys();
Iterator i=readyKeys.iterator();
long e=0;
while (i.hasNext()){
SelectionKey sk=(SelectionKey)i.next();
i.remove();
if(sk.isAcceptable()){
doAccept(sk);
}else if(sk.isValid()&&sk.isReadable()){
if(!geym_time_stat.containsKey(((SocketChannel)sk.channel()).socket())){
geym_time_stat.put(((SocketChannel)sk.channel()).socket(),System.currentTimeMillis());
doRead(sk);
}
}else if(sk.isValid()&&sk.isWritable()){
doWrite(sk);
e=System.currentTimeMillis();
long b=geym_time_stat.remove(((SocketChannel)sk.channel()).socket());
System.out.println("spend"+(e-b)+"ms");
}
}
}
}
public static void main(String[] args) {
MultiThreadNIOEchoServer echoServer=new MultiThreadNIOEchoServer();
try {
echoServer.startServer();
}catch (Exception e){
e.printStackTrace();
}
}
}
同样的客户端代码测试nio的服务器端结果:
spend8ms
spend10ms
spend11ms
spend15ms
spend7ms
spend7ms
spend6ms
spend6ms
spend6ms
spend8ms
几乎没有多少延迟。
总结:nio在数据准备好后,再交由应用进行处理,数据的读写过程仍在应用线程中。也就是说应用线程不用再等待网络io了,准备好了读写还是要处理的。
二. wait和notify
wait(),notify(),notifyAll()方法是Object的本地final方法,无法被重写。
wait()使当前线程阻塞,notify()和notifyAll()使线程唤醒,这三个方法都要写在synchronized代码块里面,因为它们要拿到锁才能执行。
当线程执行wait()方法的时候,释放当前锁,让出CPU,进入等待状态。
当线程执行notify()方法和notifyAll()方法的时候,会唤醒一个或多个正在等待的线程,然后继续向下执行,直到执行完synchronized代码块或者再次遇到wait()方法,再次释放锁。
wait()方法需要被try catch包裹,中断也可以使wait()等待的线程唤醒。
notify和wait的顺序不能错,如果A线程先执行了notify方法,B线程后执行wait方法,B线程是无法被唤醒的。
notify和notifyAll的区别就是notify只会唤醒一个线程,notifyAll会唤醒所有等待的线程,至于哪个线程第一个处理取决于操作系统。
三. 线程实现的两种方式
进程:操作系统会为进程在内存中分配一段独立的内存空间,彼此之间不会相互影响,可以负责当前应用程序的运行。当前这个进程负责调度当前程序中的所有运行细节。
线程:程序内部一个相对独立的空间,在进程的内部再次细分独立的空间,一个进程中至少有一个线程。
多线程:就是在一个进程里面同时开启多个线程,让多个线程同时去完成某些任务,目的是提高程序的运行效率。
多线程运行的原理:cpu在线程中做时间片的切换,其实不是同时运行的,只是我们感觉是同时运行的,cpu快速的在这些线程之间做切换,因为cpu的速度是很快的,所以我们感觉不到。
实现线程的两种方式:继承Thread类和实现Runnable接口,本质都是重写run()方法,要调用start()方法,而不是直接调用run()方法。如果调用了run()方法,只是一个普通的方法调用,不会开启新的线程。
public class MyThreadWithExtends extends Thread {
@Override
public void run() {
System.out.println("线程的run方法被调用……");
}
public static void main(String[] args) {
Thread thread = new MyThreadWithExtends();
thread.start();
}
}
public class MyThreadWithImpliment implements Runnable {
@Override
public void run() {
System.out.println("线程的run方法被调用……");
}
public static void main(String[] args) {
Thread thread = new Thread(new MyThreadWithImpliment());
thread.start();
}
}
四. synchronized同步代码块示例
被包裹在synchronized代码块中的代码,同一时间,只能有一个线程执行这段代码,synchronized后面跟的参数代表把谁锁住。下面的例子可以比作上厕所,必须拿到厕所的门才能上厕所,具体上厕所的方式可能不同,因为是同一把锁,所以synchronized中只能有一个线程在执行。
public class MySynchronized {
public static void main(String[] args) {
final MySynchronized mySynchronized = new MySynchronized();
new Thread() {
public void run() {
synchronized (mySynchronized) {
try {
Thread.sleep(1000);
} catch (InterruptedException e) {
e.printStackTrace();
}
System.out.println("thread1,start");
}
}
}.start();
new Thread() {
public void run() {
synchronized (mySynchronized) {
System.out.println("thread2,start");
}
}
}.start();
}
}
synchronized还可以修饰在方法上,当两个线程都调用这个方法的时候,同一时间只能有一个线程执行这个方法,另一个线程只能等待。
synchronized的缺陷:当一个线程获取了锁,其他线程只能等待线程释放锁,有两种情况:当前线程执行完成自动释放锁,另外一个是当前线程发生了异常,JVM会让线程释放锁。
深入(:
- synchronized 是 Java 中的关键字,是一种同步锁。
- 用来修饰一个代码块,被修饰的代码块称为 同步语句块,其作用的范围是 大括号 {} 括起来的代码,作用的对象是 大括号中的对象。一次只有一个线程进入该代码块,此时,线程获得的是 成员锁。
- 用来修饰一个方法,被修饰的方法称为 同步方法,锁是当前 实例对象。线程获得的是 成员锁,即一次只能有一个线程进入该方法,其他线程要想在此时调用该方法,只能排队等候。
- 用来修饰一个静态的方法,其作用的范围是整个 静态方法,锁是当前 Class 对象。线程获得的是 对象锁,即一次只能有一个线程进入该方法(该类的所有实例),其他线程要想在此时调用该方法,只能排队等候。
- 当 synchronized 锁住一个对象后,别的线程如果也想拿到这个对象的锁,就必须等待这个线程执行完成释放锁,才能再次给对象加锁,这样才达到线程同步的目的。
- 在使用 synchronized 关键字的时候,能缩小代码段的范围就尽量缩小,能在 代码段 上加同步就不要再整个方法上加同步。
- 无论 synchronized 关键字加在方法上还是对象上,它取得的锁都是对象,而不是把一段代码或函数当作锁。而且同步方法很可能还会被其他线程的对象访问。
- 实现同步是要很大的系统开销作为代价的,甚至可能造成死锁,所以尽量避免无谓的同步控制。
1.1 双重检查锁实现单例
- 使用 volatile 变量,保证先行发生关系(happens-before relationship)。对于 volatile 变量 singleton,所有的写(write)都将先行发生于读(read),在 Java 5 之前使用双重检查锁是有问题的。
- 第一次校验不是线程安全的,也就是说可能有多个线程同时得到 singleton 为 null 的结果,接下来的同步代码块保证了同一时间只有一个线程进入,而第一个进入的线程会创建对象,等其他线程再进入时对象已创建就不会继续创建。
class LockSingleton{
    private volatile static LockSingleton singleton;
    private LockSingleton(){}
    public static LockSingleton getInstance(){
        if(singleton==null){
            synchronized(LockSingleton.class){
                if(singleton==null){
                    singleton=new LockSingleton();
                }
            }
        }
        return singleton;
    }
}
1.2 枚举实现单例
-
Java 中的枚举和其它语言不同,它是一个对象。早期的 Java 是没有枚举类型的,用类似于单例的方式来实现枚举,简单的说就是让构造 private 化,在 static 块中产生多个 final 的对象实例,通过比较引用(或 equals)来进行比较,这种模式跟单例模式相似。
-
早期用类的方式实现的枚举
public class MyEnum {
    public static MyEnum NumberZero;
    public static MyEnum NumberOne;
    public static MyEnum NumberTwo;
    public static MyEnum NumberThree;

    static {
        NumberZero = new MyEnum(0);
        NumberOne = new MyEnum(1);
        NumberTwo = new MyEnum(2);
        NumberThree = new MyEnum(3);
    }

    private final int value;

    private MyEnum(int value) {
        this.value = value;
    }

    public int getValue() {
        return value;
    }
}
- 从 Java 5 开始有枚举类型之后,类似的实现
public enum MyEnum {
    NumberZero(0),
    NumberOne(1),
    NumberTwo(2),
    NumberThree(3);

    private final int value;

    MyEnum(int value) {
        this.value = value;
    }

    public int getValue() {
        return value;
    }
}
- 更简单的实现方式
public enum MyEnum {
    NumberZero,
    NumberOne,
    NumberTwo,
    NumberThree;

    public int getValue() {
        return ordinal();
    }
}
- 枚举的单例实现
enum EnumSingleton{
    INSTANCE;
    public void doSomeThing(){
    }
}
1.3 synchronized 的实现原理
-
JVM 中的同步(synchronized )基于进入和退出管程(Monitor)对象实现,无论是显式同步(有明确的 monitorenter 和 monitorexit 指令,即同步代码块)还是隐式同步都是如此。
- 在 Java 语言中,同步用的最多的地方是被 synchronized 修饰的同步方法。
- 但是同步方法并不是由 monitorenter 和 monitorexit 指令来实现同步的,而是由方法调用指令读取运行时常量池中方法的 ACC_SYNCHRONIZED 标志来隐式实现。
- 在 Java 语言中,同步用的最多的地方是被 synchronized 修饰的同步方法。
-
Java 对象保存在内存中时,由以下三部分组成。
- Java 对象头。
- 实例数据
- 对齐填充字节。
-
Java 对象头 和 Monitor 是实现 synchronized 的基础。
1.3.1 Java 对象头
- Java 对象头主要包括两部分数据:Mark Word(标记字段)、Klass Pointer(类型指针)。
- Klass Pointer 是对象指向它的类(Class)元数据的指针,虚拟机通过这个指针来确定这个对象是哪个类的实例。
- Mark Word 用于存储对象自身的运行时数据。
- 如哈希码(HashCode)、GC 分代年龄、锁状态标志、线程持有的锁、偏向线程 ID、偏向时间戳等。
- 对象头一般占有 两个机器码(在 32 位虚拟机中,1 个机器码等于 4 字节,也就是 32 bit),但是如果对象是数组类型,则需要 三个机器码,因为 JVM 可以通过 Java 对象的元数据信息确定 Java 对象的大小,但是无法从数组的元数据来确认数组的大小,所以用一块来记录数组长度。
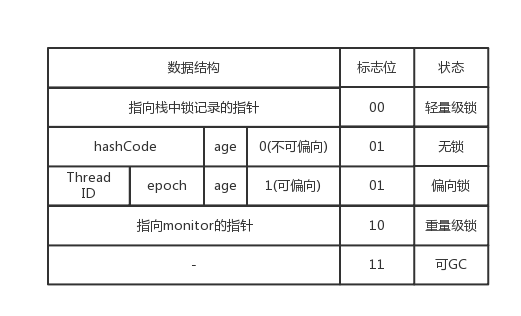
- 对象头信息是与对象自身定义的数据无关的额外存储成本,但是考虑到虚拟机的空间效率,Mark Word 被设计成一个非固定的数据结构以便在极小的空间内存存储尽量多的数据,它会根据对象的状态复用自己的存储空间,也就是说,Mark Word 会随着程序的运行发生变化,变化状态如下(32 位虚拟机)。
对象头信息
- synchronized 是重量级锁,保存了指向 Monitor 的指针。
1.3.2 Monitor(管程或监视器锁)
- Monitor 的重要特点是,同一个时刻,只有一个进程/线程能进入 Monitor 中定义的 临界区,这使得 Monitor 能够达到 互斥 的效果。
- 但仅仅有互斥的作用是不够的,无法进入 Monitor 临界区的进程/线程,它们应该被阻塞,并且在必要的时候会被唤醒。
- Monitor 作为一个同步工具,也提供了这样的管理进程/线程状态的机制。
- Monitor 机制需要几个元素来配合。
- 临界区。
- Monitor 对象及锁。
- 条件变量以及定义在 Monitor 对象上的 wait,signal 操作。
临界区
- 被 synchronized 关键字修饰的方法、代码块,就是 Monitor 机制的临界区。
Monitor 对象 / 锁 / 条件变量等
- synchronized 关键字在使用的时候,往往需要指定一个对象与之关联。这个对象就是 Monitor 对象。
- Monitor 的机制中,Monitor 对象充当着维护 mutex 以及定义 wait/signal API 来管理线程的阻塞和唤醒的角色。
- Java 语言中的 java.lang.Object 类,便是满足这个要求的对象,任何一个 Java 对象都可以作为 Monitor 机制的 Monitor 对象。
- java.lang.Object 类定义的 wait(),notify(),notifyAll() 方法,这些方法的具体实现,依赖于一个叫 ObjectMonitor(内置锁) 模式的实现,这是 JVM 内部基于 C++ 实现的一套机制,基本原理如下。
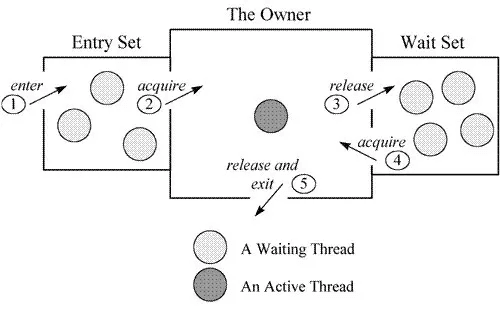
ObjectMonitor
- 当一个线程需要获取 Object 的锁时,会被放入 EntrySet 中进行等待,如果该线程获取到了锁,成为当前锁的 owner。如果根据程序逻辑,一个已经获得了锁的线程缺少某些外部条件,而无法继续进行下去(例如生产者发现队列已满或者消费者发现队列为空),那么该线程可以通过调用 wait 方法将锁释放,进入 wait set 中阻塞进行等待,其它线程在这个时候有机会获得锁,去干其它的事情,从而使得之前不成立的外部条件成立,这样先前被阻塞的线程就可以重新进入 EntrySet 去竞争锁。这个外部条件在 Monitor 机制中称为条件变量。
1.3.2.1 Monitor 与 Java对象及线程的关联
- 如果一个 Java 对象被某个线程锁住,则该 Java 对象的 Mark Word 字段中 LockWord 指向 Monitor 的起始地址。
- Monitor 的 owner 字段存放拥有相关联对象锁的线程 ID。
1.3.2.2 ObjectMonitor(内置锁) 的具体实现
- 在 Java 虚拟机(HotSpot)中,ObjectMonitor 的主要数据结构如下(位于 HotSpot 虚拟机源码 ObjectMonitor.hpp 文件,C++ 实现)
ObjectMonitor() {
    _header       = NULL;
    _count        = 0; //记录个数
    _waiters      = 0,
    _recursions   = 0;
    _object       = NULL;
    _owner        = NULL;
    _WaitSet      = NULL; //处于wait状态的线程,会被加入到_WaitSet
    _WaitSetLock  = 0 ;
    _Responsible  = NULL ;
    _succ         = NULL ;
    _cxq          = NULL ;
    FreeNext      = NULL ;
    _EntryList    = NULL ; //处于等待锁block状态的线程,会被加入到该列表
    _SpinFreq     = 0 ;
    _SpinClock    = 0 ;
    OwnerIsThread = 0 ;
}
- ObjectMonitor 中有两个队列,_WaitSet 和 _EntryList,用来保存 ObjectWaiter 对象列表( 每个等待锁的线程都会被封装成 ObjectWaiter 对象),_owner 指向持有 ObjectMonitor 对象的线程,当多个线程同时访问一段同步代码时,首先会进入 _EntryList 集合,当线程获取到对象的 Monitor 后进入 _owner 区域并把 Monitor 中的 owner 变量设置为当前线程,同时 Monitor 中的计数器 count 加 1。若线程调用 wait() 方法,将释放当前持有的 Monitor,owner 变量恢复为 null,count 自减 1,同时该线程进入 WaitSet 集合中等待被唤醒。若当前线程执行完毕也将释放 Monitor(锁)并复位变量的值,以便其他线程进入获取 Monitor(锁)。
| ObjectMonitor 方法 | 说明 |
|---|---|
| enter方法 | 获取锁。 |
| exit 方法 | 释放锁。 |
| wait 方法 | 为 Java 的 Object 的 wait 方法提供支持。 |
| notify 方法 | 为 Java 的 Object 的 notify 方法提供支持。 |
| notifyAll 方法 | 为 Java 的 Object 的 notifyAll 方法提供支持。 |
显式同步
- 从字节码中可知同步语句块的实现使用的是 monitorenter 和 monitorexit 指令,执行同步代码块后首先要先执行 monitorenter 指令,退出的时候执行 monitorexit 指令。
- 值得注意的是编译器将会确保无论方法通过何种方式完成,方法中调用过的每条 monitorenter 指令都有执行其对应 monitorexit 指令,而无论这个方法是正常结束还是异常结束。
- 为了保证在方法异常完成时 monitorenter 和 monitorexit 指令依然可以正确配对执行,编译器会自动产生一个异常处理器,这个异常处理器声明可处理所有的异常,它的目的就是用来执行 monitorexit 指令。
- 编写一个简单 Java 类。
public class Test {
    public static void main(String[] args) {
        synchronized (Test.class) {
        }
    }
}
- 通过 javap -v 查看编译字节码。
......
public static void main(java.lang.String[]);
    flags: ACC_PUBLIC, ACC_STATIC
    Code:
      stack=2, locals=3, args_size=1
         0: ldc_w         #2
         3: dup
         4: astore_1
         5: monitorenter     // 同步模块开始
         6: aload_1
         7: monitorexit        // 同步模块结束
         8: goto          16
        11: astore_2
        12: aload_1
......
隐式同步
- 方法级的同步是隐式,即无需通过字节码指令来控制的,它实现在方法调用和返回操作之中。
- JVM 可以从方法常量池中的方法表结构(method_info Structure)中的 ACC_SYNCHRONIZED 访问标志区分一个方法是否同步方法。
- 当方法调用时,调用指令将会检查方法的 ACC_SYNCHRONIZED 访问标志是否被设置,如果设置了,执行线程将先持有 Monitor, 然后再执行方法,最后在方法完成(无论是正常完成还是异常完成)时释放 Monitor。
- 方法执行期间,执行线程持有了 Monitor,其他任何线程都无法再获得同一个 Monitor。
- 如果一个同步方法执行期间抛出异常,并且在方法内部无法处理此异常,那这个同步方法所持有的 Monitor 将在异常抛到同步方法之外时自动释放。
- 编写一个简单 Java 类。
public class Test {
    public static void main(String[] args) {
        test();
    }

    public synchronized static void test() {
    }
}
- 通过 javap -v 查看编译字节码。
......
public static synchronized void test();
    flags: ACC_PUBLIC, ACC_STATIC, ACC_SYNCHRONIZED     // 检查访问标志
    Code:
      stack=0, locals=0, args_size=0
         0: return
      LineNumberTable:
        line 13: 0
......
1.3.3 类型指针
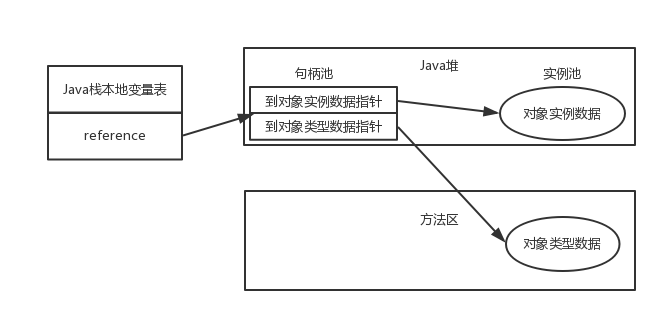
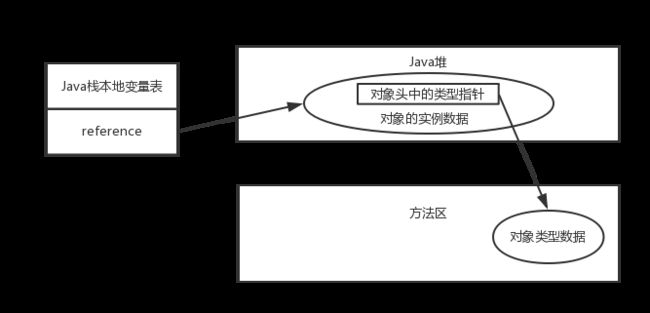
- 对象头的另外一部分是类型指针,即对象指向它的类元数据的指针,如果对象访问定位方式是句柄访问,那么该部分没有,如果是直接访问,该部分保留。
句柄访问方式
句柄访问方式
直接访问方式
直接访问方式
1.3.4 synchronized 的语义
- synchronized 同时保证了线程在同步块之前或者期间写入动作,对于后续进入该代码块的线程是可见的(对同一个 Monitor 对象而言)。在一个线程退出同步块时,线程释放 Monitor 对象,它的作用是把 CPU 缓存数据(本地缓存数据)刷新到主内存中,从而实现该线程的行为可以被其它线程看到。在其它线程进入到该代码块时,需要获得 Monitor 对象,它在作用是使 CPU 缓存失效,从而使变量从主内存中重新加载,然后就可以看到之前线程对该变量的修改。
- synchronized 还有一个语义是禁止指令的重排序(不改变程序的语义的情况下,编译器和执行器可以为了性能优化代码执行顺序),对于编译器来说,同步块中的代码不会移动到获取和释放 Monitor 的外面。
- 对于多个线程,同步块中的对象,必须是同一个对象,在相同的 Monitor 对象上同步才能够正确的设置 happens-before 关系。
1.4 synchronized 的优化
- 通过 synchronzied 实现同步用到了对象的内置锁(ObjectMonitor),而在 ObjectMonitor 的函数调用中会涉及到 mutex lock 等特权指令,那么这个时候就存在操作系统用户态和核心态的转换,这种切换会消耗大量的系统资源,因为用户态与内核态都有各自专用的内存空间,专用的寄存器等,用户态切换至内核态需要传递给许多变量、参数给内核,内核也需要保护好用户态在切换时的一些寄存器值、变量等,这也是早期 synchronized 效率低的原因。在 JDK 1.6 之后,从 JVM 层面做了很大的优化。
1.4.1 CAS
- CAS(Compare and Swap),即比较并替换,是非阻塞算法 (nonblocking algorithms,一个线程的失败或者挂起不应该影响其他线程的失败或挂起的算法)。
- CAS 有 3 个操作数,内存值(假设为 V),预期值(假设为 A),修改的新值(假设为 B)。当且仅当预期值 A 和内存值 V 相同时,将内存值 V 修改为 B,否则什么都不做。
- Unsafe,是 CAS 的核心类,通过调用 JNI 的代码实现,通过本地(native)方法来访问,Unsafe 可以直接操作特定内存的数据。
- 利用 CPU 的 CAS 指令,同时借助 JNI 来完成 Java 的非阻塞算法。其它原子操作都是利用类似的特性完成的。而整个 J.U.C 都是建立在 CAS 之上的,因此对于 synchronized 阻塞算法,J.U.C 在性能上有了很大的提升。
/**
     * Atomically update Java variable to x if it is currently
     * holding expected.
     * @return true if successful
     */
    public final native boolean compareAndSwapInt(Object o, long offset,
                                                  int expected,
                                                  int x);
- Unsafe 类中的 compareAndSwapInt,是一个本地方法,该方法的实现位于 unsafe.cpp 中。
UNSAFE_ENTRY(jboolean, Unsafe_CompareAndSwapInt(JNIEnv *env, jobject unsafe, jobject obj, jlong offset, jint e, jint x))
  UnsafeWrapper("Unsafe_CompareAndSwapInt");
  oop p = JNIHandles::resolve(obj);
  jint* addr = (jint *) index_oop_from_field_offset_long(p, offset);
  return (jint)(Atomic::cmpxchg(x, addr, e)) == e;
UNSAFE_END
1.4.1.1 CAS 存在的问题
- ABA 问题。
- 因为 CAS 需要在操作值的时候检查下值有没有发生变化,如果没有发生变化则更新,但是如果一个值原来是 A,变成了 B,又变成了 A,那么使用 CAS 进行检查时会发现它的值没有发生变化,但是实际上却变化了。
- ABA 问题的解决思路就是使用版本号。在变量前面追加上版本号,每次变量更新的时候把版本号加一,那么 A->B->A 就会变成 1A->2B->3A。
- 从 Java1.5 开始 JDK 的 atomic 包里提供了一个类 AtomicStampedReference 来解决 ABA 问题。这个类的 compareAndSet 方法作用是首先检查当前引用是否等于预期引用,并且当前标志是否等于预期标志,如果全部相等,则以原子方式将该引用和该标志的值设置为给定的更新值。
- 循环时间长开销大。
- 自旋 CAS 如果长时间不成功,会给 CPU 带来非常大的执行开销。
- 如果 JVM 能支持处理器提供的 pause 指令那么效率会有一定的提升,pause 指令有两个作用。
- 第一它可以延迟流水线执行指令(de-pipeline),使 CPU 不会消耗过多的执行资源,延迟的时间取决于具体实现的版本,在一些处理器上延迟时间是零。
- 第二它可以避免在退出循环的时候因内存顺序冲突(memory order violation)而引起 CPU 流水线被清空(CPU pipeline flush),从而提高 CPU 的执行效率。
- 只能保证一个共享变量的原子操作。
- 当对一个共享变量执行操作时,我们可以使用循环 CAS 的方式来保证原子操作,但是对多个共享变量操作时,循环 CAS 就无法保证操作的原子性,这个时候就可以用锁,或者有一个取巧的办法,就是把多个共享变量合并成一个共享变量来操作。
- 比如有两个共享变量 i=2,j=a,合并一下 ij=2a,然后用 CAS 来操作 ij。从 Java1.5 开始
JDK 提供了 AtomicReference 类来保证引用对象之间的原子性,可以把多个变量放在一个对象里来进行 CAS 操作。
1.4.2 偏向锁
- Java 偏向锁(Biased Locking)是 Java 6 引入的一项多线程优化。
- 它会偏向于第一个访问锁的线程,如果在运行过程中,同步锁只有一个线程访问,不存在多线程争用的情况,则线程不需要触发同步,这种情况下,会给线程加一个偏向锁。
- 在运行过程中,遇到了其他线程抢占锁,则持有偏向锁的线程被挂起,JVM 会消除它身上的偏向锁,将锁升级到标准的轻量级锁。
- 它通过消除资源无竞争情况下的同步,进一步提高了程序的运行性能。
- 撤销偏向锁的时候会导致 stop the world 操作,高并发的应用应禁用掉偏向锁。
- 开启偏向锁 -XX:+UseBiasedLocking -XX:BiasedLockingStartupDelay=0。
- 关闭偏向锁 -XX:-UseBiasedLocking。
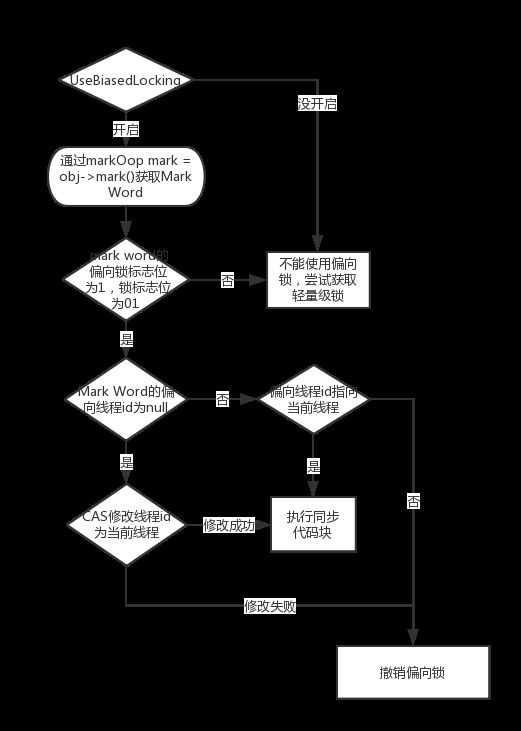
1.4.2.1 偏向锁的获取
偏向锁的获取
- 步骤 1. 访问 Mark Word 中偏向锁的标识是否设置成 1,锁标志位是否为 01,确认为可偏向状态。
- 步骤 2. 如果为可偏向状态,则测试线程 ID 是否指向当前线程。
- 如果是,进入步骤 5,
- 否则进入步骤 3。
- 步骤 3. 如果线程 ID 并未指向当前线程,则通过 CAS 操作竞争锁。
- 如果竞争成功,则将 Mark Word 中线程 ID 设置为当前线程 ID,然后执行步骤 5。
- 如果竞争失败,执行步骤 4。
- 步骤 4. 如果 CAS 获取偏向锁失败,则表示有竞争。
- 当到达全局安全点(safepoint)时获得偏向锁的线程被挂起,偏向锁升级为轻量级锁,然后被阻塞在安全点的线程继续往下执行同步代码。(撤销偏向锁的时候会导致 stop the world,时间很短)
- 步骤 5. 执行同步代码。
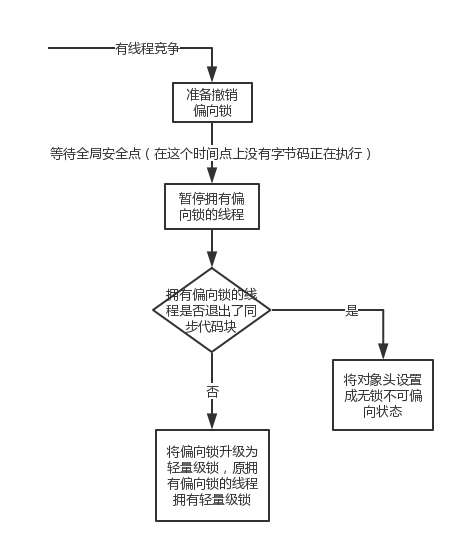
1.4.2.2 偏向锁的释放
偏向锁的释放
- 偏向锁只有遇到其他线程尝试竞争偏向锁时,持有偏向锁的线程才会释放锁(等待竞争出现才释放锁的机制),线程不会主动去释放偏向锁。
- 偏向锁的撤销,需要等待全局安全点(这个时间点上没有字节码正在执行),暂停拥有偏向锁的线程,判断锁对象是否处于被锁定状态,撤销偏向锁后恢复到未锁定(标志位为 " 01 ")或轻量级锁(标志位为 " 00 ")的状态。
1.4.2.3 安全点停顿日志
-
要查看安全点停顿,可以打开安全点日志,通过设置 JVM 参数。
- -XX:+PrintGCApplicationStoppedTime,打印出系统停止的时间。
- -XX:+PrintSafepointStatistics -XX:PrintSafepointStatisticsCount=1,打印出详细信息,可以查看到使用偏向锁导致的停顿,时间非常短暂,但是争用严重的情况下,停顿次数也会非常多。
- 在生产系统上还需要增加四个参数。
- -XX:+UnlockDiagnosticVMOptions
- -XX: -DisplayVMOutput
- -XX:+LogVMOutput
- -XX:LogFile=/dev/shm/vm.log
-
两个运行的线程同时执行同步代码块,就能出现偏向锁撤销操作,造成安全点停顿。
- 默认是偏向锁是关闭的,需要开启偏向锁才能看到日志。
         vmop                    [threads: total initially_running wait_to_block]    [time: spin block sync cleanup vmop] page_trap_count
0.036: EnableBiasedLocking              [       7          0              1    ]      [     0     0     0     0     0    ]  0
Total time for which application threads were stopped: 0.0000860 seconds, Stopping threads took: 0.0000180 seconds
         vmop                    [threads: total initially_running wait_to_block]    [time: spin block sync cleanup vmop] page_trap_count
0.071: RevokeBias                       [       9          0              1    ]      [     0     0     0     0     0    ]  0
Total time for which application threads were stopped: 0.0000810 seconds, Stopping threads took: 0.0000220 seconds
         vmop                    [threads: total initially_running wait_to_block]    [time: spin block sync cleanup vmop] page_trap_count
0.071: RevokeBias                       [       9          0              1    ]      [     0     0     0     0     0    ]  0
Total time for which application threads were stopped: 0.0001330 seconds, Stopping threads took: 0.0001090 seconds
         vmop                    [threads: total initially_running wait_to_block]    [time: spin block sync cleanup vmop] page_trap_count
0.071: no vm operation                  [       7          1              1    ]      [     0     0     0     0    10    ]  0
- RevokeBias 就是撤销偏向锁造成的安全点停顿。
| 参数 | 说明 |
|---|---|
| vmop | Java 虚拟机操作类型(时间戳:操作类型)。 |
| threads | 线程概况(安全点里的总线程数(total) ;安全点开始时正在运行状态的线程数(initially_running) ;在 Java 虚拟机操作开始前需要等待其暂停的线程数(wait_to_block))。 |
| time | 执行操作时间(等待线程响应 safepoint 号召的时间(spin);暂停所有线程所用的时间(block);等于 spin + block,这是从开始到进入安全点所耗的时间,可用于判断进入安全点耗时(sync);清理所用时间(cleanup);真正执行 Java 虚拟机操作的时间(vmop))。 |
1.4.2.4 偏向锁小结
- 一个对象刚开始实例化的时候,没有任何线程来访问它的时候,它是可偏向的,当第一个
线程来访问它的时候,它会偏向这个线程,此时,对象持有偏向锁。线程在修改对象头成为偏向锁的时候使用 CAS 操作,并将对象头中的 ThreadID 改成自己的 ID,之后再次访问这个对象时,只需要对比 ID,不需要再使用 CAS 在进行操作。 - 一旦有第二个线程访问这个对象,因为偏向锁不会主动释放,所以第二个线程可以看到对象是偏向状态,这时表明在这个对象上已经存在竞争了,检查原来持有该对象锁的线程是否依然存活,如果挂了,则将对象变为无锁状态,然后重新偏向新的线程。
- 如果原来的线程依然存活,则马上执行那个线程的操作栈,检查该对象的使用情况,如果仍然需要持有偏向锁,则偏向锁升级为轻量级锁,(偏向锁就是这个时候升级为轻量级锁的)。如果不存在使用了,则可以将对象回复成无锁状态,然后重新偏向。
1.4.3 轻量级锁
- 轻量级锁是由偏向锁升级而来,偏向锁运行在一个线程进入同步块的情况下,当第二个线程加入锁争用的时候,偏向锁就会升级为轻量级锁。
1.4.3.1 轻量级锁的加锁过程
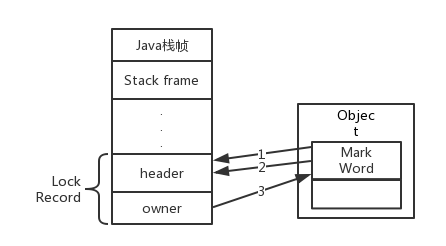
- 步骤 1. 在代码进入同步块的时候,如果同步对象锁状态为无锁状态(锁标志位为 " 01 " 状态,是否为偏向锁为 " 0 "),虚拟机首先将在当前线程的栈帧中建立一个名为锁记录(Lock Record)的空间,用于存储锁对象目前的 Mark Word 的拷贝,官方称之为 Displaced Mark Word。
轻量级锁的获取
- 步骤 2. 拷贝对象头中的 Mark Word 复制到锁记录中。
- 步骤 3. 拷贝成功后,虚拟机将使用 CAS 操作尝试将对象的 Mark Word 更新为指向 Lock Record 的指针,并将 Lock Record 里的 owner 指针指向 object mark word。如果更新成功,则执行步骤 4,否则执行步骤 5。
- 步骤 4. 如果更新动作成功了,那么这个线程就拥有了该对象的锁,并且对象 Mark Word 的锁标志位设置为 " 00 ",即表示此对象处于轻量级锁定状态。
图 A 线程堆栈与对象头的状态
- 步骤 5. 如果更新操作失败了,虚拟机首先会检查对象的 Mark Word 是否指向当前线程的栈帧,如果是就说明当前线程已经拥有了这个对象的锁,那就可以直接进入同步块继续执行。否则说明多个线程竞争锁,轻量级锁就要膨胀为重量级锁,锁标志的状态值变为 " 10 " ,Mark Word 中存储的就是指向重量级锁(互斥量)的指针,后面等待锁的线程也要进入阻塞状态。 而当前线程便尝试使用自旋来获取锁,自旋就是为了不让线程阻塞,而采用循环去获取锁的过程。
1.4.3.2 轻量级锁的释放
从释放锁的线程(已经获得轻量级锁的线程)的角度理解
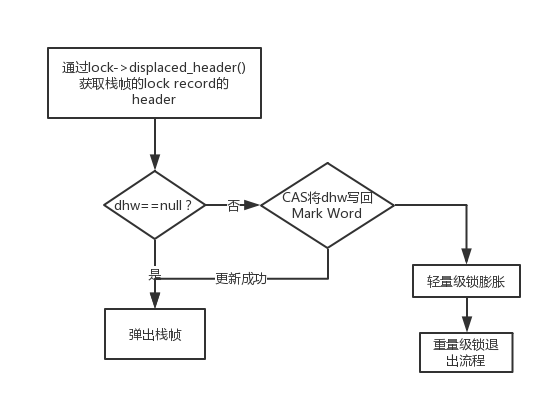
- 轻量级锁释放时,会使用原子的 CAS 操作来将 Displaced Mark Word 替换回到对象头,如果成功,则表示没有竞争发生。如果失败,表示当前锁存在竞争(在持有锁的期间有其他线程来尝试获取锁了,并且该线程对 Mark Word 做了修改),锁就会膨胀成重量级锁。
轻量级锁的释放
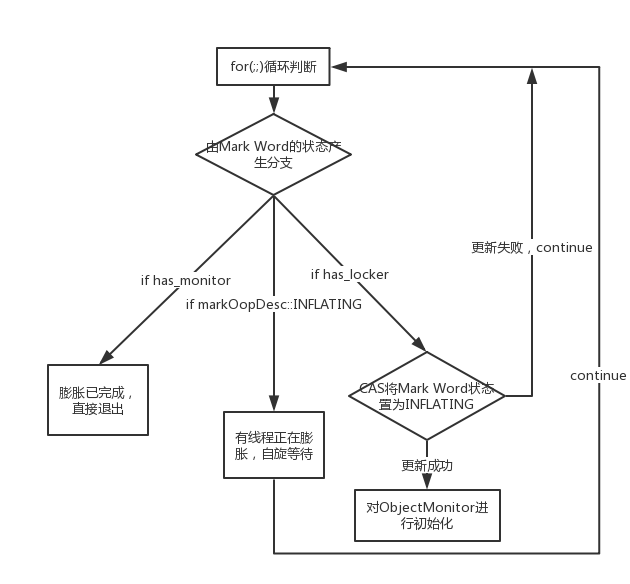
轻量级锁的膨胀
从尝试获取锁线程的角度理解
- 如果线程尝试获取锁的时候,轻量锁正被其他线程占有,那么它就会修改 Mark Word,修改为重量级锁,表示该进入重量锁了。
- 这个修改是通过自旋完成的,自旋达到一定次数 CAS 操作仍然没有成功,才会进行修改。(轻量锁的线程不会阻塞,会一直自旋等待锁)
1.4.3.3 轻量级锁小结
- 当获取到锁的线程执行同步体之内的代码的时候,另一个线程也完成了上面创建锁记录空间,将对象头中的 Mark Word 复制到自己的锁记录中,尝试用 CAS 将对象头中的 Mark Word修改为指向自己的锁记录的指针,但是由于之前获取到锁的线程已经将 Mark Word 中的记录修改过了(并且现在还在执行同步体中的代码),与这个现在试图将 Mark Word 替换为自己的锁记录的线程自己的锁记录中的 Mark Word 的值不符,CAS 操作失败,因此这个线程就会不停地循环使用 CAS 操作试图将 Mark Word 替换为自己的记录。这个循环是有次数限制的,如果在循环结束之前 CAS 操作成功,那么该线程就可以成功获取到锁,如果循环结束之后依然获取不到锁,则锁获取失败,Mark Word 中的记录会被修改为指向重量级锁的指针,然后这个获取锁失败的线程就会被挂起,阻塞了。
- 当持有锁的那个线程执行完同步体之后想用 CAS 操作将 Mark Word 中 的记录改回它自己的栈中最开始复制的记录的时候会发现 Mark Word 已被修改为指向重量级锁的指针,因此 CAS
操作失败,该线程会释放锁并唤起阻塞等待的线程,开始新一轮夺锁之争,而此时,轻量级锁已经膨胀为重量级锁,所有竞争失败的线程都会阻塞,而不是自旋。 - 轻量级锁一旦膨胀为重量级锁,则不可逆转。因为轻量级锁状态下,自旋是会消耗 CPU 的,但是锁一旦膨胀,说明竞争激烈,大量线程都做无谓的自旋对 CPU 是一个极大的浪费。
1.4.4 重量级锁
1.4.4.1 重量级锁的获取
重量级锁的获取
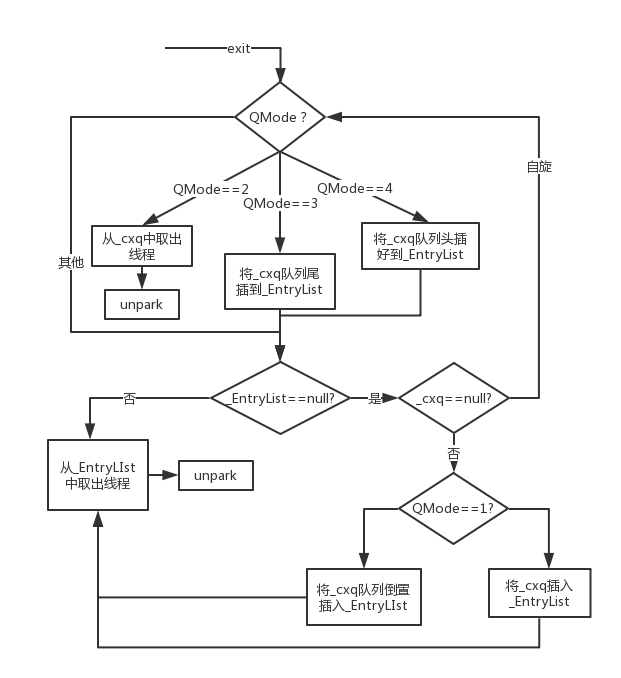
1.4.4.2 重量级锁的释放
重量级锁的释放
1.4.4.3 各种锁比较
| 锁 | 优点 | 缺点 | 适用场景 |
|---|---|---|---|
| 偏向锁 | 加锁解锁不需要额外消耗 | 如果线程间存在竞争,会带来额外的锁撤销消耗 | 一个线程访问同步块的场景 |
| 轻量级锁 | 竞争线程不会阻塞,提高程序响应速度 | 得不到锁竞争的线程,会自旋消耗 CPU | 追求响应时间,同步块执行速度很快的场景 |
| 重量级锁 | 线程竞争不适用自旋,不消耗 CPU | 线程阻塞,响应速度慢 | 追求吞吐量,同步块执行时间较长的场景 |
1.4.5 自旋锁
- 如果持有锁的线程能在很短时间内释放锁资源,那么那些等待竞争锁的线程就不需要做内核态和用户态之间的切换进入阻塞挂起状态,它们只需要等一等(自旋),等持有锁的线程释放锁后即可立即获取锁,这样就避免用户线程和内核的切换的消耗。
- 线程自旋是需要消耗 CPU 的,如果一直获取不到锁,那线程也不能一直占用 CPU 自旋做无用功,所以需要设定一个自旋等待的最大时间。
- 如果持有锁的线程执行的时间超过自旋等待的最大时间仍没有释放锁,就会导致其它争用锁的线程在最大等待时间内还是获取不到锁,这时争用线程会停止自旋进入阻塞状态。
- 自旋锁的开启
- JDK 1.6 中 -XX:+UseSpinning 开启自旋锁。-XX:PreBlockSpin=10 设置自旋次数。
- JDK 1.7后,去掉此参数,由 JVM 控制。
1.4.5.1 自旋锁的优缺点
- 自旋锁尽可能的减少线程的阻塞,这对于锁的竞争不激烈,且占用锁时间非常短的代码块来说性能能大幅度的提升,因为 自旋的消耗会小于线程阻塞挂起再唤醒的操作的消耗,这些操作会导致线程发生 两次上下文切换。
- 如果锁的竞争激烈,或者持有锁的线程需要长时间占用锁执行同步块,这时候就不适合使用自旋锁了,因为自旋锁在获取锁前一直都是占用 CPU 做无用功,同时有大量线程竞争一个锁,会导致获取锁的时间很长,线程自旋的消耗大于线程阻塞挂起操作的消耗,其它需要 CPU 的线程又不能获取到 CPU,造成 CPU 的浪费。所以这种情况下需要关闭自旋锁。
1.4.5.2 自旋锁时间阈值
- 自旋锁的目的是为了占着 CPU 的资源不释放,等到获取到锁立即进行处理。
- 在 JDK 1.6 引入了适应性自旋锁,适应性自旋锁意味着自旋的时间不在是固定的了,而是由前一次在同一个锁上的自旋时间以及锁的拥有者的状态来决定。
- 如果平均负载小于 CPUs 则一直自旋。
- 如果有超过(CPUs/2)个线程正在自旋,则后来线程直接阻塞。
- 如果正在自旋的线程发现 owner 发生了变化则延迟自旋时间(自旋计数)或进入阻塞。
- 如果 CPU 处于节电模式则停止自旋。
- 自旋时间的最坏情况是 CPU 的存储延迟(CPU A 存储了一个数据,到 CPU B 得知这个数据直接的时间差)
- 自旋时会适当放弃线程优先级之间的差异。
1.4.6 锁的优化
减少锁的时间
- 不需要同步执行的代码,能不放在同步快里面执行就不要放在同步快内,让锁尽快释放。
减少锁的粒度
- 将物理上的一个锁,拆成逻辑上的多个锁,增加并行度,从而降低锁竞争。(用空间来换时间)
- 拆锁的粒度不能无限拆,最多可以将一个锁拆为当前 CPU 数量个锁即可。
锁粗化
- 循环内的操作需要加锁,应该把锁放到循环外面,否则每次进出循环,都进出一次临界区,效率会非常差。
使用读写锁
- ReentrantReadWriteLock 是一个读写锁,读操作加读锁,可以并发读,写操作使用写锁,只能单线程写。
读写分离
- CopyOnWrite 容器即写时复制的容器。当往一个容器添加元素的时候,不直接往当前容器添加,而是先将当前容器进行 Copy,复制出一个新的容器,然后新的容器里添加元素,添加完元素之后,再将原容器的引用指向新的容器。这样做的好处是可以对 CopyOnWrite 容器进行并发的读,而不需要加锁,因为当前容器不会添加任何元素。所以 CopyOnWrite 容器也是一种读写分离的思想,读和写不同的容器。
- CopyOnWrite 并发容器用于读多写少的并发场景,因为,读的时候没有锁,但是对其进行更改的时候是会加锁的,否则会导致多个线程同时复制出多个副本,各自修改各自的。
使用 CAS
- 如果需要同步的操作执行速度非常快,并且线程竞争并不激烈,这时候使用 CAS 效率会更高,因为加锁会导致线程的上下文切换,如果上下文切换的耗时比同步操作本身更耗时,且线程对资源的竞争不激烈,使用 volatiled + cas 操作会是非常高效的选择。
消除缓存行的伪共享
- 在 JDK 1.8 中通过添加 sun.misc.Contended 注解来解决这个问题。若要使该注解有效必须在 JVM 中添加以下参数。
- -XX:-RestrictContended
- sun.misc.Contended 注解会在变量前面添加 128 字节的 padding 将当前变量与其他变量进行隔离。
消除锁
- 消除锁是 JVM 一种锁的优化,这种优化更彻底,JVM 在 JIT 编译时(可以简单理解为当某段代码即将第一次被执行时进行编译,又称即时编译),通过对运行上下文的扫描,去除不可能存在共享资源竞争的锁,通过这种方式消除没有必要的锁,可以节省毫无意义的请求锁时间。
- 如 StringBuffer 的 append 是一个同步方法,但是在 add 方法中的 StringBuffer 属于一个局部变量,并且不会被其他线程所使用,因此 StringBuffer 不可能存在共享资源竞争的情景,JVM 会自动将其锁消除。
1.5 synchronized 的关键点
synchronized 的可重入性
- 从互斥锁的设计上来说,当一个线程试图操作一个由其他线程持有的对象锁的临界资源时,将会处于阻塞状态。
- 当一个线程再次请求自己持有对象锁的临界资源时,这种情况属于重入锁,请求将会成功。
- synchronized 是基于原子性的内部锁机制,是可重入的。
- 一个线程调用 synchronized 方法的同时在其方法体内部调用该对象另一个 synchronized 方法,一个线程得到一个对象锁后再次请求该对象锁,是允许的。
中断与 synchronized
- 对于 synchronized 来说,如果一个线程在等待锁,那么结果只有两种,要么它获得这把锁继续执行,要么它就保存等待,即使调用中断线程的方法,也不会生效。
等待唤醒机制与 synchronized
- notify / notifyAll /wait 方法,必须处于 synchronized 代码块或者 synchronized 方法中,否则就会抛出 IllegalMonitorStateException 异常。
- 因为调用这几个方法前必须拿到当前对象的 Monitor 对象,也就是说 notify / notifyAll / wait 方法依赖于 Monitor 对象。
- Monitor 存在于对象头的 Mark Word 中(存储 Monitor 的引用指针),而 synchronized 关键字可以获取 Monitor。
五. ReentrantLock的方法示例
lock不是Java语言内置的,synchronized是Java语言的关键字,因此是内置性的,lock是一个类,通过这个类可以实现同步访问。
lock和synchronized有一点非常大的不同,synchronized不需要手动释放锁,当synchronized方法结束或者synchronized代码块结束,会自动释放锁的占用,lock必须手动释放,如果没有手动释放,就会出现死锁的情况。
lock是一个接口,它里面有lock()、tryLock()、tryLock(long time, TimeUnit unit)、lockInterruptibly()、unLock()这5个方法,ReentrantLock是唯一实现了Lock接口的类。ReentrantLock是可重入锁的意思。
lock()和tryLock()的使用方法:
package com.wsy;
import java.util.ArrayList;
import java.util.concurrent.locks.Lock;
import java.util.concurrent.locks.ReentrantLock;
public class Test {
private static ArrayList
static Lock lock = new ReentrantLock(); // 注意这个地方
public static void main(String[] args) {
new Thread() {
public void run() {
Thread thread = Thread.currentThread();
boolean tryLock = lock.tryLock();// 尝试获取锁
System.out.println(thread.getName() + " " + tryLock);
if (tryLock) {
try {
System.out.println(thread.getName() + "得到了锁");
for (int i = 0; i < 5; i++) {
arrayList.add(i);
}
} catch (Exception e) {
} finally {
System.out.println(thread.getName() + "释放了锁");
lock.unlock();
}
}
};
}.start();
new Thread() {
public void run() {
Thread thread = Thread.currentThread();
boolean tryLock = lock.tryLock();
System.out.println(thread.getName() + " " + tryLock);
if (tryLock) {
try {
System.out.println(thread.getName() + "得到了锁");
for (int i = 0; i < 5; i++) {
arrayList.add(i);
}
} catch (Exception e) {
} finally {
System.out.println(thread.getName() + "释放了锁");
lock.unlock();
}
}
};
}.start();
}
}
lockInterruptibly()的使用方法:
package com.wsy;
import java.util.concurrent.locks.Lock;
import java.util.concurrent.locks.ReentrantLock;
public class MyInterruptibly {
private Lock lock = new ReentrantLock();
public static void main(String[] args) {
MyInterruptibly test = new MyInterruptibly();
MyThread thread0 = new MyThread(test);
MyThread thread1 = new MyThread(test);
thread0.start();
thread1.start();
try {
Thread.sleep(2000);
} catch (InterruptedException e) {
e.printStackTrace();
}
thread1.interrupt();
System.out.println("=====================");
}
public void insert(Thread thread) throws InterruptedException {
lock.lockInterruptibly(); // 注意,如果需要正确中断等待锁的线程,必须将获取锁放在外面,然后将InterruptedException抛出
try {
System.out.println(thread.getName() + "得到了锁");
long startTime = System.currentTimeMillis();
for (;;) {
if (System.currentTimeMillis() - startTime >= Integer.MAX_VALUE)
break;
// 插入数据
}
} finally {
System.out.println(Thread.currentThread().getName() + "执行finally");
lock.unlock();
System.out.println(thread.getName() + "释放了锁");
}
}
}
class MyThread extends Thread {
private MyInterruptibly test = null;
public MyThread(MyInterruptibly test) {
this.test = test;
}
@Override
public void run() {
try {
test.insert(Thread.currentThread());
} catch (Exception e) {
System.out.println(Thread.currentThread().getName() + "被中断");
}
}
}
六. Lock和synchronized的一些区别和选择考虑的因素
ReadWriteLock是一个接口,用来处理读写中出现的多线程问题,通常,多个线程同时读是没有问题的,多个线程同时写就需要处理,不能让他们同时写。接口中有两个方法,分别是:readLock()和writeLock(),分别返回read锁和write锁。
使用synchronized来实现:读和写都在一个线程中操作,thread1必须在thread0读写完成后才能读写,导致读的时候不能多个线程同时读取,这是不符合逻辑的,我们只需要写的时候锁定。
package com.wsy;
// 一个线程又要读又要写,用synchronize来实现的话,读写操作都只能锁住后一个线程一个线程地进行
public class MySynchronizedReadWrite {
public static void main(String[] args) {
final MySynchronizedReadWrite test = new MySynchronizedReadWrite();
new Thread() {
public void run() {
test.get(Thread.currentThread());
};
}.start();
new Thread() {
public void run() {
test.get(Thread.currentThread());
};
}.start();
}
public synchronized void get(Thread thread) {
long start = System.currentTimeMillis();
int i = 0;
while (System.currentTimeMillis() - start <= 1) {
i++;
if (i % 4 == 0) {
System.out.println(thread.getName() + "正在进行写操作");
} else {
System.out.println(thread.getName() + "正在进行读操作");
}
}
System.out.println(thread.getName() + "读写操作完毕");
}
}
使用ReadWriteLock来实现:多运行几次,可以发现读操作可以交替出现,而写操作一定是单线程进行的。
package com.wsy;
import java.util.concurrent.locks.ReentrantReadWriteLock;
// 使用读写锁,可以实现读写分离锁定,读操作并发进行,写操作锁定单个线程
// 如果有一个线程已经占用了读锁,则此时其他线程如果要申请写锁,则申请写锁的线程会一直等待释放读锁。
// 如果有一个线程已经占用了写锁,则此时其他线程如果申请写锁或者读锁,则申请的线程会一直等待释放写锁。
public class MyReentrantReadWriteLock {
private ReentrantReadWriteLock rwl = new ReentrantReadWriteLock();
public static void main(String[] args) {
final MyReentrantReadWriteLock test = new MyReentrantReadWriteLock();
new Thread() {
public void run() {
test.get(Thread.currentThread());
test.write(Thread.currentThread());
};
}.start();
new Thread() {
public void run() {
test.get(Thread.currentThread());
test.write(Thread.currentThread());
};
}.start();
}
// 读操作,用读锁来锁定
public void get(Thread thread) {
rwl.readLock().lock();
try {
long start = System.currentTimeMillis();
while (System.currentTimeMillis() - start <= 1) {
System.out.println(thread.getName() + "正在进行读操作");
}
System.out.println(thread.getName() + "读操作完毕");
} finally {
rwl.readLock().unlock();
}
}
// 写操作,用写锁来锁定
public void write(Thread thread) {
rwl.writeLock().lock();
try {
long start = System.currentTimeMillis();
while (System.currentTimeMillis() - start <= 1) {
System.out.println(thread.getName() + "正在进行写操作");
}
System.out.println(thread.getName() + "写操作完毕");
} finally {
rwl.writeLock().unlock();
}
}
}
Lock和synchronized的选择:
Lock是一个接口,synchronized是Java中的关键字。
synchronized在发生异常的情况下,会自动释放锁,因此一般不会导致死锁的情况(互相死锁除外),而Lock在发生异常的情况下,不会自动调用unlock()方法,所以有可能发生死锁。因此在使用Lock的时候,一定要在finally中释放锁。
Lock可以让等待锁的线程中断,synchronized不行,使用synchronized时候,等待的线程会一直等待下去,不能够响应中断。
通过Lock可以知道有没有成功获取到锁,synchronized做不到。
Lock可以提高多个线程的读操作效率。
从性能上讲,如果竞争不是很激烈,两者的差别不大,如果竞争非常激烈,Lock的性能要远高于synchronized的,因为Lock可以具体情况具体选择。
七. Java并发包中的线程池种类及其特性介绍
在多线程开发的时候,不会使用new Thread的方式,因为一个系统能承受的线程数量是有限的,无限的new下去是肯定不行的,所以这里我们接触到了线程池的概念。线程池固定线程的数量,对于不同的任务,只需要给它不同的Runnable对象即可,就可以执行任务了。
线程池的5种创建方法:
SingleThreadExecutor:只有一个线程的线程池,因此所有的任务都是顺序执行的。
CachedThreadPool:线程池中有很多线程需要同时执行,老的可用线程被新的任务触发重新执行,如果某线程超过60秒没有执行,将被终止并从线程池中删除。
FixedThreadPool:拥有固定线程数量的线程池,如果没有任务执行,线程会一直等待,通常设置线程的数量=cpu的数量效率会比较高,可以使用代码int cpuNums = Runtime.getRuntime().availableProcessors();拿到cpu的核数量。
ScheduledThreadPool:用来调度即将执行的任务的线程池。
SingleThreadScheduledPool:只有一个线程,用来调度任务在指定时间执行。
八. 线程池&Future
线程池之Runnable的使用方法:
package com.wsy;
import java.util.concurrent.ExecutorService;
import java.util.concurrent.Executors;
public class ThreadPoolWithRunable {
// 通过线程池执行线程
public static void main(String[] args) {
// 创建一个线程池
ExecutorService pool = Executors.newCachedThreadPool();
for (int i = 1; i < 5; i++) {
pool.execute(new Runnable() {
@Override
public void run() {
System.out.println("thread name: " + Thread.currentThread().getName());
try {
Thread.sleep(1000);
} catch (InterruptedException e) {
e.printStackTrace();
}
}
});
}
pool.shutdown();
}
}
线程池之Callable的使用方法:
package com.wsy;
import java.util.concurrent.Callable;
import java.util.concurrent.ExecutionException;
import java.util.concurrent.ExecutorService;
import java.util.concurrent.Executors;
import java.util.concurrent.Future;
// callable 跟runnable的区别:
// runnable的run方法不会有任何返回结果,所以主线程无法获得任务线程的返回值
// callable的call方法可以返回结果,但是主线程在获取时是被阻塞,需要等待任务线程返回才能拿到结果
public class ThreadPoolWithcallable {
public static void main(String[] args) throws InterruptedException, ExecutionException {
ExecutorService pool = Executors.newFixedThreadPool(4);
for (int i = 0; i < 10; i++) {
Future
@Override
public String call() throws Exception {
System.out.println("a");
Thread.sleep(5000);
return "b--" + Thread.currentThread().getName();
}
});
// 从Future中get结果,这个方法是会被阻塞的,一直要等到线程任务返回结果
System.out.println(submit.get());
}
pool.shutdown();
}
}
运行下面的代码之后,可以看到有些线程的运行结果可能并不能立刻返回,但是最终还是能通过句柄拿到返回结果。代码是使用了fixedPool来提交线程,还可以使用schedulerPool来提交线程,将下面相关的注释放开即可。
package com.wsy;
import java.util.ArrayList;
import java.util.Random;
import java.util.concurrent.Callable;
import java.util.concurrent.Executors;
import java.util.concurrent.Future;
import java.util.concurrent.ScheduledExecutorService;
public class TestPool {
public static void main(String[] args) throws Exception {
Future submit = null;
Random random = new Random();
// 创建固定数量线程池
ExecutorService exec = Executors.newFixedThreadPool(4);
// 创建调度线程池
// ScheduledExecutorService exec = Executors.newScheduledThreadPool(4);
// 用来记录各线程的返回结果
ArrayList
for (int i = 0; i < 10; i++) {
// fixedPool提交线程,runnable无返回值,callable有返回值
// submit = exec.submit(new TaskRunnable(i));
// submit = exec.submit(new TaskCallable(i));
// 对于schedulerPool来说,调用submit提交任务时,跟普通pool效果一致
submit = exec.submit(new TaskCallable1(i));
// 对于schedulerPool来说,调用schedule提交任务时,则可按延迟,按间隔时长来调度线程的运行
// submit = exec.schedule(new TaskCallable(i), random.nextInt(10), TimeUnit.SECONDS);
// 存储线程执行结果
// submit其实是一个句柄,放到results里面的不是真正的结果,因为有可能add的时候还没有获取到值,放进去句柄,当后面需要获取的时候,通过句柄拿值
// 如果前面的线程阻塞或者运算量大会延迟一小会儿,那么整体的运行是不会延迟的
results.add(submit);
}
// 打印结果
for (Future f : results) {
boolean done = f.isDone();
System.out.println(done ? "已完成" : "未完成");
// 从结果的打印顺序可以看到,即使未完成,也会阻塞等待
System.out.println("线程返回future结果: " + f.get());
}
exec.shutdown();
}
}
class TaskCallable implements Callable
private int s;
Random r = new Random();
// Callable可以传参数,可以有返回值
public TaskCallable(int s) {
this.s = s;
}
@Override
public String call() throws Exception {
String name = Thread.currentThread().getName();
long currentTimeMillis = System.currentTimeMillis();
System.out.println(name + " 启动时间:" + currentTimeMillis / 1000);
int rint = r.nextInt(3);
try {
Thread.sleep(rint * 1000);
} catch (InterruptedException e) {
e.printStackTrace();
}
System.out.println(name + " is working..." + s);
return s + "";
}
}
深入剖析:
demo:
ExecutorService executorService = Executors.newSingleThreadExecutor();
Future future = executorService.submit(new XSImpleCallable());
String sss = (String) future.get();
System.out.println(sss);
public class XSImpleCallable implements Callable{
@Override
public Object call() throws Exception {
return "This is my callable/xvshu";
}
}
输出:
This is my callable/xvshu
可以看到,通过Future可以获取到线程的返回值,那么他是如何做到的呢?下面我们来看源码。
源码:
下面看调用的submit方法
public
if (task == null) throw new NullPointerException();
RunnableFuture
execute(ftask);
return ftask;
}
protected
return new FutureTask
}
可以看到是把我们实现了Callabe的对象封装成了一个FutureTask对象,并且调用了线程池的execute()方法,咦。。这个方法不是我们平常把线程丢到线程池里执行的方法吗?为啥我们调用的是线程池的submit()方法最终是调用了execute()方法呢?这个FutureTask何许人也?
public class FutureTask
public void run() {
try {
Callable
if (c != null && state == NEW) {
V result;
try {
result = c.call();
} catch (Throwable ex) {
}
if (ran)
set(result);
}
}
}
}
protected void set(V v) {
if (UNSAFE.compareAndSwapInt(this, stateOffset, NEW, COMPLETING)) {
outcome = v;
}
}
可以看到这个FutureTask本身也是实现Runnable接口,也就是他也是一个线程,看他的run方法可以看到他最终调用的是我们submit(T)的时候传过来的对象的call方法,并且把返回值赋值给result.然后调用set方法把result复制给outcome。至此,线程执行完毕,并且返回值也赋值给了outcome.那么如何获取这个outcome呢,下面我们看FutureTask的get()方法
public V get() throws InterruptedException, ExecutionException {
int s = state;
if (s <= COMPLETING)
s = awaitDone(false, 0L);//等待线程执行完毕
return report(s);
}
private V report(int s) throws ExecutionException {
Object x = outcome;
if (s == NORMAL)
return (V)x;
if (s >= CANCELLED)
throw new CancellationException();
throw new ExecutionException((Throwable)x);
}
可以看到,get方法就是把outcome给返回出去了。可以理解为,我们submit一个Callable的时候,实际上是新建了一个线程(FutureTask)来执行我们提交的任务。而这个新建的线程(FutureTask)中含有一个变量outcome用来存储我们提交的任务的返回值。当调用FutureTask的get()的时候会检查我们的任务执行完毕没有,如果没有执行完毕就堵塞:park(Object blocker) 表示阻塞指定线程。等待执行完毕之后调用unpark(Thread thread) 唤醒指定线程,参数thread指定线程对象。
九. BlockingQueue
BlockingQueue主要是用来控制线程同步的工具。其中put和take是一对阻塞存取,add和poll的一对非阻塞存取。
插入:
add(Object object):把object添加到BlockingQueue中,如果BlockingQueue可以容纳,返回true,否则抛异常。
offer(Object object):如果可能的话,将object添加到BlockingQueue中,可以容纳返回true,不能容纳返回false。
put(Object object):把object放到BlockingQueue中,如果此时空间满了,线程被阻塞,等待空间释放后,再放进去。
读取:
poll(time):取走BlockingQueue里排在首位的对象,若不能立即取出,等待time长时间,还是取不到就返回false。
take():取走BlockingQueue里排在首位的对象,如果BlockingQueue中没有对象,那么线程会阻塞,直到BlockingQueue中有对象后为止。
其他:
int remainingCapacity():返回队列剩余的容量,在队列插入和取出的时候,获取数据可能不准确。
boolean remove(Object object):从队列移除元素,如果存在,移除一个或者多个,队列改变了返回true。
boolean contains(Object object):查看队列中是否包含元素object,存在返回true,否则返回false。
int drainTo(Collection c):移除队列中所有可用元素,并将它们添加到给定的collection中。
int drainTo(Collection c, int maxElements):和上面方法不同的就是指定了移除的数量。
BlockingQueue是一个接口,上面这些方法是在接口中定义的,它有4个实现类,常用的实现类有两个,分别是ArrayBlockingQueue和LinkedBlockingQueue。
ArrayBlockingQueue:一个数组支持的有界阻塞队列,规定大小的BlockingQueue,构造函数中必须有一个int参数。
LinkedBlockingQueue:大小不定的BlockingQueue,如果构造函数时候传了一个int参数,那么这个队列也是有大小的,如果不传,那么大小是由Integer.MAX_VALUE来决定。
生产者:
package com.wsy;
import java.util.Random;
import java.util.concurrent.BlockingQueue;
public class TestBlockingQueueProducer implements Runnable {
BlockingQueue
Random random = new Random();
public TestBlockingQueueProducer(BlockingQueue
this.queue = queue;
}
@Override
public void run() {
try {
Thread.sleep(random.nextInt(10));
String task = Thread.currentThread().getName();
System.out.println(task + " put a product");
queue.put(task);
} catch (InterruptedException e) {
e.printStackTrace();
}
}
}
消费者
package com.wsy;
import java.util.Random;
import java.util.concurrent.BlockingQueue;
public class TestBlockingQueueConsumer implements Runnable {
BlockingQueue
Random random = new Random();
public TestBlockingQueueConsumer(BlockingQueue
this.queue = queue;
}
@Override
public void run() {
try {
Thread.sleep(random.nextInt(10));
System.out.println(Thread.currentThread().getName() + " trying...");
String temp = queue.take();// 如果队列为空,会阻塞当前线程
System.out.println(Thread.currentThread().getName() + " get " + temp);
} catch (InterruptedException e) {
e.printStackTrace();
}
}
}
测试程序
package com.wsy;
import java.util.concurrent.BlockingQueue;
import java.util.concurrent.LinkedBlockingQueue;
public class TestBlockingQueue {
public static void main(String[] args) {
// 不设置的话,LinkedBlockingQueue默认大小为Integer.MAX_VALUE
BlockingQueue
// BlockingQueue
TestBlockingQueueConsumer consumer = new TestBlockingQueueConsumer(queue);
TestBlockingQueueProducer producer = new TestBlockingQueueProducer(queue);
for (int i = 0; i < 3; i++) {
new Thread(producer, "Producer" + (i + 1)).start();
}
for (int i = 0; i < 5; i++) {
new Thread(consumer, "Consumer" + (i + 1)).start();
}
new Thread(producer, "Producer" + (4)).start();
}
}
通过上面的程序的运行现象可以看到,queue中有2个位置,当生产者生产的数量大于2的时候,就不能向队列中添加元素了,此时会阻塞,当消费者消费的时候,如果队列中是空的,那么也会阻塞,直到队列中有元素进来,或者程序被中断。
十. volatile
先来看一个程序,猜猜它的运行结果是多少?10000?试试看吧!
package com.wsy;
public class VolatileTest {
public static volatile int num = 0;
public static void main(String[] args) {
for (int i = 0; i < 100; i++) {
new Thread(new Runnable() {
@Override
public void run() {
for (int j = 0; j < 100; j++) {
num++;
}
}
}).start();
}
try {
// 保证让这上面的线程都运行完成
Thread.sleep(2000);
} catch (InterruptedException e) {
e.printStackTrace();
}
System.out.println(num);
}
}
发现运行结果是小于10000的,多运行几次再试试,还是小于10000的,因此,可以得出结论,volatile不能保证线程安全。问题就出在num++上了,因为num++不是一个原子性操作,num++是要分三步操作的,分别是读、改、写。将主内存中的num读取出来到工作内存,将工作内存中的数据自增1,将自增后的结果写到主内存中去。
一开始的时候,volatile修饰的变量num是主内存中存放着的,这时候,启动了100个线程,这些线程都去获取这个num变量,并把num的值从主内存拷贝到工作内存中,执行num++操作,将修改后的值传递到主内存中,在这3个步骤的间隙,如果正好有线程访问num变量的值,那么这个线程获取到的值就是更改之前的值,这个时候就出问题了,于是就会少一个++操作了。
要想保证线程安全,还是需要锁,因为锁可以保证互斥性和可见性,而volatile只能保证可见性。既然volatile不能保证线程安全,那岂不是很鸡肋?它的应用场景是怎么样的呢?
一个线程写,多个线程读,如果有多个线程写,那么就会像上面那样,出现错误数据,volatile能保证读的时候是最新的值。synchronized和volatile可以实现较低开销的读写锁。
概括来说就是:对变量的写操作不依赖于当前值;该变量没有包含在具有其他变量的不变式中。
十一. 并发编程总结
不使用线程池的缺点
并发线程很高的时候,就会大量的新建线程,开销是非常大的,资源的消耗量也很大,稳定性自然就降下来了。
指定执行策略
任务以什么顺序执行;有多少个任务并发执行;要多少个任务进入等待执行队列;系统过载,应该放弃哪些任务,如何通知到应用程序;一个任务的执行前后应该做什么处理。
线程池的类型
FixedThreadPool、CachedThreadPool、SingleThreadExecutor、ScheduledThreadPool。
线程池的饱和策略
除了CachedThreadPool之外,其他的线程池,当线程池满了之后,可以设置拒绝策略,比如可以设置ThreadPoolExecutor.setRejectExecutionHandler()方法设置一个拒绝任务的策略。
线程无依赖性
如果线程与线程之间有依赖性,有可能造成死锁或饥饿;如果调用者监视其他线程的完成情况,会影响并发量。
十二. 扩展.JMS->ActiveMQ
JMS即Java消息服务(Java Message Service)。应用程序接口是一个Java平台中关于面向消息中间件的API,用于两个应用程序之间,或分布系统之间发布消息,进行异步通信。Java消息服务是一个与平台无关的API。
JMS是一种与厂商无关的API,用来访问消息收发系统消息,类似于JDBC可以使用相同的API来访问不同的数据库,JMS提供同样与厂商无关的访问方法,以访问消息收发服务。
JMS的两种模型:
点对点或队列模型:一个生产者向一个特定的队列发布消息,一个消费者从队列中取出消息。生产者不需要在消费者消费该消息期间处于运行状态,消费者也不需要在消息发送时处于运行状态。
发布者/订阅者模型:支持向一个特定的消息主题发布消息。0个或多个订阅者可能对接受来自特定消息主题的消息感兴趣。在这种模式下,发布者和订阅者彼此不知道对方,这种模式好比匿名公告板。发布者和订阅者之间存在时间依赖性,发布者需要建立一个订阅,方便用户能够订阅。订阅者必须保持持续的活动状态以接收消息,除非订阅者建立了持久的订阅,在那种情况下,在订阅者未连接的时候发布的消息将在订阅者重新连接时重新发布。
演示ActiveMQ
在ActiveMQ官网下载ActiveMQ到本地并解压(这里演示Windows版本的,Linux操作差不多)。
修改activemq.xml配置文件,将transportConnectors中的0.0.0.0改为localhost。
双击activemq.bat运行ActiveMQ。
浏览器登录http://localhost:8161/admin/,用户名和密码都是admin。
package com.wsy;
import javax.jms.Connection;
import javax.jms.DeliveryMode;
import javax.jms.Destination;
import javax.jms.JMSException;
import javax.jms.MessageProducer;
import javax.jms.Session;
import javax.jms.TextMessage;
import org.apache.activemq.ActiveMQConnection;
import org.apache.activemq.ActiveMQConnectionFactory;
public class ProducerTest {
public static void main(String[] args) throws JMSException, Exception {
ProducerTool producer = new ProducerTool();
producer.produceMessage("Hello, world!");
producer.close();
}
}
class ProducerTool {
private String user = ActiveMQConnection.DEFAULT_USER;
private String password = ActiveMQConnection.DEFAULT_PASSWORD;
private String url = ActiveMQConnection.DEFAULT_BROKER_URL;
private String subject = "myqueue";
private Destination destination = null;
private Connection connection = null;
private Session session = null;
private MessageProducer producer = null;
// 初始化
private void initialize() throws JMSException, Exception {
ActiveMQConnectionFactory connectionFactory = new ActiveMQConnectionFactory(user, password, url);
connection = connectionFactory.createConnection();
session = connection.createSession(false, Session.AUTO_ACKNOWLEDGE);
destination = session.createQueue(subject);
producer = session.createProducer(destination);
producer.setDeliveryMode(DeliveryMode.NON_PERSISTENT);
}
// 发送消息
public void produceMessage(String message) throws JMSException, Exception {
initialize();
TextMessage msg = session.createTextMessage(message);
connection.start();
System.out.println("Producer:->Sending message: " + message);
producer.send(msg);
System.out.println("Producer:->Message sent complete!");
}
// 关闭连接
public void close() throws JMSException {
System.out.println("Producer:->Closing connection");
if (producer != null) {
producer.close();
}
if (session != null) {
session.close();
}
if (connection != null) {
connection.close();
}
}
}
运行main方法,控制台输出如下内容,表示producer已经生产了一个message并发送到了队列中,然后关闭连接。
Producer:->Sending message: Hello, world!
Producer:->Message sent complete!
Producer:->Closing connection
我们去浏览器点击queue,可以看到有一个我们刚刚自己定义的queue,命名为myqueue这一行里面对应的数字就是队列中消息数量。再次运行Customer,console中可以收到刚刚producer发出的消息,再去浏览器查看,发现Queue的内容也发生了变动。
package com.wsy;
import javax.jms.Connection;
import javax.jms.Destination;
import javax.jms.ExceptionListener;
import javax.jms.JMSException;
import javax.jms.Message;
import javax.jms.MessageConsumer;
import javax.jms.MessageListener;
import javax.jms.Session;
import javax.jms.TextMessage;
import org.apache.activemq.ActiveMQConnection;
import org.apache.activemq.ActiveMQConnectionFactory;
public class ConsumerTest implements Runnable {
static Thread t1 = null;
public static void main(String[] args) throws InterruptedException {
t1 = new Thread(new ConsumerTest());
t1.start();
while (true) {
if (!t1.isAlive()) {
t1 = new Thread(new ConsumerTest());
t1.start();
System.out.println("重新启动");
}
Thread.sleep(5000);
}
}
public void run() {
try {
ConsumerTool consumer = new ConsumerTool();
consumer.consumeMessage();
while (ConsumerTool.isconnection) {
;
}
} catch (Exception e) {
e.printStackTrace();
}
}
}
class ConsumerTool implements MessageListener, ExceptionListener {
private String user = ActiveMQConnection.DEFAULT_USER;
private String password = ActiveMQConnection.DEFAULT_PASSWORD;
private String url = ActiveMQConnection.DEFAULT_BROKER_URL;
private String subject = "myqueue";
private Destination destination = null;
private Connection connection = null;
private Session session = null;
private MessageConsumer consumer = null;
private ActiveMQConnectionFactory connectionFactory = null;
public static Boolean isconnection = false;
// 初始化
private void initialize() throws JMSException {
connectionFactory = new ActiveMQConnectionFactory(user, password, url);
connection = connectionFactory.createConnection();
session = connection.createSession(false, Session.AUTO_ACKNOWLEDGE);
destination = session.createQueue(subject);
consumer = session.createConsumer(destination);
}
// 消费消息
public void consumeMessage() throws JMSException {
initialize();
connection.start();
consumer.setMessageListener(this);
connection.setExceptionListener(this);
System.out.println("Consumer:->Begin listening...");
isconnection = true;
// 开始监听
Message message = consumer.receive();
System.out.println(message.getJMSMessageID());
}
// 关闭连接
public void close() throws JMSException {
System.out.println("Consumer:->Closing connection");
if (consumer != null) {
consumer.close();
}
if (session != null) {
session.close();
}
if (connection != null) {
connection.close();
}
}
// 消息处理函数
public void onMessage(Message message) {
try {
if (message instanceof TextMessage) {
TextMessage txtMsg = (TextMessage) message;
String msg = txtMsg.getText();
System.out.println("Consumer:->Received: " + msg);
} else {
System.out.println("Consumer:->Received: " + message);
}
} catch (JMSException e) {
e.printStackTrace();
}
}
@Override
public void onException(JMSException exception) {
isconnection = false;
}
}
同样再来看看topic,先运行producer,后运行consumer,在浏览器看到的效果类似。
package com.wsy;
import java.util.Random;
import javax.jms.Connection;
import javax.jms.DeliveryMode;
import javax.jms.Destination;
import javax.jms.JMSException;
import javax.jms.MessageProducer;
import javax.jms.Session;
import javax.jms.TextMessage;
import org.apache.activemq.ActiveMQConnection;
import org.apache.activemq.ActiveMQConnectionFactory;
public class ProducerTest {
public static void main(String[] args) throws JMSException, Exception {
ProducerTool producer = new ProducerTool();
Random random = new Random();
for (int i = 0; i < 20; i++) {
Thread.sleep(random.nextInt(10) * 1000);
producer.produceMessage("Hello, world!--" + i);
producer.close();
}
}
}
class ProducerTool {
private String user = ActiveMQConnection.DEFAULT_USER;
private String password = ActiveMQConnection.DEFAULT_PASSWORD;
private String url = ActiveMQConnection.DEFAULT_BROKER_URL;
private String subject = "mytopic";
private Destination destination = null;
private Connection connection = null;
private Session session = null;
private MessageProducer producer = null;
// 初始化
private void initialize() throws JMSException, Exception {
ActiveMQConnectionFactory connectionFactory = new ActiveMQConnectionFactory(user, password, url);
connection = connectionFactory.createConnection();
session = connection.createSession(false, Session.AUTO_ACKNOWLEDGE);
destination = session.createTopic(subject);
producer = session.createProducer(destination);
producer.setDeliveryMode(DeliveryMode.NON_PERSISTENT);
}
// 发送消息
public void produceMessage(String message) throws JMSException, Exception {
initialize();
TextMessage msg = session.createTextMessage(message);
connection.start();
System.out.println("Producer:->Sending message: " + message);
producer.send(msg);
System.out.println("Producer:->Message sent complete!");
}
// 关闭连接
public void close() throws JMSException {
System.out.println("Producer:->Closing connection");
if (producer != null) {
producer.close();
}
if (session != null) {
session.close();
}
if (connection != null) {
connection.close();
}
}
}
package com.wsy;
import javax.jms.Connection;
import javax.jms.Destination;
import javax.jms.ExceptionListener;
import javax.jms.JMSException;
import javax.jms.Message;
import javax.jms.MessageConsumer;
import javax.jms.MessageListener;
import javax.jms.Session;
import javax.jms.TextMessage;
import org.apache.activemq.ActiveMQConnection;
import org.apache.activemq.ActiveMQConnectionFactory;
public class ConsumerTest implements Runnable {
static Thread t1 = null;
public static void main(String[] args) throws InterruptedException {
t1 = new Thread(new ConsumerTest());
t1.setDaemon(false);
t1.start();
// 如果发生异常,则重启consumer
while (true) {
if (!t1.isAlive()) {
t1 = new Thread(new ConsumerTest());
t1.start();
System.out.println("重新启动");
}
Thread.sleep(5000);
}
}
public void run() {
try {
ConsumerTool consumer = new ConsumerTool();
consumer.consumeMessage();
while (ConsumerTool.isconnection) {
;
}
} catch (Exception e) {
e.printStackTrace();
}
}
}
class ConsumerTool implements MessageListener, ExceptionListener {
private String user = ActiveMQConnection.DEFAULT_USER;
private String password = ActiveMQConnection.DEFAULT_PASSWORD;
private String url = ActiveMQConnection.DEFAULT_BROKER_URL;
private String subject = "mytopic";
private Destination destination = null;
private Connection connection = null;
private Session session = null;
private MessageConsumer consumer = null;
public static Boolean isconnection = false;
// 初始化
private void initialize() throws JMSException, Exception {
ActiveMQConnectionFactory connectionFactory = new ActiveMQConnectionFactory(user, password, url);
connection = connectionFactory.createConnection();
session = connection.createSession(false, Session.AUTO_ACKNOWLEDGE);
destination = session.createTopic(subject);
consumer = session.createConsumer(destination);
}
// 消费消息
public void consumeMessage() throws JMSException, Exception {
initialize();
connection.start();
consumer.setMessageListener(this);
connection.setExceptionListener(this);
isconnection = true;
System.out.println("Consumer:->Begin listening...");
// 开始监听
// Message message = consumer.receive();
}
// 关闭连接
public void close() throws JMSException {
System.out.println("Consumer:->Closing connection");
if (consumer != null) {
consumer.close();
}
if (session != null) {
session.close();
}
if (connection != null) {
connection.close();
}
}
// 消息处理函数
public void onMessage(Message message) {
try {
if (message instanceof TextMessage) {
TextMessage txtMsg = (TextMessage) message;
String msg = txtMsg.getText();
System.out.println("Consumer:->Received: " + msg);
} else {
System.out.println("Consumer:->Received: " + message);
}
} catch (JMSException e) {
e.printStackTrace();
}
}
public void onException(JMSException arg0) {
isconnection = false;
}
}
既然说了这么多,topic和queue的区别是什么呢?
Queue
点对点模式,不可用重复消费。当生产者生产了消息之后,消息被存储在queue中,消费者消费的时候,从queue中获取,已经消费的消息,被从queue中剔除,不能再次消费。当没有消费者的时候,queue一直保存消息,直到有消费者来消费。消息不是自动推送给消费者的,而是消费者从队列中获取的。
Topic
发布/订阅模式,可以重复消费。生产者生产了消息,发布到topic中,会有多个消费者(订阅)消费该消息。发布到topic中的消息会被消费者中的所有订阅者消费。这里的消费者分为两种,一种是长期订阅,一种类是普通订阅,一条消息发送到topic后,对于普通订阅的,如果此时处于非活跃状态,那么就错过了消息,对于长期订阅的,即使此时没有处于活跃状态,当它处于活跃状态时,它还会继续受到消息的。
十三. 扩展.Java的反射实现API
使用反射可以动态加载类,调用私有的方法或者属性,动态的调用方法,可以说,反射将字符串作为输入参数,来获取类对象,或者执行对象的某些方法。
package com.wsy;
import java.io.Serializable;
import java.lang.reflect.Constructor;
import java.lang.reflect.Field;
import java.lang.reflect.Method;
import org.junit.Before;
import org.junit.Test;
public class MyReflect {
public String className = null;
public Class personClass = null;
// 反射Person类
@Before
public void init() throws Exception {
className = "com.wsy.Person";
personClass = Class.forName(className);
}
// 获取某个class文件对象
@Test
public void getClassName() throws Exception {
System.out.println(personClass);
}
// 获取某个class文件对象的另一种方式
@Test
public void getClassName2() throws Exception {
System.out.println(Person.class);
}
// 创建一个class文件表示的实例对象,底层会调用空参数的构造方法
@Test
public void getNewInstance() throws Exception {
System.out.println(personClass.newInstance());
}
// 获取非私有的构造函数
@Test
public void getPublicConstructor() throws Exception {
Constructor constructor = personClass.getConstructor(Long.class, String.class);
Person person = (Person) constructor.newInstance(100L, "zhangsan");
System.out.println(person.getId());
System.out.println(person.getName());
}
// 获得私有的构造函数
@Test
public void getPrivateConstructor() throws Exception {
Constructor constructor = personClass.getDeclaredConstructor(String.class);
constructor.setAccessible(true);// 强制取消Java的权限检测
Person person2 = (Person) constructor.newInstance("zhangsan");
System.out.println("**" + person2.getName());
}
// 访问非私有的成员变量
@Test
public void getNotPrivateField() throws Exception {
Constructor constructor = personClass.getConstructor(Long.class, String.class);
Object obj = constructor.newInstance(100L, "zhangsan");
Field field = personClass.getField("name");
field.set(obj, "lisi");
System.out.println(field.get(obj));
}
// 访问私有的成员变量
@Test
public void getPrivateField() throws Exception {
Constructor constructor = personClass.getConstructor(Long.class);
Object obj = constructor.newInstance(100L);
Field field2 = personClass.getDeclaredField("id");
field2.setAccessible(true);// 强制取消Java的权限检测
field2.set(obj, 10000L);
System.out.println(field2.get(obj));
}
// 获取非私有的成员函数
@Test
public void getNotPrivateMethod() throws Exception {
System.out.println(personClass.getMethod("toString"));
Object obj = personClass.newInstance();// 获取空参的构造函数
Method toStringMethod = personClass.getMethod("toString");
Object object = toStringMethod.invoke(obj);
System.out.println(object);
}
// 获取私有的成员函数
@Test
public void getPrivateMethod() throws Exception {
Object obj = personClass.newInstance();// 获取空参的构造函数
Method method = personClass.getDeclaredMethod("getSomeThing");
method.setAccessible(true);
Object value = method.invoke(obj);
System.out.println(value);
}
@Test
public void otherMethod() throws Exception {
// 当前加载这个class文件的那个类加载器对象
System.out.println(personClass.getClassLoader());
// 获取某个类实现的所有接口
Class[] interfaces = personClass.getInterfaces();
for (Class class1 : interfaces) {
System.out.println(class1);
}
// 反射当前这个类的直接父类
System.out.println(personClass.getGenericSuperclass());
// getResourceAsStream这个方法可以获取到一个输入流,这个输入流会关联到name所表示的那个文件上。
// 不以‘/’开头时默认是从此类所在的包下取资源,以‘/’开头则是从ClassPath根下获取。其只是通过path构造一个绝对路径,最终还是由ClassLoader获取资源。
System.out.println(personClass.getResourceAsStream("/log4j.properties"));
System.out.println(personClass.getResourceAsStream("log4j.properties"));
// 判断当前的Class对象表示是否是数组
System.out.println(personClass.isArray());
System.out.println(new String[3].getClass().isArray());
// 判断当前的Class对象表示是否是枚举类
System.out.println(personClass.isEnum());
System.out.println(Class.forName("com.wsy.City").isEnum());
// 判断当前的Class对象表示是否是接口
System.out.println(personClass.isInterface());
System.out.println(Class.forName("com.wsy.TestInterface").isInterface());
}
}
class Person implements Serializable, TestInterface {
private Long id;
public String name;
public Person() {
this.id = 100L;
this.name = "afsdfasd";
}
public Person(Long id, String name) {
this.id = id;
this.name = name;
}
public Person(Long id) {
super();
this.id = id;
}
private Person(String name) {
super();
this.name = name + "=======";
}
public Long getId() {
return id;
}
public void setId(Long id) {
this.id = id;
}
public String getName() {
return name;
}
public void setName(String name) {
this.name = name;
}
public String toString() {
return "Person [id=" + id + ", name=" + name + "]";
}
private String getSomeThing() {
return "sdsadasdsasd";
}
private void testPrivate() {
System.out.println("this is a private method");
}
}
enum City {
}
interface TestInterface {
}
十四. 扩展.动态代理的工作机制
说到动态代理,先举个例子,原来有一个方法用来返回商品的价格,现在需求变动了,增加了优惠券,所以返回的价格就需要在原来的基础上进行改动,不过这个方法在别的系统里面也用到了,不能直接改这个方法的代码,所以我们可以使用代理的方法解决,在调用这个方法的前面或者后面加上自己的逻辑,就可以实现优惠券的逻辑,而不改动原来的代码,这不就是开闭原则嘛,对扩展开放,对修改关闭,增强原来的方法。
动态代理的流程:
书写代理类和代理方法,在代理方法中实现代理Proxy.newProxyInstance。
代理中需要的参数分别是:被代理类的类加载器,被代理类的所有实现接口,句柄方法。
在句柄方法中有一个invoke()方法需要被复写,invoke()方法有3个参数:被代理的对象,被代理的方法,被代理方法需要的参数,这invoke()方法中,我们就可以对被代理方法进行增强。
获取代理类,强转成被代理的接口。
最后,可以像没被代理一样,调用接口的任何方法,方法被调用后,方法名和参数被传入代理类的invoke()方法中, 进行新业务的逻辑流程。
十五、动态代理的demo代码
原业务接口
package com.wsy.service;
// 这是一个业务的接口,这个接口中的业务就是返回衣服的价格
public interface IBoss {
int yifu(String size);
}
原业务实现类
package com.wsy.service.impl;
import com.wsy.service.IBoss;
// 实现了卖衣服的接口 自定义了自己的业务,卖裤子
public class Boss implements IBoss {
public int yifu(String size) {
System.err.println("天猫小强旗舰店,老板给客户发快递----衣服型号:" + size);
// 这件衣服的价钱,从数据库读取
return 50;
}
public void kuzi() {
System.err.println("天猫小强旗舰店,老板给客户发快递----裤子");
}
}
原业务调用
package com.wsy.action;
import org.junit.Test;
import com.wsy.service.IBoss;
import com.wsy.service.impl.Boss;
public class SaleAction {
// 不使用代理,直接调用方法 方法中规定什么业务,就只能调用什么业务,规定什么返回值,就只能输出什么返回值
@Test
public void saleByBossSelf() throws Exception {
IBoss boss = new Boss();
System.out.println("老板自营!");
int money = boss.yifu("xxl");// 老板自己卖衣服,不需要客服,结果就是没有聊天记录
System.out.println("衣服成交价:" + money);
}
}
代理类
package com.wsy.proxyclass;
import java.lang.reflect.InvocationHandler;
import java.lang.reflect.Method;
import java.lang.reflect.Proxy;
public class ProxyBoss {
// 对接口方法进行代理
public static
return (T) Proxy.newProxyInstance(interfaceClass.getClassLoader(), new Class[] { interfaceClass }, new InvocationHandler() {
public Object invoke(Object proxy, Method method, Object[] args) throws Throwable {
Integer returnValue = (Integer) method.invoke(implementsClass.newInstance(), args);// 调用原始对象以后返回的值
return returnValue - discountCoupon;
}
});
}
}
新业务调用
package com.wsy.action;
import org.junit.Test;
import com.wsy.proxyclass.ProxyBoss;
import com.wsy.service.IBoss;
import com.wsy.service.impl.Boss;
// 什么是动态代理? 简单的写一个模板接口,剩下的个性化工作,好给动态代理来完成!
public class ProxySaleAction {
// 使用代理,在这个代理中,只代理了Boss的yifu方法 定制化业务,可以改变原接口的参数、返回值等
@Test
public void saleByProxy() throws Exception {
IBoss boss = ProxyBoss.getProxy(10, IBoss.class, Boss.class);// 将代理的方法实例化成接口
// IBoss boss = new Boss();// 将代理的方法实例化成接口
System.out.println("代理经营!");
int money = boss.yifu("xxl");// 调用接口的方法,实际上调用方式没有变
System.out.println("衣服成交价:" + money);
}
}
其实不要被代理类的写法吓坏,它的写法是比较死的,需要传什么参数就传什么参数,只是表面上看着比较陌生而已。看顺眼了就不觉得困难了。
十六、利用socket来进行远程过程调用
在大数据开发中,通常是部署集群的方式,所以多台机器之间访问的时候,需要使用socket通信,代码在下面,先运行服务端,后运行客户端,可以看到服务端始终在运行,客户端发送socket请求后,立刻接收到了服务端方法调用返回的数据。
业务接口
package com.wsy;
public interface IBusiness {
public int getPrice(String param);
}
业务实现类
package com.wsy;
public class TestBusiness implements IBusiness {
@Override
public int getPrice(String param) {
return param.equals("yifu") ? 10 : 20;
}
}
服务端
package com.wsy;
import java.net.InetSocketAddress;
import java.net.ServerSocket;
import java.net.Socket;
public class TestServer {
public static void main(String[] args) throws Exception {
// 创建socket并绑定IP和端口号
ServerSocket serverSocket = new ServerSocket();
serverSocket.bind(new InetSocketAddress("localhost", 9898));
// 因为是服务端,所以需要一直在接受请求,这里使用while(true)来处理
while (true) {
// accept()方法是一个阻塞方法,等待请求,如果一直没有请求发过来,就一直阻塞着
Socket socket = serverSocket.accept();
// 因为业务逻辑可能处理的时间比较长,为了不影响后面的请求处理,这里使用线程的方法来处理请求,可以改成线程池,这里简写一下
new Thread(new TestServerTask(socket)).start();
}
}
}
socket处理线程
package com.wsy;
import java.io.BufferedOutputStream;
import java.io.BufferedReader;
import java.io.IOException;
import java.io.InputStream;
import java.io.InputStreamReader;
import java.io.OutputStream;
import java.io.PrintWriter;
import java.lang.reflect.Method;
import java.net.Socket;
public class TestServerTask implements Runnable {
private Socket socket;
public TestServerTask(Socket socket) {
this.socket = socket;
}
// 接收客户端发送过来的socket信息,处理并返回
@Override
public void run() {
InputStream inputStream = null;
OutputStream outputStream = null;
BufferedReader bufferedReader = null;
PrintWriter printWriter = null;
try {
inputStream = socket.getInputStream();
outputStream = socket.getOutputStream();
// 读取输入流中的内容,并为下一步的反射做处理
bufferedReader = new BufferedReader(new InputStreamReader(inputStream));
String request = bufferedReader.readLine();
String[] split = request.split(":");
String classname = split[0];
String methodName = split[1];
String methodParam = split[2];
// 通过反射的方式生成类对象,并调用方法
Class className = Class.forName(classname);
System.out.println("calling class: " + className);
Object newInstance = className.newInstance();
Method method = className.getMethod(methodName, String.class);
System.out.println("calling method: " + method);
Object invoke = method.invoke(newInstance, methodParam);
System.out.println("results: " + (int) invoke);
// 将执行结果通过流返回给客户端
printWriter = new PrintWriter(new BufferedOutputStream(outputStream));
printWriter.println((int) invoke);
printWriter.flush();
} catch (Exception e) {
e.printStackTrace();
} finally {
// 关闭资源
try {
bufferedReader.close();
printWriter.close();
socket.close();
} catch (IOException e) {
e.printStackTrace();
}
}
}
}
客户端
package com.wsy;
import java.io.BufferedOutputStream;
import java.io.BufferedReader;
import java.io.InputStream;
import java.io.InputStreamReader;
import java.io.OutputStream;
import java.io.PrintWriter;
import java.net.Socket;
public class TestClient {
public static void main(String[] args) throws Exception {
// 确定socket的IP和端口用来发送请求
Socket socket = new Socket("localhost", 9898);
OutputStream outputStream = socket.getOutputStream();
InputStream inputStream = socket.getInputStream();
// 通过socket发送请求参数到服务端
PrintWriter printWriter = new PrintWriter(new BufferedOutputStream(outputStream));
printWriter.println("com.wsy.TestBusiness:getPrice:yifu");
printWriter.flush();
// 接收服务端处理后的socket结果
BufferedReader bufferedReader = new BufferedReader(new InputStreamReader(inputStream));
String readLine = bufferedReader.readLine();
System.out.println("client get result: " + readLine);
socket.close();
}
}
